Advertisement
PRODUCT INFORMATION
| Model Power(W) | Vol/Freq | Ultra-soft Pressure Hose | Replaceable Pressure Hose | Noise(DB) | Suggested Water Inlet Pressure | |
| Brush | 1800 | 120V-/60Hz | No | No | 95 | <0.8mpa(116psi) |

| Pressure Hoses length | 1/2 inch × 65ft |
| Drill Size | 12mm (29/64" or 15/32" or 31/64") |
| Temperature Range | 32°F - 104°F |
| Maximum Pressure | 2200PSI |
| Shipping Weight | 18.19KG/40.12LBS |
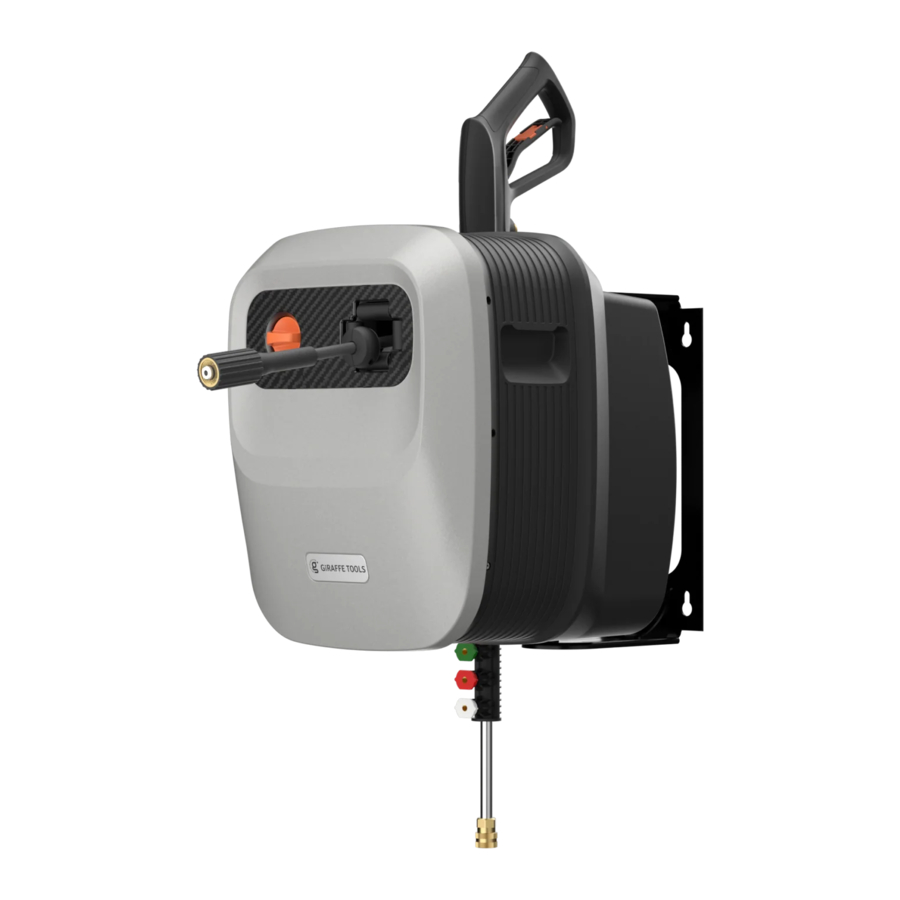
WHAT'S INCLUDED

- M8-60 Expansion Bolts
- P115-G20 Wall Base
- P115-G20 Rotating Bracket
- P115-G20 Ball Handle
- M12-80 Bolts, Coarse Thread, Dacromet
- P115-G20 Foam Pot Hanger
- P115-G20 Foam Pot
- P115-G20
- 1 x Pressure Gun Lance
- 1 x Pressure Gun
- 4 x Quick-Connect Nozzles(0°, 15°, 25°, 40° )
- M12 Nuts, Coarse Thread, Dacromet
- M8-70 Hexagon Socket Self-tapping Screws, Dacromet
- M12-80 Bolts, Coarse Thread, Dacromet
- Lead-in Hose
OPEN-BOX CHECK
- Confirm that the above parts are included in your package.
- Check for any scratches or damage done to the product.
- If your product is missing parts or has visible damage upon receipt, please contact the Giraffe Tools customer service team.
Note: If you notice an initial aroma upon opening your package, this is due to the sealed environment in which the package traveled overseas.
TOOLS REQUIREMENT
- Electric drill (12mm), you can choose a 29/64" or 15/32" or 31/64" drill
- Hammer
- Wrench
- Socket set or a Phillips screwdriver
USING STEPS
Choose a Place
Due to the weight of the pressure washer and the pulling force during use, the bracket base must be installed on a solid surface. As a matter of convenience, please install the pressure washer close to your cordon socket and make sure the plug can reach that socket.
Tips: Please measure the correct drill bit width to use. Ensuring the wall anchors have a secure fit, you may drill slightly under size since masonry materials all have different sizing properties.
Note: Please install the pressure washer at a height of approximately 24-32in above the ground to maximize the function of auto-retraction.
Installing the Bracket
- Use the installation template to mark the location of the 4 holes.
- Use a drill bit with a diameter of 12mm (recommend a 29/64" or 15/32" or 31/64" drill) and a length of more than 100mm / 3 47/50in. to drill 60mm / 2 9/25in. deep holes. Please ensure the diameter after drilling is between 12mm / 47/100in. to 12.5mm / 49/100in.
Tips: Depth and the diameter after drilling are important. If the hole is too deep and the wall anchor is rotating, use a matchstick or similar tool to tighten the hole tightly. - Hammer the wall anchor into the 4 holes.
- Hold the bracket base in place, put the nut in and then tighten it.
Note: The rotating bracket is designed to fix the pressure washer without shaking during use.
Setting Up Pressure Washer
- Slide the pressure washer bracket onto the wall base, use 2 expansion bolts and nuts to tighten it.
- Fixing the matching end of the hose firmly into the gun handle. See figure 1 and 2. Tighten the connector by hand only. Loosen the high pressure hose to avoid twist.

- Connect the lance to pressure gun.

- Push the trigger lock button, ensure the trigger in the "OFF" position.

- Connect the water inlet hose (end with filter) to the water inlet end of the pressure washer by hand and tighten it by hand (Please make sure that there is no debris blockage on the filter side of the water inlet hose).

![]()
Please do not use tools such as wrenchs to tighten it. That will damage to the machine. - Turn the water supply on, making sure that the tap is fully open. Release the trigger lock.
- Trigger the gun to expel the air in the unit before its working.
- Turning the ON/OFF switch to the "OFF" position.
- Put plug into socket of main electric power.
- Choose the appropriate size nozzle for your work. Use your hands to connect the quick-connect collar slightly downward, the required nozzle will be stuck in the quick connect collar, release hands and hear the sound of click, indicating that the nozzle is successfully connected.


AFTER USE TIPS
How to Retract
In order to enhance your experience with Giraffe Tools and extend the life of the pressure hose reel.
First, when the cleaning task is done, please turn to the state of "OFF", and then turn off the water supply.
Second, when the high-pressure hose is filled with water after use, its automatic retracting function will be greatly affected. Please press the handle first to release pressure and drain the excess water. Figure A for your reference.

Third, after releasing the pressure, please hold the pressure gun and pull the pressure hose a little out, and then, retracting the pressure hose to the whole reel. Figure B for your reference.

Last, store your pressure gun.
Storage During Winter
- Switch to the state of "OFF"
- Turn off the water supply tap
- Remove the plug from the socket
- Discharge the residual pressure from the gun until all the water has come out of the nozzle
- Drain and wash out the detergent tank at the end of the working session. To wash out the tank, use clean water instead of the detergent
- Roll the pressure hoses
- Engage the gun safety catch
- To better maintain the performance of the pressure washer, please dismantle the pressure washer and store it indoors during winter
- When you use it again, please make sure to check whether there is any icing in the water hose first. If it is partially frozen, do not pull out the high-pressure hose, please wait for it to melt before using it normally
PROBLEMS SOLUTION
| PROBLEM | PROBABLE CAUSE | SOLUTION |
| Pressure drops during use | Water intake from external tank | Connect appliance to the mains water supply |
| Intake water too hot | Reduce temperature | |
| Nozzle clogged | Clean nozzle | |
| O-ring to one-way valve broken | Replace the broken component | |
| Intake filter dirty | Clean filter | |
| Motor "sounds" but fails to start | Insufficient power supply | Check that the voltage of the mains power supply line is the same as that on the plate |
| Voltage loss due to use of extension cable | Check characteristics of extension cable | |
| Appliance not used for long period of time | Contact your nearest Authorized Service Centre | |
| Problems with TSS device | Contact your nearest Authorized Service Centre | |
| Water leakage | Seals worn | Have the seals replaced at your nearest Authorized Service Centre |
| Safety valve tripped and discharging | Contact an Authorized Service Centre | |
| Water leakage from the water inlet | Please use the wrench to connect the garden hose and the black threaded collar of the water inlet filter | |
| Oil leakage | Seals worn | Contact your nearest Authorized Service Centre |
| Motor started when gun is not triggered | Nozzle clogged | Clean nozzle |
| High pressure system or pump hydraulic circuit not watertight | Contact your nearest Authorized Service Centre | |
| Appliance works intermittently | Safety valve soften or nozzle clogged | Clean the nozzle or contact your nearest Authorized Service Centre |
| No water out when triggering the gun | Nozzle clogged | Clean the nozzle |
SAFETY RULES
Safety "Must Nos"
- DO NOT use the appliance with inflammable or toxic liquids, or any products which are not compatible with the correct operation of the appliance. EXPLOSION OR POISONING HAZARD
- DO NOT direct the water jet towards the unit itself, electrical parts or towards other electrical equipment. ELECTRIC SHOCK HAZARD
- DO NOT direct the water jet towards people or animals. INJURY HAZARD
- DO NOT touch the plug and/or socket with wet hands. ELECTRIC SHOCK HAZARD
- DO NOT allow children or incompetent persons to use the appliance. INJURY HAZARD
- DO NOT use the appliance if the electrical cable is damaged. ELECTRIC SHOCK AND SHORT CIRCUIT HAZARD
- DO NOT use the appliance if some important components like electrical cable, high pressure hose, gun and safety devices etc are damaged. EXPLOSION AND ELECTRIC SHOCK HAZARD
- DO NOT jam the trigger in the opening position. ACCIDENT HAZARD
- Check the data plate attached to the appliance. If not available, please contact the dealer. Do Not use the appliance without data plate because it's not sure safe or dangerous.
- DO NOT tamper with or adjust the setting of safety valve or the safety devices. EXPLOSION HAZARD
- DO NOT alter the original diameter of the spray head nozzle and other operation setting;
- Make sure that the high pressure hose are free of being pressed by car or other heavy objects or cut by sharp objects;
- DO NOT leave the appliance unattended ACCIDENT HAZARD
- When directed towards tyres, tyre valves or other pressurized components, the high pressure jet is potentially dangerous. Do not use the rotating nozzle kit, and always keep the jet at a distance of at least 30 cm during cleaning. EXPLOSION HAZARD
- DO NOT use this appliance to clean fragile objects. DAMAGE HAZARD
- Check that the electrical supply voltage and frequency correspond to those specified on the appliance data plate.
- The appliance should only be connected to a mains power supply equipped with an adequate earth connection.
- DO NOT use the appliance after drinking alcohol, taking medicine or being tired;
- DO NOT direct the jet towards the not strong wall to avoid damage and danger;
- Use only extension electrical cable with waterproof plug and socket;
- Connecting or replace plug and electrical cable MUST be carried out by qualified staff;
- DO NOT pull fiercely when discharging the plug;
- Electrical cable should be far away from fire and sharp object;
- Cut the power supply immediately in case of breakdown or stop and find out the reason before re-start the appliance;
- To be sure the appliance standing on dry surface.
SAFETY "MUSTS"
- All electrical conductors MUST BE PROTECTED against the water jet. SHORT CIRCUIT HAZARD
- The appliance MUST ONLY BE CONNECTED to an adequate power supply in compliance with all applicable regulations. ELECTRIC SHOCK HAZARD
- Use of a safety residual current circuit-breaker (R.C.C.B) will provide additional protection for the operator:
- Appliance without plug MUST be installed by qualified staff; Use only authorized electrical extension leads with suitable conductor gauge.
- High pressure may cause parts to rebound: wear all the protective clothing and equipment needed to ensure the operator's safety. INJURY HAZARD
- Plug MUST be pulled out after shutting the appliance or the appliance might start automatically or burn itself;
- Holding the gun firmly before triggering it. INJURY HAZARD
- COMPLY WITH the requirements of the local water supply company. According to EN 12729(BA), the appliance may only be connected to the mains drinking water supply if a back flow prevented valve with drain facility is installed in the supply hose. CONTAMINATION HAZARD
- Maintenance and/or repair of electrical components MUST be carried out by qualified staff. ACCIDENT HAZARD
- Shut down the appliance, cut power supply and water supply. Then, discharge the residual pressure by triggering the gun before disconnecting the unit hose. INJURY HAZARD
- Before using the appliance, CHECK every time that the screws are fully tightened and that there are no broken or worn parts. ACCIDENT HAZARD
- ONLY USE detergents which will NOT corrode the coating materials of the high pressure hose/electrical cable. EXPLOSION AND ELECTRIC SHOCK HAZARD
- ENSURE that all people or animals keep a minimum distance of 16yd. (15M) away. INJURY HAZARD
- The unit should fixed when it's working.
- This appliance can NOT be stored in damp environment;
- When stopping the appliance, shut the appliance's switch before pulling plug out;
- Use only original or manufacturer approved spare parts for safety sake
- Total Stop (motor stops when trigger released) does NOT always keep effective and the appliance can NOT be at Total Stop for long time. If ineffective ( for inner seal damaged, local voltage too low etc), MUST turn off the switch to stop the machine during working.

- Do not tamper with or adjust the safety valve setting.
Safety valve and/or pressure limiting valve.
The safety valve is also a pressure limiting valve.
When the gun trigger is released, the valve opens and the water recirculates through the pump inlet or is discharged onto the ground. - Safety catch (see Connection of gun and hose)
Prevent accidental spraying of water. - Air outlet on plastic case and it should NOT be blocked during operation, or fire or electric shock hazard is possible
RECOMMENDED PRODUCTS

If you are interested in the above products, you can visit giraffetools.com or search for Giraffe Tools on Amazon
Scan code to visit Giraffe Tools store on Amazon.com

Scan code to visit giraffetools.com

Scan code to join our facebook group

WE WILL DO THE HEAVY LIFTING
To purchase Giraffe Tools products and more, visit giraffetools.com or search for Giraffe Tools on Amazon.com.
Complete your registration online for a 100 DAYS WARRANTY EXTENSION

giraffetools.com
service@giraffetools.com
+1 (833)583-0881
(9am - 5pm EST)
Documents / Resources
References
Download manual
Here you can download full pdf version of manual, it may contain additional safety instructions, warranty information, FCC rules, etc.
Advertisement

Need help?
Do you have a question about the P115-G20 and is the answer not in the manual?
Questions and answers