Table of Contents
Advertisement
Quick Links
Advertisement
Table of Contents

Related Manuals for thomann the t.bone IEM 100


Summary of Contents for thomann the t.bone IEM 100
- Page 1 IEM 100 UHF Wireless System...
- Page 2 Thomann GmbH Hans-Thomann-Straße 1 96138 Burgebrach Germany Telephone: +49 (0) 9546 9223-0 Internet: www.thomann.de 26.04.2024, ID: 137793 (V2)
-
Page 3: Table Of Contents
Table of contents Table of contents General information..........................6 1.1 Symbols and signal words....................... 6 Safety instructions............................. 8 Features and scope of delivery......................10 Installation and starting up........................ 11 4.1 General Information........................11 4.2 Transmitter............................12 4.3 Receiver............................... 13 Connections and controls........................15 5.1 Transmitter............................ - Page 4 Table of contents Plug and connection assignment....................31 Troubleshooting............................34 Protecting the environment......................36 IEM 100 UHF Wireless System...
- Page 5 IEM 100 UHF Wireless System...
-
Page 6: General Information
Our products and documentation are subject to a process of continuous development. They are therefore subject to change. Please refer to the latest version of the documentation, which is ready for download under www.thomann.de. 1.1 Symbols and signal words In this section you will find an overview of the meaning of symbols and signal words that are used in this document. - Page 7 General information Signal word Meaning DANGER! This combination of symbol and signal word indicates an immediate dangerous situation that will result in death or serious injury if it is not avoided. WARNING! This combination of symbol and signal word indicates a pos‐ sible dangerous situation that can result in death or serious injury if it is not avoided.
-
Page 8: Safety Instructions
Safety instructions Safety instructions Intended use This device is intended to be used for the wireless transmission of audio signals to earplugs. Use the device only as described in this user manual. Any other use or use under other oper‐ ating conditions is considered to be improper and may result in personal injury or property damage. - Page 9 Safety instructions NOTICE! Damage to the device if operated in unsuitable ambient conditions! The device can be damaged if it is operated in unsuitable ambient conditions. Only operate the device indoors within the ambient conditions specified in the “Technical specifications” chapter of this user manual. Avoid operating it in environments with direct sun‐ light, heavy dirt and strong vibrations.
-
Page 10: Features And Scope Of Delivery
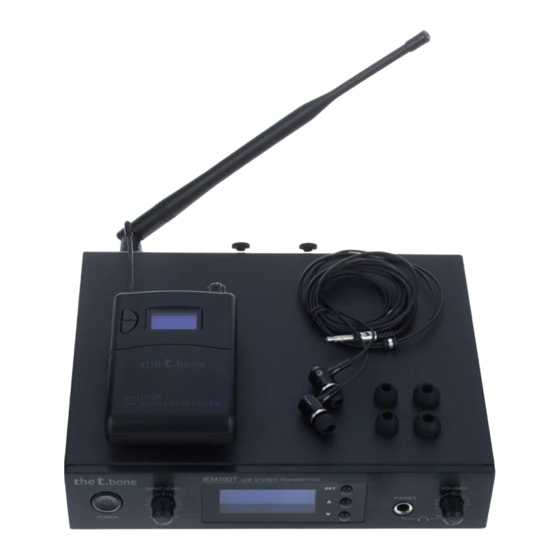
Features and scope of delivery Features and scope of delivery The UHF wireless system IEM 100 is an in-ear monitoring system especially suitable for profes‐ sional events, on rock stages and in concert halls, theatres and musicals. Your IEM 100 UHF wireless system consists of the following components: 9.5-inch stereo transmitter IEM 100 ST –... -
Page 11: Installation And Starting Up
For more information, please visit: http://www.thomann.de. Make sure that transmitter and receiver are both tuned to the same channel. -
Page 12: Transmitter
Installation and starting up 4.2 Transmitter Rack mounting The unit has been designed for rack mounting in a standard 19-inch rack; it occupies one rack unit. Connecting the power supply NOTICE! Damage to the external power supply due to high voltages! The device is powered by an external power supply. -
Page 13: Receiver
Installation and starting up Attaching the antenna Attach the included antenna to the back of the transmitter. To improve transmission quality and adapt to spatial conditions, it can be rotated and swivelled. If there is not enough space on the device for direct assembly of the antenna, for example because there is not much space in the rack, you can use the included coaxial cable to assemble the antenna separately from the device. - Page 14 Installation and starting up Starting up the system Make sure that the receiver is turned off, and the main switch / volume control (14) is in the “OFF” position. Attach the receiver to your belt or guitar strap with the clip. Carefully insert the earplug into the ear canal, note the markings ‘L’...
-
Page 15: Connections And Controls
Connections and controls Connections and controls 5.1 Transmitter Front panel ö % & IEM100T UHF STEREO TRANSMITTER INPUT LEVEL VOLUMEN PHONES POWER IEM 100 UHF Wireless System... - Page 16 Connections and controls 1 [POWER] | Main switch. Turns the device on and off. To turn on, press this button for about 1 second. 2 [INPUT LEVEL] | Control for adjusting the input sensitivity 3 Display 4 [SET] | Enter button for menu control | Buttons for increasing or decreasing the value currently displayed 6 [PHONES] | Socket for connecting headphones 7 [VOLUME] | Volume control for the headphone output...
- Page 17 Connections and controls Rear panel ö PUSH PUSH DC INPUT 12V-18V 300mA -12 dB 0 dB AF INPUT RoHS POWER LEFT INPUT RIGHT INPUT FREQ. ANTENNA 768~788MHz IEM 100 UHF Wireless System...
- Page 18 Connections and controls 1 [DC INPUT] | Socket for connecting the supplied plug-in power supply. If you are using a different power supply, observe the correct voltage, the polarity of the plug and the power consumption. 2 [LEFT INPUT] / [RIGHT INPUT] | XLR/6.35-mm jack combination jacks (left and right channels) for direct connection to a mixer or an audio device that serves as a signal source.
- Page 19 Connections and controls Display 1 [Limiter] | Indicates limiter action as protection against volume peaks. ö 2 [Stereo] / [Mono]| Indicates the set operating mode (stereo or mono). 3 Level indicator for left and right channels | Indicates that the device is locked to prevent unintentional changes. 5 Displays the frequency that is assigned to the set combination of frequency group and channel.
-
Page 20: Receiver
Connections and controls 5.2 Receiver ö ö ' * + ö FREQ. 768~788MHz PHONES & IEM 100 UHF Wireless System... - Page 21 Connections and controls 1 Flexible antenna | Buttons for increasing or decreasing the currently displayed value. Press and hold the corresponding button to adjust the balance. 3 [ESC] | "Cancel/Exit" function in the menu 4 Battery compartment for two round cell batteries (AA, LR6), 1.5 V or comparable rechargeable batteries 5 Battery compartment lid 6 [ON/OFF/MAX ]| Main switch and volume control.
- Page 22 Connections and controls Display 1 [GR] | Displays the set frequency group. ö # $ & 2 [CH] | Displays the selected channel. 3 [LIM] | Indicates limiter action as protection against volume peaks. 4 [HF] | Indicates that the high frequency boost function is on. 5 Battery level indicator.
-
Page 23: Operating
Operating Operating 6.1 Setting up the transmitter Selecting the frequency group and channel Press [SET] repeatedly until the ‘GROUP’ field (frequency group) flashes on the display. Use the buttons to increase or decrease the displayed value by one. When the desired value appears, press [SET] to confirm the setting and proceed to the next menu item. - Page 24 Operating Selecting the operating mode Press [SET] repeatedly until the ‘Stereo’ or ‘Mono’ field flashes on the display. Use the buttons to switch between mono and stereo mode. When the desired mode appears, press [SET] to confirm the setting and proceed to the next menu item. Locking the settings Press [SET] repeatedly until ‘ON’...
-
Page 25: Setting Up The Receiver
Operating 6.2 Setting up the receiver The [SET] and [ESC] buttons that you need to set up the receiver are located behind the battery compartment lid. Selecting the frequency group and channel Press [SET] repeatedly until the ‘GROUP’ field (frequency group) flashes on the display. Use the buttons to increase or decrease the displayed value by one. - Page 26 Operating Transmitter and receiver must be set to the same combination of frequency group and channel. If you use multiple wireless systems from this device family, you will ach‐ ieve the best results by assigning all systems to the same frequency group, but giving each system a different channel.
-
Page 27: Technical Specifications
Technical specifications Technical specifications 7.1 Receiver Number of channels Output connections Earphones 1× 3.5-mm jack socket (stereo) Audio output level 100 mW Output level adjustment +3 dB Frequency range 863 MHz … 865 MHz Bandwidth 2 MHz Modulation type Frequency modulation (FM) Sensitivity –94 dBm @ 30 dB SINAD, typical Antenna gain... -
Page 28: Transmitter
Technical specifications Battery 2 round cell batteries (AA, LR6) Dimensions (W × H × D), 105 mm × 64 mm × 23 mm without antenna Weight 100 g Ambient conditions Temperature range 0 °C…40 °C Relative humidity 20%…80% (non-condensing) 7.2 Transmitter Input connections Power supply Socket for connecting the power adapter... - Page 29 Technical specifications Maximum input level > +8 dBu Bandwidth 2 MHz Modulation type Frequency modulation (FM) Input impedance 6.8 KΩ Range in clear field of vision > 50 m NF frequency response 60 Hz…16 kHz (±3 dB) Total harmonic distortion (THD) <...
-
Page 30: Frequency Table
Technical specifications 7.3 Frequency table Channel 1 Channel 2 Channel 3 Channel 4 Channel 5 Channel 6 Channel 7 Channel 8 863.100 MHz 863.900 MHz 864.500 MHz 864.900 MHz 863.200 MHz 863.300 MHz 863.400 MHz 863.500 MHz Channel 9 Channel 10 Channel 11 Channel 12 Channel 13... - Page 31 Plug and connection assignment Plug and connection assignment Introduction This chapter will help you select the right cables and plugs to connect your valuable equip‐ ment in such a way that a perfect sound experience is ensured. Please note these advices, because especially in ‘Sound & Light’ caution is indicated: Even if a plug fits into the socket, an incorrect connection may result in a destroyed power amp, a short circuit or ‘just’...
- Page 32 Plug and connection assignment 1/4" TS phone plug (mono, unbalanced) Signal Ground, shielding 1/4" TRS phone plug (stereo, unbalanced) Signal (left) Signal (right) Ground IEM 100 UHF Wireless System...
- Page 33 Plug and connection assignment XLR plug for signal input on the XLR / 6.35-mm jack combo sockets serve as signal input on the transmitter. The drawing and transmitter (balanced) table show the XLR pin assignment (balanced wiring) and the assignment of a suitable jack plug.
- Page 34 Troubleshooting Troubleshooting In the following we list a few common problems that may occur during operation. We give you some suggestions for easy troubleshooting: Symptom Remedy No sound 1. Check the power supply of the transmitter and receiver. 2. Ensure that the transmitter and receiver are operating in the same frequency range and that the transmitter antenna is designed for this frequency range.
- Page 35 The sound is distorted Change the setting of the "INPUT LEVEL" control on the transmitter. If the procedures recommended above do not succeed, please contact our Service Center. You can find the contact information at www.thomann.de. IEM 100 UHF Wireless System...
- Page 36 Protecting the environment Protecting the environment Disposal of the packing material Environmentally friendly materials have been chosen for the packaging. These materials can be sent for normal recycling. Ensure that plastic bags, packaging, etc. are disposed of in the proper manner. Do not dispose of these materials with your normal household waste, but make sure that they are collected for recycling.
- Page 37 When disposing of the device, comply with the rules and regulations that apply in your country. You can also return your old device to Thomann GmbH at no charge. Check the current conditions on www.thomann.de.
- Page 38 Notes IEM 100 UHF Wireless System...
- Page 40 Musikhaus Thomann · Hans-Thomann-Straße 1 · 96138 Burgebrach · Germany · www.thomann.de...
Need help?
Do you have a question about the the t.bone IEM 100 and is the answer not in the manual?
Questions and answers