Table of Contents
Advertisement
Quick Links
Advertisement
Table of Contents

Related Manuals for AVer FONE700


Summary of Contents for AVer FONE700
- Page 1 FONE700 Array Speakerphone Conference System — — User Manual...
- Page 2 Federal Communications Commission Statement NOTE: This equipment has been tested and found to comply with the limits for a Class A digital device, pursuant to part 15 of the FCC Rules. These limits are designed to provide reasonable protection against harmful interference when the equipment is operated in a commercial environment.
- Page 3 Remote Control Battery Safety Information: Store batteries in a cool and dry place. Do not throw away used batteries in the trash. Properly dispose of used batteries through specially approved disposal methods. Remove the batteries if they are not in use for long periods of time. Battery leakage and corrosion can damage the remote control.
- Page 4 © 2023 AVer Information Inc. All rights reserved. | December 11, 2023 All rights of this object belong to AVer Information Inc. Reproduced or transmitted in any form or by any means without the prior written permission of AVer Information Inc. is prohibited.
- Page 5 Tel: +81 (0) 3 5989 0290 テクニカル・サポート: https://jp.aver.com/technical-support Vietnam Branch Office Công ty TNHH AVer Information (Việt Nam) Tầng 5, 596 Nguyễn Đình Chiểu, P.3, Quận 3, Thành phố Hồ Chí Minh 700000, Việt Nam Tel: +84 (0)28 22 539 211...
-
Page 6: Table Of Contents
Contents Overview ..........................1 Package Contents ....................... 1 Optional Accessories ......................1 Dimensions .......................... 2 Parts Info ..........................3 LED Indicators ........................4 Connection .......................... 5 Installation .......................... 7 Ceiling Mount Installation ....................8 Ceiling Grid Mount ......................8 VESA Mount ........................9 Projector Ceiling Mount.................... -
Page 7: Overview
Overview Package Contents FONE700 Ceiling FONE700 Hub Power Adapter Power Cable Speakerphone (48V/3.75A) RJ45 Cable 10M USB-C 2.0 Cable 5M Hub Wall Mount Wall Mount Screw Kit Bracket (Screw: ST4.9*32mm) Ceiling Mount Drill Wall Mount Drill Quick Start Guide Template... -
Page 8: Dimensions
Dimensions Speakerphone Unit: mm Hub Unit: mm... -
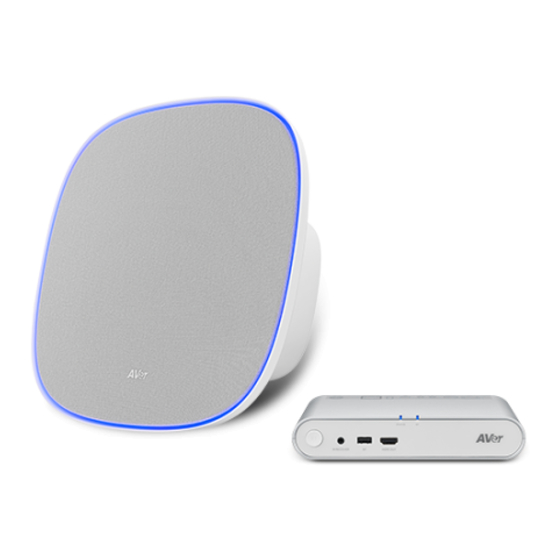
Page 9: Parts Info
Parts Info Speakerphone 1. Speakerphone 3. Tie-off Point 2. LED Indicator 4. RJ45 Out Port (red port) 5. RJ45 In Port (yellow port) 6. M4 Screw Holes (x4) 7. 1/4”-20 Screw Hole Hub 1. Bluetooth Button 7. Kensington Lock 2. -
Page 10: Led Indicators
LED Indicators Speakerphone Status Blue (Flash once) Connect to Hub Blue (Flashing) Start-up Blue (Solid) Active Red (Solid) Mute mic Red (Flashing) Firmware update Hub Hub Status Status Blue (Flash once) Power on Blue (Flashing) Start-up Blue (Solid) Active Orange (Solid) Standby/Sleep mode... -
Page 11: Connection
Connect to Description Monitor/TV 1. Plug in the FONE700 Hub power adapter to power up. 2. Use an HDMI cable to connect the FONE700 Hub to a monitor or TV to share the computer screen. USB Cable: Connect FONE700 Hub to a PC with a USB Type-C cable to configure settings in PTZApp 2 or send PC audio to the FONE700 Speakerphone. - Page 12 1. Plug in Bluetooth dongle first, then connect FONE700 Hub to the power adapter. 2. Long press the BT button on FONE700 Hub for 2 seconds to start pairing. 3. You can then use Bluetooth to connect your phone to the FONE700 Hub.
-
Page 13: Installation
Installation Installation height Audio tracking radius Recommended: 8.2ft (2.5m) Recommended: 6.9ft (2.1m) Effective range: 6.6-9.8ft (2-3m) Effective range: 5.6-7.9ft (1.7-2.4m) Daisy-chain device distance Audio meeting radius Recommended: 6.6-13.2ft (2-4m) Recommended: 8.2ft (2.5m) Minimum: 3.3ft (1m) Effective range: up to 11.5ft (3.5m) ... -
Page 14: Ceiling Mount Installation
Ceiling Mount Installation We provide 4 different methods to install your FONE700 Speakerphone. Except for the ceiling mount bracket, the rest of the brackets and cables are self-purchase accessories Ceiling Grid Mount (Optional Accessories) 1. Remove a section of the ceiling board. Use 2. -
Page 15: Vesa Mount
VESA Mount (Self purchase accessories) 1. Prepare a universally compatible VESA mount bracket. 2. Secure the VESA Mount with four M4 screws comes with its package. 3. Attach the bracket and the Speakerphone to the ceiling. Projector Ceiling Mount (Self purchase accessories) 1. -
Page 16: Suspension Cable Mount
Suspension Cable Mount (Self purchase accessories) 1. Prepare suspension cables compatible with four M4 screw holes. 2. Secure the cables into the Speakerphone thread holes. 3. Attach the cables and the Speakerphone to the ceiling. -
Page 17: Hub Installation
Hub Installation You may optionally place the hub in front of the HDMI Screen, or install it on the wall mount bracket. Place in front of the HDMI Screen Wall Mount Installation Measure the height of the hub on the wall. Note that the height varies depending on which side of the hub is facing upward. -
Page 18: Get Started
Get Started Before you start, download PTZApp 2 from AVer Download Center. In PTZApp 2, you may set up and configure settings including System, Audio and Audio Tracking and more. Install PTZApp 2 1. Download PTZApp 2 to your computer from the official website: https://communication.aver.com/model/ptzapp2... - Page 19 Turn hotkey on or off. View PTZApp 2 version or check for updates. PTZApp Update Usage Data Opt-in or opt-out of providing anonymous usage data. Pair with EZManager to manage all your USB-connected AVer cameras*. EZManager Pair *Notes: Will be supported in future release.
-
Page 20: Setting
Item Description Select an idle time for the sleep timer. When there’s no connection or Sleep Timer the timer is up, FONE700 will enter sleep mode. Allow Remote Access Turn on or off the remote access function. Visca Over IP Sends several different control commands over the network connection. -
Page 21: System
Click Start to activate Bluetooth pairing. USB Display Turn on the function for HDMI output. Auto Update: Update FONE700 firmware automatically. FW Update Manual Update: Upload firmware update file from your computer. The device will reboot automatically after the update. - Page 22 1. Click Start > Output to save the log and download it to your computer. Trouble Shooting 2. When finished, click Done. You can provide the file to AVer technicians for trouble shooting. Click Start, and follow the on-screen instruction to test your FONE700 Test Speakerphone Speakerphone.
-
Page 23: Audio
FONE700 Mode Phone In Jack: Phone In: Connect your mobile phone to FONE700 for (VC Mode) use as an external speakerphone in mobile-based video conferencing. 3.5mm External Microphone Only: Connect to an... - Page 24 Line Out: Connect to an external speaker as the only audio transmitting device; FONE700 speaker will be disabled. FONE700 Line Out for Sound Out: Connect to an external speaker for joint audio transmission with FONE700 speaker. Select Hybrid Mode for concurrent local meetings and video conferencing.
-
Page 25: Audio Tracking
Audio Tracking Pair your FONE700 Speakerphone with a PTZ tracking camera. When the speakerphone detects a sound, it sends the X, Y, and Z axis direction value to the camera and triggers the camera audio tracking function. Item Description Enter the installation height of your speakerphone. You may select the Installation Height measurement unit between Inch and CM. - Page 26 Rename Click the pencil icon on the upper right corner of the thumbnail to rename the speakerphones. Turn FONE700 audio tracking on or off. Turning it on will turn off your 3D Audio Tracking linked camera’s Audio Tracking mode.
-
Page 27: Virtual Audio Stream
While using the Virtual Stream function, you cannot change any audio settings. To start a virtual audio stream: 1. Make sure your FONE700 and computer running the video conferencing software are connected to the same network. 2. Go to Virtual Stream > click Start on FONE700 Device Card.
Need help?
Do you have a question about the FONE700 and is the answer not in the manual?
Questions and answers