Advertisement
Quick Links
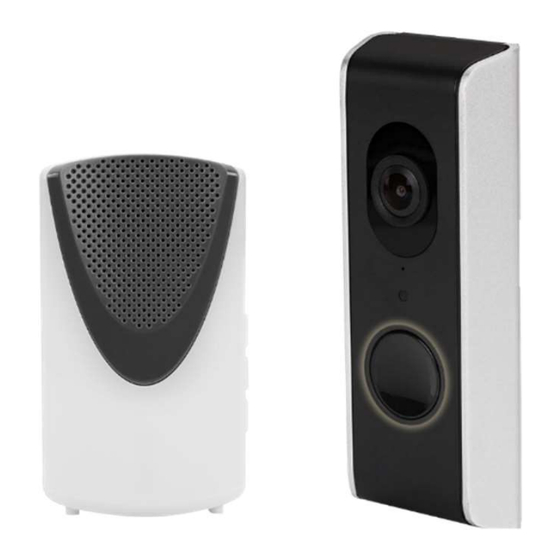
Wi-Fi Video Doorbell Camera and
Wireless Chime
Installation Guide
Model: RVDBA701000A/RVDBA701009A
For additional languages, use a QR scanner to scan
the QR code
1. What's in the Box
2. Product Overview
2.1
Lens
2.2
Microphone
2.3
Day/night sensor (automatically)
2.4
Push button
2.5
Loudspeaker
2.6
Micro SD card slot (inside housing)
2.7
Rubber cover for wiring
2.8
Release pin for bracket and doorbell
2.9
Chime Loudspeaker
2.10
Volume Settings
2.11
Melody Settings
2.12
No function when bundle using with Wi-Fi Doorbell
2.13
Wall mount holes
2.14
Battery compartment (3x AA batteries, excluded)
3. Wi-Fi Doorbell Connections
Reset button
1. Reset button (Hold for 10 seconds)
2. Connection for electrical lock (B1, B2 / 0V)
3. RJ45 internet cable connection (TD-, TD+, RD-, RD+)
TD- = Internet cable, Orange color wire
TD+ = Internet cable, Orange / White color wire
RD- = Internet cable, Green color wire
RD+ = Internet cable, Green / White color wire
Note: Wired internet works only when you first connect the internet
cable to the Wi-Fi doorbell and router. After that, insert the
adapter in the socket.
4. Adapter connection (V+, V- / 12V 1A)
V+ = Red Wire
V- = Black wire
Note: Pay attention to connect correctly.
5. Wired Chime indoor connection (C1, C2 / 0V): the mechanical Chime must
be powered by an 8V AC transformer. The separate power supply is AC,
so it makes no difference which wire goes to C1 and C2 (see APPENDIX).
4. Preparation Before Installation using your
Smart Device
To install the Wi-Fi doorbell, you need to prepare the following information.
Your Wi-Fi Username and Password: the Wi-Fi doorbell must be
registered on your own Wi-Fi network during this installation.
During the installation keep your phone close to the Wi-Fi Doorbell
(max. 1 meter)
Connection of the Smart Phone to the Doorbell is established
through Bluetooth Communication.
Note: This procedure can take up to 3 minutes.
First perform the setup as explained in these instructions and then
install the Wi-Fi doorbell on your front door.
5. Installation
1.
Remove the rubber cover (2.7) on the rear of the Wi-Fi doorbell.
2.
Connect the adaptor with the extension cord.
3.
Use a screwdriver to punch a hole into the rubber cover.
4.
Insert the extensions cord through the rubber cord.
5.
Connect the extension cord to the Wi-Fi doorbell (V+ red wire, V- black
wire).
6.
Insert the adaptor into the power socket.
7.
Close the rubber cover (2.7).
Note: Do not connect an internet cable during the installation.
6. Connecting the Wi-Fi Doorbell to your Wi-Fi Network
1.
Open the RISCO HandyApp on your smart phone.
2.
Enter the Configurator and then click Video Doorbell Settings.
3.
Identify the new Video Doorbell and then select one of the following
two options:
Smart Setup – proceed to step 4 below.
Wired Connection –
a. Connect the Video Doorbell to the Wi-Fi network as described
below.
b. Unplug the Video Doorbell from the electrical outlet.
c.
Connect the Video Doorbell according to the Wiring Diagram
(see APPENDIX).
d. Plug the Video Doorbell back into the electrical outlet.
4.
Power up the Video Doorbell and wait for the announcement that the
Video Doorbell is ready.
Note: Make sure the LED is flashing on the Video Doorbell.
A list of Wi-Fi networks that the doorbell "sees" is displayed.
5.
Select the Wi-Fi network that you want the Video Doorbell to connect to.
6.
Enter the password for the selected Wi-Fi network.
The doorbell has now been successfully connected to the Wi-Fi
network.
7.
Click Additional Settings.
8.
Enter a name for the Video Doorbell and then click Done.
1
9.
Assign the Video Doorbell to a Site on the RISCO Cloud by following the
straightforward instructions on the screen that opens.
Once the video doorbell is registered in the site and ready for use,
continue below.
10. Click Perform Video Test.
The Video Doorbell now presents a livestream of what the Video Doorbell
"sees".
Adding Chime
Note: The Chime that arrives in the Video Doorbell kit is already
registered in the Video Doorbell. Perform this section to register
an additional Chime.
1.
Click Add Chime.
2.
With the batteries not installed in the Chime, click
Start Chime Pairing.
3.
Enter the batteries.
Note: You will have 30 seconds to enter the batteries for successful
pairing.
Advertisement

Summary of Contents for Risco RVDBA701000A
- Page 1 Assign the Video Doorbell to a Site on the RISCO Cloud by following the 3. Wi-Fi Doorbell Connections 6. Connecting the Wi-Fi Doorbell to your Wi-Fi Network straightforward instructions on the screen that opens. Open the RISCO HandyApp on your smart phone.
- Page 2 Parameter Description Supported for Wi-Fi 7. Video Doorbell Buttons and Settings via Bluetooth Setup Only iRISCO App Wi-Fi Parameter Frequency 2400-2483.5MHz The iRISCO app allows the end user to operate and setup the video Power Mode DC 9V-48V doorbell. IR Off: Average 160- Open the iRISCO App on the smart phone.
- Page 3 APPENDIX: WIRING DIAGRAMS...
- Page 4 EXCEPT FOR THE WARRANTIES SET FORTH HEREIN, RISCO AND ITS LICENSORS HEREBY DISCLAIM ALL EXPRESS, IMPLIED OR STATUTORY, REPRESENTATIONS, WARRANTIES, GUARANTEES, AND CONDITIONS WITH REGARD TO THE PRODUCTS, INCLUDING BUT NOT LIMITED TO ANY REPRESENTATIONS, WARRANTIES, GUARANTEES, AND CONDITIONS OF...
Need help?
Do you have a question about the RVDBA701000A and is the answer not in the manual?
Questions and answers