
Related Manuals for Stanley DUBUIS BDL041


Summary of Contents for Stanley DUBUIS BDL041
- Page 1 ELEKTRO-HYDRAULISCHER KNICKBESEITIGER DÉCOQUEUR SUR BATTERIE ELECTRO HYDRAULIC KINK-REMOVER BDL041 BEDIENUNGSANLEITUNG MANUEL D’UTILISATION (NOTICE ORIGINALE) INSTRUCTION MANUAL...
- Page 2 Deutsch Allgemeine Eigenschaften Der Fahrdraht einer Oberleitung kann Verformungen, sogenannte “Knickstellen”, haben: Diese sind Auswirkungen vom Abwi- ckeln des Drahtes oder vom Einsatz von Ziehstrümpfen im Servicefall. Um einen guten Kontakt zwischen dem Kontaktdraht und dem Stromabnehmer zu gewährleisten, ist es erforderlich, dass der Fahrdraht gerade ist. Mit dem Knickbeseitiger ist es möglich diese Knicke weitestgehend zu entfernen.
-
Page 3: Wartung
DUBUIS und STANLEY HYDRAULIC TOOLS (nachstehand “Stanley”), erklären unter Berücksichtigung der nachstehenden Ausnahmen, dass die Garantie nach Versendung der Ware ein Jahr beträgt. Die Garantie umfasst Material- und Montagefehler. Stanley behält sich nach Prüfung durch einen autorisierten Stanley Vertriebspartner vor die Werkzeuge nachzubessern, Teile oder komplette Geräte auszutauschen. - Page 4 Deutsch SICHERHEITSHINWEISE Elektro-hydraulischer Knickbeseitiger: Für einen sicheren Umgang mit diesem Werkzeug ist es nötig die Anleitung aufmerksam zu lesen und die Anweisungen die sie enthält zu befolgen. Wenn Sie die Anweisungen dieser Anleitung nicht befolgen erlischt die Garantie und Haftung. Dieses Werkzeug erfüllt die europäischen Sicherheitsvorschriften.
- Page 5 Deutsch SICHERHEITSHINWEISE Sicherheitsanweisung Achtung! Um jedes mögliche Risiko durch elektrische Schläge, Feuer und unfallbedingte Verletzungen zu vermeiden be- folgen Sie bitte die folgenden Sicherheitsanweisungen. Lesen und befolgen Sie diese Anleitung bevor sie das Werkzeug verwenden. Bewahren Sie diese Anleitung griffbereit auf.
-
Page 6: Using The Tool
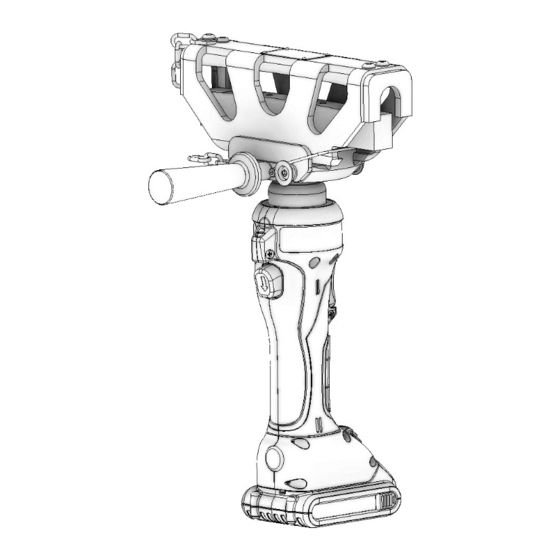
Deutsch USING THE TOOL Der abnehmbare Griff kann an beiden Seiten des Gerätes montiert warden. Ziehen Sie die Feder und Finden Sie den Knick im Fahrdraht. schieben Sie den Kopf vom Legen Sie den Kopf auf diese Stelle (die Kette muss zu Werkzeug Ihnen zeigen). - Page 7 Deutsch ANWENDUNG Durch Drücken des Vorschubschalters fährt der bewegliche Stempel aus. Vergewissern Sie Sich, dass die Knickstel- le in der Mitte des Stempels ist. Halten Sie den Vorschubschalter gedrückt, bis die automatische Abschaltung den Vorschub beendet. ACHTUNG: Langen Sie nicht in den Pressbereich des Werkzeuges. Verwenden Sie dieses Werkzeug nicht bei unter Spannung stehenden Leitungen Betätigen Sie den Rücklaufschalter, um den Kolben zurück zu ziehen.
-
Page 8: Led-Anzeige
Deutsch LED ANZEIGE LED leuchtet für 1 Sekunde LED blinkt LED leuchtet Drücken Sie den Schalter ON/OFF am Werkzeug. Einschalten des Werkzeuges ON Die 3 LED´s leuchten grün für 1 Sekunde. Die Arbeitslampe leuchtet. Grün Grün Grün Das Werkzeug ist einsatzbereit Drücken Sie den Schalter ON/OFF am Werkzeug. -
Page 9: Caractéristiques
Français CARACTÉRISTIQUES Le fil de contact de la caténaire peut présenter des déformations appelées “coques” résultant de problèmes lors du déroulage du fil de contact ou par utilisation de mains de tirage, lors d’interventions sur la caténaire. Pour assurer le contact entre le fil de contact et le pantographe, il est nécessaire que le fil de contact soit rectiligne. -
Page 10: Maintenance - Entretien
DUBUIS et STANLEY Hydraulic Tools (ci-après dénommé «Stanley»), sous réserve des exceptions prévues ci-dessous, garantie les nouveaux outils pour une période d'un an à compter de la date d'expédition de Stanley, qui sont exempts de défauts en pièces et / ou main-d'œuvre au moment de la livraison. -
Page 11: Consignes De Sécurité
Français CONSIGNES DE SÉCURITÉ DÉCOQUEUR SUR BATTERIE : POUR TRAVAILLER SANS DANGER AVEC CET OUTILLAGE, IL EST IMPÉRATIF DE LIRE LE MODE D’EMPLOI ATTENTIVEMENT ET DE RESPECTER LES CONSIGNES QUI S’Y TROUVENT. LE NON-RESPECT DES CONSIGNES PRÉSENTES DANS CETTE NOTICE ENTRAÎNE L’ANNULATION DE LA GARANTIE L’outil est conforme aux normes de sécurité... - Page 12 Français CONSIGNES DE SÉCURITÉ INSTRUCTIONS DE SÉCURITÉ Attention ! : Afin de réduire le risque de décharge électrique, de blessure et d’incendie lors de l’utilisation d’outils élec- triques, observez les mesures de sécurité fondamentales suivantes. Lisez et observez ces instructions avant d’utiliser l’outil. Conservez ces instructions de sécurité. CHOIX DE L’OUTIL : Utilisez l’outil adéquat.
-
Page 13: Utilisation De L'outil
Français UTILISATION DE L’OUTIL Poignée amovible pouvant se visser des 2 côtés de la tête Tirer le ressort et faire glisser Repérer la coque sur le fil de contact. la tête du décoqueur. Poser la tête du décoqueur sur le fil de contact (chaine de maintien face à... - Page 14 Français UTILISATION DE L’OUTIL Avancer la matrice mobile contre le fil de contact en appuyant sur la gâchette. S'assurer que l’outil soit centré par rapport à la coque. Appuyer sur la gâchette jusqu'à l’arrêt automatique de l’outil. ATTENTION : LES MATRICES SERRENT TRÈS FORTS. NE GLISSEZ PAS VOS DOIGTS DANS LE PROFIL DE LA MATRICE.
-
Page 15: Indications Led
Français INDICATIONS LED LED allumée pendant 1 seconde. LED clignote. LED allumée. Appuyer sur le bouton marche ON/OFF. Mise en marche ON de l’outil Les 3 LED s’allument en VERT pendant 1 seconde. La lampe d’éclairage s’allume. VERT VERT VERT L’outil est prêt à... -
Page 16: General Features
English GENERAL FEATURES The overhead contact wire may have deformations called “kinks”, the result of problems when unwinding the wire or through the use of pulling grips during servicing on the overhead wire. In order to ensure good contact between the contact wire and the pantograph, it is necessary that the contact wire should be straight. -
Page 17: Maintenance
DUBUIS and STANLEY Hydraulic Tools (hereinafter called “Stanley”), subject to the exceptions contained below, warrants new tools for a peri- od of one year from the shipping date from Stanley, to be free of defects in material and/or workmanship at the time of delivery. Stanley will, at its option, repair or replace any tool or part of a tool, or new part, which is found defective upon examination by a Stanley authorized service out- let or by Stanley’s factories in Blois, France or Milwaukie, Oregon USA. -
Page 18: Safety Instructions
English SAFETY INSTRUCTIONS ELECTRO HYDRAULIC KINK-REMOVER: TO WORK IN SAFE CONDITIONS WITH THIS TOOLING, IT IS IMPERATIVE TO READ CAREFULLY THE DIRECTIONS FOR USE AND TO FOLLOW THE INSTRUCTIONS IT CONTAINS. IF YOU DO NOT RESPECT THE INFORMATION WRITTEN IN THAT INSTRUCTION MANUAL THE WARRANTY WILL BE CANCELLED. - Page 19 English SAFETY INSTRUCTIONS SAFETY INSTRUCTIONS Warning! In order to avoid any risk of electrical shocks, injuries and fire, please follow the enclosed safety instructions. Read and respect these instructions before using the machine. Keep this document. CHOICE OF TOOL: Use the appropriate tool. Do not use tools or adaptable devices of too low a power rating to undertake heavy work. Do not use tools for other purposes than the work for which they have been designed MAINTENANCE AND STORAGE: Store your tools in a safe place.
-
Page 20: Using The Tool
English USING THE TOOL The moveable handle can be screwed on 2 sides of the head Pull the spring and slide the Spot the kink on the contact wire. head of the tool. Fit only head of the kink-remover over the contact wire (the chain should be in front of you). - Page 21 English USING THE TOOL Move the moveable die in contact of the contact wire by pressing the advance trigger. Make sure that the tool is cen- tered relative to the kink. Press the crimping trigger up to automatic stop of the tool. CAUTION: THE DIE TIGHTENS VERY TIGHTLY.
-
Page 22: Led Indications
English LED INDICATIONS LED lighting for 1 second LED flashing LED lighting Press the button ON/OFF tool. Starting ON the tool The 3 LED lighting GREEN for 1 second. The front DEL lighting. GREEN GREEN GREEN The tool is ready for work. Stopping OFF of the tool Press the button ON/OFF tool. - Page 23 DÉCLARATION CE...
- Page 24 NOTES...
- Page 26 17-19 rue Jules Berthonneau - Z.I. de Villebarou CS73406 - 41034 BLOIS Cedex - France Té l . : + 3 3 ( 0 ) 2 5 4 5 2 4 0 0 0 - F A X : + 3 3 ( 0 ) 2 5 4 5 2 4 0 3 4 h t t p : / / w w w .
Need help?
Do you have a question about the DUBUIS BDL041 and is the answer not in the manual?
Questions and answers