Table of Contents
Advertisement
Advertisement
Table of Contents

Related Manuals for dji RS 4


Summary of Contents for dji RS 4
- Page 1 User Manual v1.0 2024.04...
- Page 2 This document is copyrighted by DJI with all rights reserved. Unless otherwise authorized by DJI, you are not eligible to use or allow others to use the document or any part of the document by reproducing, transferring, or selling the document. Users should only refer to this document and the content thereof as instructions to operate DJI products.
-
Page 3: Using This Manual
User Manual Read the entire quick start guide and user manual and watch the informational and tutorial videos on the product page of the DJI™ official website (https://www.dji.com/rs-4, https://www. dji.com/rs-4-pro). Read the safety guidelines to understand your legal rights and responsibilities. -
Page 4: Table Of Contents
Legends Read Before Use Download the Ronin App and Watch the Tutorial Videos Contents Introduction DJI RS 4 Diagram DJI RS 4 Pro Diagram Using For The First Time Charging the Battery Attaching the Extended Grip/Tripod Mounting the Camera Balancing... -
Page 5: Introduction
24-70mm F2.8 lens. DJI RS 4 is specifically designed for mirrorless cameras and supports a tested payload of up to 3 kg. DJI RS 4 Pro is specifically designed for mirrorless and miniature cameras and supports a tested payload of up to 4.5 kg. -
Page 6: Dji Rs 4 Diagram
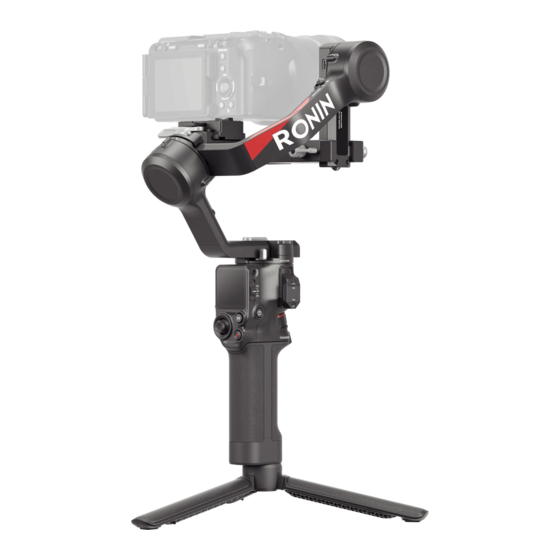
DJI RS 4 / RS 4 Pro User Manual DJI RS 4 Diagram Upper/Lower Quick-Release Plate Gimbal Horizontal Plate (Removable Part on the Camera Mounting Plate) 1.8-inch OLED Full-Color Touchscreen M Button Joystick Camera Control Button BG21 Grip (Built-in battery with 1/4"-20... -
Page 7: Dji Rs 4 Pro Diagram
DJI RS 4 / RS 4 Pro User Manual DJI RS 4 Pro Diagram Upper/Lower Quick-Release Plate Gimbal Horizontal Plate (Removable Part on the Camera Mounting Plate) 1.8-inch OLED Full-Color Touchscreen M Button Joystick Camera Control Button BG30 Grip (Built-in battery with 1/4"-20... -
Page 8: Using For The First Time
DJI RS 4 and 1.5 hours to fully charge the battery of DJI RS 4 Pro. Press the battery level button to check the current battery level when powered off. [1] Measured with a charger supporting 18 W fast charging. It is recommended to use chargers supporting PD protocol. -
Page 9: Attaching The Extended Grip/Tripod
"click" to ensure that the handle is firmly attached. • DJI RS 4 and DJI RS 4 Pro are installed in the same way. DJI RS 4 is used as an example below. -
Page 10: Mounting The Camera
• DJI RS 4 and DJI RS 4 Pro are installed in the same way. DJI RS 4 is used as an example below. - Page 11 DJI RS 4 / RS 4 Pro User Manual • During mounting, if the pan axis lever, roll axis lever, and knobs on either side of the mounting plate interfere with the camera, lift up the levers or knobs to reorient them.
- Page 12 DJI RS 4 / RS 4 Pro User Manual 2. Attach the Camera to the Gimbal DJI RS 4 and DJI RS 4 Pro support horizontal shooting and vertical shooting. Follow the steps to install the camera in horizontal and vertical shooting modes.
- Page 13 DJI RS 4 / RS 4 Pro User Manual Vertical Shooting a. Loosen the knob on the camera mounting plate and press the knob and safety lock at the same time, then remove the gimbal horizontal plate, mount it vertically to the gimbal and tighten the knob.
-
Page 14: Balancing
This ensures the stability of videos and the full performance of the gimbal. • The balance of DJI RS 4 and DJI RS 4 Pro is adjusted in the same way. DJI RS 4 is used as an example below. - Page 15 DJI RS 4 / RS 4 Pro User Manual 2. Balancing Depth for the Tilt Axis a. Rotate the tilt axis so that the camera lens is pointing forward. b. Check to make sure the camera is not front or back-heavy. If front-heavy, move the camera backward by turning the knob.
- Page 16 DJI RS 4 / RS 4 Pro User Manual 3. Balancing the Roll Axis a. Lightly rest the axis arm and unlock the roll axis b. Check the direction in which the roll motor swings. If the camera rotates to the left, move the camera to the right.
- Page 17 DJI RS 4 / RS 4 Pro User Manual 4. Balancing the Pan Axis a. Unlock the pan axis b. While holding the grip, tilt the gimbal forward, and rotate the pan arm until parallel with you. Check the movement of the pan axis. If the camera lens rotates to the left, push the pan axis to the right.
- Page 18 DJI RS 4 / RS 4 Pro User Manual Balancing in Vertical Shooting 1. balancing the Vertical Tilt a. Unlock the tilt axis b. Follow the figure below (top view) and rotate the tilt axis so that the camera lens is pointing upward.
- Page 19 DJI RS 4 / RS 4 Pro User Manual 2. Balancing Depth for the Tilt Axis a. Rotate the tilt axis so that the camera lens is pointing forward. b. Check to make sure the camera is not front or back-heavy. If front-heavy, move the camera backward by turning the knob.
- Page 20 DJI RS 4 / RS 4 Pro User Manual 3. Balancing the Roll Axis a. Lightly rest the axis arm and unlock the roll axis b. Check the direction in which the roll motor swings. If the camera rotates to the left, move the camera to the right.
- Page 21 DJI RS 4 / RS 4 Pro User Manual 4. Balancing the Pan Axis a. Unlock the pan axis b. While holding the grip, tilt the gimbal forward, and rotate the pan arm until parallel with you. Check the movement of the pan axis. If the camera lens rotates to the left, push the pan axis to the right.
-
Page 22: Activation
DJI RS 4 / RS 4 Pro User Manual Activation Activation is required for DJI RS 4 and DJI RS 4 Pro through the Ronin app. Follow the steps below to activate your device: 1. Press and hold the power button to power on your device, and select the language on the touchscreen. -
Page 23: Firmware Update
• It is normal for the gimbal to unlock, lock, and reboot automatically during the update process. Connecting a Camera DJI RS 4 and DJI RS 4 Pro support connecting to the camera via Bluetooth or camera control cable. Connect to the Camera via Bluetooth... -
Page 24: Auto Tune
DJI RS 4 / RS 4 Pro User Manual Setting up Gimbal Bluetooth Swipe down from the top of the touchscreen on the Home screen to enter the Control Center screen. Tap the Bluetooth icon in the upper right corner. The gimbal will scan the Bluetooth signals of the surrounding devices. -
Page 25: Operations
M Button Press once to take photos by default. For DJI RS 4, the function of the button can be set on the touchscreen to C1/ Fn1 Button Mapping. For DJI RS 4 Pro, the function of the button can be set on the touchscreen to C1/Fn1 Button Mapping or LiDAR AF/MF. - Page 26 For zoom control: Move the joystick up and down to control the zoom. • Enable the power zoom on Sony cameras and then the joystick can control the power zoom of the camera. When used with the DJI Focus Pro Motor, the joystick can control the zoom after calibration. Set the motor to Z mode when in use.
- Page 27 For connecting the focus motor. Video Transmission Port (DJI RS 4) For DJI RS 4, this port can be connected to the DJI Ronin Image Transmitter for communication or to the focus motor for focus control. Video Transmission/LiDAR Range Finder Port (DJI RS 4 Pro)
-
Page 28: Touchscreen
Tap Start Calibration and the gimbal of DJI RS 4 will calibrate automatically. For DJI RS 4 Pro, select Handheld mode or Car Mount mode according to the shooting requirements and then tap Start Calibration. Handheld mode can meet the shooting requirements of most scenarios, and Car Mount mode can provide better stabilization in vehicle shooting scenarios. - Page 29 DJI RS 4 / RS 4 Pro User Manual Follow Speed Tap to select follow speed. Users can choose fast, medium, slow, and custom. Tap the icon on the top-right of the touchscreen to customize the speed. Slide Dow - Control Center Screen Slide down from the top of the touchscreen to enter the control center screen.
- Page 30 • When using DJI RS 4 Pro, make sure that the roll axis does not interfere with the pan axis before selecting Fold & Lock. Otherwise, the gimbal may be damaged.
- Page 31 M Button Allow users to take photos by default. For DJI RS 4, the function of the button can be set on the touchscreen to C1/Fn1 Button Mapping. For DJI RS 4 Pro, the function of the button can be set on the touchscreen to C1/Fn1 Button Mapping or LiDAR AF/MF.
- Page 32 DJI RS 4 / RS 4 Pro User Manual Slide Left - Create Screen Slide left from the right edge of the screen to enter the create screen. Timelapse In Timelapse, the gimbal triggers the camera to capture still images at the set interval time and will automatically stop when completed.
-
Page 33: Gimbal Follow Modes
(PTF), and pan, tilt, and roll follow (FPV). FPV mode can be switched to 3D Roll 360 mode or Custom mode via the touchscreen. • The gimbal follow modes of DJI RS 4 and DJI RS 4 Pro are the same. DJI RS 4 is used as an example below. - Page 34 DJI RS 4 / RS 4 Pro User Manual PTF: Pan and tilt follow, where both the pan and tilt axes Suitable for scenarios when follow the movement of the moving on a slant. grip. FPV: Pan, tilt, and roll follow,...
-
Page 35: Gimbal Operation Modes
There are four operation modes for DJI RS 4 and DJI RS 4 Pro: Upright, Underslung, Flashlight, and Briefcase. • The gimbal operation modes of DJI RS 4 and DJI RS 4 Pro are the same. DJI RS 4 is used as an example below. - Page 36 DJI RS 4 / RS 4 Pro User Manual Mount the briefcase handle to the gimbal according to the figure below. • It is recommended to mount the briefcase handle to the NATO port on the left side of the touchscreen.
-
Page 37: Ronin App Settings
DJI RS 4 / RS 4 Pro User Manual Ronin App Settings Users can activate the gimbal, update the firmware, use intelligent functions and image transmission using Ronin app. Motor parameters, user profile, joystick speed, and joystick direction can also be adjusted via the app. System status, user manual and the tutorial videos are also available. - Page 38 DJI RS 4 / RS 4 Pro User Manual Virtual Joystick Use the virtual joystick in the app to control the movement of the gimbal and to shoot. 1. Control Bar: Control the speed and smoothness of the gimbal by adjusting the control bar.
- Page 39 DJI RS 4 / RS 4 Pro User Manual Force Mobile Force Mobile requires the phone holder and a mobile phone mounted on a tripod or handlebar vertically. After enabling this feature in the Ronin app, the gimbal movement can be controlled by tilting and rotating your mobile phone.
- Page 40 DJI RS 4 / RS 4 Pro User Manual Panorama Panorama allows users to capture a series of interconnecting still images with precise control based on the sensor type, lens focal length, overlap, and interval. Make sure you have connected the camera and gimbal using the corresponding camera control cable before using Panorama (Bluetooth connection is not supported).
- Page 41 DJI RS 4 / RS 4 Pro User Manual Timelapse In Timelapse, the gimbal triggers the camera to capture still images with the set interval time and will automatically stop when completed. The duration for the Timelapse and the frame rate can be set so that the gimbal can calculate the exact number of images required.
- Page 42 DJI RS 4 / RS 4 Pro User Manual Track Track is designed to capture video with up to 10 waypoints. Users need to select the waypoint manually by moving the gimbal or using the virtual joystick. Tap + to add a waypoint. The duration and stay time can be set on the waypoint settings screen after a waypoint is added and the position of the waypoint also can be reset.
- Page 43 DJI RS 4 / RS 4 Pro User Manual Gaming Controller PS4 DualShock and Xbox controllers can be used to control the gimbal and camera. After connecting the controller to the mobile device and gimbal, users can control gimbal movements, focus, and zoom, and can record videos, recenter gimbal, and capture photos.
- Page 44 DJI RS 4 / RS 4 Pro User Manual Image Transmission With the DJI Ronin Image Transmitter mounted, tap Connect to RavenEye on the homescreen of the Ronin app to use the image transmission feature. LiDAR Lens Profile (DJI RS 4 Pro) Lens can be calibrated and flange distance can be adjusted in LiDAR Lens Profile.
- Page 45 DJI RS 4 / RS 4 Pro User Manual Motor Parameters There are Basic and Advanced menus. Stiffness can be displayed and adjusted in the Basic menu. In addition, Strength can be adjusted in the Advanced menu (do not adjust if not necessary).
- Page 46 DJI RS 4 / RS 4 Pro User Manual User Profile Gimbal mode, follow speed, deadband, push mode and joystick control can be set in this page. Deadband determines how much movement the gimbal tolerates prior to translating the pan, tilt, and roll movement of the camera.
- Page 47 DJI RS 4 / RS 4 Pro User Manual Control Settings Channels The channel indicator provides feedback when configuring remote operation. Pan, tilt, and roll channels can be reassigned and each axis can also be inverted. Normal means the direction of movement is the same as the joystick. Inverted means the direction of movement is the opposite of the joystick.
- Page 48 DJI RS 4 / RS 4 Pro User Manual Status Settings Use more features such as Motor Pause, Silent Mode, Horizontal Calibration, and Restore Gimbal Setup. Checklist Displays the connection status of the Bluetooth and camera. When the gimbal status is abnormal, the status information is displayed here.
-
Page 49: Grip And Built-In Battery
DJI RS 4 / RS 4 Pro User Manual Grip and Built-In Battery DJI RS 4 is equipped with the BG21 grip with a built-in 3000 mAh battery that gives the gimbal a maximum running time of about 12 hours . - Page 50 DO NOT use non-DJI batteries. Go to www.dji.com to purchase new batteries. DJI takes no responsibility for any damage caused by non-DJI batteries. DO NOT use or charge a swollen, leaky, or damaged grip. If the grip is abnormal, contact DJI or a DJI authorized dealer for further assistance.
- Page 51 DJI RS 4 / RS 4 Pro User Manual Travel Notice Before carrying the grip on an airline flight, it must first be discharged until the battery level is lower than 30%. Only discharge the grip in a fireproof location and store the grip in a ventilated location.
-
Page 52: Maintenance
DJI RS 4 / RS 4 Pro User Manual Maintenance The gimbal is not waterproof. Make sure to protect it from dust and water during use. After use, it is recommended to wipe the gimbal with a soft dry cloth. DO NOT spray any cleaning liquids onto the gimbal. - Page 53 DJI RS 4 / RS 4 Pro User Manual Working Performance Tested Payload 3 kg (6.6 lbs) 4.5 kg (10 lbs) Maximum Controlled Pan: 360°/ s Pan: 360°/ s Rotation Speed Tilt: 360°/ s Tilt: 360°/ s Roll: 360°/ s Roll: 360°/ s...
- Page 54 This content is subject to change without prior notice. https://www.dji.com/rs-4/downloads https://www.dji.com/rs-4-pro/downloads If you have any questions about this document, please contact DJI by sending a message to DocSupport@dji.com. DJI is a trademark of DJI. Copyright © 2024 DJI OSMO All Rights Reserved.
Need help?
Do you have a question about the RS 4 and is the answer not in the manual?
Questions and answers