Advertisement
- 1 Package List
- 2 Product Overview
- 3 Specifications
- 4 How to Connect to PC
- 5 How to Connect to Android
- 6 How to Connect to NINTENDO SWITCH
- 7 LED Status under SWITCH Connection
- 8 How to Connect to PS3
- 9 Turbo Button Setting
- 10 How to Connect to PS3
- 11 Turbo Button Setting
- 12 How to set the customized buttons
- 13 How to clear the customization setting
- 14 FAQ
- 15 After-sale services
- 16 Contact Information
- 17 Documents / Resources
Package List
1 x ESM-9110 Wireless Game Controller
1 x USB Type C Cable
1 x USB Receiver
1 x User Manual
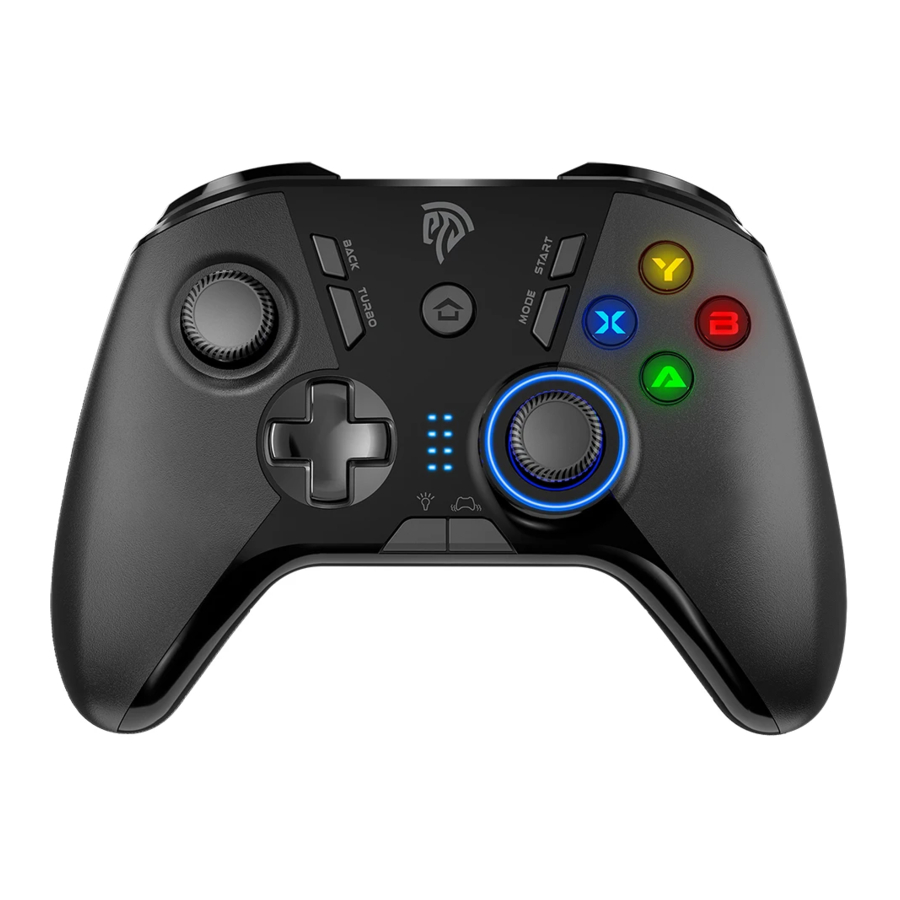
Product Overview

- Backward
- Left Joystick
- D-Pad
- TURBO
- Light Control Button (5 Settings)
- Vibration Control Button (5 Settings)
- Right Joystick
- X, Y, A, B
- Start
- Mode
- Reset
- Type C Charging Port
- LT
- LB
- Charging LED Indicator
- RT
- RB
Specifications
| Compatibility | Nintendo Switch, PC, PS3, Android |
| Distance | 8-10m |
| Power Supply | Embedded 600mA Battery |
| Charge Time | 2.5h |
| Use Time | 8h |
| Motor | 2 pieces |
How to Connect to PC
Connect via Xinput Mode
- Press HOME button to switch on the controller and LED1, LED2, LED3 and LED4 start flashing and pairing begins.
- Insert the receiver or USB cable into the USB port of your computer and the game controller starts pairing with the receiver. LED1 and LED4 will remain on, meaning the connection is successful.
- If LEDI and LED4 are not glowing solid, press MODE button for 5 seconds until LED1 and LED4 remain illuminated.
Note: After pairing, LEDI and LED4 will blink and vibration will be switched off when batteries are running below 3.5V
Connect via Dinput Mode
- Press HOME button to switch on the controller and LED1, LED2, LED3 and LED4 start flashing and pairing begins.
- Insert the receiver or USB cable into the USB port of your computer and the game controller starts pairing with the receiver. LED1 and LED3 will remain on, meaning the connection is successful.
- If LED1 and LED3 are not glowing solid, press MODE button for 5 seconds until LED1 and LED4 remain illuminated.
How to Connect to Android
>> Please make sure that your smartphone and tablet fully support OTG function and prepare an OTG cable. Also, note that Android games do not support vibration.
- Connect the receiver to the OTG cable (NOT INCLUDED), or connect the cable to the game controller directly.
- Plug the other end of the OTG cable into the USB port of your smartphone. LED2 and LED3 will remain illuminated, indicating the connection is successful.
- If LED2 and LED3 are not glowing solid, press MODE button for 5 seconds until LED2 and LED3 remain illuminated
How to Connect to NINTENDO SWITCH
- Turn on NINTENDO SWITCH console and go to System Settings > Controllers and sensors > Pro Controller wired Communication
- Insert the receiver or USB cable into USB2.0 of the console charging pad
- Press HOME button to turn on the game controller and pairing starts.
Note: The USB2.0 on the SWITCH console supports wired game controllers but the USB3.0 doesn't and 2 game controllers are supported simultaneously.
LED Status under SWITCH Connection

How to Connect to PS3
- Press HOME button once to switch on the controller and LED 1, LED2, LED3 and LED4 start flashing and pairing begins.
- Insert the receiver or USB cable into the USB port of your PS3, and the game controller starts pairing with the receiver. LEDI and LED3 will remain on, meaning the connection is successful.
- Press HOME button to confirm
Turbo Button Setting
- Press and hold any key you want to set with TURBO function, then press TURBO Button. The TURBO LED will start flashing red, indicating setting is done. After that, you are free to hold this button during gaming to achieve fast strike.
- Hold down this button again and press TURBO Button simultaneously to disable TURBO function.
How to Connect to PS3
- Press HOME button once to switch on the controller and LED1, LED2, LED3 and LED4 start flashing and pairing begins.
- Insert the receiver or USB cable into the USB port of your PS3, and the game controller starts pairing with the receiver. LED1 and LED3 will remain on, meaning the connection is successful.
- Press HOME button to confirm
| First Controller | LED 1 | Fifth Controller | LED1+LED4 |
| Second Controller | LED 2 | Sixth Controller | LED2+LED4 |
| Third Controller | LED 3 | Seventh Controller | LED3+LED4 |
| Fourth Controller | LED 4 |
Turbo Button Setting
- Press and hold any key you want to set with TURBO function, then press TURBO Button. The TURBO LED will start flashing red, indicating setting is done. After that, you are free to hold this button during gaming to achieve fast strike.
- Hold down this button again and press TURBO Button simultaneously to disable TURBO function.
How to set the customized buttons
- Press and hold the button that needs to be customized, such as M1, and then press the BACK button. At this point, the ring LED light changes to a mixed color and enters the custom state.
- Press the button that needs to be programmed to M1, such as A button. It can also be the combination button A B button.
- Press the M1 button again, the ring LED will turn blue, setting successfully. Other M2 M3 M4 button settings are the same as above.
How to clear the customization setting
- Press and hold the button that needs to be cleared, such as M1, and then press the BACK button. At this time, the ring LED light changes to a mix color and enter the clear custom state.
- Press the M1 button again, the ring LED will turn blue, then cleared successfully. Clear setting for M2 M3 M4 buttons same as above.
FAQ
-
The device failed to connect
- Press HOME Button for 5 seconds to force it to reconnect.
- Try another free USB port on your device or restart the computer.
-
The device failed to be recognized by my computer
- Make sure the USB port on your PC works fine.
- Insufficient power might cause unstable voltage to your PC USB port. So try another free USB port.
- A computer running Windows XP or a lower operating system needs to install X360 game controller driver first. Download on: www.easysmx.com
-
Why cannot I use this unit in the game?
- The game you are playing does not support game controller.
- You need to set the gamepad in the game settings first.
-
Why does not the unit vibrate at all
- The game you are playing does not support vibration.
- Vibration is not turned on in the game settings.
- Android mode does not support vibration.
- What should I do if the button remapping goes wrong, cursor shakes or auto order execution happens?
Use a pin to push the reset button on the back of the controller.
After-sale services
Read the following information to get better services.
Dear customers:
Thank you for purchasing EasySMX products. If you have any problems or suggestions, please contact us quickly and we will answer you as soon as possible.
Contact Information
United States: easysmx@easysmx.com
United Kingdom: easysmx@easysmx.com
France: fiona@easysmx.com
Germany: leslie@easysmx.com
Spain: support.es@easysmx.com
Italy: support.it@easysmx.com
Russia: support.ru@easysmx.com
Japan: support.jp@easysmx.com

Follow us to get a free gift special discount and our latest news
EasySMX co., Limited
Email: easysmx@easysmx.com
Web: www.easysmx.com
Documents / Resources
References
Download manual
Here you can download full pdf version of manual, it may contain additional safety instructions, warranty information, FCC rules, etc.
Download EasySMX Arion 9110 (ESM-9110) - Game Controller Manual
Advertisement


Need help?
Do you have a question about the Arion 9110 and is the answer not in the manual?
Questions and answers