Table of Contents
Advertisement
Quick Links
Advertisement
Table of Contents

Related Manuals for Ole Hickory Pits CTO-TQ


Summary of Contents for Ole Hickory Pits CTO-TQ
- Page 2 Contact your pre-approved service company. Contact OLE HICKORY PITS, during the next regular business day that the required work has been completed and defective parts have been returned. Failure to follow the above may result in warranty claim being denied.
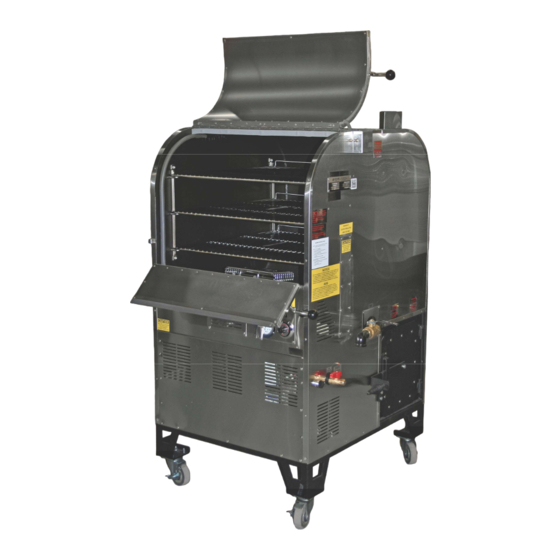
- Page 3 OLE HICKORY PITS 4077 Nash Road Scott City, MO 63780 Owner’s Manual for Model CTO-TQ Installation & Operating Instructions Notice: These instructions should be affixed to the unit or adjacent to your Ole Hickory Pit Please retain this manual for future reference...
- Page 4 Ole Hickory Pits must be secured for stationary installation on a level; impervious floor (concrete or comparable). Floor has to support 490 to 620 pounds at all times.
-
Page 5: General Specifications
General Specifications Dimensions: Over-all Depth: 38” 59” Width: 34 1/4” Height: Height w/door open: 72’’ Weight: 500 lbs, uncrated Materials: Basic Frame: 16 gauge steel welded to ¾’’ tubular steel Interior Sidewall: 12 gauge steel Front: 22 gauge stainless steel, type 304 #4 finish Sides, Top &... -
Page 6: Electrical Specifications
Electrical Specifications Specifications: 120 Volts, 60 HZ, 1 Phase AVOID NON-GROUNDED EXTENSION CORDS 15 amp Wiring Inspections: 1. Electrical receptacles must be wired in accordance with local codes and supplied by a qualified electrician. 2. All Switches should be in the “OFF” position prior to power cord plug insertion into receptacle. -
Page 7: Gas Piping Instructions
Gas Piping Instructions Gas Requirements Flexible hose must be used for the installation of all Ole Hickory Pits. A manual shut-off valve MUST be supplied in the gas line between the unit and the meter in an easily accessible location. A low-pressure regulator is required to maintain correct gas pressure to the burner. -
Page 8: Burner Instructions
Burner Instructions ALLOW A FIVE (5) MINUTE COMPLETE SHUTOFF PERIOD BEFORE APPLIANCE IS RE-LIGHTED. Initial Start of Burner: 1. Remove service access panel. 2. Check burner for proper connection to gas lines. 3. Turn gas supply to burner on. 4. Replace service access panel. 5. -
Page 9: Read Carefully
⚠ ⚠ ***IMPORTANT*** READ CAREFULLY POSITIVE AIR FLOW through the air MUST shutter on the burner be maintained for safe and proper operation of the unit(s). Burner air flow may be affected by one or a combination of the following. Improper flue installation. -
Page 10: Safety Tips
Safety Tips Please Read & Follow All Safety Instructions! The area surrounding the Ole Hickory Pit MUST be kept clear of combustible materials. DO NOT STORE OR USE GASOLINE OR OTHER FLAMMABLE VAPORS OR LIQUIDS IN THE VICINITY OF THIS OR ANY OTHER APPLIANCE. Venting air MUST NOT be obstructed form reaching the pit. - Page 11 Please maintain a minimum safety clearance from surrounding materials as follows: Combustible Construction Noncombustible Construction Back: 2’’ Right Side: 12’’ Wall Left Side: 2” -When placed next to a wall. 12" 12" 2" Please maintain a minimum safety clearance from surrounding materials as follows: Combustible Construction Noncombustible Construction Back: 2’’...
- Page 12 Picture shows a CTO, however the same principles apply for the Model CTO-DW and Model CTO-TQ. Locally Approved Hood Locally Approved Hood 22" Between CTO Locally Approved Hood System Front View Side View Convecture Tri Ovens, when installed inside a building or enclosed mobile kitchen, should be installed under a Locally Approved Hood System, as the example shown above.
- Page 13 *The following are examples of non-approved venting of CTO. Please be aware that if you vent this way it will VOID your warranty. Example 1 – Non-approved Venting:...
- Page 14 Example 2 – Non-approved Venting:...
- Page 15 How To Calibrate The Thermostat After the smoker has heated for about an hour, if the Thermometer & Thermostat DO NOT agree… Follow This Procedure: Thermometer Thermostat After removing knob, locate the screw inside the shaft. If the thermometer reads lower than the thermostat, turn slotted screw...
- Page 16 Operating Instructions Plug the power cord into a grounded receptacle. Place 3 to 4 Chunks of wood, per smoking cycle, into the wood basket. DO NOT OVERLOAD Slide the wood basket in the middle of the firebox chamber away from the burner flame. Close the fire box door.
- Page 17 Operating Instructions Continued Set the thermostat to the desired cooking temperature. Optimum cooking temperature is between 160-225˚ F, for best results we recommend cooking temperature of 225˚ F. Do not exceed 275˚ F. Operating above 275˚ F may result in tripping the “HIGH LIMIT”...
-
Page 18: Maintenance And Cleaning
Be sure to clean both chimneys with a brush every 6 months. (chimney brushes are provided with smoker from Ole Hickory Pits) Grease should be drained from the unit DAILY. Please remove any meat debris before to prevent clogging the drain. -
Page 19: Maintenance Schedule
Maintenance Schedule ⚠WARNING⚠ BEFORE PERFORMING ANY MAINTENANCE OR CLEANING MAKE SURE UNIT IS DISCONNECTED FROM POWER SUPPLY AND GAS IS TURNED OFF ! Maintenance How Often Clean Ashes from Firebox Daily Drain Grease Daily Clean Fan Blade After every 10-15 cook cycles (There is an extra blade and an Allen wrench inside the cooking chamber, so you can continue to cook, just replace w/extra blade and then rotate as needed to keep clean) Sensor Probes... - Page 21 Thank you for choosing Ole Hickory Pits/CTO-TQ. We’re sure you’ll be pleased with your new cooking equipment. Ole Hickory Pits/CTO-TQ's Limited Warranty applies to the ORIGINAL user to be free of defects in material and workmanship for a period of 1 year. Retain your dated ORIGINAL sales receipt as proof of purchase. The full warranty is printed on the reverse side of this card for your information.
- Page 22 Ole Hickory Pits – CTO-TQ Limited Ole Hickory Pits/CTO-TQ warranties its products and components to be free from defects due to faulty workmanship or defective materials at time of shipment and under normal use and service for (1) year from date of purchase. This LIMITED WARRANTY does not extend or apply to Ole Hickory Pit s/ CTO-TQ, or any component thereof, which has been misused, neglected, improperly installed or otherwise abused.
- Page 23 Equipment which is defective in material or workmanship and which is removed within the specific time period will be repaired or replaced as follows: 1. All service work to be performed is to be pre-approved by Ole Hickory Pits prior to the service call. CALL 1-800-223-9667.
- Page 25 Model CTO-TQ Cooking Capacity Chart Rack Size: (3) 26.5” X 26.5” Cooking Surface: 14.63 Sq. Ft. (All item counts are estimated) Est. Item Capacity St. Louis Style Ribs (3-lbs & down) Butts (10-lbs each) Whole Chicken (3.25-lbs each) ½ Chicken (1.6-lbs each)
Need help?
Do you have a question about the CTO-TQ and is the answer not in the manual?
Questions and answers