Table of Contents
Advertisement
Available languages
Available languages
Advertisement
Table of Contents

Summary of Contents for gologi Deluxe Outdoor Camera
- Page 1 Deluxe Buiten Camera Handleiding – Deluxe Outdoor Camera User Manual –...
-
Page 2: Table Of Contents
NL - Nederlands ..............3 1. INLEIDING ..........................4 2. BEOOGD GEBRUIK .......................5 3. HET PAKKET .......................... 5 3.1. Inhoud ........................5 3.2. Uitpakken ........................6 3.3. Veiligheid Tijdens het Uitpakken ................6 4. TECHNISCHE SPECIFICATIES ....................8 5. PRODUCT ONDERDELEN ....................10 6. CAMERA INSTALLATIE ......................11 7. - Page 3 EN - English ..............59 1. INTRODUCTION ......................... 60 2. INTENDED USE ........................61 3. THE PACKAGE ........................61 3.1. Contents ........................61 3.2. Unpacking ........................62 3.3. Safety During Unpacking ..................62 4. TECHNICAL DATA......................64 5. PRODUCT PARTS ....................... 66 6. CAMERA INSTALLATION ....................67 7.
-
Page 4: Nederlands
NL - Nederlands Deluxe Buiten Camera Handleiding - 3 -... -
Page 5: Inleiding
De afbeeldingen in de handleiding zijn alleen ter illustratie en kunnen lichtjes afwijken van het product. Gologi is in dat geval niet verplicht de handleiding aan te passen. Gebruik het werkelijke product als referentie. -
Page 6: Beoogd Gebruik
2. BEOOGD GEBRUIK De Gologi Deluxe Buiten Camera is een apparaat dat video kan opnemen vanaf een locatie zonder medeweten van de proefpersonen en wordt voornamelijk gebruikt voor bewakingsactiviteiten. Het apparaat wordt bediend via de Gologi-app op een smartphone of tablet. -
Page 7: Uitpakken
3.2. Uitpakken Haal alles uit de verpakking en controleer op beschadigingen. Als dit het geval is, gebruik of installeer de Camera dan niet. Wees zeer voorzichtig bij het openen van de verpakking om schade aan het product te voorkomen. Vergelijk alle onderdelen met de verpakkingsinhoud. Mis je een onderdeel, of je hebt een beschadigd onderdeel, neem dan contact met ons op via e-mail support@gosmart.eu. - Page 8 WAARSCHUWING: Wurggevaar. Kabels, snoeren of koorden die langer zijn dan 18 cm (7 inch) kunnen schadelijk zijn voor baby's en zeer jonge kinderen. Kinderen kunnen verstrikt raken tijdens het spelen met de kabel. Laat de kabel niet rondslingeren. WAARSCHUWING: Scherpe pin. Kleine kinderen kunnen zich (ook in de ogen) prikken tijdens het spelen met de reset pin.
-
Page 9: Technische Specificaties
4. TECHNISCHE SPECIFICATIES Productnaam Deluxe Buiten Camera Product model GO005 Merk Gologi Kleur Wit & Zwart Bijhorende app Gologi Certificeringen CE, RoHS, FCC Voedingsspanning Camera voedingsspanning 12V dc Voedingsadapter - Ingang: 100-240 V ac; 50/60 Hz; 0,4 A - uitgang: 12 V dc; 1 A; 12 W... - Page 10 Audiocompressie Netwerk WiFi 802.11b/g/n 2.4GHz (niet compatibel met 5GHz wifi-netwerk) Wireless Security WEP, WPA, WPA2 Remote Access Beweging Bewegingen volgen Ondersteund Bewegingsdetectie Ondersteund Opslag Micro SD kaart (TF kaart) Maximale ondersteuning 128 GB (Aanbevolen klasse 10, 32 GB) Cloud Ondersteuning voor cloudopslag Camera Beweging Draaien (horizontaal) 310 °...
-
Page 11: Product Onderdelen
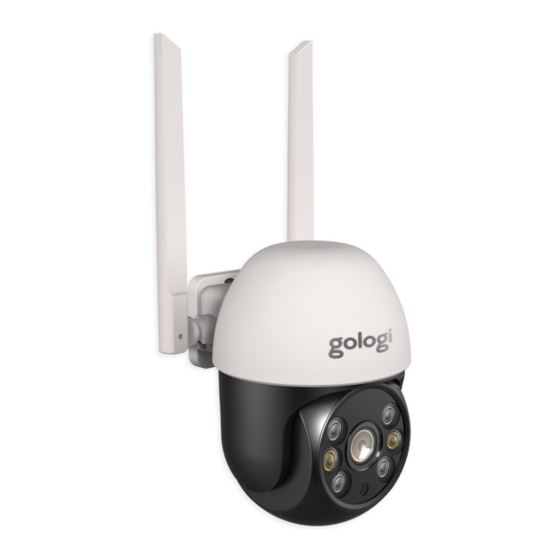
5. PRODUCT ONDERDELEN ③ ④ ⑤ ① ⑥ ⑦ ② ⑧ ⑨ ① Witte LED's ⑥ IR-sensor ② Voedingsinterface (12V DC) ⑦ Microfoon ③ Luidspreker ⑧ TF-kaartsleuf ④ Infrarood LED's ⑨ Reset knop ⑤ Lens - 10 -... -
Page 12: Camera Installatie
6. CAMERA INSTALLATIE NOTES: - Het wordt aanbevolen om jouw Camera in te stellen met de app voordat je de fysieke installatie uitvoert (zie het volgende hoofdstuk). - Gebruik de live playback op je telefoon om een installatieplek met het beste zicht te kiezen. - Zorg ervoor dat er een stopcontact in de buurt van jouw camera is. -
Page 13: Camera Voedingsaansluiting
④ Plaats de gaten van de montagebeugel boven de geboorde gaten schroef kruiskopschroevendraaier schroeven in de pluggen. Draai de schroeven niet te vast aan. ⑤ Schuif de camera op de montagebeugel. 7. DE CAMERA VOEDINGSAANSLUITING • Gebruik alleen de meegeleverde 12 V dc voedingsadapter om de camera van stroom te voorzien. -
Page 14: Camera Micro Sd-Kaart
De iOS (Apple) versie is vergelijkbaar. 9.1. Downloaden De Gologi-app is te vinden in de App Store (Apple) of in Google Play (Android). Je kunt de app echter ook downloaden via de QR-code op de volgende pagina. -
Page 15: De App Installeren
9.2. De App Installeren Open de App Store (Apple) of Google Play (Android), zoek naar Gologi en installeer de app op je mobiele telefoon. - 14 -... -
Page 16: Een Account Aanmaken
9.3. Een Account Aanmaken Wanneer je de app voor het eerst Druk op de Sign Up knop om een start, User account aan te maken. Aanmel- Agreement en de pagina Privacy den is een eenmalige actie. Als je Policy. Druk op de Agree knop. de app herstart nadat je een account hebt aangemaakt, hoef je alleen maar in te loggen door... - Page 17 Gebruik je e-mailadres om je aan Er wordt een registratieverifi- te melden. Het land/de regio van catie-code verzonden naar het de app is standaard hetzelfde als e-mail adres dat je hebt inge- de instelling in je mobiele telefoon. voerd. Je kunt dit bij jouw aanmelding Deze code is slechts 30 minuten wijzigen.
- Page 18 Voer de 6-cijferige verificatie- Kies een goed, sterk en veilig code in. wachtwoord (6-20 tekens met een combinatie van letters en cijfers) en druk vervolgens op de Done knop. Met dit account kun je nu inloggen en al je apparaten beheren. Je ontvangt ook meldingen op dit account.
- Page 19 Je kunt maar 1 account aanmaken met hetzelfde e-mailadres. Wanneer je een tweede account probeert aan te maken met hetzelfde e-mailadres, zie je de onderstaande prompt: Druk op de Cancel knop om te annuleren of op de Confirm knop om in te loggen.
-
Page 20: Inloggen
9.4. Inloggen Je kunt inloggen door jouw regio, e-mailadres en wachtwoord in te voeren. Plaats het vinkje naast het privacybeleid en klik op de Log In knop. - 19 -... -
Page 21: Wachtwoord Vergeten
9.5. Wachtwoord Vergeten Als je het wachtwoord bent Klik op de Get Verification Code vergeten, vul dan jouw regio en knop. jouw e-mailadres in. Klik dan op Forgot Password. - 20 -... - Page 22 Er wordt een registratieverifi- Kies een goed, sterk en veilig catie-code verzonden naar het e- wachtwoord (6-20 tekens met mail adres dat je hebt inge- een combinatie van letters en voerd. Deze code is slechts 30 cijfers) en druk vervolgens op de minuten geldig.
-
Page 23: Apparaten Toevoegen Of Verwijderen In De App
(Personalization). Je kunt dit aanvinken of negeren. Klik op de Go to App knop om de app te gebruiken. OPMERKING: Dit is een eenmalige actie. De Gologi- app toont deze pagina niet meer nadat je de selectievakjes hebt aangevinkt. -
Page 24: Wifi-Voorbereiding
10.2 WiFi-Voorbereiding OPMERKING: De Camera ondersteunt alleen een 2,4 GHz WiFi-netwerk. Controleer voordat je begint met installeren of je router een 2,4 GHz-kanaal heeft. Je kunt dit navragen bij jouw provider. Je provider kan een kanaal voor je openen. • Stel de routerparameters in voordat je de WiFi configureert. Zorg ervoor dat jouw router is verbonden met internet. - Page 25 + knop (rechterbovenhoek). de Camera optimaal te kunnen gebruiken, moet je altijd alle toestemmingen geven of akkoord gaan met de Gologi app. Vooral bij het eerste gebruik zal de app meerdere keren om toestemming vragen. Het aanvragen van toegangs-...
- Page 26 Gologi wil jouw locatiegegevens gangsrechten. gebruiken. Klik op de Continue knop. Klik op de Allow all the time knop. OPMERKING: Dit is een eenmalige actie. De Gologi-app zal dit niet opnieuw vragen nadat je dit hebt toegestaan. - 25 -...
- Page 27 Op de Add Device pagina selec- Klik op de Next knop. teer je Cameras en Deluxe Out- door Camera. - 26 -...
- Page 28 Klik op de Next knop. Klik op de Next knop. - 27 -...
- Page 29 Plaats het vinkje naast next step. Een hele belangrijke stap is het Klik op de Next knop. kiezen van het juiste Wifi netwerk. De Camera ondersteunt geen 5 GHz netwerk. Je moet vooraf het juiste 2,4 GHz netwerk hebben ingesteld. Als je het niet hebt gedaan, open dan je telefooninstellingen en selecteer het juiste WiFi-netwerk.
- Page 30 Sta de locatietoegang toe om de Schakel de locatietoegang in. app te laten zoeken naar WiFi- Verlaat deze pagina door op de < apparaten in de buurt. knop linksboven te klikken. Klik op de Settings knop. - 29 -...
- Page 31 Klik op de Continue knop. te nemen. Klik op de Allow all the time knop. OPMERKING: Dit is een eenmalige actie. De Gologi-app zal dit niet opnieuw vragen nadat je dit hebt toegestaan. - 30 -...
- Page 32 Scan de op jouw mobiele telefoon zichtbare QR-code met de camera. OPMERKINGEN: Houd een afstand van 15 tot 20 cm Houd het scherm van jouw tussen de mobiele telefoon en de mobiele telefoon ongeveer 5 tot camera van de Camera. Wanneer 10 seconden voor de camera.
- Page 33 De Gologi-app probeert nu verbin- De Camera verschijnt op de ding te maken met de Camera. Het Device pagina. toevoegen van het apparaat kan standaardnaam voor even duren. apparaat is "Gologi - Deluxe configuratie succesvol outdoor camera”. Je kunt de wanneer je de Camera "Camera...
- Page 34 Verlaat de Add Device pagina door Jouw apparaat is nu toege- op de Done knop te klikken. voegd aan de app en is zicht- baar op de Home pagina. - 33 -...
- Page 35 Don’t show this message again en formatie gaat over het auto- klik op de Test knop. matisch laten starten van de app. Klik op de Next knop. OPMERKING: Dit zijn eenmalige acties. De Gologi-app zal dit niet nog een keer vragen. - 34 -...
- Page 36 De tweede informatie gaat over Je Camera is nu verbonden met het instellen van het batterijge- de Gologi-app en is klaar voor bruik van jouw telefoon. Klik op gebruik. de Done knop. Je ziet direct het camerabeeld verschijnen op je telefoon of als je op het apparaat op de Home pagina klikt.
-
Page 37: Loskoppelen Van De App
10.4 Loskoppelen van de App Klik op het pictogram met de 3 Selecteer het apparaat dat je wilt stippen op de Home pagina. verwijderen. Zorg ervoor dat je Klik vervolgens op Device Mana- het juiste apparaat selecteert gement. voor het geval er meerdere ap- paraten in de lijst staan. - Page 38 Klik op de Confirm knop om het Het wissen is gelukt wanneer je apparaat te verwijderen. een toon hoort. Klik op de Cancel knop als je het Het apparaat is nu verwijderd apparaat niet wilt verwijderen. Device Management pagina. Klik op de Done knop. - 37 -...
-
Page 39: Real-Time Preview Interface
11. DE REAL-TIME PREVIEW INTERFACE 11.1. De Camera-Instellingen en het Gebruik Normaal scherm Zoom Door op knop 6 te klikken kun je Door op knop 16 te klikken schakel overschakelen naar een grotere je terug naar de standaard weer- weergave (zoom) zoals weerge- gave zoals weergegeven in de geven in de afbeelding rechts. - Page 40 Video stream Video stream Landscape weergave Standaard weergave 4 19 OPMERKING: Je kunt in- of uitzoomen op de afbeelding door jouw vingers scherm jouw mobiele telefoon te gebruiken. Als je op het (pijlpictogram) klikt, ga je terug naar de All Devices pagina in Home pagina.
- Page 41 Maak een foto (screenshot) van wat je ziet in de real-time preview. De foto wordt opgeslagen in de galerij van je telefoon. Spreek knop. Druk hierop om met de Camera te praten. Voor deze functie moet je toegangsrechten verlenen (zie hoofdstuk 11.3).
- Page 42 Alarm. Hier kom je op de Detection Alarm Settings pagina terecht. - Zet het Bewegingsdetectiealarm aan of uit. - Zet Motion Tracking aan of uit. - Stel een opnameschema in Herhalen: (eenmalig of kies de dagen voor de opname). • Notitie: voeg tekst/informatie toe aan het opnameschema.
-
Page 43: De Instellingen (Settings) Pagina
11.2. De Instellingen (Settings) Pagina - 42 -... - Page 44 Als je op het (pijlpictogram) klikt, keer je terug naar het normale scherm van de real-time preview-interface. De naam van het apparaat. Je kunt het pictogram en de naam wijzigen en de locatie van de Camera instellen. Apparaat informatie. De apparaatinformatie omvat het e-mailadres van de eigenaar, het IP-adres, de apparaat-ID en de tijdzone.
- Page 45 Apparaat delen. Je kunt het apparaat hier op verschillende manieren met 1 of meerdere personen delen. De persoon met wie je het apparaat deelt, moet de app hebben geïnstalleerd en een Gologi-account hebben. Toevoegen aan startscherm. Hier kun je een snelkoppeling naar de camera op jouw bureaublad plaatsen.
-
Page 46: Toegangsrechten: Eenmalige Acties
Klik op mobiele telefoon. Klik op de Allow de Continue knop. all the time knop. OPMERKING: Dit is een eenmalige actie. De Gologi-app zal dit niet opnieuw vragen nadat je dit hebt toegestaan. - 45 -... - Page 47 Klik op de foon. Klik op de Allow all the time Continue knop. knop. OPMERKING: Dit is een eenmalige actie. De Gologi-app zal dit niet opnieuw vragen nadat je dit hebt toegestaan - 46 -...
-
Page 48: Me Pagina
12. DE ME PAGINA Op deze pagina kun je enkele persoonlijke instellingen voor jouw Gologi-account maken. Op de volgende pagina worden de belang- rijkste instellingen heel kort uitgelegd. knop brengt je naar de instellingen (settings) pagina. De instellingen zijn heel gemakkelijk te begrijpen. -
Page 49: Veiligheidsinstructies
Deze veiligheidsinstructies zijn bedoeld om je de informatie te geven die je nodig hebt om de Gologi Deluxe Buiten Camera te gebruiken en om dergelijke gevaren te voorkomen. Gezond verstand en respect voor het apparaat helpen het risico op letsel te verminderen. -
Page 50: Algemene Apparaat Veiligheid
13.1. Algemene Apparaat Veiligheid • Gebruik de Camera niet voor een ander doel dan waarvoor het bedoeld is (zie het hoofdstuk “BEOOGD GEBRUIK”). • De Camera is ontworpen en bedoeld voor huishoudelijk gebruik en is niet geschikt voor commercieel of industrieel gebruik. •... -
Page 51: Personen & Gebruik
13.2. Personen & Gebruik • De Camera is geen speelgoed. Houd en bewaar het apparaat buiten bereik van kleine kinderen. • De Camera kan worden gebruikt door kinderen van 8 jaar en ouder en personen met verminderde fysieke, zintuiglijke of mentale capaciteiten of gebrek aan ervaring en kennis als ze onder toezicht staan of instructies hebben gekregen over het veilige gebruik van het apparaat en ze de daaruit voortvloeiende gevaren begrijpen. -
Page 52: De Stroomkabel
veroorzaken. Neem contact op met een gekwalificeerde elektricien om het losse of versleten stopcontact te vervangen. • Om voedingsadapter koppelen, neem adapterbehuizing vast en trek je de adapter uit het stopcontact. • Als tijdens het gebruik de stroom uitvalt, schakel het apparaat dan onmiddellijk uit en trek de voedingsadapter uit het stopcontact. -
Page 53: Hitte & Koeling
13.5. Hitte & Koeling • Dek het apparaat niet af terwijl het opgeladen wordt, omdat dit kan leiden tot oververhitting van de Camera. Dit vormt een risico op brand, elektrische schokken of letsel. • Zorg voor een goede ventilatie rondom het apparaat tijdens het gebruik. -
Page 54: Reiniging
14. REINIGING • Haal altijd de voedingsadapter uit het stopcontact voordat je de camera reinigt. • Een licht vochtige of droge doek wordt aanbevolen voor het reinigen van de buitenkant van de Camera. Droog af met een zachte doek. • Pas op dat je tijdens het schoonmaken niet te veel druk op de Camera uitoefent. -
Page 55: Onderhoud & Service
• Neem voor ontbrekende accessoires zoals de handleiding, software of andere items contact met ons op via bovenstaand e-mailadres. • Stuur in geval van defect het product terug naar Gologi met een beschrijving van het defect, het aankoopbewijs en alle toebehoren. -
Page 56: Opslag & Transport
16. OPSLAG & TRANSPORT • We raden aan om de Camera schoon te maken voordat je het apparaat voor lange tijd opbergt. • Bewaar de Camera op een stofvrije plaats die niet wordt blootgesteld aan zonlicht en vochtigheid. • Bewaar de Camera niet bij extreem hoge of extreem lage temperaturen. -
Page 57: Afvalverwerking & Recyclage
17. AFVALVERWERKING & RECYCLAGE 17.1. Verwijdering van het Apparaat Dit product voldoet aan de richtlijn voor afgedankte elektrische en elektronische apparatuur 2012/19/EU (WEEE). Het symbool met de doorstreepte vuilnisbak op het apparaat geeft aan dat het product op het einde van zijn levenscyclus afzonderlijk van het gewoon huishoudelijk afval moet worden afgedankt en hiervoor naar een centrum voor gescheiden afvalophaling... -
Page 58: Verwijdering Van Het Verpakkingsmateriaal
18. GARANTIE & AANSPRAKELIJKHEID Gologi garandeert dat dit product gedurende één jaar vanaf de aankoopdatum vrij zal zijn van materiaal- en fabricagefouten. Deze garantie is van toepassing op producten die voor persoonlijke... - Page 59 Gologi behoudt zich het recht voor om op elk moment, zonder kennisgeving of verplichting, wijzigingen aan te brengen in de handleiding, kleuren, specificaties, accessoires, materialen en modellen.
-
Page 60: English
EN - English Deluxe Outdoor Camera User Manual - 59 -... -
Page 61: Introduction
The images in the manual are for illustrative purposes only and may differ slightly from the product. In that case, Gologi is not obliged to adjust the manual. Use the actual product as a reference. 1. INTRODUCTION Congratulations on your purchase of the Gologi Deluxe Outdoor Camera. -
Page 62: Intended Use
2. INTENDED USE The Gologi Deluxe Outdoor Camera is a device that can capture video from a location without the subjects' knowledge and is mainly used for surveillance activities. The device is operated via the Gologi app on a smartphone or tablet. It connects to the internet via Wi-Fi and can send notifications to the user. -
Page 63: Unpacking
3.2. Unpacking Remove everything from the packaging and check for damage. If this is the case, do not use or install the Camera. Be very careful when opening the package to avoid damage to the product. Compare all parts with the package contents. If you are missing a part, or if you have a damaged part, contact us by e-mail: support@gosmart.eu. - Page 64 WARNING: Strangulation Hazard. Cables, cords, or strings longer than 18 cm (7 inches) can be harmful to babies and very young children. Children may get entangled while playing with the cable. Do not leave the cable lying around. WARNING: Sharp pin. Small children can prick themselves (also in the eyes) while playing with the reset pin.
-
Page 65: Technical Data
4. TECHNICAL DATA Product name Deluxe Outdoor Camera Product model GO005 Brand Gologi Color White & Black Applicable app Gologi Certifications CE, RoHS, FCC Power Supply Camera power supply 12V dc Power adapter - Input: 100-240V ac; 50/60Hz; 0.4A - Output: 12V dc; 1A; 12W... - Page 66 Network WiFi 802.11b/g/n 2.4GHz (not compatible with 5GHz WiFi network) Wireless Security WEP, WPA, WPA2 Remote Access Motion Motion Tracking Supported Motion Detection Supported Storage Micro SD Card(TF Card) Maximum support 128GB (Recommended Class-10, 32GB) Cloud Support cloud storage Movement Pan (horizontal) 310°...
-
Page 67: Product Parts
5. PRODUCT PARTS ③ ④ ⑤ ① ⑥ ⑦ ② ⑧ ⑨ ① White LEDs ⑥ IR sensor ② Power interface (12V dc) ⑦ Microphone ③ Speaker ⑧ TF card slot ④ Infrared LEDs ⑨ Reset button ⑤ Lens - 66 -... -
Page 68: Camera Installation
6. CAMERA INSTALLATION NOTES: - It is recommended to set up your Camera with the app before physical installation (see the next chapter). - Use the live playback on your phone to pick an installation spot with the best view. - Be sure that there is a mains outlet close to your camera. -
Page 69: The Camera Power Connection
⑤ Slide the Camera on the mounting bracket. 7. THE CAMERA POWER CONNECTION • Only use the provided 12V dc power adapter to power the Camera. Another adapter with the wrong specifications may cause malfunction and/or damage. • Connect the power interface of the Camera with the dc-connector of the power cable and connect the power cable with the power adapter. -
Page 70: The Camera Micro Sd Card
(Apple) version is similar. 9.1. Download The Gologi app can be found in the App Store (Apple) or in Google Play (Android). However, you can also download the app via the QR code on the next page. - 69 -... -
Page 71: Install The App
9.2. Install the App Open the App Store (Apple) or Google Play (Android), search for Gologi, and install the app on your mobile phone. - 70 -... -
Page 72: Creating An Account
9.3. Creating an Account When you start the app for the Press the Sign Up button to create first time, you will enter the User an account. Sign Up is a one-time Agreement and the Privacy Policy action. If you restart the app after page. - Page 73 Use your e-mail address to sign A registration verification code up. By default, the country/region will be sent to the e-mail of the app is the same as the address you entered. setting on your mobile phone. You This code is only valid for 30 can change this when registering.
- Page 74 Enter 6-digit verification Choose a good, strong, and code. secure password (6-20 characters with letters numbers), and then press the Done button. With this account, you can now log in and manage all your devices. You will also receive notifications on this account. - 73 -...
- Page 75 You can only create 1 account with the same e-mail address. When you try to create a second account by using the same e-mail address, then you will see the prompt below: Press the Cancel button to cancel or the Confirm button to log in. - 74 -...
-
Page 76: Log In
9.4. Log In You can log in by entering your region, e-mail address, and password. Place the checkmark next to the privacy policy and click the Log In button. - 75 -... -
Page 77: Forgot Password
9.5. Forgot Password have forgotten Click on the Get Verification Code password, enter your region and button. your e-mail address. Then Click on Forgot Password. - 76 -... - Page 78 A registration verification code Choose a good, strong, and will be sent to the e-mail address secure password (6-20 you entered. characters with a mix of letters This code is only valid for 30 and numbers), and then click the minutes.
-
Page 79: Adding Or Deleting Devices In The App
You can check this or ignore it. Click the Go to App button to use the app. NOTE: This is a one-time action. The Gologi app will not show this page again after you have marked the checkboxes. 10.1. Power Up the Camera 1. -
Page 80: Wifi Preparation
10.2. WiFi Preparation NOTE: The Camera only supports a 2.4 GHz WiFi network. Before you start installing, check that your router has a 2.4 GHz channel. You can check this with your provider. Your provider can open a channel for you. •... -
Page 81: Connecting With The App
+ button (upper right Camera corner). optimally, you must always grant or agree to give all permissions to the Gologi app. Especially during the first use, the app will ask for permission several times. Requesting permissions appear in another sequence than mentioned in this user manual. - Page 82 Gologi wants to use your location access permissions. info. Click on the Continue button. Click on the Allow all the time button. NOTE: This is a one-time action. The Gologi app will not ask this again after you have allowed it. - 81 -...
- Page 83 In the Add Device page, you Click on the Next button. select Cameras Deluxe Outdoor Camera. - 82 -...
- Page 84 Click on the Next button. Click on the Next button. - 83 -...
- Page 85 Place the checkmark beside next A very important step is to choose step. the correct WiFi network. The Click on the Next button. Camera does not support a 5 GHz network. You need to have set in advance the correct 2.4 GHz network. If you did not do it, then enter your phone settings and select the correct WiFi network.
- Page 86 Allow the location access to let Switch the Location access on. the app search for nearby WiFi Leave this page by clicking on the devices. < button on the top left. Click on the Settings button. - 85 -...
- Page 87 Click on the Continue button. Click on the Allow all the time button. NOTE: This is a one-time action. The Gologi app will not ask this again after you have allowed it. - 86 -...
- Page 88 Scan the QR code visible on your mobile phone with the Camera. NOTES: Keep a distance of 15 to 20 cm Hold the screen of your mobile between the mobile phone and the phone in front of the Camera Camera. When hear for about 5 to 10 seconds.
- Page 89 The Gologi app is now trying to The Camera will appear on the connect with the Camera. Adding Add Device page. The default the device can take some time. name for the device is “Gologi - configuration successful Deluxe Outdoor Camera”. You...
- Page 90 Leave the Add Device page by Your device is now added to the clicking on the Done button. app and is visible on the home page. - 89 -...
- Page 91 The first information is about on the Test button. how to let the app Autostart. Click on the Next button. NOTE: These are one-time actions. The Gologi app will not ask this again. - 90 -...
- Page 92 The second information is about Your Camera is now connected to how to set the battery usage of the Gologi app and is ready to your phone. Click on the Done use. button. You will immediately see the camera image appear on your phone or when you click on the device on the Home page.
-
Page 93: Disconnecting From The App
10.4. Disconnecting from the App Click on the 3 dots icon on the Select the device you want to Home page. remove. Make sure to select the Then click on Device Manage- correct device in case there are ment. multiple devices in the list. Click on Remove Device. - Page 94 Click on the Confirm button to The deleting is successful when delete the device. you hear a tone. Click on the Cancel button if you The device is now removed from do not want to delete the device. the Device Management page. Click on the Done button.
-
Page 95: The Real-Time Preview Interface
11. THE REAL-TIME PREVIEW INTERFACE 11.1. The Camera Settings and Use Normal screen Zoom Clicking on button 6 lets you Clicking on button 16 lets you switch to a bigger view (zoom) as switch back to the standard shown in the picture on the right. screen size as shown in the picture on the left. - Page 96 Video stream Video stream Landscape view Standard view 4 19 NOTE: You can zoom in or out on the image by using your fingers on the screen of your mobile phone. If you click on the (arrow icon) you go back to the All Devices page on the Home page.
- Page 97 Take a photo (screenshot) of what you see in the video. The photo will be saved in your phone's gallery. Speak button. Press to talk (communicate) with people in front of the camera. You need to grant access permissions for this function (see chapter 11.3).
- Page 98 Alarm. Here you enter the Detection Alarm Settings page. - Set the Motion Detection Alarm on or off. - Set the Motion Tracking on or off. - Set a schedule for recording Repeat: (once or choose the days for the recording). •...
-
Page 99: The Settings Page
11.2. The Settings Page - 98 -... - Page 100 If you click on the (arrow icon) you go back to the normal screen of the real-time preview interface. The name of the device. You can change the icon, and name and set the location of the Camera. Device Information. The device information includes the owner's e-mail address, IP address, device ID, and time zone.
- Page 101 You can share the device with 1 or more people here in various ways. The person you share the device with must have the app installed and must have a Gologi account. Add to Home Screen. Here you can place a shortcut to the camera on your desktop. You do have to give the app permission in your phone settings to create a shortcut.
-
Page 102: Access Permissions: One-Time Actions
Click on the Allow all the permissions. Click on the Continue time button. button. NOTE: This is a one-time action. The Gologi app will not ask this again after you have allowed it. - 101 -... - Page 103 Click on the Allow all the time sions. button. Click on the Continue button. NOTE: This is a one-time action. The Gologi app will not ask this again after you have allowed it. - 102 -...
-
Page 104: The Me Page
12. THE ME PAGE On this page, you can make some personal settings for your Gologi account. The most important settings are very briefly explained on the next page. button takes you to the settings page. The settings are very easy to understand. -
Page 105: Safety Instructions
These safety instructions are intended to give you the information you need to use the Gologi Deluxe Outdoor Camera and to avoid such hazards. Common sense and respect for the device will help reduce the risk of injury. -
Page 106: General Device Safety
13.1. General Device Safety • Do not use the Camera for any other purpose other than its intended use (see the chapter “INTENDED USE”). • The Camera is designed and intended for household use and is not suitable for commercial or industrial use. •... -
Page 107: Persons & Use
13.2. Persons & Use • The Camera is not a toy. Keep and store it out of the reach of small children. • The Camera can be used by children aged 8 years and above and persons with reduced physical, sensory, or mental capabilities or lack of experience and knowledge if they have been given supervision or instruction concerning the use of the device safely and they understand the resulting hazards. -
Page 108: Power Cable
• To disconnect the power adapter, grasp the adapter housing and pull the adapter out of the mains socket. • If the power fails during the operation, turn off the device immediately and pull the power adapter from the mains socket. •... -
Page 109: Heat & Cooling
13.5. Heat & Cooling • Do not cover the device while it is being used as this may cause the Camera to overheat. This poses a risk of fire, electric shock, or injury. • Make sure that the ventilation around the device is good during use. •... -
Page 110: Cleaning
14. CLEANING • Always unplug the power adapter from the mains socket before cleaning the Camera. • A slightly moist or dry cloth is recommended for cleaning the exterior of the Camera. Dry with a soft cloth. • Be careful not to put too much pressure on the Camera while cleaning. -
Page 111: Maintenance & Service
• For missing accessories such as the manual, software, or other items, contact us at the above-mentioned e-mail address. • In case of a defect, return the product to Gologi with a failure description, proof of purchase, and all accessories. -
Page 112: Storage & Transport
16. STORAGE & TRANSPORT • We advise cleaning the Camera before long time storage. • Store the Camera in a place not exposed to sunlight & humidity, and which is dust-free. • Do not store the Camera in extremely high or extremely low temperatures. -
Page 113: Disposal & Recycling
17. DISPOSAL & RECYCLING 17.1. Device Disposal This product complies with the Waste Electrical and Electronic Equipment Directive 2012/19/EU (WEEE). The crossed-out wheeled bin symbol on the device indicates that, at the end of its life, the product must be disposed of separately from normal household waste and taken to a separate collection center for the recycling of electrical and electronic equipment or returned to the seller at the time a new... -
Page 114: Warranty & Liability
18. WARRANTY & LIABILITY Gologi guarantees that for one year from the date of purchase, this product will be free from defects in materials and workmanship. This warranty applies to products used for personal purposes, and not for commercial or rental purposes. Gologi, at its discretion, will replace or repair this product or any component of the product found to be defective during the warranty period. - Page 115 Gologi cannot be held responsible for any lost data after, for example, removing or resetting the memory, factory reset or other causes due to lost data. Gologi reserves the right to make changes at any time, without notice or obligation, in the user manual, colors, specifications, accessories, materials, and models.
- Page 116 Florijnstraat 11 2988CL Ridderkerk Nederland : +31 88 202 38 00 support@gosmart.eu : : www.gosmart.eu © 2023 Gologi Made in China Document Versie/Version: 2023-03-27 - 115 -...
Need help?
Do you have a question about the Deluxe Outdoor Camera and is the answer not in the manual?
Questions and answers
Beste heer/ mevrouw, Hoe activeer ik het sd kaartje in de camera de luxe en zichbaar is op mijn Samsung mobiel.
To activate the SD card in the Gologi Deluxe Outdoor Camera and make it visible on your Samsung mobile:
1. Insert a C10 microSD card (Class 10 with a minimum write speed of 10MB/s) from a reputable brand into the camera. Ensure the card is formatted before use.
2. Power on the camera using the provided 12V DC power adapter.
3. Install the Gologi app on your Samsung mobile via the Google Play Store or using the QR code in the manual.
4. Create an account in the app, if not done already.
5. Add the camera to the app following the steps outlined in the manual:
- Scan the visible QR code with your phone's camera.
- Ensure the camera is connected to the app and shows as "Camera Online."
Once the camera is successfully connected to the app, recordings on the activated SD card should be visible within the app on your Samsung mobile.
This answer is automatically generated