Table of Contents
Advertisement
Advertisement
Table of Contents

Related Manuals for iENYRID iE-M4


Summary of Contents for iENYRID iE-M4
- Page 1 iE-M4...
- Page 2 USER MANUAL PLEASE READ THE INSTRUCTIONS CAREFULLY BEFORE RIDING Scan QR Code Or Enter URL for Online Installation Video https://www.youtube.com/watch?v=i4jBAiumX3U...
- Page 3 1、 This manual was written to help you undertsand the proper use and maintenance of the iENYRID line of Electric Scooter. 2、 It is important to understand the functions and features of the new iENYRID before operating it as it will allow you to enjoy it from every ride.
-
Page 4: Table Of Contents
CONTENT Product & Component Display ·······································································1~2 Product Parameters ···················································································· 3 Products & Accessories ··············································································· 4 Product Installation ····················································································5~7 Product Folding ························································································8~9 Power On & Unlock····················································································10 Safe Driving Warning ·················································································11~12 Battery & Charging ··················································································· 13~14 Error Code ····························································································· 15 After Sales ····························································································· 16 Limited Warranty ······················································································17 Warranty Card ··································································... -
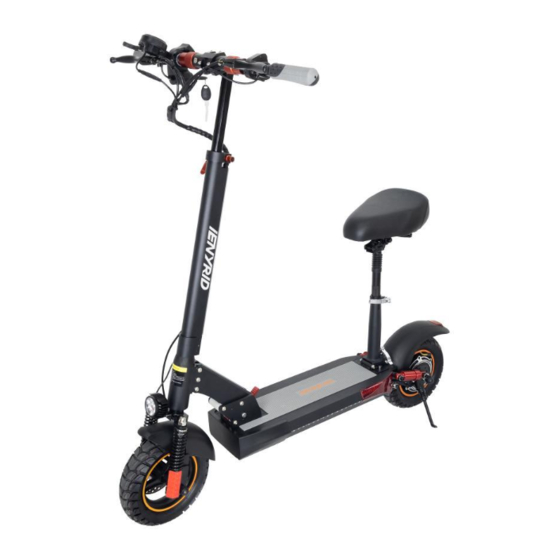
Page 5: Product & Component Display
Product & Component Display 08: Front brake 15: Rear brake 01: Instrument 16: Motor 09: Brake pads 02: Front brake lever 10: Front wheel 17: Rear shock absorber 03: Vertical pole buckle 18: Rear brake 11: Folding buckle 04: Vertical pole 12: Side light strip 19: Tail lights 05: Headlights... - Page 6 Product & Component Display 01: Rear Brake Control Bar 06: Voltmeter 11: Total mileage 02: Horn 07: Meter 12: Battery level 03: Turn Signal Switch 08: Front Brake Control Bar 13: Accelerator 04: Lamp Button 09: Gear 14: Power on button 05: Key Of Electric Lock 10: Speed 15: Gear position...
-
Page 7: Product Parameters
Product Parameters Model iE-M4 Tire Size 10 inch Battery 48V/10Ah Tyre Type Off-road Air tires Power 600W Charging time 6~8 hours Display Screen Color Frame Material Aluminum alloy Max Speed 25-45KM/H Net Weight 22.5KG Range 25-35KM Gross Weight 27.7KG Max Load... -
Page 8: Products & Accessories
Products & Accessories SERIAL NUMBER ITEM QUANTITY Charger Toolkit Seat Bag Instructions Lift Hands... -
Page 9: Product Installation
Product Installation Remove the scooter from the Tighten and fix the handlebars Lift the handlebar packaging box Press the folding button A clicking sound when quickly Ensure that the handlebars with your fingers lifting the handle indicates that are fixed unfold the vehicle body the vehicle is locked... - Page 10 Ensure that the folding buckle Install the seat tube by Correctly place the buckle pressing buckle is securely locked, which is a safety device prerequisite for safe driving inward with your fingers Take out the seat package parts and fix the large buckles on both Insert connecting rod Lock the seat pipe buckle sides of the seat pole by hand...
- Page 11 Insert the small buckle Screw in screws on both Put it into the seat bag for fixation sides Tighten the screws Insert the seat and secure Assembly completed with the wrench...
-
Page 12: Product Folding
Product Folding The rotating buckle safety Press the buckle safety device device is shown in the figure outward with your fingers Squeeze the front and rear brakes with both hands, and step on the Quickly and forcefully press down folding buckle with your feet... - Page 13 Put down the handlebar Turn out the handlebar Folding handlebars Folding completed...
-
Page 14: Power On & Unlock
Power On & Unlock Insert the key, turn it clockwise to turn on the power, and long press the power button the meter panel to turn it on After unlocking, please wear a helmet and protective gear before cycling, and ensure that all functions of the scooter are normal before starting your cycling. -
Page 15: Safe Driving Warning
Helmet: Most common and serious injuries from riding are head injuries. This can be prevented by dorning a helmet. You must wear a helmet when riding the iENYRID Scooter. The helmet must be warn according to their instruction. MECHANICAL SAFETY Before using the iENYRID Scooter: 1) Always perform a visual inspection of all screws and nuts are tight and in place. - Page 16 RIDING SAFETY Put one foot on the board and the other on the ground. Press the accelerator lever slightly,and the scooter accelerate, Put both feet on the board after you can keep balance. Press down the lever to speed the scooter up. Release the accelerator to slow down, Squeeze the brake lever at the left handle bar to stop the scooter.
-
Page 17: Battery & Charging
Battery & Charging BATTERY Do not charge indoors. - Do not turn on and operate the scooter while charging. - Keep the battery away from children, pets or direct heat. - Do not expose the battery to high temperature and pressure. - Please use the charger included with the scooter for charging. - Page 18 Battery & Charging First Charge It is important to fully charge the battery before your first use of the scooter. Your scooter ’s battery comes with these built-in features: 1. Balanced charging protection: During charging, the battery automatically balances the voltage among the internal cells to protect each cell.
-
Page 19: Error Code
Error Code Error Code Fault Diagnostic Step Solution Unplug the instrument and reconnect it, adjust and restore to factory settings, and If the problem persists, the meter Meter Failure check if the problem still exists. may need to be replaced Open the front corner plastic cover, unplug the motor Hall wire to check if the If the problem persists, the motor Motor Failure... -
Page 20: After Sales
We hope these videos will help you better understand and use our product. If you still have questions or concerns after watching the videos, please feel free to contact our customer service team, and we will be happy to assist you. Thank you again for your purchase and support! Wishing you a pleasant user experience! https://www.ienyrid.com https://www.youtube.com/@iENYRID https://www.facebook.com/iENYRID... -
Page 21: Limited Warranty
11. Defects or damages from improper storage, exposure to moisture or dampness, modifications, connections, repairs (except as carried out by iENYRID or its authorised centres), misuse, neglect, abuse, accident, alteration, improper installation, or other acts which are not the fault of iENYRID, including damage caused by dropping, blown fuses, liquid entering the interior of the product. -
Page 22: Warranty Card
Serial number Model Invoice Number Battery serial number Name Distributor Contact Note Shenzhen Tianshengle Robot Co., Ltd. Address: Room505, 5th Floor, Liuwei Business Center, Yangmei Longjing Road, Longgang District, Shenzhen city, China WhatsApp: +8613612953725 Customer support: support@ienyrid.com Official website: www.ienyrid.com...
Need help?
Do you have a question about the iE-M4 and is the answer not in the manual?
Questions and answers
Is there a serial number on the HENYRID MA4 , if so, where is it located?