Table of Contents
Advertisement
Quick Links
Advertisement
Table of Contents

Subscribe to Our Youtube Channel
Related Manuals for DOREGRILL MODEL Series

Summary of Contents for DOREGRILL MODEL Series
- Page 1 MODEL Baskets-roast...
- Page 2 DOREG RILL S.A.S.
-
Page 3: Table Of Contents
TABLE OF C ONTENTS TECHNICAL DESCRIPTION General description General components Control panel Rotisserie Dimensions Technical Data Intended use Electrical diagram General instructions Installation Electrical Connection MAINTENANCE Disassembly for Cleaning Longevity of Armored Elements Automatic Cleaning Cycle MAIN CAUSES OF TEMPERED GLASS BREAKAGE Thermal Shock Blows to the glass Handling... - Page 4 Specific repairs 8.2.1 Changing a Bulb ............................. 21 8.2.2 Opening of the technical housing ..................... 21...
- Page 5 1.2 Importance of the manual This manual aims to provide installers and users of DOREGRILL equipment with all the necessary information for optimal use, to extend its lifespan through regular and appropriate maintenance, to address minor incidents and breakdowns that often do not require the intervention of a specialist, and to avoid any risk of injury to its users by following the warnings and recommendations.
- Page 6 1.3 W arranty IMPORTANT: This device is for professional use. To avoid any danger, its operation should be carried out by qualified personnel. Parts that have been protected by the manufacturer or its representative should not be handled by the installer or the user.
- Page 7 Transport and handling 2.1 Transport and delivery 2.2 U npacking and handling...
-
Page 8: Technical Description
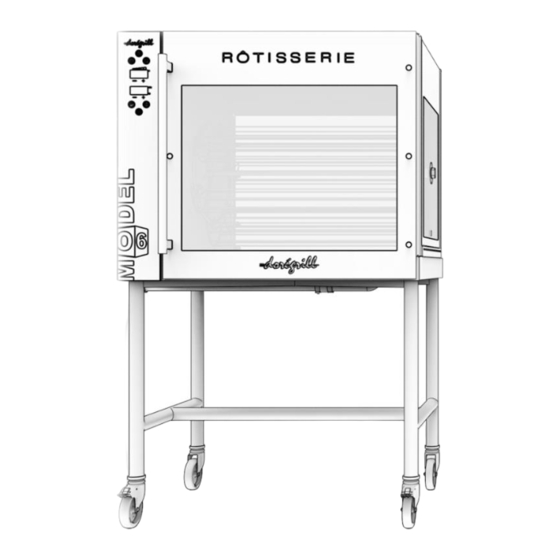
TECHNICAL DESCRIPTION 3.1 General description The MODEL 6 and MODEL 9 series are mounted on wheeled carts, two of which are equipped with brakes. (Fig. 2) The rotisseries consist of - Made of brushed stainless steel, it features a structure (base 1, ceiling 2, side and rear panels 3). -
Page 9: General Components
3.2 General components... -
Page 10: Control Panel
3.3 Control panel 1- Power light button 2- Cooking light button 3- Temperature maintenance light button (rotisserie in temperature maintenance mode aftercooking) 4- Motor rotation light button 5- Cleaning cycle light button 6- Probe light button (optional) A- Temperature display B- Time display... - Page 11 1- Power light touch button: touch and hold for a few seconds to activate or deactivate the touch screen controls. 2- Cooking light touch button: touch to start the cooking mode -> countdown is active. 3- Light and temperature maintenance touch button: touch to turn on/off. 4- Motor rotation control light touch button: touch to start/stop the motor.
-
Page 12: Rotisserie Dimensions
3.4 Rotisserie Dimensions Refer to Chapter 8, ‘’Technical Specifications’’. 3.5 Technical Data Refer to Chapter 8, ‘’Technical Specifications’’. 3.6 Intended use Our rotisseries are intended for cooking meats and poultry prepared for use in the hot food and catering sections of foodservice professionals. 3.7 Electrical diagram Refer to Chapter 8, ‘’Technical Specifications’’. -
Page 13: General Instructions
SETU P 4.1 General instructions The installation of rotisseries as objects (positioning and connection) must be carried out by authorized personnel with the technical and professional skills required to perform this installation in compliance with the standards in force in the country of use of this equipment. See Chapter 9, '’Installation’'. - Page 14 4.4 W ater connection 4.5 C ooking - Place the poultry in the rotisserie after poking and seasoning them. - Power on the touch screen control with button 1. - Select the cooking temperature using the + and - buttons (usually, 5 LEDs lit for poultry cooking).
-
Page 15: Maintenance
MAINTENANCE 5.1 Disassembly for Cleaning Inside the machine : accessories Remove the spits and their support. To remove the rotisserie's axis, ensure that the drive unit is in the vertical position. Inside the machine : ventilation cover fixed on the ceiling This maintenance should be performed at least once a week, more frequently in the case of frequent use. -
Page 16: Longevity Of Armored Elements
Cleaning the double glazing The separate opening of the two panes allows cleaning of all glass surfaces. 5.2 Longevity of Armored Elements All our armored resistances are of the "Incoloy" quality. They are located at the top of the appliance, on either side of the air distribution housing. Despite their quality, and given the power of the new cleaning products, these elements can be altered and weakened. -
Page 17: Automatic Cleaning Cycle
5.3 Automatic Cleaning Cycle This cycle assists in cleaning by generating steam for 15 minutes inside the cooking chamber. Procedure : - Connect the rotisserie to the water supply using the stainless steel sanitary hose provided with the machine. - Turn on the water tap. - Remove all accessories that need to be washed (axle, spits, etc.) - Turn off other programs and functions. -
Page 18: Main Causes Of Tempered Glass Breakage
MAIN CAUSES OF TEMPERED GLASS BREAKAGE 6.1 Thermal Shock The temperature difference between two specific points on the glass should not exceed 80°C. When this limit is exceeded, it can cause a point of rupture, leading to the glass shattering instantly. -
Page 19: Technical Specifications
TECHNICAL SPECIFICATIONS MODEL 6 MODEL 9 DIMENSIONS 1020 MM 1020 MM Overall length 775 MM 955 MM Overall depth 910 MM 1090 MM Height of the rotisserie on the stand/trolley 168 KG 239 KG Total empty weight 40 KG 60 KG Maximum load to be observed COMPOSANTS TECHNIQUES Number... -
Page 20: Maintenance / After-Sales Service
MAINTENANCE / AFTER-SALES SERVICE Any repairs on your device should be carried out by a qualified professional. 8.1 Fault finding This section aims to list the main breakdowns that any user may encounter, provide their possible causes, and offer solutions for addressing them without external intervention. DEFECTS POSSIBLE CAUSES REMEDIES TO BE APPLIED... - Page 21 8.2 Specific repairs 8.2.1 Changing a Bulb This operation can be performed by the user. IMPORTANT: Before changing a still hot light bulb, w ait a few minutes for it to cool dow n to avoid the risk of burns. Disconnect the electrical power supply to the rotisserie.
- Page 22 DIAG RAMS 9.1 Electrical Diagram for MODEL 6...
- Page 23 9.2 Electrical Diagram for MODEL 9...
- Page 24 9.3 Evacuation and Power Supply...
- Page 25 AC C ESSORIES Stand-up baskets Standard baskets Thighs baskets Large piece baskets Hollow tray Grid Large piece rotisserie Large piece rotisserie spit with forks spit Roof Rolling trolley...
- Page 26 Storage cabinet Warming cabinet Accessory references Accessories MODEL 6 MODEL 9 AC00008 Standard baskets AC00006 Stand-Up baskets AC00002 Thighs baskets AC00004 Large piece baskets AC00088 Hollow tray AC00044 Large piece rotisserie spit AC00028 Large piece rotisserie spit with forks AC00057 AC00058 Grid KIT0063...
Need help?
Do you have a question about the MODEL Series and is the answer not in the manual?
Questions and answers