Advertisement
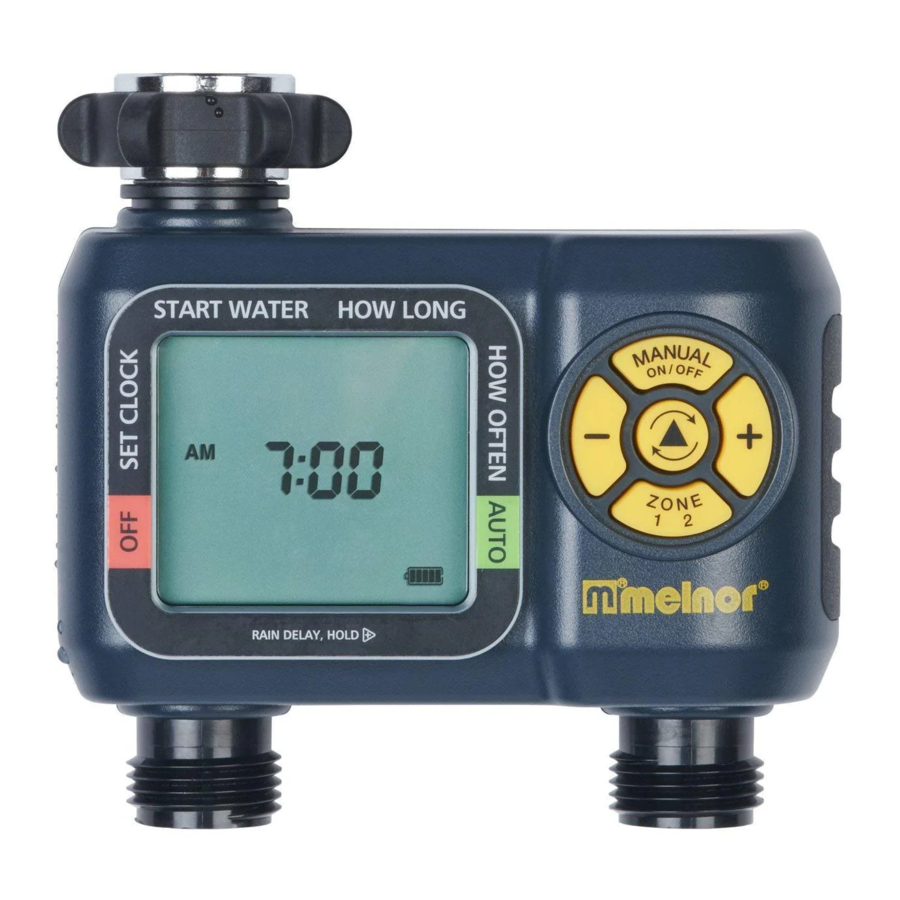
PARTS AND FEATURES

Understanding Zones
This is a two zone timer allowing you to water two different areas from the same faucet. Each zone can be programmed with up to four different start times.
Battery Installation & Assembly

Remove the battery holder from the back of the Timer Control Unit. Insert two AA alkaline batteries (Do not use rechargeable batteries) as indicated on the battery holder. Replace the battery holder, making sure that it is firmly and securely placed in the Timer Control Unit.
 NOTE: Do not use your timer when the air temperature is below 40oF (4.5oC).When storing your timer, be sure it is in a dry place and protected from frost.
We recommend replacing batteries when the indicator reaches:

Installation of the Timer
Attach the timer to an outside faucet and turn on the water. The water must be left on while the timer is attached to the faucet for your timer to operate.
NOTE: You may choose to program your timer before or after attaching it to the faucet.
SETTING THE CLOCK

Touch any button to wake the timer.
Using the  button, move the arrow to SET CLOCK.
Press the  &
&  buttons to adjust the clock to the current time.
Press the  button again to set the time and move to the next setting, START WATER.
SELECT WHEN TO WATER

With the arrow pointing to START WATER, use the  &
&  buttons to select the first time of the day you want to water. All remaining watering cycles during the day will be based on this time.
Press the button to move to the next setting.
Note: You will see Zone 1 highlighted at the bottom of the screen; program Zone 1 before moving on to Zone 2.
SELECT HOW LONG TO WATER

With the arrow pointing to HOW LONG, use the & buttons to select the length of each watering cycle.
Cycles can be up to 360 minutes (6 hours) in duration.
Press the  button to move to the next setting.
SELECT HOW OFTEN TO WATER

With the arrow pointing to HOW OFTEN, use the & buttons to select the watering frequency.
Watering can be as often as Every 1 Hour or little as Every 7 Days (once per week).
| EVERY 1 DAY | |||||||
| SUNDAY | MONDAY | TUESDAY | WEDNESDAY | THURSDAY | FRIDAY | SATURDAY | |
| EVERY WEEK |  | | | | | | |
| EVERY 2 DAY | |||||||
| SUNDAY | MONDAY | TUESDAY | WEDNESDAY | THURSDAY | FRIDAY | SATURDAY | |
| WEEK ONE | | | | ||||
| WEEK TWO | | | | | |||
| EVERY 3 DAY | |||||||
| SUNDAY | MONDAY | TUESDAY | WEDNESDAY | THURSDAY | FRIDAY | SATURDAY | |
| WEEK ONE | | | |||||
| WEEK TWO | | | | ||||
SETTING ANOTHER ZONE

When you have set START WATER, HOW LONG and HOW OFTEN for zone 1, press the  button to go back to START WATER.
Press  to select Zone 2, and repeat steps 4-6 above.
When all desired zones are set, press the button to enter AUTO mode.
AUTO MODE

After programming, the timer will be in AUTO mode.
The screen display will alternate between showing the current time and the next watering cycle of each zone.
If the next watering cycle is more than 24 hours away, the NEXT START TIME will be displayed in days instead showing a time.
RAIN DELAY MODE

If there is rain in the forecast, you can temporarily suspend your watering program on both zones for up to 7 days using the RAIN DELAY feature.
RAIN DELAY mode will stop all watering for up to 7 days.
After the selected delay has ended, your watering program will automatically resume.
To activate RAIN DELAY mode, make certain the arrow is pointing to AUTO.
Press the  key to select the delay period. You can reduce the delay period with the key.
In RAIN DELAY mode, the screen will toggle between the current TIME and the remaining DELAY time. If the delay is greater than 12 hours, the DELAY will be shown in DAYS.
OFF MODE

If you wish to stop watering for an extended period, push the  button until the arrow is pointing to OFF.
The timer will not water automatically while in this mode. The screen will display the word OFF in large letters.
To start watering automatically again, simply press the button until the arrow is pointing to AUTO. The program will begin watering at the next available Start Time.
Note: Watering will be stopped for both zones when this feature is activated.
MANUAL WATERING

To use a hose or other watering tool, simply press the  button. Then use the
  button to select which zone you want to use.
Using the  button, select the length of time you wish to water. After a few seconds, the valve will open, and then automatically close when the selected time is reached.
To quit the manual function, press the  button again.
Note: The timer will hold the last manual time in its memory. To reset the manual time back to zero, press the arrow keys to adjust the time.
TIMER RESET

If you need to completely erase all settings in the timer and return it to it's original state, press and hold the button for 7 seconds.
The screen will display RESET.
NOTE: All programming will be lost when the timer is RESET.

Intended for outdoor use only. Severe electrical shock could result if water is sprayed into outlets or sources of electrical current. Do not use water more than 115oF (46oC). Do not use when the ambient air temperature is less 40oF (4.5oC). When not in use, remove batteries, drain and store indoors away from freezing temperatures.

Documents / ResourcesDownload manual
Here you can download full pdf version of manual, it may contain additional safety instructions, warranty information, FCC rules, etc.
Download Melnor AquaTimer 63100 - Two-Zone Automatic Water Timer Manual
Advertisement


Need help?
Do you have a question about the AquaTimer 63100 and is the answer not in the manual?
Questions and answers