Table of Contents
Advertisement
Advertisement
Table of Contents

Related Manuals for Teeter FreeStep LT7


Summary of Contents for Teeter FreeStep LT7
- Page 1 GET STARTED Assembly & User Guide FreeStep Recumbent Cross Trainer ® ™...
-
Page 2: Table Of Contents
If you have any questions concerning assembly or if any parts are missing, DO NOT RETURN THE ITEM TO THE STORE OR CONTACT THE RETAILER. Our dedicated product service experts can help! Contact Teeter Customer Service at 800-847-0143, or via online forms or Live Chat at teeter.com. -
Page 3: Important Safety Instructions
BEFORE YOU BEGIN: Review all steps before beginning assembly and read all precautions before using the Teeter FreeStep. Carefully adhere to the Assembly Instructions and User Guide to help ensure safety and product integrity. IMPORTANT SAFETY INSTRUCTIONS READ ALL INSTRUCTIONS BEFORE USING THE TEETER FREESTEP WARNING FAILURE TO FOLLOW INSTRUCTIONS AND WARNINGS COULD RESULT IN SERIOUS INJURY OR DEATH. -
Page 4: Items For Assembly
I TE MS FOR AS S EM B LY Parts are not shown to scale. Hardware drawings located on the insert inside each Hardware Kit. ITEM NO. ITEM NAME ITEM NO. ITEM NAME Base Leg Cover Sets SE2731 Base SE2710 Leg Cover Sets SE2712 Power Adapter... -
Page 5: A Guide To Your Freestep
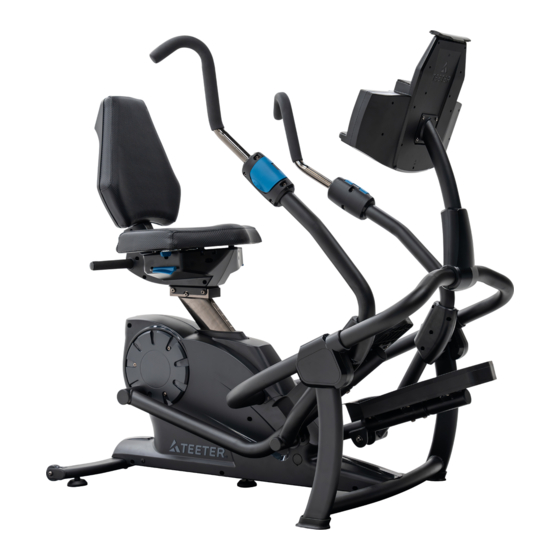
A GU I D E TO YO U R F RE E STE P Before reading further, study the drawing below to familiarize yourself with the important components of your Teeter FreeStep. LEFT FRONT BACK RIGHT Base Seat Back Assembly... -
Page 6: Safety Warning Labels And Product Specifications . . . . . . . . . . . . . . . . 4
This drawing indicates the locations of the warning labels found on your product (image and labels below not shown at actual size). If a label is missing, illegible or is removed, contact Teeter Customer Service to request a complimentary replacement label. WARNING... -
Page 7: Assembly Steps
DESCRIPTION ITEM QTY NET DIMENSIONS/DESCRIPTION NOTE 11/16/2023 8D A1: RELEASE FOR TEETER INTERNAL USE ONLY STEP 1 - INSERT CONSOLE SUPPORT BAR INTO BASE. BE SURE NOT TO PINCH THE CONSOLE WIRE ON THE LEFT SIDE WHEN INSERTING. Assemble Console Support Bar IMPORTANT: Do not pull or pinch the Console Wire during the Console Support Bar installation. - Page 8 S T E P 2 FIGURE 4 STEP 4.1 - FLIP THE MAHINE FORWARD AND LET IT REST ON THE CONSOLE SUPPORT BAR. IT IS RECCOMENDED TO USE SCRAP CARDBOARD OR A BLANKET ON THE FLOOR TO PROTECT THE FLOOR AND THE STEP 4.1 - FLIP THE MAHINE FORWARD AND MACHINE.
- Page 9 S T E P 3 FIGURE 4 Assemble Console to Console Post IMPORTANT: Do not pull or pinch the Console Wire during installation. Figure 8: Connect the Console Wire between the Console Post and the Console. Use the Step 3 Hardware Kit to attach the Console to the Console Post using the 4 ×...
- Page 10 Connect the Console Wire Figure 10: Connect the Console Wire between the Console Post and Console Support Bar. Connect the Power Adapter to the Base (refer to Page 14). Temporarily plug into a power source. To enable you to move the Linkage as needed in the remaining steps, you will need to disengage the Step Lock.
- Page 11 STEP 11 - INSTALL THE LEFT AND RIGHT LEG COVERS WITH SIX (6) PHILLIPS SCREWS, THREE (3) PER SIDE, USING THE PHILLIPS SCREW DRIVER. TAKE CARE TO NOT PINCH THE CONSOLE WIRE ON THE LEFT SIDE. NOTE, YOU MAY NEED TO MOVE THE LINKAGE SOME TO GAIN ACCESS TO SOME SCREW HOLES.
- Page 12 S T E P 8 Assemble Lower Seat Figure 14: Locate the Step 8 Hardware Kit. Position the Lower Seat into the slot in the Seat Post on the Base. TIP: Hold the seat slightly forward, then guide it down in a backward diagonal direction. When properly aligned, the round rod (Actuator) that protrudes out of the Lower Seat will need to rest inside of the mechanism...
- Page 13 S T E P 9 Assemble Pedals Figure 18: Locate the Pedals, noting Right and Left assembly stickers. Insert the Pedals into their respective Linkage Arms. Figure 18 Figure 19a: Hand tighten 4 × Bolts and 4 × Washers from the Step 9a Hardware Kit. Figure 19b: Hand tighten 8 ×...
- Page 14 S T E P 1 0 Assemble Seat Back Figure 20: Locate the Step 10 Hardware Kit. Insert the Seat Back Assembly onto the housing behind the Lower Seat and hand tighten 4 × Bolts and 4 × Washers. JOINT Proceed to fully tighten all the Bolts with the CREWS LTS USING...
- Page 15 S T E P 1 2 Assemble Forward Pivot Cover Sets Figure 22: Locate the Forward Pivot Cover Sets, noting Right and Left markings. Using the Step 12 Hardware Kit fully tighten 4 × Phillips Screws on each side using the Phillips Screwdriver.
-
Page 16: User Guide
USER G UI DE Leveling Figure 24: Make sure the FreeStep is on a flat, stable surface. If any of the 3 × Leveling Feet are not resting flat on the ground, rotate them clockwise to lower until they reach the ground. Powering On NOTE: Be sure that the 90-degree Adapter is attached to the standard Power Cord tip, which... - Page 17 U SER G UI DE CAUTION ALWAYS adjust Seat height before use to avoid injury to the knees. Proper feet placement and seat height will ensure that your knees never travel over your toes when bent, and that your leg does not lock out in full extension. Seat Height Adjustment Figure 29: To find your ideal Seat height, start with the seat in the lowest position.
- Page 18 U SE R GU ID E Seat Back Position Figure 33: The Seat Back adjusts to three (3) positions for customized support of the lower back while targeting different muscle groups during your workout. Figure 33 Figure 34-35: To adjust the Seat Back, pull up on the Seat Back Adjustment Lever under the Lower Seat (right), pull back on the Seat Back, and release the Lever once...
- Page 19 U SER GUIDE Handle Length Adjustment Figure 38: Release the locking mechanism by opening the Handle Cam Lock. Figure 38 Figure 39: Adjust the length in or out until you reach your desired setting. Close the Handle Cam Lock to secure the Handle in place. Figure 39 Figures 40-41: The Handle length should be set so that when your arms are fully extended, your...
- Page 20 U SE R G U I DE Grip Position The handles can be rotated to an Upright Grip or Lower Grip to target different muscle groups. Figure 42: To change grip position, open the Handle Cam Lock. Rotate the Handle into the desired position until you feel the Cam Lock housing engage into the ‘groove’...
- Page 21 U SER G UI DE Figure 45 Figure 46 Figure 47 Total Body Legs Only Arms Only Figure 45: For a balanced, Figure 46: Target your lower Figure 47: Target your upper full-body workout, use both body by only using your legs. body by only using your arms.
- Page 22 During your workout, your heart rate will be displayed and the Heart Icon will blink to your heart beat. For optimal performance, we recommend using the Teeter Wireless Heart Rate Monitor Chest Strap (available at teeter.com), which will automatically pair with the FreeStep Console.
-
Page 23: Console Display
U S ER GU IDE: CON SO L E DI S PL AY Button Controls MUTE BRIGHTNESS HOLD 2 SEC HOLD 3 SEC USER: Press to select a User Profile (1-4). To set up a new User Profile, press and hold. PROGRAMS: Press to enter the Programs list. - Page 24 US ER GU ID E: CON S OL E D I SPL AY Operation Start-Up Mode: The Console will enter the Start-Up mode if it is plugged into a power source, if any button is pressed, or if you start pedaling. The Program Text will read “Select Program or Press Start.”...
- Page 25 U S E R GUI DE: CON SO L E D I S PL AY Programs PRESET WORKOUTS: Cardio, Easy Trail, Stairs, Unwind, Keep Stepping, Mountain, Cruising, Rolling Hills, Uphill Climb, Fat Burn, Random, High Low, Interval, Valley, Pyramids, Downhill. To start a preset workout: Set Workout Time;...
- Page 26 After 15 minutes of inactivity on all other screens. • Console Software Updates: An app is available in the App Store and on Google Play called “Teeter Console Update”. The app will automatically sync to the Bluetooth ® on the FreeStep...
-
Page 27: Warranty And Registration
Warranty in no way extends the original Warranty period. Under no circumstances shall Teeter, or any other party involved in the sale of this product, have any liability for incidental or consequential damage arising from breach of an express or implied warranty on any Teeter product. - Page 28 This page intentionally left blank.
-
Page 29: Terms And Conditions
Teeter also offers a 30-Day Price Match Guarantee. If at any time within 30 days of placing your order, you find the same, new-condition model advertised in print or online by a Teeter authorized dealer for a lower price, send Teeter customer service a copy of the ad (dated and published within 30 days of placing your order) and they will either adjust your future payments for the new price or refund you the difference. - Page 30 Sites or these materials, whether or not the circumstances giving rise to such cause may have been within the control of Teeter or of any vendor providing software or services. In no event will Teeter or any such parties be liable to you, whether in contract or tort, for any direct, special, indirect, punitive, consequential or incidental damages, attorney fees, or any other damages of any kind even if Teeter or any other such party has been advised of the possibility thereof.
- Page 31 Coaching Every Step of the Way Access workouts and instructions anytime, anywhere. Our guided personal training is available to you with the free Teeter Move app. Designed to help you stay motivated and moving forward in your strength, endurance, and mobility training.
- Page 32 800-847-0143 U.S. and Foreign Patents Apply. Teeter and Teeter logo are registered trademarks of Teeter. Specifications subject to change without notice. © COPYRIGHT 2024 Teeter. International Law Prohibits Any Copying. SE2740 0324-0...
Need help?
Do you have a question about the FreeStep LT7 and is the answer not in the manual?
Questions and answers
I held the unlock button for 5 seconds and set the screen to manual, all the lights came on however when I pressed start the handles and paddles won't move.
The handles and pedals on the Teeter FreeStep LT7 may not move because the step lock is engaged. To unlock them, press and hold the step lock console button for 5 seconds.
This answer is automatically generated
How muuch does the base (SE2731) weigh without anything attached to it?