Advertisement
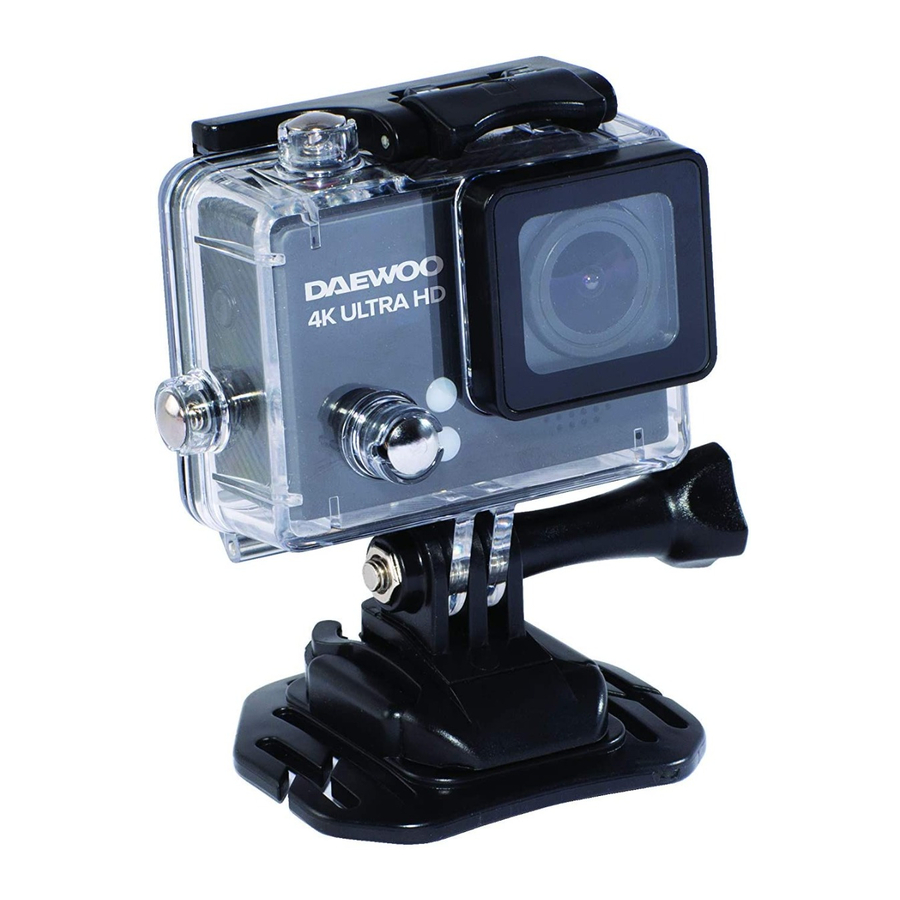
Description of Parts

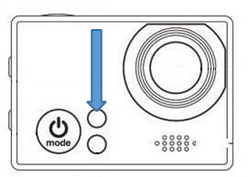
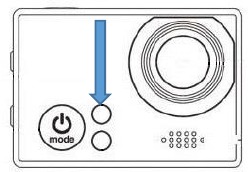
- Busy Indicator.
- Power/Mode Button.
- Wi-Fi Indicator.
- Lens.
- Microphone.
- OK Button/Shutter.
- Battery Compartment Door.
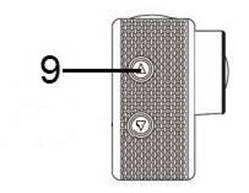
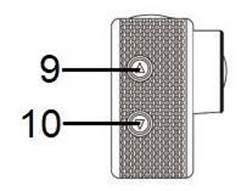
- Charging Indicator.
- Menu/Up Button.
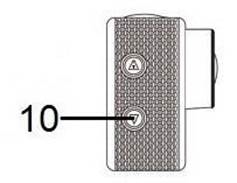
- Down/Wi-Fi Button.
- Micro SD Card Slot.
- Micro USB Charging Port.
- Micro USB Charging Cable.
- Helmet Mount.
- Handlebar Mount.
- Waterproof Case.
- Fixing Strap.
Charging Your Camera
Before first using your Camera, ensure it is fully charged as follows:
- Insert the Micro USB plug of the Micro USB Charging Cable (13) into the Micro USB Charging Port (12) on the side of the Camera.
- Insert the large USB plug into a suitable USB charger or computer USB outlet rated to at least 1 Amp. (most USB chargers and USB outlets are rated at 1 Amp or above).
- Whilst the Camera is on charge, the Charging Indicator (8) will glow red, once the internal battery is fully charged the Charging Indicator (8) will go out.
NB Charging time will take approximately 3 hours – remove the charging cable once the Camera is fully charged.
Storage Card
NB there is no built-in memory in this camera and therefore a memory card (not supplied) must be inserted before use.

- Insert a Micro SD memory card (not supplied) into the Micro SD Card Slot (11) on the side of the camera as shown left.
- To remove the card, gently press the card in and it will then automatically pop out.

We recommend a high-speed SD card of 6MB/s (class 6) or higher for best results. This camera will operate with memory cards of up to 64Gb in capacity.
Powering Up Your Camera

- Power On: Press and hold the Power/Mode Button (2) for approximately 3 seconds.
- Power Off: Press and hold the Power/Mode Button (2) for approximately 3 seconds.
Camera Modes
Briefly press the Power/Mode Button (2) on the front of the camera to step through the five camera modes:
- Video Recording – Record continuous video.
- Still Photographs – take single photographs.
- Time Lapse Video – Records a time lapse video.
- Playback – Playback photo and videos.
- Settings – Adjust the camera settings.
Video Recording Mode 1
Briefly press the Power/Mode Button (2) on the front of the camera until the camera is in video recording mode:

Briefly press the OK Button/Shutter button (6) to start the camera recording , press the button again to stop recording. The time of the length of the recording will be shown at the bottom centre of the screen next to a flashing red dot to show the camera is recording. The Busy Indicator (1) will also flash whilst recording (arrowed right).
Zooming
Press and hold the Menu/Up Button (9) to increase the zoom level to a maximum zoom of x4.
Press and hold the Down/Wi-Fi Button (10) to reduce the zoom level.
The set zoom level will be shown on the bottom right of the screen – see the diagram above.
NB the resolution will vary slightly while using the zoom settings.

Muting and Unmuting the Microphone
Whilst recording, briefly pressing the Menu/Up Button (9) will mute and unmute the Microphone (5).
NB the microphone symbol at the bottom left corner of the display will show as crossed out when the microphone is muted.
Still Photograph Mode 2
Briefly press the Power/Mode Button (2) on the front of the camera until the camera is in Still Photographs mode:

Briefly press the OK Button/Shutter button (6) to take a photograph. The Busy Indicator (1) will also flash to show when the photograph has been taken (arrowed right).
Zooming
Press and hold the Menu/Up Button (9) to increase the zoom level to a maximum zoom of x4.
Press and hold the Down/Wi-Fi Button (10) to reduce the zoom level.
The set zoom level will be shown on the bottom right of the screen – see the diagram above.
NB the resolution will vary slightly while using the zoom settings.
Time Lapse Video Mode 3
Briefly press the Power/Mode Button (2) on the front of the camera until the camera is in Time Lapse Video mode:

Briefly press the OK Button/Shutter button (6) to start the camera recording, press the button again to stop recording.
The time of the length of the recording will be shown at the bottom centre of the screen next to a flashing red dot to show the camera is recording. The Busy Indicator (1) will also flash whilst recording (arrowed right).

Zooming
Press and hold the Menu/Up Button (9) to increase the zoom level to a maximum zoom of x4.
Press and hold the Down/Wi-Fi Button (10) to reduce the zoom level.
The set zoom level will be shown on the bottom right of the screen – see the diagram above. NB the resolution will vary slightly while using the zoom settings.

Muting and Unmuting the Microphone
Whilst recording, briefly pressing the Menu/Up Button (9) will mute and unmute the Microphone (5).
NB the microphone symbol at the bottom left corner of the display will show as crossed out when the microphone is muted.

NB the Time Lapse mode is similar to Video Recording mode only that an image is taken every few milliseconds and so uses less memory on the SD Card.
Playback Mode 4
Briefly press the Power/Mode Button (2) on the front of the camera until the camera is in Playback mode:

Briefly press the Menu/Up Button (9) to move to the next video or photograph.
Briefly press and hold the Down/Wi-Fi Button (10) to move to the previous video or photograph.
NB Briefly press the OK Button/Shutter button (6) to start video playback. Briefly press the OK Button/Shutter button (6) again to stop video playback.
Settings Mode 5
Briefly press the Power/Mode Button (2) on the front of the camera until the camera is in Settings mode:

Setting Selection
Briefly press the Power/Mode Button (2) on the front of the camera to step through the five camera modes:
- Video Settings
- Photo Settings.
- Image Settings.
- Camera Settings.
- Exit Settings.
Briefly press the OK Button/Shutter button (6) to enter and select the option:
Briefly press the Power/Mode Button (2) to step back.
Briefly press the Menu/Up Button (9) and the Down/Wi-Fi Button (10) to scroll through options.
| |
| Video Resolution | 4K 30FPS/ 2.7K 30FPS/ 1080P 60FPS/ 1080P 30FPS/ 720P 120FPS/ 720P 60FPS/ 720P 30FPS (NB FPS = Frames Per Second) |
| Recording Sound | ON/OFF (Tick mark enables this function) |
| Time-lapse | Close (OFF) / 0.5S / 1S / 2S / 5S / 10S / 30S / 60S |
| Loop Recording | Close (OFF) / 2min / 3min / 5min |
| Slow Motion | 1080P@60FPS / 720P@120FPS |
| |
| Photo Resolution | 2m/ 5m /8m / 12m/ 16m |
| Timed | Close (OFF) 3S / 5S / 10S / 20S |
| Auto | Close (OFF) 3S / 10S / 15S / 20S / 30S |
| Drama Shot | 3P/S / 5P/S / 10P/S / OFF |
| |
| Exposure | -3 / +3 |
| White Balance | Auto / Sunny / Cloudy / Incandescent Light / Fluorescent Light |
| Image Rotation | ON/OFF (Tick mark enables this function) |
| Driving Mode | ON/OFF (Tick mark enables this function) |
| Light Source Frequency | Auto / 50Hz / 60Hz |
| LED Indicator Light | ON/OFF (Tick mark enables this function) |
| Auto Screensaver | 10S / 20S / 30S / OFF |
| Auto Shutdown | 1min / 3min / 5min / OFF |
| Time Watermark | ON/OFF (Tick mark enables this function) |
| |
| Language | English /German /French /Italian /Spanish /Polish /Dutch /Portugese /Traditional Chinese /Simplified Chinese /Turkey /Japanese /Russian /Korean. |
| Date - Time | 2015/01/01 12:00:00 |
| Format (clear memory card) | Confirmation / Cancel – NB Use this setting with caution as all images and videos will be erased permanently after Format. |
| Reset to Factory Settings | Confirmation / Cancel – Set the camera to original settings. |
| Firmware Version | This will display Model number, Version number, etc. |


| Micro SD Capacity | 4K@30FPS / 1080P@60FPS | 1080P@30FPS | 720P@60FPS |
| 32 GB | 120 Min | 240 Min | 320 Min |
| 16GB | 60 Min | 120 Min | 160 Min |
Using the USB Connection
After connecting the USB to Micro USB cable to a computer and the camera, 3 options are displayed on the camera screen:
![]() USB Mode:This will show the contents of the memory card on the computer. Use your computer file manager to view or copy files. For best results whilst playing back video on a computer, we recommend the use of a HD (high definition) video player such as VLC which can be www.videolan.org. ;
USB Mode:This will show the contents of the memory card on the computer. Use your computer file manager to view or copy files. For best results whilst playing back video on a computer, we recommend the use of a HD (high definition) video player such as VLC which can be www.videolan.org. ;
![]() PC/Web Camera: This will allow you to use the camera as a webcam when connected to your computer as follows:
PC/Web Camera: This will allow you to use the camera as a webcam when connected to your computer as follows:
- Ensure there is a formatted micro SD card inserted – see camera settings above.
- Power up the camera by holding the Power/Mode Button (2) for 3 seconds.
- Insert the micro USB cable (other end plugged into your computer).
- Select 'PC Camera' using the side up down menu buttons (9&10) and confirm using the top OK/Shutter Button (6)
- Enable camera on your PC, etc.
![]() Charge Mode: This will charge the internal battery in the camera from the computer USB port.
Charge Mode: This will charge the internal battery in the camera from the computer USB port.
Briefly press the Menu/Up Button (9) and the Down/Wi-Fi Button (10) to scroll through options:
Briefly press the OK Button/Shutter button (6) to select the desired option.
Wi-Fi and Smart Device Use
Your Action Camera can pair with a Wi-Fi enabled device such as a smartphone to control the camera remotely.
To enable this function on your smartphone, download and install the 'XDV' application from the Google Play or Apple Store:

Power up the camera and switch on Wi-Fi mode on the camera by briefly pressing the Down/Wi-Fi Button (10).
Enable Wi-Fi on your Smartphone and search for new Wi-Fi connections on your smartphone, connect to the camera which will be "AVS1360".
Should you be prompted for a password this will be displayed on the screen on the camera. Now open the XDV application on your smartphone and you will be able to control the camera remotely from your phone.
After using the Wi-Fi application, switch off the Wi-Fi mode on the camera to conserve the battery.
Technical Specification
| Model Number | AVS1360 |
| LCD | 2.0 LTPS |
| Lens | 170 Degree A + High-Resolution Wide-Angle Lens |
| Video | MP4 |
| Compression Format | H.264 |
| Memory | Micro SD Card up to 64GB |
| Light Source Frequency | 50Hz / 60Hz |
| USB | USB 2.0 |
| Video Time | 1080p / 90 Minutes |
| Power Supply/Charger | DC 5V 1A |
| Battery | Li-ion, 1150 mAh 3.8V 4.37Wh |
| Charge Time | Approximately 3 Hours |
| Weight | 70g |
| Dimensions (Approx.) | 40mm (h) x 58mm (w) x 30mm (d) Approx. |
| Operation temperature | 0°C to + 40°C |
| This product conforms to Radio Equipment Directive 2014/53/EU | |
IMPORTANT SAFEGUARDS
When using electrical appliances, basic safety precautions should always be followed.
These instructions should be saved for future reference:
- Read and familiarise yourself with all operating instructions before using your Camera.
- Before using your Camera, visually check that the unit is intact and has not suffered any transit damage.
- Only charge the Camera from a suitable USB outlet, any other power source may cause permanent damage to the product.
- The Camera must be fully charged via the USB port before use.
- Do not operate this Camera after a malfunction or after being dropped or damaged in any way.
- Never allow children to play with the Camera. Small parts may be a choking hazard.
- Do not allow the USB charging cable to hang over sharp edges or come in contact with hot surfaces.
- This Camera is intended for household use only and should not be used for industrial purposes.
- Do not use this Camera for anything other than its intended use.
- Do not immerse the Camera in water or any other liquids.
- Do not expose the Camera to moisture, rain or humidity without it's outer case fitted as it is not waterproof.
- Before cleaning, ensure the Camera is not connected to the USB supply.
- Never clean the Camera with solvents or harsh or abrasive cleaners.
- Do not attempt to dismantle the Camera, it does not contain any user serviceable parts.
- Keep the Camera away from any strong magnetic interference such as electrical machinery, TV's, etc. where strong radio waves might be damaging to the product and effect the sound or image quality.
- Do not expose the Camera to high temperature or direct sunlight.
- We recommend using high quality Micro SD Cards with fast write speeds for best, reliable recording.
- Do not place Micro SD Cards near strong magnetic objects to avoid file corruption.
- Store the Camera in a cool dry place free from extreme temperatures, humidity or dust.

Documents / Resources
References
Download manual
Here you can download full pdf version of manual, it may contain additional safety instructions, warranty information, FCC rules, etc.
Advertisement
Need help?
Do you have a question about the AVS1360 and is the answer not in the manual?
Questions and answers