Table of Contents
Advertisement
Quick Links
Sitter On Cue
TM
Instruction Manual
Sitter On Cue
®
Instruction Manual
The Posey Sitter On Cue Alarm
is an important part of your falls
management program.
Ensure all parts of this system
are operational before leaving
a patient unattended.
8645
Before using the Posey Sitter On Cue, read this entire manual and save for future reference.
44U00092-D
Advertisement
Table of Contents

Related Manuals for TIDI Posey Sitter On Cue


Summary of Contents for TIDI Posey Sitter On Cue
- Page 1 Ensure all parts of this system are operational before leaving a patient unattended. 8645 Before using the Posey Sitter On Cue, read this entire manual and save for future reference. 44U00092-D...
-
Page 2: Table Of Contents
Contents Before You Begin ......................... 3 Features of the Sitter On Cue ....................4-5 Contents and Bracket Options ...................... 6 Preparing the Sitter On Cue for Use ...................7-8 Setting Alarm Mode ........................9-10 Setting Alarm Tone........................11 Adjusting Alarm Volume ......................12 Time Delay .......................... -
Page 3: Before You Begin
Description: Posey Sitter On Cue Fall Monitor for use with wired sensors and nurse call cable. Intended use: Alerts staff of attempted bed, chair, stretcher, commode, or toilet seat exits by patients at risk for falls. -
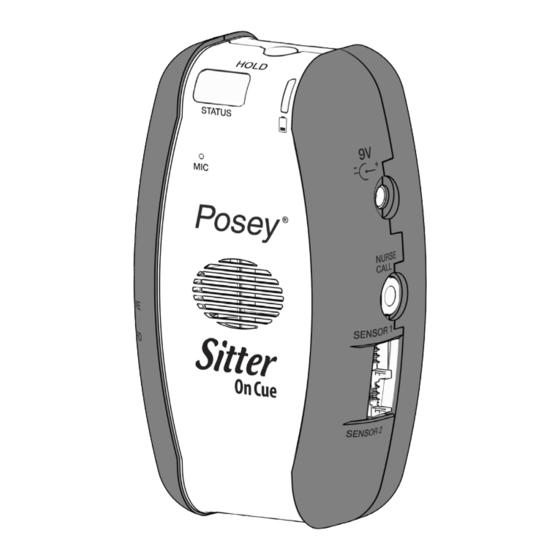
Page 4: Features Of The Sitter On Cue
FEATURES Features of the Sitter On Cue REAR VIEW (OPEN BATTERY DOOR) Sitter On Cue 44U00092-D... - Page 5 Failsafe sensor alarm. The Posey Sitter On Cue activates if the alarm is monitoring and a sensor • cord is removed from the alarm.
-
Page 6: Contents And Bracket Options
CONTENTS AND BRACKET OPTIONS Each Sitter On Cue is shipped to you with: Alarm (1) • “AA” Alkaline batteries (4) • Instructions for Use • NOTE: The Sitter On Cue can optionally be run on AC power using an authorized AC power adapter (8383AC). -
Page 7: Preparing The Sitter On Cue For Use
PREPARING Preparing the Sitter On Cue for Use Battery Installation: Fresh alkaline batteries have an estimated life of 30 days of daily use. Actual life depends on alarm mode, tone and volume you select. 1. Slide the power switch to the OFF position before inserting/ changing batteries (Fig. - Page 8 STATUS LIGHT KEY FLASH ALARM STATE DESCRIPTION Sensor is connected and pressure is being Green Active Monitoring applied to the sensor pad or sensor belt is fastened. The sensor will activate and begin monitoring Yellow Ready as soon as pressure is applied to a connected sensor pad or the sensor belt is fastened When pressure is applied to a sensor, the alarm Rapid Yellow...
-
Page 9: Setting Alarm Mode
SETTING MODE Setting Alarm Mode The Sitter On Cue has four (4) alarm modes. These allow you to select an alarm notification best suited to patient and facility needs. Mode Features Depending on whether a custom voice recording is made, either the factory default VOICE &... - Page 10 SETTING MODE Setting Alarm Mode (Continued) 4. When “Voice Only” or “Mute” are selected, you must have the nurse call cable plugged into your alarm and the appropriate wall jack for your nurse call system. Ensure that the nurse call system indicators (nursing station and wall light) are activated when the cable is unplugged from the wall jack.
-
Page 11: Setting Alarm Tone
SETTING TONE Setting Alarm Tone The Sitter On Cue has seven (7) available tones. This allows you to differentiate between patients and other equipment alarms. To Select Tone: 1. Lift the programming control protective cover (Fig. 4). 2. Ensure alarm is on. 3. -
Page 12: Adjusting Alarm Volume
ADJUSTING VOLUME Adjusting Alarm Volume There are three (3) alarm volume settings: low, medium and high (default setting). These allow you to select the right volume for facility and/or patient needs. All volume settings are within OSHA standards. For maximum staff alert in noisy areas, use HIGH (loudest) volume setting. -
Page 13: Time Delay
TIME DELAY Time Delay The delay is the time that will elapse AFTER weight is removed from sensor pad or sensor belt is unfastened, and BEFORE alarm activates. Set a delay, if any, to meet the needs of each patient. The Sitter On Cue gives you the option of a 0, 1, or 2 second alarm delay. -
Page 14: To Record A Message
RECORDING A MESSAGE To Record a Message The Posey Sitter On Cue has a feature that allows a caregiver or family member to communicate a verbal “warning” message about unassisted sensor pad exits or unfastening of the sensor belt without having to be physically in the room with the patient. -
Page 15: The Hold Button
THE HOLD BUTTON The HOLD Button (Sensor Use ONLY) NOTE: HOLD feature will work only when the alarm is actively monitoring or alarming. To Place the Alarm on HOLD: 1. Press HOLD button on the top of alarm (Fig. 11) The STATUS LED will begin flashing RED indicating the alarm is in HOLD mode. - Page 16 THE HOLD BUTTON To Place the Alarm on EXTENDED HOLD: 1. Press HOLD button on the top of alarm (Fig. 11) for 3 seconds. The STATUS LED will begin flashing RED indicating the alarm is in HOLD mode and an audio cue will say “5 minute HOLD activated”.
-
Page 17: Connecting To Ac Power (Optional)
Connecting to AC Power (Optional) The Posey Sitter On Cue is equipped with a DC jack to allow you to use AC power to operate the alarm. To ensure proper alarm function and to prevent damage to the alarm, use only an authorized... -
Page 18: Nurse Call Interface
2. Insert the other end of cable into wall jack of nurse call panel. Depending on your system, you may need a “Y” nurse call adapter to use the Posey Sitter On Cue and the patient nurse call device at the same time. - Page 19 NURSE CALL INTERFACE Nurse Call Interface (Continued) FOR SAFE USE WITH NURSE CALL CABLE: DO NOT stretch or strain cable to avoid possible damage and possible malfunction. • DO NOT attach cable to moving parts of the bed or chair that will cause strain or •...
-
Page 20: Latching Mode
LATCHING MODE Latching Mode In non-latching mode (factory default), when weight is re-applied to a sensor or the sensor belt is reattached the Sitter On Cue will stop signaling the nurse call system. When Latching mode is selected and an alarm signal is initiated, the nurse call signal will cease only when the caregiver interacts with the alarm. -
Page 21: Monitoring With A Sensor
• FAILSAFE FEATURE The Posey Sitter On Cue contains a “failsafe” feature that activates the Posey alarm if the sensor is removed from the alarm when actively monitoring. To silence the alarm, reconnect the sensor to the same sensor port from which it was removed. - Page 22 MONITORING Monitoring with a Sensor (Continued) FOR SAFE USE OF ALL SENSOR TYPES: To reduce the risk of serious injury or death, ALWAYS follow these steps after putting the sensor in place and before leaving patient unattended (see instructions below). DO NOT use any alarm or sensor that does not alarm each time it is tested.
-
Page 23: Monitoring With Two Sensors
MONITORING Monitoring with Two Sensors Two sensors can be connected to the alarm allowing the patient to be transferred from one location to another without moving sensors or switching out cords. Transferring a Patient between sensors 1. Connect the second sensor to the alarm. 2. -
Page 24: The Sitter On Cue And Use Of Physical Restraints
USE OF PHYSICAL RESTRAINTS The Sitter On Cue and Use of Physical Restraints If the patient’s care plan calls for the use of a restraint, staff should read and follow all instructions and warnings for the restraint. The position of the sensor pad is vital when using a restraint. Make sure the restraint is applied correctly per instructions for that device. -
Page 25: Warnings And Cautions
• batteries and potential corrosion. The Posey Sitter On Cue is an electronic device. It may fail to work if subjected to severe shock, • such as being dropped, or immersed in liquid. To reduce the risk of serious injury or death, test the alarm and sensor for proper operation prior to putting in service with a patient, and each time before leaving the patient unattended. - Page 26 WARNINGS AND CAUTIONS Warnings and Cautions (Continued) To reduce the risk of serious injury or death, ALWAYS follow these steps after putting the sensor in place and before leaving patient unattended. DO NOT use any alarm or sensor that does not alarm each time it is tested.
-
Page 27: Mounting The Sitter On Cue
MOUNTING Mounting the Sitter On Cue There are multiple mounting options to choose from for the Sitter On Cue: The Sitter On Cue ships with the 8276 bracket listed below. If you plan to use the Sitter On Cue for stretcher sensor monitoring or commode sensor monitoring, please refer to the Instruction Sheets for these products, 8316 and 8333. - Page 28 MOUNTING HEAD/FOOTBOARD MOUNTING – TO MOUNT THE 8276 WIRE BRACKET: 1. Slide alarm onto bracket from top down until it is firmly in place (Fig. 17). 2. Choose location on head or footboard where patient cannot reach or tamper with the alarm or connections.
- Page 29 MOUNTING Chair/Wheel Chair Mounting WITH THE 8276 WIRE BRACKET 1. Choose location on back of chair back where patient cannot reach or tamper with the alarm or connections. 2. Slide alarm onto bracket from top down until it is firmly in place (Fig. 17 page 27). 3.
-
Page 30: Alarm Cleaning, Storage And Battery Maintenance
CLEANING, STORAGE, MAINTENANCE Alarm Cleaning, Storage and Battery Maintenance Cleaning: Sensor, Cables and Alarm Housing (exterior ONLY) Dampen (but DO NOT soak) a clean cloth with disinfectant. Wipe alarm clean, using care not to get disinfectant inside speaker grill and connector ports. To reduce the risk of damage, NEVER: Use any cleaning substance that contains Phenol •... -
Page 31: Troubleshooting Guide
TROUBLESHOOTING GUIDE Troubleshooting Guide PROBLEM: Continuous alarm with patient in bed or chair. POTENTIAL CAUSE: Chair Sensor Pad SOLUTIONS: Check that sensor pad cord and plug are clean and undamaged. Check plug connection • to alarm. Check sensor pad for creases or damage to cover. •... - Page 32 TROUBLESHOOTING GUIDE Troubleshooting Guide (Continued) PROBLEM: Intermittent Alarm while the patient is in a bed or chair. SOLUTIONS: Check that sensor cord and plug are clean and undamaged. Check plug connection to alarm. • Check sensor pad for creases or damage to vinyl cover. •...
- Page 33 TROUBLESHOOTING GUIDE Troubleshooting Guide (Continued) POTENTIAL CAUSE: Belt Sensor SOLUTIONS: Check that all connections are tight and properly plugged into the alarm. • Check the “DELAY” setting. • PROBLEM: Alarm volume is too low or too loud. SOLUTION: Press the VOLUME button on the side of alarm to change volume setting. Continue tapping the •...
-
Page 34: Alarm Specifications And Warranty
Latching and non-Latching modes. System default is non-latching Configuration Four Year Warranty TIDI Products, LLC warrants, for a period of four (4) years after date of manufacture (the “Warranty Period”), that the Posey Sitter On Cue (“Alarm”) is free of defects in materials and workmanship. -
Page 35: Useful Life
USEFUL LIFE Useful Life The useful life of the alarm is 4 years from the date of manufacture. The year of manufacture is located on the back of the alarm. It is the first 2 digits of the serial number. If alarm is found to be beyond 4 years from manufacture, please contact Customer Service (1.800.521.1314). - Page 36 Sitter On Cue ® Instruction Manual TIDI Products, LLC • 570 Enterprise Drive, Neenah, WI 54956 USA • Phone: 1.800.521.1314 Fax: 1.800.767.3933 • www.tidiproducts.com © 2024 TIDI Products, LLC. All rights reserved. M6273 REV D 2024-01-17 On Cue and Posey are registered trademarks of TIDI Products, LLC.
Need help?
Do you have a question about the Posey Sitter On Cue and is the answer not in the manual?
Questions and answers