Table of Contents
Advertisement
Quick Links
Advertisement
Table of Contents

Related Manuals for Faro Freestyle 2


Summary of Contents for Faro Freestyle 2
- Page 1 Freestyle 2 User Manual August 2020...
-
Page 2: Legal Notices
FARO Freestyle 2 User Manual Legal Notices Legal Notices Release Notice This is the August 2020 version of the Freestyle 2 User Manual. It applies to the Freestyle 2 and the © mobile PC. FARO Technologies Inc., August 2020. All rights reserved. -
Page 3: Table Of Contents
FARO Freestyle 2 User Manual Contents Contents Legal Notices Copyright Notice Contents Chapter 1: General Information Notes and Signs Chapter 2: Safety Precautions Intended Use General Safety Information Laser Safety Electrical Safety Mechanical Safety Data Safety Safety During Work Transport... - Page 4 Decide How to Carry the Mobile PC Prepare the Smartphone Chapter 6: Scanning with Freestyle 2 Typical Workflow for a Freestyle 2 Scan Project Attach the Phone to the Handset Place the Phone on the Handset Connect the Handset to the Mobile PC...
- Page 5 FARO Freestyle 2 User Manual Contents General On-Site Compensation Compensation Data and Report Cleaning Instructions for Lens Protection Mobile PC Chapter 11: Disposal Appendix A: Working with Markers Appendix B: Technical Support Appendix C: Technical Data General Performance Specifications Laser (Optical Transmitter)
- Page 6 FARO Freestyle 2 User Manual Contents FARO Freestyle 2 (August 2020) Page 6 of 58...
-
Page 7: Chapter 1: General Information
FARO Freestyle 2 User Manual Chapter 1: General Information Chapter 1: General Information Notes and Signs DANGER: A DANGER notice denotes a hazard. It calls attention to an operating procedure or practice that, if not correctly performed or adhered to, will result in personal injury or death. -
Page 8: Chapter 2: Safety Precautions
• Do not use parts which have not been supplied or recommended by FARO. • Use only replacement parts authorized by FARO and according to the instructions obtained from FARO. • Do not expose the devices to extreme temperatures. The ambient temperature must not be lower or higher than given in the specifications. -
Page 9: Laser Safety
Laser Safety • The Freestyle 2 is classified as a class 1 laser in accordance with IEC 60825-1:2014 (ed. 3). • Complies with 21 CFR 1040.10 and 1040.11 except for conformance with IEC 60825-1 Ed. 3., as described in Laser Notice No. 56, dated May 8, 2019. -
Page 10: Mechanical Safety
• This product should be operated only from a battery supplied or recommended by FARO for this device. Ensure that the specifications of the AC converter are met by your line voltage. If you do not know the power line voltage in your area, consult your local power company. -
Page 11: Transport
• The FARO batteries are lithium-ion batteries and are thus classified as dangerous goods. When transporting or shipping the FARO batteries, ensure that you observe all applicable local and international rules and regulations. For further information, contact your local forwarder before transportation or shipping. -
Page 12: Servicing
Power Block Battery Safety Measures The following safety measures must be followed when working with the Power Block battery: • Charge the Power Block only in the Mobile PC or in a charger recommended by FARO to charge the Power Block. • Do not charge or discharge damaged batteries. -
Page 13: Chapter 3: Freestyle 2 Parts And Their Functions
• PC for SCENE. Refer to the SCENE manual for recommended specifications. Optional Equipment and Replacement Parts • Spare Power Block battery (Contact your FARO sales representative.) • Power Dock battery charger (order number ACCSS8002) • Power Supply for Power Dock (order number ACCSS8006) •... -
Page 14: Freestyle 2 Handset
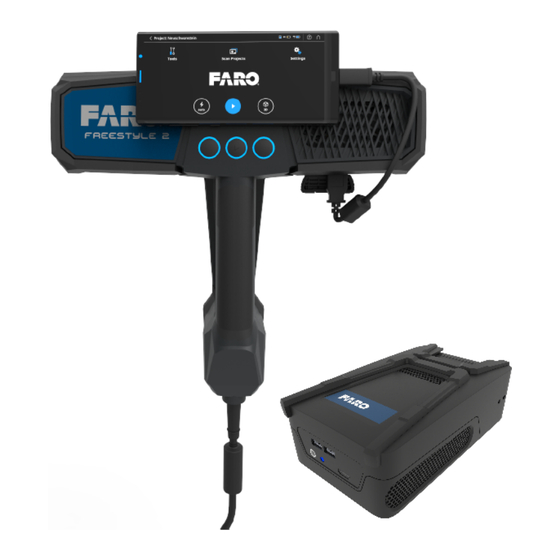
FARO Freestyle 2 User Manual Chapter 3: Freestyle 2 Parts and their Functions Freestyle 2 Handset Figure 3-1 Freestyle 2 handset, top side components ! Start/Stop button and status LED lights " Exhaust vent (on left side) # Cooling vent $ Mobile phone % Flashlight button (on, off, auto) &... - Page 15 FARO Freestyle 2 User Manual Chapter 3: Freestyle 2 Parts and their Functions Figure 3-2 Freestyle 2 handset, bottom side components ) Infrared cameras * LED Flashlight (6 total) + Color camera , Infrared projector with class 1 laser FARO Freestyle 2 (August 2020) Page 15 of 58...
-
Page 16: Mobile Pc
FARO Freestyle 2 User Manual Chapter 3: Freestyle 2 Parts and their Functions Mobile PC The device has multiple interfaces as shown in the figure below. Figure 3-1 Parts of the Mobile PC ! USB Ports: Use these ports with a USB flash drive to transfer data from the Mobile PC, or to attach a mouse and keyboard. - Page 17 Other batteries are not supported. NOTE: Older versions of the Power Block are not compatible with the Mobile PC and Freestyle 2. Ensure that your Power Block type label includes the designation HC. & Data and power socket (only for connection to Freestyle 2).
-
Page 18: Chapter 4: How Freestyle 2 Works
FARO Freestyle 2 User Manual Chapter 4: How Freestyle 2 Works Chapter 4: How Freestyle 2 Works The Freestyle 2 scanner enables you to record the dimensions and colors of objects and environments in three dimensions. To accomplish this, you move the handset along or around the object of interest. As you move the handset, three integrated sensors record what they capture. - Page 19 FARO Freestyle 2 User Manual Chapter 4: How Freestyle 2 Works Loop-closing: the process of correcting small tracking errors so that areas that are recorded more than once in a single scan are properly positioned with respect to all the frames in the scan.
-
Page 20: Chapter 5: Prepare To Scan
The Mobile PC can be carried either with a shoulder strap or with a belt clip. Choose the method you want to use and follow one set of instructions, below. NOTICE: Use only mounting systems provided by FARO. Using another system or screw could damage the device. - Page 21 FARO Freestyle 2 User Manual Chapter 5: Prepare to Scan Attaching the Shoulder Strap Figure 5-1 Attaching the strap Insert both ends of the strap to the round plugs that are attached to the Mobile PC. Make sure that you hear it click into place.
- Page 22 FARO Freestyle 2 User Manual Chapter 5: Prepare to Scan Mounting the Belt-Clip Plate and Belt-Clip Figure 5-2 Attaching the Mounting Plate Attach the included mounting plate using the screw as shown in the picture above onto the Mobile PC.
-
Page 23: Prepare The Smartphone
FARO Freestyle 2 User Manual Chapter 5: Prepare to Scan Figure 5-3 Belt clip Unscrew the screws as shown—only as much as is necessary to swing open the clip. Put the clip around own belt if you choose to carry the Mobile PC in this way. It can also be mounted on the straps of a backpack or similar. - Page 24 FARO Freestyle 2 User Manual Chapter 5: Prepare to Scan Figure 5-1 Correct position for the metallic sticker • If the Freestyle 2 app is not installed on the phone you intend to use, locate the app in the Google Play store and install on your phone.
-
Page 25: Chapter 6: Scanning With Freestyle 2
FARO Freestyle 2 User Manual Chapter 6: Scanning with Freestyle 2 Chapter 6: Scanning with Freestyle 2 Typical Workflow for a Freestyle 2 Scan Project 1. Attach Mobile PC to your belt or shoulder strap. Attach the Phone to the Handset below. -
Page 26: Place The Phone On The Handset
FARO Freestyle 2 User Manual Chapter 6: Scanning with Freestyle 2 Place the Phone on the Handset Place the phone on the handset as shown. The metallic sticker on the phone must hold the phone securely in place. NOTE: The phone mount (that is, the part of the handset that contains the magnets) is removable. - Page 27 HDMI cable, the QR code will be visible in a window and can also be scanned by a phone). 3. Start the Freestyle 2 app. If a WiFi connection to the Mobile PC is established, the app will lead you directly to the screen where capturing can be started.
-
Page 28: Adjust The Recording Settings
Figure 6-1 Default Scan Settings dialog • Data range: Enter a number between 1 m and 10 m (3 ft and 33 ft). The Freestyle 2 will not record points that are further away than this distance. Use this setting when you want to exclude unimportant objects from your scan. -
Page 29: Scanning
Scanning Tips for Successful Scanning Scanning with Freestyle 2 is easy, but there are some guidelines which will help you get the best results. • Plan how you will scan the objects of interest before you begin, taking the following contradictory... - Page 30 FARO Freestyle 2 User Manual Chapter 6: Scanning with Freestyle 2 • The longer a single scan takes, the longer the processing time will be. Try to keep scan times as short as possible—under 5 minutes is best. • It is better to have one scan that captures all objects of interest than to have several scans.
-
Page 31: Scanning Tutorials
Parameters that are not good enough for the Freestyle 2 to create good scans are shown in red. This lets you see how adjustments to your scanning technique affect the information that the Freestyle 2 is able to collect. - Page 32 After a few seconds, a window appears with the 3D Point Cloud View. The Freestyle 2 tries to find a starting point for the scan. To do this, it needs to scan an area with features that it can identify. If you start to scan an area that is mostly featureless (for example, a white wall), this may be difficult.
-
Page 33: Tracking Lost: Resume Tracking
FARO Freestyle 2 User Manual Chapter 6: Scanning with Freestyle 2 Figure 6-3 Scanning Tracking Lost: Resume Tracking If tracking is lost, you can resume it. As soon as the tracking is lost, the view changes. You see what the handset sees, superimposed on a static picture of the place where tracking was lost. -
Page 34: Stop Capturing
FARO Freestyle 2 User Manual Chapter 6: Scanning with Freestyle 2 If this icon is shown, finish the scan as intended. You do not need to stop the capturing immediately. The app will then finalize and save the scan project. - Page 35 FARO Freestyle 2 User Manual Chapter 6: Scanning with Freestyle 2 Figure 6-1 Set Anchor Point If you come back during your scan to that area, the software will automatically search for the anchor point in the 3D point cloud, and it will display in blue if it is detected and aligned properly.
-
Page 36: Chapter 7: Process The Scan Project
FARO Freestyle 2 User Manual Chapter 7: Process the Scan Project Chapter 7: Process the Scan Project Processing is a series of manipulations to the scan data in a project that improve the quality of the scan. This chapter will give you a description of how to process a scan project. -
Page 37: Exporting Point Clouds
FARO Freestyle 2 User Manual Chapter 7: Process the Scan Project Scan Optimization This adjusts all frames of a scan to minimize displacements errors. The function searches for loops in the scan and tries to close those loops. Loop closing is necessary because small errors from frame to frame may accumulate over time, resulting in gaps if you return to the same position again. -
Page 38: Chapter 8: Use A Scan Project In Scene
Chapter 8: Use a Scan Project in SCENE SCENE is the FARO software that you can use to work with your scans. In SCENE, you can measure distances and areas, add annotations, view the project with Virtual Reality equipment, etc. You can also export the data to SCENE WebShare Cloud, and to many other file formats. - Page 39 FARO Freestyle 2 User Manual Chapter 8: Use a Scan Project in SCENE NOTE: If the project was already processed in the app, you only need to process it again if you want to use a different processing configuration. 1. Click, Process Scans.
-
Page 40: Chapter 9: Freestyle 2 App Settings
FARO Freestyle 2 User Manual Chapter 9: Freestyle 2 App Settings Chapter 9: Freestyle 2 App Settings This chapter provides a brief description of app settings not previously documented. Figure 9-1 Default Scan Settings dialog Recording Settings For more information, see “Adjust the Recording Settings” on page 28. -
Page 41: Help
Scanning tutorials: Scanning modes that do not save data, but instead provide real-time feedback about the information that the Freestyle 2 is capturing. Use this mode to learn about how to best move the handset, or to test scanning conditions before you actually begin with a scan project. -
Page 42: Chapter 10: Maintenance
Check the housing of the handset for damage. To ensure a complete manufacturing recalibration of the Freestyle 2, we recommend that you request the yearly maintenance and certification service offered by FARO. Contact your local FARO Customer Service team for more information. - Page 43 FARO Freestyle 2 User Manual Chapter 10: Maintenance 4. Ensure that the reference plate is well illuminated. The illumination intensity should be at least 250 Lux (25 fc). 5. Ensure that the reference plate is not covered by hard shadows. This may happen easily, so check in advance if parts of your body, Freestyle 2, or something else could produce a hard shadow on the...
- Page 44 14. A vertical bar with a drawing of the handset is shown at the left, together with a vertical line and a measurement showing an approximate height from the reference plate. Figure 10-4 Video View with cone and Freestyle 2 icon bar 15. Hold the handset directly and horizontally over the reference plate. A black band across the background of the animation will turn gray when you have the proper height.
-
Page 45: Compensation Data And Report
FARO Freestyle 2 User Manual Chapter 10: Maintenance illustrating the scanning angle does not have to match up with the blue line--it only needs to be parallel to it as long as the scanner is still scanning the reference plate. A white arrow may appear to tell you the direction that you need to rotate the handset to be perpendicular and parallel to the reference plate. -
Page 46: Mobile Pc
Follow these procedures to prevent problems with your system: • Do not use the Mobile PC in dusty environments. If the ventilation covers begin to show an accumulation of dust, contact your FARO representative for maintenance. • Avoid knocking or dropping the device. •... -
Page 47: Chapter 11: Disposal
FARO Freestyle 2 User Manual Chapter 11: Disposal Chapter 11: Disposal At the end of its lifecycle, this product must not be disposed with normal waste, but instead must be returned to a recycling facility for electric and electronic devices. -
Page 48: Appendix A: Working With Markers
Freestyle 2 scan with a FARO Focus Scan. A set of 20 unique markers is included with the Freestyle 2 kit. -
Page 49: Appendix B: Technical Support
Appendix B: Technical Support Appendix B: Technical Support FARO Technologies, Inc. is committed to providing the best technical support to our customers. If you have any problem using one of our products, follow these steps before contacting our Technical Support Team: •... - Page 50 Fax: +91 11.4646.5660 End User Documents All documents related to the Software End User License Agreement, Purchase Conditions, and FARO Products Service Policy can be found on the FARO Knowledge Base at the following URL: https://knowledge.faro.com/Essentials/General/FARO_End_User_License_Agreement_Location. FARO Freestyle 2 (August 2020)
-
Page 51: Appendix C: Technical Data
FARO Freestyle 2 User Manual Appendix C: Technical Data Appendix C: Technical Data General Type of device: Hand-held 3D laser scanner Power supply voltage: 19 V Average Power when scanning (Mobile PC+Freestyle 2): 67 W Peak power when scanning (Mobile PC+Freestyle 2): 95 W 21.6 W Freestyle 2 maximum power:... -
Page 52: Laser (Optical Transmitter)
FARO Freestyle 2 User Manual Appendix C: Technical Data 10 mm @ 3 m distance 35 mm @ 5 m distance 100 mm @ 10 m distance 420 mm x 550 mm @ 0.5 m 930 mm x 1170 mm @ 1 m 1880 mm x 2160 mm @ 2 m Typical field of view (HxW): 2740 mm x 3160 mm @ 3 m... -
Page 53: Mobile Pc
FARO Freestyle 2 User Manual Appendix C: Technical Data Mobile PC Dimensions 215 x 123 x 70 mm 870 g without Power Block Weight 1300 g with Power Block ® Intel Core™ i7-8650U Processor Processor 16 GB RAM DDR4-2400 1.2 V SO-DIMM Solid State Drive 250 GB Power supply voltage: 19 V... -
Page 54: Freestyle 2 Led Codes
FARO Freestyle 2 User Manual Appendix C: Technical Data running on battery, and external power from power cord is detected. Red constant Power supply system corrupt - No work possible! Green flashing External power source is connected. Mobile PC is switched off. -
Page 55: Appendix D: Glossary
2D Objects (e.g., planes) and textures that are recorded by the Freestyle 2 and which can be identified by Freestyle 2 software. Features are used during the tracking process. - Page 56 A target can be a naturally occurring plane such as a wall or desk, or a marker. tracking: The process of following features from frame to frame. Tracking makes it possible to reconstruct the movement of Freestyle 2 in space, thus putting the points of the individual frames into a common 3D context.
-
Page 57: Appendix E: Fcc And Ic Equipment Authorization
1. This device may not cause harmful interference, and 2. This device must accept any interference received, including interference that may cause undesired operation. Changes or modifications not expressly approved by FARO could void the user’s authority to operate the equipment. IC Statement Contains IC 1000M-8265NG This device complies with Industry Canada’s license-exempt RSSs. - Page 58 250 Technology Park Lake Mary, FL 32746 800-736-2771 U.S. / +1 407-333-3182 Worldwide Email: support@faro.com FARO Europe GmbH & Co. KG Lingwiesenstrasse 11/2 D-70825 Korntal-Münchingen, Germany FREECALL +800 3276 73 78 / +49 7150/9797-400 FREEFAX +800 3276 1737 / +49 7150/9797-9400 Email: support.emea@faro.com...
Need help?
Do you have a question about the Freestyle 2 and is the answer not in the manual?
Questions and answers