Table of Contents
Advertisement
33 Amy Way
Hanover, PA 17331
Phone: 763-300-5730
Sales@AdvantageLifts.com
www.AdvantageLifts.com
Backyard Buddy
Installation and Operations Manual
IMPORTANT SAFETY INSTRUCTIONS. Please read the entire contents of this
manual prior to installation, operation, servicing or maintaining the lift. Reference
ANSI/ALI ALIS "Safety Requirements for Installation and Service of Automotive
Lifts" & ALI "Lifting it Right". By proceeding you agree that you fully understand
and comprehend the full contents of this manual and other included materials
that came with your lift. Make this manual available to all operators. Failure to
operate this equipment as directed may cause injury or death. SAVE THESE
INSTRUCTIONS.
Designed and Engineered in Warren, Ohio USA
Advertisement
Table of Contents
Troubleshooting

Related Manuals for Advantage Backyard Buddy

Summary of Contents for Advantage Backyard Buddy
- Page 1 Hanover, PA 17331 Phone: 763-300-5730 Sales@AdvantageLifts.com www.AdvantageLifts.com Backyard Buddy Installation and Operations Manual IMPORTANT SAFETY INSTRUCTIONS. Please read the entire contents of this manual prior to installation, operation, servicing or maintaining the lift. Reference ANSI/ALI ALIS “Safety Requirements for Installation and Service of Automotive Lifts”...
- Page 2 When using your garage equipment, basic safety precautions should always be followed, including the following: 1. Read all instructions. 2. Care must be taken as burns can occur from touching hot parts. 3. Do not operate equipment with a damaged cord or if the equipment has been dropped or damaged - until it has been examined by a qualified service person.
-
Page 3: Table Of Contents
Table of Contents Warranty ................................1 Lift Information ..............................1 Safety ................................. 2 Owner’s Responsibilities ............................ 4 Hazard Level Definitions ............................ 4 Shipping Information ............................5 Receiving your lift: ............................5 Tools for Assembly ............................6 STEP 1: Selecting a Site ............................ 6 Overhead Obstructions: .......................... - Page 4 Lock Linkage Rod Installation ........................26 Primary lock adjustment ..........................27 Tips and Troubleshooting Lock Linkages ..................... 27 STEP 6: Installing Top Caps & Power Unit Mount................... 28 STEP 7: Hydraulic Hose & Drain Kit ........................ 28 Drain Kit ................................ 29 STEP 8: Installing Cables ..........................
-
Page 5: Warranty
Advantage Lifts warranty only applies to the original purchaser of the lift. Advantage Lifts shall repair or replace at their option any defective part, as soon as the part becomes available, during the warranty period. Part(s) in question may be required to be returned to the factory freight prepaid for inspection prior to being considered defective. -
Page 6: Safety
Safety Read these safety instructions entirely, Check advantagelifts.com for manual updates. Advantage recommends reviewing the current version of the ANSI/ALI ALIS “Safety Requirements for Installation and Service” to provide additional safety information for installing and using your lift. Additionally, the ALI “Lifting it Right” and “Safety Tips” documents are recommended reading for every lift operator (autolift.org). - Page 7 The Owner/Employer shall ensure worn, damaged, or broken parts are replaced with parts approved by the original equipment manufacturer or with parts meeting original manufacturer specifications. MAINTAIN your lift. Keep the lift clean for better and safe performance. Follow manual for proper lubrication and maintenance instructions.
-
Page 8: Owner's Responsibilities
WARNING! RISK OF EXPLOSION. This equipment has internal arcing or sparking parts which should not be exposed to flammable vapors. This machine should not be located in a recessed area or below floor level. IMPORTANT NOTICE. Do not attempt to install this lift if you have not been trained in basic automotive lift installation procedures. -
Page 9: Shipping Information
All freight claims must be communicated to Advantage Lifts. Advantage Lifts recommends picking up your lift at a local freight terminal with a trailer at least 18 feet long. Prior to arrival, communicate with the freight carriers and arrange for them to load the lift directly on your trailer. -
Page 10: Tools For Assembly
Improper installation can accelerate wear, resulting catastrophic failure which may cause property damage and/or bodily injury. Advantage Lifts assumes no liability for loss or damage of any kind, expressed or implied, resulting from improper installation or use of this product. Read this installation manual in its entirety before attempting to install or operate the lift. -
Page 11: Floor Requirements
Floor Requirements: Visually inspect the floor where the lift is to be installed and check for cracked or defective concrete. This lift must be installed on a level concrete floor with no more than 3 degrees of slope and in good condition. -
Page 12: Site Planning
Site Planning Minimum Clearance Figure 1.2 Clearance Around the Lift Calculate Ceiling Height Figure 1.3 Lift Clearance (Height) Step 1: Measure the lower vehicle height. Step 2: Round up to the next lock (see page 10). Step 3: Measure the Upper vehicle height. Minimum Ceiling Height = Clearance Lock Height + 4.5 + Upper Vehicle Height BYB User Manual Page 8 of 55... -
Page 13: Specifications
Specifications Specification Imperial Capacity *Lifting Capacity CL, XT, BT 7,000 lbs. *Lifting Capacity WB/BB, WF 8,000 lbs. Max Capacity / Front Axel 50% of Lifting Capacity. Max Capacity / Rear Axel 50% of Lifting Capacity. Height Leg Height CL 80.375 in. Leg Height XT, WB/BB, WF, BT 102.375 in. -
Page 14: Elevation Drawings
Elevation Drawings: Classic (CL) Note: Slot dimensions are the distance from the ground to the bottom of the runway. This is the vehicle clearance for each lock. Figure 1.4 Lift Elevation & Lock Holes XT, WF, WB, BB, BT Note: Slot dimensions are the distance from the ground to the bottom of the runway. -
Page 15: Overall Dimensions
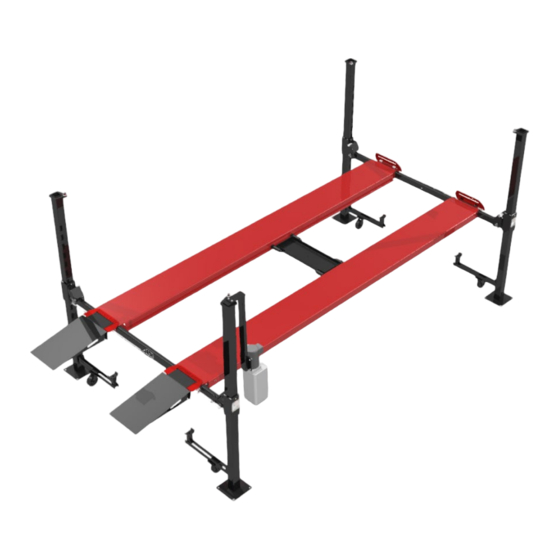
Overall Dimensions: Classic (CL) B-4P7CL Figure 1.6 Classic Lift Overview BYB User Manual Page 11 of 55 PN: 90020 Version: 1.4... -
Page 16: Classic Extra Tall (Xt) B-4P7Xt
Classic Extra Tall (XT) B-4P7XT Figure 1.7 Classic Extra Tall Lift Overview BYB User Manual Page 12 of 55 PN: 90020 Version: 1.4... -
Page 17: Workforce (Wf) B-4P8Wf
Workforce (WF) B-4P8WF Figure 1.8 Workforce Lift Overview BYB User Manual Page 13 of 55 PN: 90020 Version: 1.4... -
Page 18: Wide Buddy & Big Buddy (Wb/Bb) B-4P8Wb And B-4P8Bb
Wide Buddy & Big Buddy (WB/BB) B-4P8WB and B-4P8BB Figure 1.9 Wide Buddy/ Big Buddy Lift BYB User Manual Page 14 of 55 PN: 90020 Version: 1.4... -
Page 19: Boat/Trailer (Bt) B-4P8Bt
Boat/Trailer (BT) B-4P8BT Figure 1.10 Boat Trailer Lift Overview BYB User Manual Page 15 of 55 PN: 90020 Version: 1.4... -
Page 20: Step 2: Unloading And Unpacking
STEP 2: Unloading and Unpacking: Freight carriers may have restrictions on delivering to residential addresses requiring freight terminal pick- up. Please contact the freight carrier to coordinate delivery to a terminal where the terminal personnel will load the lift onto the customer's trailer or truck. Lifts will not be shipped to an address without a fork-lift. Lifts cannot be unloaded using a lift gate vehicle due to size restrictions. - Page 21 With the lift assembly still on the trailer position the material handler to lift the portion of the package closest to the trailer tongue (figure 2.3) using a strap as shown. Position a wheeled car dolly underneath the shipping bracket and lower on to the dolly. Wood blocking may be necessary. Figure 2.3: Material Handling Lift in Position With the one side of the package assembly securely resting on the car dolly, the material handler may now be re-positioned to the rear of the trailer and the strap attached to the rear section of the package.
- Page 22 Figure 2.4 Finally, the car dolly and blocking can be positioned on the ground between the legs of the material handler, directly under the packaged assembly. It can now be safely lowered to rest on the dolly. If possible, leave the packaged lift assembly securely resting on the car dollies.
-
Page 23: Step 3: Legs, Crossmember & Guide Block Installation
STEP 3: Legs, Crossmember & Guide Block Installation Once the layout has been determined, remove the cardboard and shrink wrap if still attached and cut the metal banding with caution as it is under tension. Remove the top runway and leg bolts using a 3/4 box wrench and socket (or impact). -
Page 24: Components In The Lift
Components in the lift The components in the lift are now accessible to view. the contents list to verify that all the parts are present. Some of the smaller components found nested under the lips of the lower runway. Take the time to review each item before continuing the build. See Figure 3.4 to view the items packed between the runways, Figure 3.5 for items inside the hardware box and the hardware list provided. -
Page 25: Hardware Bag Contents
Hardware Bag Contents *Contained within the hardware box QTY Type Fastener Location 60032-01 Flat Washer Pulley Covers & Nylon Retainers 60015-01 HHCS 1/4-20 x 1/2 Pulley Covers & Nylon Retainers 60007-01 Lock Washer 5/16 Power Unit 60006-01 Hex Nut 5/16-18 Power Unit (8) &... - Page 26 Figure 3.7 Lifting the Crossmember Using wood blocks, prop the leg up so there is clearance to slide the crossmember down the legs. Position the crossmember so the guide blocks align with both columns, adjust the leg spacing as necessary to match them up.
-
Page 27: Front And Back Locations
The crossmember and legs are extremely heavy, a material handler may be used to assist in raising the assembly. To prevent the crossmember from riding up the legs place a stop in the lock hole directly above the crossmember. The stop can be a piece of metal, prybar screwdriver, etc. take care not to drop the stop into the leg while lifting. -
Page 28: Step 4: Runway Installation
STEP 4: Runway Installation The powered runway will be installed first, this is the upper runway that was removed and set on blocks. Take note to visually locate the hole for the hydraulic fitting exiting the side of the powered runway, this fitting must be located next to the column the power unit will be bolted to, front left or rear right. -
Page 29: Step 5: Lock Linkage Installation
Once the runways are secured, attach the wheel stop front plate to the wheel stop mounting plate. For all lifts except the WB, a spacer will be placed on either side of the tube welded to the wheel stop front plate. For the WB lift, the spacers will be offset towards the left and right as shown to allow the ramp to be centered with the runway. -
Page 30: Lock Linkage Rod Installation
Lock Linkage Rod Installation Gather the parts shown in Table 5-1 from the hardware bag. Select the (2) 3/8 x 3.875 or 11.875 pieces of all thread. Install a 3/8-24 nut and then a 3/8 hiem joint on to each end (figure 5.3). Select the (2) 3/8 long Round Rods (zip tied to the square rod in the power runway) and slide through the... -
Page 31: Primary Lock Adjustment
Figure 5.4 Install the spring from the hardware box onto the eyebolt and washer welded on the long 3/8 Round Rod. With the lock opposite the T-bar installed and the T-bar pointed up and down (12’o clock) on both the front and back Crossmembers, adjust the top hiem in figure 5.5 so the hole in the hiem and T-bar line up. -
Page 32: Step 6: Installing Top Caps & Power Unit Mount
STEP 6: Installing Top Caps & Power Unit Mount There is a Top Cap for each of the four columns that secures the ends of the lift cables. The Top Cap with the holes (used to attach the power unit arm) mounts on the leg where the hydraulic fitting exits the runway. Orient the holes for the cables so they are pointing inward to the inside corner of the post (figure 6.1 &... -
Page 33: Drain Kit
DO NOT OVER TIGHTEN. TEFLON IS NOT NEEDED FOR O-RING FITTINGS Fill the hydraulic reservoir of the Power Unit with Hydraulic Fluid to a point about two inches below the fill cap of the reservoir. Use AW-32 for cold climates or AW-46 for warmer climates. The tank will hold approximately 12 quarts, leave room for hydraulic oil expansion. -
Page 34: Step 8: Installing Cables
STEP 8: Installing Cables The cables come pre-installed and pre-routed on the cylinder runway. Begin by finding the zip ties and cutting with a pair of side cutters. Caution, the cables may be under tension. Make sure to cut the cable tie only (Figure 8.1 or 8.2 for XT). - Page 35 Figure 8.3 Cables Routing XT Pull on the cables where attached to the cylinder under the power runway to extend the rod on the lift cylinder. Pull until you have the rod cylinder extended about 3/4 of the way out. This will gain enough free cable length to wrap around the various pulleys and attach the cables to the Top Caps.
-
Page 36: Step 9: Cable Keepers And Pulley Guard
Pass the cable through the hole in the Top Cap. Install the washer first then the 3/4-10 jam nut followed by the 3/4-10 full nut. Ensure at least 1/4 inch of threads are exposed above the nylon hex nut (figure 8.8). Repeat this procedure for each of the four cables. -
Page 37: Step 10: Pre-Operation And Maintenance Checks
The most common cause of hydraulic system malfunction or failure is contamination of the hydraulic fluid. The hydraulic system (hose and pipe, cylinders, valves, etc.) must be clean to prevent contamination problems. For unusual vehicles (limousines, RV’s, long wheelbases, short wheelbases, etc.) contact Advantage Lifts for loading instructions. If Lift Does Not Rise Check hose connections. -
Page 38: Daily Checks
Daily Checks are the responsibility of the owner or qualified operator. Confirm all fasteners are in place and tight. (Snap rings, collars, bolts, nuts etc.) Check that the hoses are not kinked, are clear of the cables and do not hang up on the tank. All secondary locks move freely and return to home position. -
Page 39: Step 11: First Start Up (At Installation)
STEP 11: First Start Up (At Installation) Wax the outside of the columns where the UHMW Guide Blocks will make contact to the column. The wax will reduce friction and make for smooth operation (figures 11.1 & 11.2). Grease the zerk fittings (4 on the powered runway and 2 on each crossmember). -
Page 40: Before Loading
Read and follow all safety instructions in this document and the power unit before operation. • Advantage Lifts also recommends ALI’s “Lifting it Right” and “Safety Tips” from autolift.org. Drive the vehicle onto the lift platform using a spotter. It is recommended to center the wheelbase on •... -
Page 41: Cable Inspection Guide
If you notice kinking, flattening, bird caging, cuts or other possible defects of a cable. • If you have any questions regarding the condition of your cables that may not be listed above, contact Advantage Lifts for assistance. Always check the full length of the cable Notes: •... -
Page 42: Anchoring Instructions
Anchoring Instructions This lift does not require anchoring to the floor. If you choose to anchor the lift, which is not recommended, follow the instructions below. Make sure anchors are 8 inches from any wall, crack, or seam. • • Make sure the concrete has properly cured at least 28 days. - Page 43 Pictographs and Warning Labels used with permission of Automotive Lift Institute www.autolift.org. BYB User Manual Page 39 of 55 PN: 90020 Version: 1.4...
-
Page 44: Troubleshooting Guide
If possible place the lift on the locks to release mechical engery stored in the cables and unplug the power unit and call Advantage Lifts at 763-300- 5730 for further assistance. Repair work must be performed by a qualified person. -
Page 45: Accessories
Accessories Rolling Jack Platform (ALI Certified) Loosen the set screw on one set of wheels (axles that ride on the same track channel). Confirm the other 2 wheels are tight then place tightened wheels of the Rolling Jack Tray on one set of accessory rails. Slide the loosened axles in or out to allow the wheels to seat properly on the opposite accessory rail. -
Page 46: Ramps
Ramps To place the ramps on the lift, lower the lift to the ground. Hook the ramp tongue onto the slot on the automatic wheel stops. Ramps MUST BE REMOVED during lift operation to avoid floor or ramp damage. (PN 40273, Set of 2) Figure 10.5 Ramps Drip Pans Drip pans rest on the accessory rails. -
Page 47: Rolling Jack Air Over Hydraulic
Rolling Jack Air Over Hydraulic Loosen the set screw on one set of wheels (axles that ride on the same track channel). Confirm the other 2 wheels are tight then place tightened wheels of the Rolling Jack Tray on one set of accessory rails. -
Page 48: Available Accessories
Ramps () ALI and NRTL certifications become void when unapproved accessories are added. Replacement parts For replacement parts and availibility please contact Advantage Lifts at (763) 300-5730. Only use parts approved by the original equipment manufacturer. Maintenance Log: BYB User Manual Page 44 of 55 PN: 90020 Version: 1.4... - Page 49 BYB User Manual Page 45 of 55 PN: 90020 Version: 1.4...
- Page 50 BYB User Manual Page 46 of 55 PN: 90020 Version: 1.4...
-
Page 51: Parts List
Parts List Main Lift Overview Item Description 40204 Assembly, Wheel Stop 40205 Ramps 40246 Caster Assembly 40247 Rolling Jack Platform BYB User Manual Page 47 of 55 PN: 90020 Version: 1.4... -
Page 52: Legs, Top Caps, Power Unit
Legs, Top Caps, Power Unit BYB User Manual Page 48 of 55 PN: 90020 Version: 1.4... - Page 53 ITEM 14 HYDRAULIC UNIT 110V UNIT 90010 220V UNIT 90043 Item Description 40223 Power Unit Mount 40224 Top Cap w/ Holes 40005 Top Cap 60007-01 5/16 Split Lock Washer 60006-01 5/16-18 Nut 60018-01 3/4 Flat Washer 60019-01 5/16-18 x 1 HHCS 60021-01 3/8 Split Lock Washer 60001-04...
-
Page 54: Crossmembers
Crossmembers NOTE: ON OPPOSITE SIDE CROSSMEMBER, • ITEM 16 IS REPLACED WITH ITEM 7, • ITEM 37 IS REPLACED WITH ITEM 36, • ITEM 43 IS REDUCED BY QTY 1, • ITEMS 22 AND 39 ARE REMOVED. SEE NEXT SHEET FOR ADDITIONAL ASSEMBLY DETAILS BYB User Manual Page 50 of 55 PN: 90020 Version: 1.4... - Page 55 Item Description 20440 Pulley Cover (Right) 20441 Pulley Cover (Left) 20112 Nylon Retainer Bracket TABLE Crossmember Rod 60061-01 Extension Spring 20160 Primary Pulley Shaft 20021 Primary Lock 20020 Secondary Pulley Shaft 20022 Secondary Lock 60038-02 5/16-18 x 3-1/2 Eyebolt 60053-01 0.75 Snap Ring 40009 Single Pulley Assembly...
-
Page 56: Runways
Runways CL, WB, BB, WF, BT Runways BYB User Manual Page 52 of 55 PN: 90020 Version: 1.4... - Page 57 Powered Runway Parts List for CL, WB, BB, WF, BT Item Description 20049 Cable Keeper 20161 4 Pulley Pin BYB 20218 Cylinder Pin 20419 Cable Block 20421 UHMW Plastic Single Pulley Spacer 20422 UHMW Plastic Double Pulley Spacer 40009 Single Pulley Assembly 40045 Double Pulley Assembly SEE TABLE...
- Page 58 XT Runway BYB User Manual Page 54 of 55 PN: 90020 Version: 1.4...
- Page 59 Powered Runway Parts List for XT 60010-01 Grease Fitting 20161 Runway Pin 40045 Double Pulley Assembly 60004-02 Set Screw Collar 60127-01 HHCS Grade 5 3/8-16 X 3 3/4 Zinc Plated 60021-01 Lock Washer 3/8 Zinc Plated Steel 40009 Single Pulley Assembly 90036 Hydraulic Cylinder 20218...
- Page 60 BYB User Manual PN: 90020 Version: 1.4...
Need help?
Do you have a question about the Backyard Buddy and is the answer not in the manual?
Questions and answers