Table of Contents

Related Manuals for RainPoint TTP106W


Summary of Contents for RainPoint TTP106W
- Page 1 Instruction WIFI Indoor Water Pump Timer Model: TTP106W Customer Support WEB: www.rainpointus.com Please contact us at the above Email:service@rainpointus.com for support with any questions Free Hotline (US): 1 833 3815659 about use.
- Page 2 PLEASE NOTE!!! If you make into trouble during use, please contact us by the following, we will do our best to solve them. (PS. All RainPoint products also have the contact ways for support on the back.) www.rainpointus.com...
-
Page 3: Table Of Contents
2. Determine the correct placement 3. Connect the hose correctly 4. Installation completed and tested 9-11 SIMPLE TO PAIRE WIFI 1. Initial RainPoint App Setup 2. Pair the water pump 12-15 APP INTERFACE OVERVIEW 1. Home Interface 2. Irrigation Schedule Settings 3. - Page 4 MANUAL WATERING MODE REST THE DEVICE TROUBLESHOOTING WARRANTY CUSTOMER SUPPORT...
-
Page 5: Product Overview
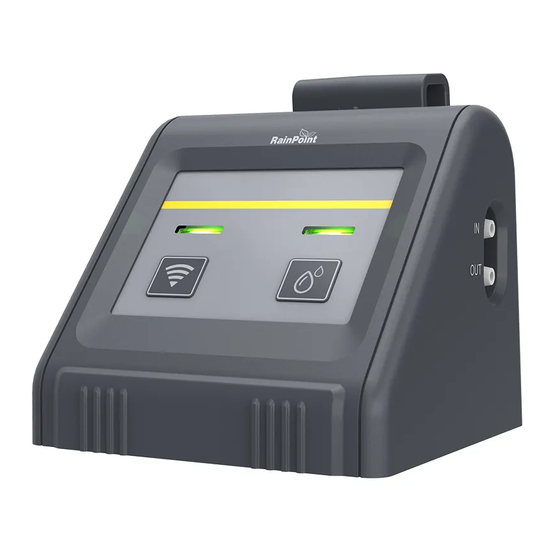
PRODUCT OVERVIEW 1. Product Appearance Name Function WiFi Button Pair WiFi or reset Manual Button Manual or pause watering USB Port Manual or pause watering Pair WiFi or power supply Indicates the status of WiFi disconnected, connected or completed Watering Indicator Light Indicates the status of WiFi disconnected, connected or completed Inlet Port... -
Page 6: Package Includes
2. Package Includes Accessories Name Function Included USB Cable *Pair WiFi or power supply LEN: 10m/32.8Ft Tubing Inner diameter of pipe:0.17”(>1/6”) Outside diameter of pipe: 1/4” Filter *Filtering impurities from water Tubing End *Stop water flow at the end of the pipe Caps Micro Drip *Inserted into the soil to water the plant... -
Page 7: Specification
3. Specification Working Pressure 0.3Bar Water Flow 30L/H Water Proof IPX2 Pumping Head 2-3m Pumping Distance 2-3m Maximum Water Pressure ≥200kPa Working Temperature 0°C to 50°C(37°F-122°F) Power By USB cable (included)or 4*AA batteries(excluded) Material - 03 -... -
Page 8: Easy To Install
EASY TO INSTALL 1. 2 Ways to apply power for activating the pump 1.1 Insert 4*AA 1.5V alkaline batteries 1) Remove the battery tray back of the pump. 2) Inset 4 brand new AA (1.5V) alkaline batteries (not included) as the marked "-", "+" direction. 3) Firmly reinstall the battery cover back into the pupm. - Page 9 EASY TO INSTALL 1. 2 Ways to apply power for activating the pump 1.2 Plug in the cable of the UBS port 1) Plug in the USB cable (included) 2) When the power is on, the indicator will light up. Note: ·...
-
Page 10: Determine The Correct Placement
2. Determine the correct placemen 2.1 Please put the pump below the water level of the reservoir to effectively avoid the siphoning phenomenon.(The siphoning effect will cause the water leaking and over-watering problem) 2.2 The lift length of the water pump: the vertical distance of 2-3m, because the water pipe can not be placed 100% straight, we recommend that the height of the plants than the pump should not exceed 2.5m. -
Page 11: Connect The Hose Correctly
3. Connect the hose correctly 3.1 Cut the hose according to the distance of the device, the plant or you need 3.2 Put the head of hose into hot water for 10s or Put a little veggie oil on the end of the hose before connecting veggie 3.3 Connect the hose to water inlet and outlet Inlet... -
Page 12: Installation Completed And Tested
3.6 When water needs to be delivered to the soil, you need to use the micro drip emitte Tips: Loosen the soil first, then insert the drips at least 3 inches deep, which will help water enter the plant roots. 3.7 Connect a tubing end cap when you finished a branch installation 4. -
Page 13: Simple To Paire Wifi
SIMPLE TO PAIR WIFI 1. Initial RainPoint App Setup 1.1 Search for "RainPoint"and download Android version or iOS version App for free. Or scan the QR code to download Rainpoint APP. 1.2 Create an account and login Create an account or login with an existing account to begin pairing with Wi-Fi water pump. - Page 14 2.3 Select 2.4GHz Wi-Fi Network and enter password. Then click "Next". Note : RainPoint Wi-Fi water pump only pairing with a 2.4GHz WiFi, for a dual-band router, please independently enable 2.4GHz WiFi band and name it differently from 5GHz WiFi band.
- Page 15 2.5 Wi-Fi pairing requires about 1-2 mins, once the device is paired successfully, the APP will show "Device added successfully". Note : • You can customize the name of the device as required. • If you have not been able to pair for over 2 mins, please go to page 9 and follow the instructions to fully reset the device and start pairing again from the beginning.
-
Page 16: App Interface Overview
1. Home Interface Weather Forecast Add Device Get the weather data for Allows to add multiple the town you selected to RainPoint smart devices. realize intelligent watering. Created Home Customize home names of Added device(s) the different irrigation areas Click on your selected by entering ''My Home"... -
Page 17: Device Information
3. Device Information Virtual ID For Device Offline Notification Open:send a message to APP when device is offline. FAQ & Feedback Remove Device Asking support and Remove the device before feedback questions. resetting it, refer to Page to view. - 13 -... -
Page 18: Smart Function Interface
4. Smart Function Interface Automation Function Add Watering Plan Customize multi-irrigation Click to set the conditions plans with local weather, and tasks for your plan. temps, humidity, sunrise/ sunset or weeks. Tap-to-Run Function Means you can set and control multiple devices and plans with one tap. - Page 19 4.1 Condition Settings Setup arguments and add conditions as your required. 4.2 Task Settings Set up tasks as your required, then trigger task if conditions are met. - 15 -...
-
Page 20: Personal Date Interface
5. Personal Date Interface Setup arguments and add conditions as your required. Add or remove Home Manger/Home(group) as your need. AUTOMATIC WATERING MODE Step1: Click to setup Step2: Click to setup watering frequency as your watering duration as your required and "done" it. required and "done"... - Page 21 MANUAL WATERING MODE 1. Manual Operation Via App Click the switch to turn ON / OFF manual watering, manual water run time you choose will be the duration your cycle will run for. Note: If you want to change the manual irrigation time, please adjust the "How Long"...
- Page 22 TROUBLESHOOTING Problem Possible Cause Possible Solution WiFi can’t be Not in 2.4GHz wifi channel Reset the router for a 2.4G connected connection channel and reconnect. Too far between the pump Move the pump to a closer and router, causing the socket near the router and signal unstable reconnect.
- Page 23 The watering schedule needs lost power and the plan was to be reset. emptied. If your Rainpoint product does not operate properly after trying the troubleshooting steps, please contact us by phone or email : 1-833-3815659 (US Hotline) | service@rainpointus.com - 19 -...
- Page 24 FCC Statement: This device complies with part 15 of the FCC Rules. Operation is subject to the following two conditions: (1) This device may not cause harmful interference, and (2) this device must accept any interference received, including interference that may cause undesired operation.
- Page 25 If you find it difficult to set up and want to watch the setting tutorial video, please subscribe to our channel: RainPoint on YouTube. Please scan the QR code to visit the RainPoint channel on YouTube quickly. If the app and the user manual don’t have what you’re looking for, and you need some help, please prepare the Model NO.
Need help?
Do you have a question about the TTP106W and is the answer not in the manual?
Questions and answers