Table of Contents
Advertisement
Quick Links
Advertisement
Table of Contents

Related Manuals for Renogy Smart Shunt 300


Summary of Contents for Renogy Smart Shunt 300
- Page 1 RENOGY Smart Shunt 300 RSHST-B02P300-G1 VERSION A0 USER MANUAL...
- Page 2 The illustrations in the user manual are for demonstration purposes only. Details may appear slightly different depending on product revision and market region. z Renogy reserves the right to change the information in the user manual without notice. For the latest user manual, visit renogy.com.
-
Page 3: Table Of Contents
1.2. Introduction ..............................1 1.3. Key Features ..............................1 1.4. SKU ................................. 1 Get to Know Renogy Smart Shunt 300 ..................... 2 2.1. What’s In the Box? ............................. 2 2.2. Required Tools & Accessories........................2 2.3. Product Overview ............................3 2.4. - Page 4 Maintenance ..............................26 Inspection ................................26 Cleaning ................................26 Storage .................................. 26 Emergency Responses ..........................27 Renogy Support ............................28 FCC & RSS ..............................29 FCC Statement ..............................29 FCC Radiation Exposure Statement ........................ 29 RSS Standard ............................... 29...
-
Page 5: General Information
NOTE: Indicates an important step or tip for optimal performance. 1.2. Introduction Renogy Smart Shunt 300 is an intelligent battery monitor that measures the battery voltage and current based on which it calculates the state of charge (SOC) and remaining running time of the battery. -
Page 6: Get To Know Renogy Smart Shunt 300
Get to Know Renogy Smart Shunt 300 2.1. What’s In the Box? Renogy Smart Shunt 300 × 1 ST4 x 18 mm RENOGY Smart Shunt 300 RSHST-B02P300-G1 VERSION A0 QUICK GUIDE Quick Guide × 1 Mounting Screws x 3 (1 extra) -
Page 7: Product Overview
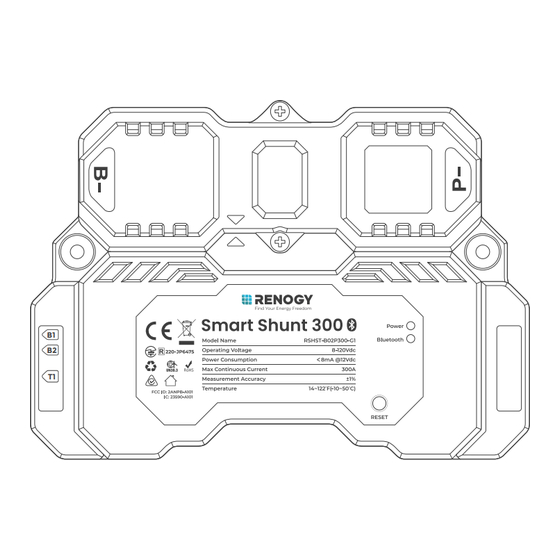
2.3. Product Overview █ Exterior Upper Cover Mounting Hole Mounting Hole Power LED Indicator Bluetooth LED Indicator Lower Cover RESET Button █ Interior (with the covers removed) B- Terminal (M10) P- Terminal (M10) B1 and B2 Terminals Battery Temperature Sensor (T1) Port 2.4. - Page 8 120V. Main batteries in parallel Positive Negative Temperature BAT+ BAT- Main Batteries Starter Battery (optional) Loads / Chargers / Inverters You can connect the Smart Shunt 300 to a starter battery via the B2 port on demand. — 4 —...
- Page 9 120V. Main batteries in series Positive Negative Temperature BAT+ BAT- Main Batteries Starter Battery (optional) Loads / Chargers / Inverters You can connect the Smart Shunt 300 to a starter battery via the B2 port on demand. — 5 —...
-
Page 10: Preparation
Make sure that the Renogy Smart Shunt 300 is installed with ambient temperature range from -4°F to 122°F or -20°C to 50°C. Make sure that the Renogy Smart Shunt 300 is installed in an environment with relative humidity between 0% and 95% and no condensation. -
Page 11: Check System Voltage And Current
3.3. Check System Voltage and Current Ensure the smart shunt operates within a power system with a maximum system voltage of 120V and a continuous current of up to 300A. Exceeding these voltage and current limits may cause damage to the shunt. 8V to 120V Risk of electric shock! Before installing the shunt, please turn off all devices within the system and ensure there is no current flowing through the circuit. - Page 12 Step 2: Thread the exposed bare wire through a piece of heat shrink tubing. Heat Shrink Tubing Step 3: Attach a 3/8-inch lug onto the end of the bare wire. Step 4: Securely crimp the lug onto the bare wire using a manual hydraulic pliers.
-
Page 13: Installation
Installation To ensure safe and efficient operation of the inverter charger and to avoid potential damage or hazards, always follow the installation instructions in the sequence described in this manual. 4.1. Wear Insulating Gloves Insulating Gloves 4.2. Remove the Covers █... -
Page 14: Connect The Shunt To The Main Battery Negative
4.3. Connect the Shunt to the Main Battery Negative Renogy Smart Shunt 300 STEP-1 Install the bare wire on the shunt B- terminal. 173.5—224.8 in·lbs (19.6—25.4 N·m) Bare Wire STEP-2 Install the bare wire on the battery negative. Main Battery 4.4. -
Page 15: Connect The Shunt To The Main Battery Positive
4.5. Connect the Shunt to the Main Battery Positive Renogy Smart Shunt 300 STEP-1 Install the B+ wire on the shunt B1 terminal. Open Close B1 Wire STEP-2 Install the B+ wire on the main battery positive. Main Battery 4.6. Install a Battery Temperature Sensor... -
Page 16: Connect The Shunt To The Starter Battery Positive (Optional)
4.7. Connect the Shunt to the Starter Battery Positive (Optional) Renogy Smart Shunt 300 STEP-1 Install the B+ wire on the shunt B2 terminal. Open Close B2 Wire STEP-2 Install the B+ wire on the starter battery positive. Starter Battery 4.8. -
Page 17: Install The Covers
4.9. Install the Covers █ Install the Lower Cover █ Install the Upper Cover (Optional) Installing the Upper Cover is optional in cases where the terminals are not enclosed by the cover. — 13 —... -
Page 18: Configuration
█ Initial Paring For initial startup, follow the steps below to pair the shunt with the DC Home app or Renogy ONE. Step 1: On DC Home or Renogy ONE, navigate to “Add Devices”. - Page 19 █ Pairing with Another Device Step 1: Remove the shunt from the DC Home app or ONE. Alternatively, you can press and hold RESET on the shunt for 5s. Step 2: After the Bluetooth LED turns off, redo scanning and pairing. —...
-
Page 20: Energy Monitoring
5.3. Energy Monitoring Depending on the specific application, the shunt can establish either short-range or long-range communication connections with monitoring devices. These monitoring devices including RENOGY ONE Core and DC Home facilitate real-time monitoring, programming, and complete system management, offering comprehensive control and enhanced flexibility. - Page 21 █ Wireless Long-Range Monitoring If long-range communication and programming are required, connect the shunt to RENOGY ONE Core (sold separately) through Bluetooth, and the RENOGY ONE Core to the DC Home app through Wi-Fi. Recommended Components *RENOGY ONE Core Components marked with “*” are available on renogy.com.
-
Page 22: Soc Synchronization
After there has been an interruption in the voltage supply to the DC Home or Renogy ONE z When the battery has not been fully charged z When the DC Home or Renogy ONE has not detected that the battery has been fully charged because the “Charging Amps” has been set incorrectly. - Page 23 Step 4: Tap “Sync” to complete the synchronization. █ Renogy ONE In the Renogy ONE, follow the steps below to synchronize the battery SOC in your system: Step 1: Tap the shunt details page. Tap "..." in the upper-right corner of the page.
- Page 24 Step 4: Tap “Sync” to complete the synchronization. — 20 —...
-
Page 25: Led Indicators
LED Indicators Power LED Indicator Off: Power Off Solid: Power On Bluetooth LED Indicator Off: No Bluetooth device connected Solid: Bluetooth connected — 21 —... -
Page 26: Troubleshooting
Troubleshooting Issue Possible Cause Solution In DC Home or Renogy ONE, the current is shown as negative Inspect for reverse contact on B- Reverse polarity contact when charging and positive or P- terminals. when discharging. Incorrect temperature The temperature sensor wiring is... -
Page 27: Faq
█ Can I monitor more than two batteries in parallel and series with one Smart Shunt 300? Yes, you can monitor more than two batteries in parallel and series with one Renogy Smart Shunt 300. Just ensure that the total system voltage and maximum current draw are within the specified limits, and follow the installation instructions accordingly. -
Page 28: Dimensions And Specifications
3.82 in (97 mm) 5.27 in (134 mm) 0.87 in (22 mm) Dimension tolerance: ±0.5 mm (0.2 in) 9.2. Technical Specifications Product Name Renogy Smart Shunt 300 Model Name RSHST-B02P300-G1 Operating Voltage 8V to 120V DC Power Consumption < 0.1 W... - Page 29 Dimensions 5.27 x 3.82 x 1.22 in (134 x 97 x 31 mm) Weight 0.57 lb (260g) Certifications CE, FCC ID, IC ID, RCM, TSCA, RoHS, UN38.3, and TELEC Warranty 1 year — 25 —...
-
Page 30: Maintenance
Cleaning Follow the steps below to clean the Renogy Smart Shunt 300 regularly. z Shut down Renogy Smart Shunt 300. If you clean the inside of the device, you need to disconnect the power supply. z Wipe the charger housing and connector contacts with a damp cloth or non-metallic brush. If it is not clean after wiping, use a household cleaner. -
Page 31: Emergency Responses
Put out the fire with a fire extinguisher. Acceptable fire extinguishers include water, CO2, and ABC. Do not use type D (flammable metal) fire extinguishers. Flooding If the Renogy Smart Shunt 300 is submerged in water, stay away from the water. Disconnect all cables connected to the Renogy Smart Shunt 300. Smell Disconnect all cables connected to the Renogy Smart Shunt 300. -
Page 32: Renogy Support
Questionnaire Investigation To explore more possibilities of solar systems, visit Renogy Learning Center at: renogy.com/learning-center For technical questions about your product in the U.S., contact the Renogy technical support team through: renogy.com/contact-us 1(909)2877111 For technical support outside the U.S., visit the local website below: Canada ca.renogy.com... -
Page 33: Fcc & Rss
FCC & RSS FCC Statement This device complies with Part 15 of the FCC Rules. Operation is subject to the following two conditions: (1) This device may not cause harmful interference, and (2) This device must accept any interference received, including interference that may cause undesired operation. - Page 34 Save 105 gallons of water from being consumed Renogy Power PLUS Renogy Power Plus allows you to stay in the loop with upcoming solar energy innovations, share your experiences with your solar energy journey, and connect with like-minded people who are changing the world in the Renogy Power Plus community.
Need help?
Do you have a question about the Smart Shunt 300 and is the answer not in the manual?
Questions and answers