Roland Aerophone Pro AE-30 - Digital Wind Instrument Manual
- Owner's manual (24 pages) ,
- Parameter manual (75 pages) ,
- Manual (13 pages)
Advertisement
- 1 Main Specifications
- 2 Panel Descriptions
- 3 Before You Play
- 4 Performing
- 5 Using the Aerophone Pro with a Computer or Smartphone
- 6 Making Settings in the Menu
- 7 Shortcut
- 8 Caring for the Aerophone Pro
- 9 Troubleshooting
- 10 USING THE UNIT SAFELY
- 11 IMPORTANT NOTES
- 12 Documents / Resources
Main Specifications
| Power Supply | AC adaptor (DC 5.7 V) Ni-MH battery (AA, HR6) (sold separately) x 6 |
| Current Draw | 915 mA |
| Expected battery life under continuous use | approximately 6 hours (When using batteries having a capacity of 1,900 mAh.)
|
| Sound Generator | ZEN-Core SuperNATURAL acoustic |
| Parts | 4 Parts (Drum: 1 Part) |
| Preset Memory | Preset Scenes: more than 300 |
| User Memory | User Scenes: 600 Favorite Scenes: 12 |
| Effects | Multi-effects Chorus Delay Reverb |
| Bluetooth | Ver 4.2 Profile Support: A2DP (Audio), GATT (MIDI over Bluetooth Low Energy) Codec: SBC (Support to the content protection of the SCMS-T method) |
| Dimensions | 133 (W) x 84 (D) x 687 (H) mm 5-1/4 (W) x 3-5/16 (D) x 27-1/16 (H) inches |
| Weight (including batteries) | 1,140 g 2 lbs 9 oz |
| Accessories | Owner's Manual, Leaflet "USING THE UNIT SAFELY", AC adaptor, USB cable (Type C–Type A), Mouthpiece cap, Band, Thumb hook cover (2 types), Water basin, Dedicated hand carry bag |
| Options (sold separately) | Replacement Mouthpiece (OP-AE05MPH) |
* This document explains the specifications of the product at the time that the document was issued. For the latest information, refer to the Roland website.
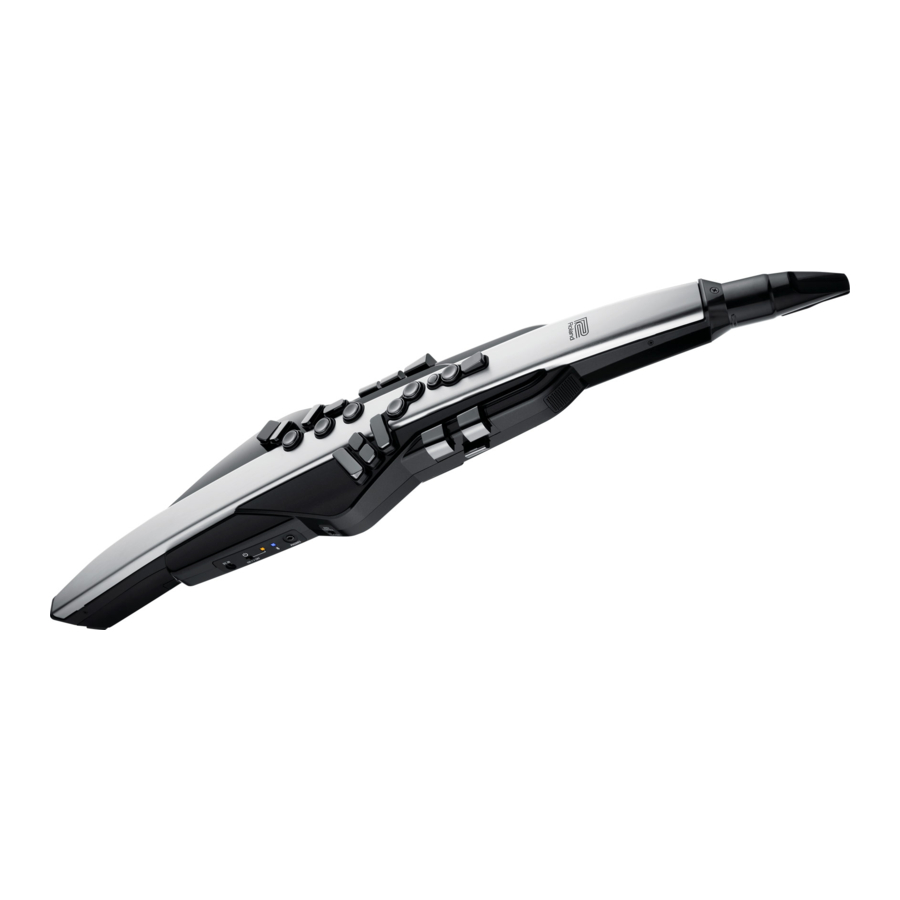
Panel Descriptions

- Mouthpiece Cap
Protects the mouthpiece. When you're not playing, leave the mouthpiece cap attached. Press it on until you hear it click into place.- When removing or attaching the mouthpiece cap, take care not to touch the reed.
- Mouthpiece
A dedicated mouthpiece for the Aerophone that is constructed as a single unit with the reed.
→ "Embouchure"- When attaching the mouthpiece, take care not to pinch your finger between the movable part and the body of the instrument.
- Band
Prevents saliva from reaching the unit during performance, and entering the interior from around the buttons, switches, or performance keys. - Performance keys
These keys are used for performance. They allow performance using the same fingering as a saxophone. Some keys, such as the side keys, allow you to assign various functions or parameters.
→ "Pressing the Performance Keys"
→ "Assigning Functions to Controllers (Assign)"
→ Fingering Chart of "Aerophone Pro Parameter Guide" (PDF) - [S1] / [S2] buttons
You can assign a variety of functions or parameters to these buttons.
→ "Assigning Functions to Controllers (Assign)" - Octave keys
These buttons switch octaves. You can assign them to switch ±2 or ±3 octaves, or to sax compatible mode. Operate them using the left-hand thumb.
→ "Aerophone Pro Parameter Guide" (PDF) - Thumb rest
Place your left thumb here.
→ "Holding the Aerophone Pro" - Display
This indicates the scene (sound) name and various parameters.- The display of this unit automatically turns off when a certain length of time has elapsed since the unit was last operated.
- [SCENE] (
![]() ) buttons
) buttons
Use these buttons to select scenes (sounds).
→ "Making Sound Settings" - [-][+] (
![]() ) buttons
) buttons
Use these buttons to select menu items or edit values. - [MENU] button
Use this button to specify the details of the system, scene, assign, and MIDI control settings.
By long-pressing the [MENU] button you can access a screen where you can register user scenes and favorite scenes.
→ "Making Settings in the Menu"
→ "Storing a user scene"
"Registering a favorite scene" - Thumb lever
This raises or lowers the pitch. You can assign a variety of functions or parameters to this lever. Operate it using the right-hand thumb.
→ "Assigning Functions to Controllers (Assign)"
→ "Aerophone Pro Parameter Guide" (PDF) - Thumb pad
You can assign a variety of functions or parameters to this pad. Operate it using the right-hand thumb.
→ "Assigning Functions to Controllers (Assign)" - [SCENE CATEGORY] knob
→ "Making Sound Settings"Turn Switch preset scene categories. Turn while holding down the [SCENE] ( ![]() ) button
) button Switch user scene banks. Turn while holding down the [SCENE] ( ![]() ) button
) button Switch favorite scenes. - [TRANSPOSE] knob
Selects the base key.
→ "Selecting the Key in Which to Play"
You can use the [TRANSPOSE] knob to adjust the volume of the audio sent to the speakers or to an external output.
→ "Aerophone Pro Parameter Guide" (PDF) - Battery case
If you are using this unit on batteries, insert six Ni-MH batteries (AA).
Turn the screw to open or close the cover of the battery compartment. When performing, make sure that the cover of the battery compartment is firmly fastened with the screw.
→ "Selecting the Power Source" - Cord hook
If cords are attached to the unit while in use, secure them to the cord hook. This prevents the cord from being inadvertently unplugged if it is pulled, and prevents the connector from being stressed. - Water drain
Drops of water will exit here. - Water basin
This cover receives water droplets that come out of the water drain. This prevents the water droplets from falling to the floor. After use, remove the cover and discard the water that has accumulated.- Fit the rounded protrusion of the water basin into the depression at the lower part of this unit.
- Built-in speakers
A speaker is located at each side of this unit, left and right. These speakers allow the performer to hear the sound for monitoring purposes. - Strap ring
Attach a commercially available neck strap designed for musical instruments here. - Thumb hook
Place your right thumb under the hook. Attach the included thumb hook cover as desired.
→ "Holding the Aerophone Pro" - [MIDI CONTROL] switch
This switch turns MIDI control mode on/off. If you are using this unit as a MIDI controller, turn this switch on.
→ "Assigning MIDI Control to a Controller (MIDI Control)" - Bluetooth LED (blue)
The LED indication shows the Bluetooth function's on/off status.
→ "Using the Aerophone Pro with a Smartphone"Lit Bluetooth function on Blinking Waiting to connect via Bluetooth audio Unlit Bluetooth function off - Power LED (orange)
The LED indicates whether the power is on/off and the amount remaining in the batteries.Lit Power on Blinking Batteries are low Unlit Power off - [
![]() ] switch
] switch
Turns the power on/off.
→ "Turning the Power On/Off"


Connect Your Equipment
- MIDI OUT connector
- MIDI IN connector
Use these to connect this unit to an external sound module or other device, so that MIDI messages can be transmitted and received. Use MIDI cables (commercially available) to make these connections. - PHONES jack (stereo mini)
Connect headphones.
→ "Connecting Headphones or External Speakers" - DC IN jack
Connect the included AC adaptor here.
→ "Selecting the Power Source" - OUTPUT jack (stereo 1/4" phone type)
This is an output jack for audio signals. Connect it to your amplified speakers etc.
→ "Connecting Headphones or External Speakers" - USB port (Type-C)
Use the included USB cable (Type C–Type A) to connect this unit to your computer so that MIDI and audio can be transmitted or received.
You can also connect a USB flash drive to update this unit if a new version of the system program becomes available.
→ "Using the Aerophone Pro with Computer Software"- This unit will not operate on USB power. Do not connect a power supply to the USB port.
- Never turn off the power or remove the USB flash drives while the screen indicates "Writing..."
Product serial number
This unit's serial number is listed inside the battery compartment. Enter the product serial number when performing user registration for this unit.

Before You Play
Selecting the Power Source
The Aerophone Pro can operate on batteries or on the included AC adaptor.
When using batteries
This allows approximately 6 hours of playing.
- Insert six Ni-MH batteries (AA).
![]()
- Battery life can vary depending on the specifications of the batteries, capacity of the batteries, and the conditions of use.
- When the batteries run low, the power LED (orange) blinks. Replace the battery as soon as possible.
- When turning the unit over, be careful so as to protect the buttons and knobs from damage. Also, handle the unit carefully; do not drop it.
- If you handle batteries improperly, you risk explosion and fluid leakage. Make sure that you carefully observe all of the items related to batteries that are listed in "USING THE UNIT SAFELY" and "IMPORTANT NOTES".

When using AC adaptor
You can play without being concerned about how much battery power you have left.
- Connect the included AC adaptor as shown in the illustration.
![]()
- Use the cord hook to secure the cord of the AC adaptor as shown in the illustration.
![]()
- Use the cord hook to secure the cord of the AC adaptor as shown in the illustration.


NOTE
This unit cannot charge batteries that are installed in it, even if it is connected by an AC adaptor that's plugged into an AC outlet. Use a commercially available charger to charge the batteries.
Connecting Headphones or External Speakers
- To prevent malfunction and equipment failure, always turn down the volume, and turn off all the units before making any connections.


Turning the Power On/Off
Turning the power on
- If an external device is connected to this unit, minimize its volume before you turn on the power.
- Turn the unit's [
![]() ] switch "ON".
] switch "ON".
The power LED is lit, and the display shows the scene screen. - If an external device is connected to this unit, power-on the external device, and then adjust the volume.
Turning the power off
- If an external device is connected to this unit, turn off the power of the connected external devices.
- Turn the unit's [
![]() ] switch "OFF".
] switch "OFF". - The power to this unit will be turned off automatically after a predetermined amount of time has passed since it was last used for playing music, or its buttons or controls were operated (Auto off function). If you do not want the power to be turned off automatically, disengage the Auto Off function.
- Unsaved data is lost when the power turns off. Before turning the power off, save the data that you want to keep.
- To restore power, turn the power on again.
- You might hear some sound when switching the unit on/off. However, this is normal and does not indicate a malfunction.
- The power to this unit will be turned off automatically after a predetermined amount of time has passed since it was last used for playing music, or its buttons or controls were operated (Auto off function). If you do not want the power to be turned off automatically, disengage the Auto Off function.
Adjusting the Volume
The volume is adjusted by the strength of your breath when performing, but you can use a menu setting to adjust the overall volume.
Aerophone Pro built-in speakers
- Press the [MENU] button.
The Menu screen appears. - Use the [-][+] (
![]() ) buttons to select "Speaker Volume", and press the [MENU] button.
) buttons to select "Speaker Volume", and press the [MENU] button. - Use the [-][+] (
![]() ) buttons to adjust the volume.
) buttons to adjust the volume.
 ) buttons to select "Speaker Volume", and press the [MENU] button.
Headphones/external speakers
- Press the [MENU] button.
The Menu screen appears. - Use the [-][+] (
![]() ) buttons to select "Output Volume", and press the [MENU] button.
) buttons to select "Output Volume", and press the [MENU] button. - Use the [-][+] (
![]() ) buttons to adjust the volume.
) buttons to adjust the volume.
You can use the [TRANSPOSE] knob to adjust the volume of the audio sent to the speakers or to an external output.
→ "Aerophone Pro Parameter Guide" (PDF)
Performing
Holding the Aerophone Pro
- Hold the Aerophone Pro as shown in the illustration.
![]()
- Place your left thumb on the thumb rest, and place your right thumb under the thumb hook.
- Use a commercially available neck strap designed for musical instruments.

Selecting the Key in Which to Play
Transposes the pitch range of the tone in semitone steps.
- Turn the [TRANSPOSE] knob.
![]()

 The operation of the [TRANSPOSE] knob differs depending on the value of the system setting "Transpose Mode".
- If Transpose Mode is "System" (default value)
Transposition is always the value of the [TRANSPOSE] knob. - If Transpose Mode is "Scene"
The transposition will be as specified by the scene.- The value indicated by the [TRANSPOSE] knob might be different than the actual transposition.
- Even if transposition is specified for the scene, turning the [TRANSPOSE] knob sets the transposition to the value of the knob.
How to set the Transpose Mode
- Press the [MENU] button.
The Menu screen appears. - Use the [-][+] (
![]() ) buttons to select "Transpose Mode," and press the [MENU] button.
) buttons to select "Transpose Mode," and press the [MENU] button.
The cursor position moves to the lower line.
![]()
- Use the [-][+] (
![]() ) buttons to change the value.
) buttons to change the value.

Embouchure
Hold the mouthpiece lightly between your upper teeth and lower lip, and blow into it.

- By using tonguing (using your tongue to control your breath) and legato you can control the sound more expressively.
- You can control the pitch by the strength with which you bite the reed.
→ "Aerophone Pro Parameter Guide" (PDF)
Pressing the Performance Keys
You can perform using the same fingering as on a saxophone.
→ For details on fingering, refer to "Fingering Chart".

- When you lay down this unit, attach the mouthpiece cap and lay the unit down with the performance keys upward. Laying down the unit with the performance keys downward might cause problems such as the buttons failing to return.
Making Sound Settings
Overview

Tone
A sound that's assigned to a part is called a "tone". A tone consists of four partials. You can edit tone settings such as the oscillator, filter, and effect (MFX).
Part
You can assign a sound (tone) to each of four parts, and make pan and EQ settings for it. One tone is assigned to each part for performance. There are four parts. Drum kit tones can be assigned only to part 1. If a drum kit tone is assigned to part 1, parts 2–4 are not available.
Scene
A "scene" contains the settings for each part (tone number, pan, volume, etc.), the settings common to all parts (scene effects, etc.), the assignment settings for each controller, the MIDI control settings and so on.
When performing, it is convenient to save your scene settings in a user bank ahead of time, and then switch between scenes during your performance. There are 50 scenes x 12 banks, allowing you to save a total of 600 scenes. Up to 12 preset scenes and user scenes can also be registered as Favorites.
- Detailed settings for tones, parts, and scenes can be controlled from the "Aerophone Pro Editor" app (iOS/Android).


System settings
Here you can make various settings for the Aerophone Pro unit itself.
The assignment and MIDI control settings are found in both the system and scene settings. You can set which setting to use from the "Asgn Src Breath" – "Asgn Src Key" parameters in the system settings.
What is SuperNATURAL sounds?
These are proprietary Roland sounds created using Behavior Modeling Technology, which enables natural and rich expression that was difficult to achieve on earlier sound generators.
About [SCENE CATEGORY] knob
Use [SCENE CATEGORY] knob to switch between preset scene categories, user scene banks, or favorite scenes. For details on how to edit each scene.
Playing the Internal Sounds (PRESET SCENE)
Here's how to select a preset scene (internal sounds). This unit contains sounds of 12 categories including synthesizer, wind instruments, and ethnic instruments.
- Turn the [SCENE CATEGORY] knob to select the category of sound.
![]()
- Use the [SCENE] (=/?) buttons to select a scene.
![]()


If you long–press a [SCENE] ( ) button, the scene switches consecutively, and stops at the beginning of the category.
| No. | Category |
| 1 | Synth Hard Lead |
| 2 | Synth Soft Lead |
| 3 | Synth Pad/Strings |
| 4 | Synth Brass/Bass |
| 5 | Woodwinds |
| 6 | Brasswinds |
| 7 | Strings |
| 8 | Ethnic |
| 9 | Keyboard |
| 10 | Guitar/Bass |
| 11 | Vox/Choir |
| 12 | Percussion |
Reference
For a list of scenes, refer to "Aerophone Pro Scene List" (PDF).
Editing the Sound to Your Taste (USER SCENE)
You can edit a preset scene (internal sound) and save it as a "user scene".
Editing the scene
Scene editing is done via the "Aerophone Pro Editor" app.
→ "Using the Aerophone Pro with a Smartphone"
→ "Aerophone Pro Parameter Guide" (PDF)
Storing a user scene
You can save one bank (50 scenes) in each position of the [SCENE CATEGORY] knob.
This means that you can save up to 600 user scenes.

| User bank | User scene |
| 1–12 | 1–50 |
- Long-press the [MENU] button.
"Write Scene" blinks.
![]()
If you decide to cancel, press the [MENU] button. - Use the [-](
![]() ) buttons to select "User".
) buttons to select "User". - Use the [SCENE CATEGORY] knob to select a user bank.
- Use the [-][+] (
![]() ) buttons to specify the user scene number in which you want to save the currently selected scene.
) buttons to specify the user scene number in which you want to save the currently selected scene. - Press the [MENU] button.
A screen appears, allowing you to edit the name of the scene.
![]()
- If you want to edit the name, press the [
![]() ] (YES) button.
] (YES) button. [-][+] ( ![]() ) button
) buttonMoves cursor [SCENE] ( ![]() ) button
) button Change the character [S1] button Insert one character [S2] button Delete one character ![]()
- Press the [MENU] button.
A confirmation message appears.
![]()
- To write the scene, press the [+] (
![]() ) button. If you decide not to write, press the [-] (
) button. If you decide not to write, press the [-] (![]() ) button.
) button.
After writing is completed, the user scene that you wrote is shown.


Selecting a user scene
- While holding down the [SCENE](
![]() ) button, turn the [SCENE CATEGORY] knob to select a user bank.
) button, turn the [SCENE CATEGORY] knob to select a user bank.
The User Scene screen appears.
![]()
- Use the [SCENE] (
![]() ) buttons to select a user scene.
) buttons to select a user scene.

Clearing all user scenes
If you want to clear all of the user scenes that you saved, proceed as follows. When you clear the scenes, they return to the factory-set user scenes.
- Press the [MENU] button.
The Menu screen appears. - Use the [-][+] (
![]() ) buttons to select "User Scene Clear", and press the [MENU] button.
) buttons to select "User Scene Clear", and press the [MENU] button.
A confirmation message appears.
![]()
- To clear the user scene, press the [+](
![]() ) button. If you decide to cancel, press the [-](
) button. If you decide to cancel, press the [-](![]() ) button.
) button.
A confirmation message appears again.
![]()
- To execute, press the [MENU] button. If you decide to cancel, press the [-](
![]() ) button.
) button.
The display indicates "Executing...", and all user scenes are cleared. - Once the message "Completed!" appears on screen, press the [MENU] button to return to the menu screen.


Instantly Recalling Sounds (FAVORITE SCENE)
You can register up to 12 of your favorite scenes (preset scenes or user scenes) for instant recall. These are called "favorite scenes". It is convenient to register scenes in the order in which you use them during your live performance, so that you can instantly recall the next scene when needed.
Favorite scene (example)

Registering a favorite scene
- Long-press the [MENU] button.
"Write Scene" blinks.
![]()
If you decide to cancel, press the [MENU] button. - Use the [+](
![]() ) buttons to select "Favorite".
) buttons to select "Favorite".
![]()
- Use the [-][+] (C/A) buttons or [SCENE CATEGORY] knob to specify the favorite scene number in which you want to save the currently selected scene.
- Press the [MENU] button.
A confirmation message appears.
![]()
- To write the scene, press the [+] (
![]() ) button. If you decide not to write, press the [-] (
) button. If you decide not to write, press the [-] (![]() ) button.
) button.
After writing is completed, the scene that you wrote is shown.


Selecting a favorite scene
- While holding down the [SCENE](
![]() ) button, turn the [SCENE CATEGORY] knob.
) button, turn the [SCENE CATEGORY] knob.
The scenes registered in Favorites are selected.
You can change the system settings to allow favorite scenes to be switched simply by turning the [SCENE CATEGORY] knob without having to hold down the [SCENE] knob.
→ "Aerophone Pro Parameter Guide" (PDF)
> Settings Used on this Instrument > System Parameters > Category Knob Mode > Favorite
Using the Aerophone Pro with a Computer or Smartphone
If you use Bluetooth to wirelessly connect the Aerophone Pro to a smartphone, tablet, or other mobile device (subsequently referred to as "smartphone"), you'll be able to perform along with a song that's being played back on the smartphone, and use the "Aerophone Pro Editor" app. If you use the included USB cable to connect this unit to a computer, you'll be able to transmit and receive MIDI and audio.
Using the Aerophone Pro with a Smartphone
Setting Procedure
Pairing
In order to wirelessly connect the Aerophone Pro to the smartphone via Bluetooth, you need to "pair" the unit with the smartphone so that the two devices can authenticate with each other.
As an example, we explain how to make settings for an iPhone.
The pairing process
Separate pairing is required for "Performing Along with a Song from Your Smartphone" and for "Using the Aerophone Pro with an App." Note that these processes are different.
Performing Along with a Song from Your Smartphone
Settings on the Aerophone Pro

Settings on the smartphone
Using the Aerophone Pro with an App
Settings on the smartphone
Settings on the App
Performing Along with a Song from Your Smartphone
- Bluetooth audio supports only input. Audio cannot be output to Bluetooth speakers or headphones.
- Once a smartphone has been paired with Aerophone Pro, there is no need to perform pairing again. Refer to "Connecting an alreadypaired smartphone".
Pairing with the smartphone
- Place the smartphone that you want to connect near Aerophone Pro.
- Press the [MENU] button.
The Menu screen appears. - Use the [-][+] (
![]() ) buttons to select "BT Audio Pairing", and press the [MENU] button.
) buttons to select "BT Audio Pairing", and press the [MENU] button.
The cursor moves to the lower line, and the display indicates "Yes" "No".
![]()
![information]() If the Aerophone Pro's Bluetooth function is off, use MENU to turn "Bluetooth" to "On".
If the Aerophone Pro's Bluetooth function is off, use MENU to turn "Bluetooth" to "On". - Use the [+](
![]() ) button to select "Yes".
) button to select "Yes".
![]()
The Bluetooth LED blinks, and the Aerophone Pro waits for pairing. - Turn on the Bluetooth function of your smartphone.
![]()
- Tap "AE-30 AUDIO" that appears in the smartphone's Bluetooth "DEVICES" field.
Aerophone Pro and smartphone are paired. When pairing is completed, a display like the following appears.Smartphone "AE-30 AUDIO" is added to the "My devices" area, and shown as "Connected". Aerophone Pro The screen indicates "Connected".
![]()


Playing back songs from your smartphone
When you play back a song on the smartphone, the sound is heard from the Aerophone Pro's built-in speakers (or from headphones).
Use your smartphone to adjust the volume of the song.
Connecting an already-paired smartphone
- Turn on the Bluetooth function of your smartphone.
Aerophone Pro and the smartphone are connected wirelessly.- If the above step does not establish a connection, tap "AE-30 AUDIO" that are shown in the "DEVICES" field of the smartphone.
Using the Aerophone Pro with an App
You can connect the Aerophone Pro with the "Aerophone Pro Editor" app, and edit scenes (sounds) or perform remote control operations from the smartphone.

- Apps can be downloaded from the App Store (iOS) or from Google Play (Android).
![]()

As an example, we explain the settings when using "Aerophone Pro Editor" with an iPhone.
Pairing with the app
If the Aerophone Pro's Bluetooth function is off, use MENU to turn "Bluetooth" to "On".
- Turn on the Bluetooth function of your smartphone.
![]()
NOTE
Even if the "DEVICES" area shows the name of the product that you're using (e.g., AE-30), do not tap it. If you tapped this, temporarily cancel the device registration, and perform the procedure again from step 1. - Start the app "Aerophone Pro Editor" on your smartphone.
- From your smartphone app "Aerophone Pro Editor", initiate pairing.
The Aerophone Pro is paired with the app. When pairing is completed, the app indicates "Connected to Aerophone".

Using the Aerophone Pro with Computer Software
You can connect the Aerophone Pro to a computer via the included USB cable, and record your performance as audio or MIDI using a DAW or other software on the computer, or play software synthesizers in a DAW from the Aerophone Pro.
- Do not use a USB cable that is designed only for charging a device. Charge-only cables cannot transmit data.
![]()

In order to connect the Aerophone Pro to a computer and send/ receive MIDI or audio, you'll need to install the USB driver.
The USB driver is software that transfers data between the Aerophone Pro and the software such as DAW on your computer.
For details on downloading and installing the USB driver, refer to the Roland website.
http://www.roland.com/support/
Making Settings in the Menu
Here's how to specify the details of the system, scene, assign, and MIDI control settings.
Making System Settings and Scene Settings
- Press the [MENU] button.
The Menu screen appears.
![]()
(Menu Type System:
System settings, Scene: Scene settings,
Assign: Assign settings, MIDI: MIDI control settings) - Use the [-][+] (
![]() ) buttons to select a menu item.
) buttons to select a menu item.
![information]() Hold down the [-] [+] (
Hold down the [-] [+] (![]() ) buttons to make the menus change in series, stopping at the beginning of each menu type (System, Scene, Assign, MIDI).
) buttons to make the menus change in series, stopping at the beginning of each menu type (System, Scene, Assign, MIDI). - Press the [MENU] button.
The cursor position moves to the lower line.
![]()
- Use the [-][+] (
![]() ) buttons to change the value.
) buttons to change the value.
![information]()
- You can long-press the [MENU] button to move to the USER/ FAVORITE registration screen.
- Press the [SCENE] button to return to the scene screen from the menu screen.


What is system settings and scene settings?
Menu settings contain system settings and scene settings.
- "System settings" are common to all scenes. These settings are saved automatically when you change them.
- "Scene settings" are the settings for each scene. Edited settings are not automatically saved. If you want to keep the settings, save them to a user scene.
→ "Editing the Sound to Your Taste (USER SCENE)"
System Settings
System settings are common to all scenes.
→ The following table explains part of the items in system settings. For a list of the items in system settings, refer to "Aerophone Pro Parameter Guide" (PDF).
| Indication | Value | Explanation | ||||||||
| Transpose Mode | Switches the operating mode for transpose. | |||||||||
| System | Turn the [TRANSPOSE] knob to transpose the sound in that amount. The transposition does not change even when you select a scene. | |||||||||
| Scene | The transposition will be as specified by the scene.
| |||||||||
| Transpose Knob Mode | These parameters configure the functions for the [TRANSPOSE] knob. | |||||||||
| System Transpose | Specifies that the [TRANSPOSE] knob is used for the transpose function. | |||||||||
| Speaker Volume | Specifies that the [TRANSPOSE] knob is used for adjusting the volume of the built-in speakers. | |||||||||
| Output Volume | Specifies that the [TRANSPOSE] knob is used for adjusting the volume for headphones connected to the PHONES jack, or of the signal output from the OUTPUT jack. | |||||||||
| Speaker & Output | Specifies that the [TRANSPOSE] knob is used for simultaneously adjusting the volume of the built-in speakers and of headphones connected to the PHONES jack, as well as the signal output from the OUTPUT jack. | |||||||||
| System Tranpose | -5 (G) – 0 (C) – +6 (F#) | Sets the system transpose value. | ||||||||
| Display Off Time | Always On, 3sec, 10sec, 30sec, 1–3min | Sets the time it takes for the display to turn off when the instrument is not being used. When set to "Always On", the display is always on. When you press the [SCENE] or [MENU] button while the display is off, the display turns back on. | ||||||||
| Auto Off | Always On, 5min, 30min | Sets the time before the instrument automatically turns off. The power to this unit will be turned off automatically after a predetermined amount of time has passed since it was last used for playing music, or its buttons or controls were operated (Auto Off function). If you don't want the unit to turn off automatically, change this setting to "Always On". | ||||||||
| Output Volume | 0–11 | Specifies the volume that is output from the OUTPUT jack or from headphones connected to the PHONES jack. | ||||||||
| Output Mode | Stereo, Mono | Sets whether the audio signal output from the PHONES or OUTPUT jack is outputted in stereo or in mono. | ||||||||
| Breath Curve | Specifies how the sound responds to the force of your breath (breath sensitivity). | |||||||||
| L5–L1 | We recommend these settings if you're a beginning wind instrument player. Fortissimo (ff) can be produced even by blowing relatively softly. |  | ||||||||
| M | This is the usual setting. | |||||||||
| H1–H5 | We recommend these settings for experienced wind instrument players. Fortissimo (ff) is produced only when you blow quite strongly. | |||||||||
| Bite Ctrl Mode | These parameters set how the bite sensor controls the sound. | |||||||||
| Off | Turns off the bite sensor control. | |||||||||
| Sax | Reducing the strength of your bite on the reed makes the pitch fall. | |||||||||
| E-Wind | Cyclically varying the strength of your bite on the reed applies vibrato. | |||||||||
| Bend Range Source | System, Scene | Selects whether the bend range in system settings (System) or the bend range set in each scene (Scene) is used when operating the pitch bend. | ||||||||
| Bend Range Mode | These parameters switch between bend range modes. | |||||||||
| Normal | Either the Bend Range Bite, Bend Range Motion or Bend Range Ctrl (whichever is larger) is used for the bend range. When you use both bite control and the thumb lever or other bend controls together, the bend range is limited to the maximum or minimum value and does not operate beyond this. | |||||||||
| Advance | Automatically calculates the bend range using the combination of Bend Range Bite, Bend Range Motion and Bend Range Ctrl. | |||||||||
| Asgn Src Breath | System, Scene | Selects whether to use the system settings (System) or the settings in each scene (Scene) for the Assign or MIDI parameter that is assigned to the breath control. | ||||||||
| Asgn Src Bite | Selects whether to use the system settings (System) or the settings in each scene (Scene) for the Assign or MIDI parameter that is assigned to the bite control. | |||||||||
| Asgn Src Lever | Selects whether to use the system settings (System) or the settings in each scene (Scene) for the Assign or MIDI parameter that is assigned to the thumb lever. | |||||||||
| Asgn Src Thumb Pad | Selects whether to use the system settings (System) or the settings in each scene (Scene) for the Assign or MIDI parameter that is assigned to the thumb pad. | |||||||||
| Asgn Src Motion | Selects whether to use the system settings (System) or the settings in each scene (Scene) for the Assign or MIDI parameter that is assigned to the motion control. | |||||||||
| Asgn Src S1/S2 | Selects whether to use the system settings (System) or the settings in each scene (Scene) for the Assign or MIDI parameters assigned to the [S1]/[S2] buttons. | |||||||||
| Asgn Src Key | Selects whether to use the system settings (System) or the settings in each scene (Scene) for the Assign or MIDI parameters assigned to the performance keys. | |||||||||
| Harmony Source | Selects whether to use the system harmony settings (System) or the harmony settings in each scene (Scene). | |||||||||
| Scene Shortcut | Off, On | This turns the shortcut function on/off, which is useful for switching between scenes. → "Shortcut" | ||||||||
| Bluetooth | Off, On | Turns the Bluetooth function on/off. | ||||||||
| Bluetooth ID | Off, 1–9 | If you are pairing with your smartphone in a location where there are multiple Aerophone Pro units, you can assign an ID to each unit. When you specify a Device ID, the specified number is added to the end of the device name that is shown on your smartphone or app. Example: "AE-30 AUDIO 1" "AE-30 1" etc.
| ||||||||
| BT Audio Pairing | (Pairing Start) | Perform the pairing to use Bluetooth audio. → "Playing back songs from your smartphone" | ||||||||
| MIDI Ctrl PC | Off, On | When the MIDI control mode is on, this switches the program change message output on/off. | ||||||||
| MIDI Ctrl BS | Off, On | When the MIDI control mode is on, this switches the bank select (MSB, LSB) output on/off. | ||||||||
| Key Delay | 0–10 | Sets the time it takes for the performance keys to actually produce sound when you play them. Unintended notes can be sounded due to inconsistent fingering when you press or release multiple keys simultaneously. The larger the value, the less likely it is for unintended notes to sound. | ||||||||
| Fingering Mode | Specifies the fingering mode. → For details on fingering in each mode, refer to "Fingering Chart". | |||||||||
| Sax | Sax fingering | |||||||||
| Recorder | Recorder fingering This uses standard recorder fingering, with the pitch range expanded by the table key. With this fingering, the side keys are disabled so that the note does not change even if you inadvertently press the left or right side key. | |||||||||
| E-Wind | Electronic wind instrument fingering The same "C D E F G A B C" fingering as a standard sax or recorder, with key combinations that raise/lower the pitch by a semitone.
| |||||||||
| Trumpet | Trumpet fingering This mode is close to the fingering of a typical brass instrument. Right-hand keys 4, 5, and 6 correspond to pistons 1, 2, and 3 of a trumpet. | |||||||||
| Left Hand | Fingering that lets you perform using only the left hand | |||||||||
| Right Hand | Fingering that lets you perform using only the right hand | |||||||||
| Flute | Flute fingering This uses standard flute fingering, with the pitch range expanded by the below keys.
| |||||||||
| Clarinet | Clarinet fingering This uses standard clarinet fingering, with the pitch range expanded by the below keys.
| |||||||||
| Factory Reset | – | The "Factory Reset" operation returns the system settings stored in the Aerophone Pro to their factoryset condition. → "Restoring the Factory Settings" | ||||||||
Scene Settings
These settings are for each individual scene.
- The following table explains about certain settings you can make on this instrument. For other settings, see the "Aerophone Pro Parameter Guide" (PDF).
You can use the "Aerophone Pro Editor" app to configure all scene settings.Indication Value Explanation Scene Volume 0 – 127 Specifies the volume of each scene. Scene Transpose -5 – 0 – +6 Specifies the transposition (pitch shift) of each scene. - If the system setting's transpose mode is "Scene, " this transpose value is applied when you select the scene.
- If, after selecting the scene, you operate the transpose knob, the transpose value of the knob is applied.
Scene Octave Shift -3 – 0 – +3 Specifies the octave shift setting of the scene. All Effects Off – Turns off all effects (chorus, reverb, delay and MFX) set for the scene.
To turn all effects off, press the [MENU] button and then press the [+] (![]() ) button.
) button.
If you edit the scene settings and then select a different scene without saving the edited settings, the following message screen appears.

If you want to switch scenes without saving, press the [-]( ) button. If you want to save the settings, press the [+](
 ) button. If you decide to cancel, press the [MENU] button.
You can also prevent this screen from appearing.
→ "Aerophone Pro Parameter Guide" (PDF)
> Settings Used on this Instrument > System Parameters > Edit Confirm
Assigning Functions to Controllers (Assign)
You can assign functions to controllers such as the buttons and the thumb lever, and specify how the functions are controlled.
For a list of the functions that you can assign, refer to "Aerophone Pro Parameter Guide" (PDF).
- The Assign parameters work when the settings in "Asgn Src" (assign source) of each controller of the system are set to "System". If Asgn Src is set to "Scene," each scene's assignment settings are used.
- Press the [MENU] button.
The Menu screen appears.
![]()
- Long-press a [–][+] (
![]() ) button to select an "Assign" parameter.
) button to select an "Assign" parameter.
![]()
![information]() If you long–press a [–][+] (
If you long–press a [–][+] (![]() ) button, the menu type switches between System, Scene, Assign, and MIDI.
) button, the menu type switches between System, Scene, Assign, and MIDI. - Press the [MENU] button.
The cursor position moves to the lower line.
![]()
- Use the [–][+] (
![]() ) buttons to specify the upper/lower limits in which a continuously-operated controller will function, or the values when a switch-type controller is pressed/released.
) buttons to specify the upper/lower limits in which a continuously-operated controller will function, or the values when a switch-type controller is pressed/released.
![information]() You can long-press the [MENU] button to move to the USER/FAVORITE registration screen.
You can long-press the [MENU] button to move to the USER/FAVORITE registration screen.


Assigning a continuously-variable controller
For breath (the strength of your breath), bite (the strength at which you bite the reed), thumb lever, thumb pad, and motion specify the following parameters.
- Indications of "***" in the table will contain the following names. The first parameter for Breath is shown as "Breath_1", the second parameter for S1 is shown as "S1_2" and so on.
Breath_1–8, BiteDn_1–4, BiteUp_1–4, LeverDn_1–2, LeverUp_1–2, ThumbPad_1–4, Motion_1–2 - For controllers whose Func parameter is "Off", their parameters related to the assign settings are not shown.
| Parameter | Indication | Value | Explanation | ||
| Assign Function | *** Func | → "Aerophone Pro Parameter Guide" (PDF) | Specify the function that is assigned to a continuously-operated controller. | ||
| Input Min Value | *** In Min | 0–127 | Specify the minimum value (Min) and maximum value (Max) in which controller operations are effective. | → "Function assignment (continuous operation)" | |
| Input Max Value | *** In Max | ||||
| Output Min Value | *** Out Min | 0–127 | Specify the minimum value (Min) and maximum value (Max) in which the assigned function operates. | ||
| Output Max Value | *** Out Max | ||||
| Mode | *** Mode | Momentary, Latch | Specifies the operation mode. | ||
| Latch | Each operation switches between Output Min Value and Output Max Value. The switch occurs at the mid-point value between Input Min Value and Input Max Value. | ||||
| Momentary | The function operates like a graph, according to how you operate the controller. | ||||
| Curve | *** Curve | Specifies the operation curve when the operation mode is Momentary. | |||
Function assignment (continuous operation)

Example 1

Example 2

- If Output Min is larger than Output Max, the Curve is vertically inverted.
Assigning a switch-type controller
For the [S1] / [S2] buttons and the side keys, specify the following parameters.
- Indications of "***" in the table will contain the following names.
S1_1–2, S2_1–2, X_1–2, C1_1–2, C2_1–2, C3_1–2, C4_1–2, C5_1–2, Tc_1–2, Ta_1–2 - For controllers whose Func parameter is "Off, " their parameters related to the assign settings are not shown.
| Parameter | Indication | Value | Explanation | |
| Assign Function | *** Func | → "Aerophone Pro Parameter Guide" (PDF) | Specifies the function that is assigned when each controller is pressed. | |
| Release Value | *** Release Val | 0–127 | Specify the value when you take your finger off the button (Release) and the value when you press the button (Press). | |
| Press Value | *** Press Val | |||
| Mode | *** Mode | Momentary, Latch | Specifies the operation mode. | |
| Latch | Each time you press the button, the Press Value and Release Value alternate. | |||
| Momentary | The Press Value is applied while the button is pressed, and the Release Value is applied while the button is released. | |||
Assigning MIDI Control to a Controller (MIDI Control)
You can assign a MIDI control function to each controller, and specify how control occurs.
- As with Assign, the MIDI control parameters work when the settings in "Asgn Src" (assign source) of each controller of the system are set to "System." If Asgn Src is set to "Scene," each scene's MIDI control settings are used.
What is MIDI Control mode?
Use this when you want to control an external sound module from the Aerophone Pro, or to use the Aerophone Pro with a DAW or other software. Use the [MIDI CONTROL] switch to turn MIDI control mode on/off.
MIDI control mode lets you do the following.
- To each controller, assign a MIDI control function that is separate from controlling the internal sound engine
- When MIDI control mode is off, MIDI data used to control the internal sound engine is outputted.
- When a scene is selected, transmit the MIDI messages that are assigned to the scene
If the system setting "MIDI Ctrl Sound" is on, you can play the Aerophone Pro's own sound engine while controlling an external MIDI device. If "MIDI Ctrl Sound" is off, the Aerophone Pro's own sound engine does not produce sound when in MIDI control mode.
→ "Aerophone Pro Parameter Guide" (PDF)
- Press the [MENU] button.
The Menu screen appears.
![]()
- Long-press a [–][+] (
![]() ) button to select an "MIDI" parameter.
) button to select an "MIDI" parameter.
![]()
![information]() If you long–press a [–][+] (
If you long–press a [–][+] (![]() ) button, the menu type switches between System, Scene, Assign, and MIDI.
) button, the menu type switches between System, Scene, Assign, and MIDI. - Press the [MENU] button.
The cursor position moves to the lower line. - Use the [–][+] (
![]() ) buttons to specify the upper/lower limits in which a continuously-operated controller will function, or the values when a switch-type controller is pressed/released.
) buttons to specify the upper/lower limits in which a continuously-operated controller will function, or the values when a switch-type controller is pressed/released.
![information]() You can long-press the [MENU] button to move to the USER/FAVORITE registration screen.
You can long-press the [MENU] button to move to the USER/FAVORITE registration screen.


Assigning a continuously-variable controller
For breath (the strength of your breath), bite (the strength at which you bite the reed), thumb lever, thumb pad, and motion specify the following parameters.
- Indications of "***" in the table will contain the following names.
Breath_1–8, BiteDn_1–4, BiteUp_1–4, LeverDn_1–2, LeverUp_1–2, ThumbPad_1–4, Motion_1–2 - For controllers whose Func parameter is "Off", their parameters related to the assign settings are not shown.
| Parameter | Indication | Value | Explanation | ||
| Assign Function | *** Func | → "Aerophone Pro Parameter Guide" (PDF) | Specify the function that is assigned to a continuously-operated controller. | ||
| Input Min Value | *** In Min | 0–127 | Specify the minimum value (Min) and maximum value (Max) in which controller operations are effective. | → "Function assignment (continuous operation)" | |
| Input Max Value | *** In Max | ||||
| Output Min Value | *** Out Min | 0–127 | Specify the minimum value (Min) and maximum value (Max) in which the assigned function operates. | ||
| Output Max Value | *** Out Max | ||||
| Mode | *** Mode | Momentary, Latch | Specifies the operation mode. | ||
| Latch | Each operation switches between Output Min Value and Output Max Value. The switch occurs at the mid-point value between Input Min Value and Input Max Value. | ||||
| Momentary | The function operates like a graph, according to how you operate the controller. | ||||
| Curve | *** Curve | Specifies the operation curve when the operation mode is Momentary. | |||
Assigning a switch-type controller
For the [S1] / [S2] buttons and the side keys, specify the following parameters.
- Indications of "***" in the table will contain the following names.
S1_1–2, S2_1–2, X_1–2, C1_1–2, C2_1–2, C3_1–2, C4_1–2, C5_1–2, Tc_1–2, Ta_1–2 - For controllers whose Func parameter is "Off", their parameters related to the assign settings are not shown.
| Parameter | Indication | Value | Explanation | |
| Assign Function | *** Func | → "Aerophone Pro Parameter Guide" (PDF) | Assign the function that is output via MIDI when you operate each controller. | |
| Release Value | *** Release Val | 0–127 | Specify the value when you take your finger off the button (Release) and the value when you press the button (Press). | |
| Press Value | *** Press Val | |||
| Mode | *** Mode | Momentary, Latch | Specifies the operation mode. | |
| Latch | Each time you press the button, the Press Value and Release Value alternate. | |||
| Momentary | The Press Value is applied while the button is pressed, and the Release Value is applied while the button is released. | |||
Disabling the Auto-Off Function
The Aerophone Pro automatically powers-off after a certain length of time has elapsed since you stopped playing or operating it. You can specify that the power does not turn off automatically, or you can change the time until the power turns off automatically.
- Press the [MENU] button.
The Menu screen appears. - Use the [-][+] (
![]() ) buttons to select "Auto Off", and press the [MENU] button.
) buttons to select "Auto Off", and press the [MENU] button.
The cursor position moves to the lower line.
![]()
- Use the [-][+] (
![]() ) buttons to change the value.
) buttons to change the value. Value Explanation 30min The power automatically turns off 30 minutes after you stopped playing or operating the unit. 5min The power automatically turns off 5 minutes after you stopped playing or operating the unit. Always On The power does not turn off automatically.

Restoring the Factory Settings
The "Factory Reset" operation returns all settings stored in the Aerophone Pro to their factory-set condition.
Performing this operation does not erase the scenes that are stored in the user scenes. If you want to erase all scenes that are stored in the user scenes, refer to "Clearing all user scenes".
- Press the [MENU] button.
The Menu screen appears. - Use the [-][+] (
![]() ) buttons to select "Factory Reset", and press the [MENU] button.
) buttons to select "Factory Reset", and press the [MENU] button.
A confirmation message appears.
![]()
- To execute factory reset, press the [+](
![]() ) button. If you decide to cancel, press the [-](
) button. If you decide to cancel, press the [-](![]() ) button.
) button.
A confirmation message appears again.
![]()
- To execute, press the [MENU] button. If you decide to cancel, press the [-](
![]() ) button.
) button.
The display indicates "Executing...", and the factory reset operation will be executed.
![]()
- Turn the power off, then on again.


Operation with a MIDI Foot Controller
If a MIDI foot controller (sold separately) is connected to the MIDI IN connector, you can operate the pedals to control various functions, such as switching scenes.

→ For details on the functions that can be operated using a MIDI foot controller, refer to "Aerophone Pro Parameter Guide" (PDF).
Shortcut
| Button | Explanation |
Hold down [ ] and press [ ] and press [ ] ] | Decrease the value rapidly |
| Hold down []and press [] | Increase the value rapidly |
[SCENE] ( ) or ( ) or ( ) + Performance Key [E ) + Performance Key [E ] ] | Decrement the scene number
|
| [SCENE] () or () + Performance Key [C] | Increment the scene number
|

Instantly Recalling a User Scene
User scenes U01-01–U01-08 can be recalled instantly by holding down the [SCENE] () or (![]() ) button and pressing one of the [1]–[8] performance keys.
) button and pressing one of the [1]–[8] performance keys.
This is a convenient way to switch scenes during a live performance.
- Enabled when "Scene Shortcut" in system settings is On.


Caring for the Aerophone Pro
- If the mouthpiece becomes soiled from playing, remove the mouthpiece, wash it with water.
![]()
- Use a soft cloth to dry off any water droplets.
- When attaching the mouthpiece, insert it so that there is no gap between it and the body of the main unit.
- Applying commercially available recorder cream makes attachment and removal easier.
![]()
NOTE- Take care that the front and back of the mouthpiece are oriented correctly. If you insert it in the wrong orientation, it might become impossible to remove.
- Take care not to hurt your hand on the screw that's inside the mouthpiece.
- Applying commercially available recorder cream makes attachment and removal easier.
- Lean the Aerophone Pro against a wall or other vertical surface, so that any saliva inside the instrument can drain out.
When you lean the instrument against a wall or other vertical surface with the mouthpiece upward, any saliva inside will exit from the water drain. Wipe it off with a soft cloth.
NOTE
To remove saliva, place the Aerophone Pro upright so that it exits the water drain. Using any other method, such as pointing the mouthpiece downward, might cause malfunctions.


Troubleshooting
If you suspect a malfunction, please check the following points. If this does not resolve the problem, contact a nearby Roland Service Center.
| Troubles | Items to check | Action |
| Troubles with sound | ||
| No sound / Insufficient volume | If using batteries, are the batteries oriented correctly? | Install the batteries in the correct orientation. |
| Is the Aerophone Pro correctly connected to the amplified speaker or headphones? | Connect amplified speakers to the Aerophone Pro's OUTPUT jack or headphones to the Aerophone Pro's PHONES jack. | |
| If you're connecting an amplified speaker, connect to the amplified speaker's input jack. | ||
| Could an audio cable of headphones or amplified speaker be broken? | Try using a different cable. | |
| If sound is not output from the amplified speaker that's connected, is sound output when you connect headphones? | If sound is being output, either the connection cable of the amplified speaker is broken, or there is a malfunction in the amplified speaker that's connected. Check the connected device and cable. | |
| Could the Aerophone Pro's volume be lowered? | Adjust the volume to an appropriate level. | |
| Could the volume of the connected amplified speaker be lowered? | Adjust the volume to an appropriate level. | |
| Could the volume be lowered on the smartphone etc. that's connected via Bluetooth? | Raise the volume of your smartphone. | |
| Noise is heard in the sound | Could you be using alkaline batteries or carbon-zinc batteries? | Use Ni-MH batteries. |
| Unintended sound is heard | If multiple keys are pressed or released simultaneously, inconsistent fingering might cause unintended sounds to be produced. | Set the key delay. → "Aerophone Pro Parameter Guide" (PDF) |
| Can't use bite control successfully | Is the mouthpiece inserted all the way? | If the mouthpiece is not inserted all the way, bite control might not work. Insert the mouthpiece so that there is no gap between it and the body of the main unit. |
| Can't use breath control successfully | Could water droplets have accumulated inside the Aerophone Pro? If water droplets accumulate inside the unit, breath control might not work. | Lean this unit against a wall so that any internal moisture can drain out. |
| Troubles with USB | ||
| Can't communicate with a computer | Is the USB cable connected correctly? | Check the connections. |
| Troubles with MIDI | ||
| No sound from an external MIDI device | Is the MIDI channel set correctly? | Set the MIDI channels of the Aerophone Pro and external MIDI device to the same setting. → "Aerophone Pro Parameter Guide" (PDF) > Scene parameters > SCENE/CONTROL (MIDI) > Tx Channel |
| No sound when connected via MIDI to an external device | Are breath control and expression messages being transmitted? | If these messages are not transmitted, you may not hear any sound even if the instrument sends note messages. |
| Other troubles | ||
| Can't charge the batteries | Could the AC adaptor be connected with batteries installed in the Aerophone Pro? | The Aerophone Pro cannot charge rechargeable batteries. Use a commercially available charger to charge the batteries. |
Troubles with Bluetooth functionality
| Troubles | Items to check | Action |
| "AE-30" is not shown on your smartphone | Could this unit's Bluetooth function be "Off"? | Turn this unit's Bluetooth function "On". Bluetooth audio function: Bluetooth MIDI function: |
| Can't connect to | If your smartphone's Bluetooth device list shows "AE-30 AUDIO" | In your smartphone's settings, temporarily remove the registration of the "AE-30 AUDIO" Bluetooth device, turn the Bluetooth function off and then on again, and execute pairing once again. |
| Bluetooth audio | If your smartphone's Bluetooth device list does not show "AE-30 AUDIO" | In your smartphone's settings, turn the Bluetooth function off and then on again, and then initiate pairing from the Aerophone Pro to pair it once again. |
| Can't connect to Bluetooth MIDI | For the Bluetooth MIDI function, you'll execute pairing not via the Bluetooth settings of your smartphone, but by using the settings within the app "Aerophone Pro Editor. " Even if your smartphone's Bluetooth device list shows "AE-30, " do not tap it. If you tapped it by mistake, cancel "AE-30, " turn the Bluetooth function off and then on again, and make the connection again. | |
| A paired smartphone does not connect | If connection occurs but is immediately broken, turning the smartphone's Bluetooth function off and then on again might make connection succeed. | |
USING THE UNIT SAFELY

Concerning the Auto Off function
The power to this unit will be turned off automatically after a predetermined amount of time has passed since it was last used for playing music, or its buttons or controls were operated (Auto Off function). If you do not want the power to be turned off automatically, disengage the Auto Off function.

Use only the supplied AC adaptor and the correct voltage
Be sure to use only the AC adaptor supplied with the unit. Also, make sure the line voltage at the installation matches the input voltage specified on the AC adaptor's body. Other AC adaptors may use a different polarity, or be designed for a different voltage, so their use could result in damage, malfunction, or electric shock.

Keep small items out of the reach of children
To prevent accidental ingestion of the parts listed below, always keep them out of the reach of small children.
Included Parts/Removable Parts
Thumb hook cover
IMPORTANT NOTES

Power Supply: Use of Batteries
- If the batteries run extremely low, the sound may distort / interruptions in the sound may occur at high volume levels, but this does not indicate a malfunction. If this occurs, please replace the batteries / use the included AC adaptor.
- If operating this unit on batteries, please use Ni-MH batteries.
- Even if batteries are installed, the unit will turn off if you connect or disconnect the power cord from the AC outlet while the unit is turned on, or if you connect or disconnect the AC adaptor from the unit. When this occurs, unsaved data may be lost. You must turn off the power before you connect or disconnect the power cord or AC adaptor.
Repairs and Data
- Before sending the unit away for repairs, be sure to make a backup of the data stored within it; or you may prefer to write down the needed information. Although we will do our utmost to preserve the data stored in your unit when we carry out repairs, in some cases, such as when the memory section is physically damaged, restoration of the stored content may be impossible. Roland assumes no liability concerning the restoration of any stored content that has been lost.
Additional Precautions
- Any data stored within the unit can be lost as the result of equipment failure, incorrect operation, etc. To protect yourself against the irretrievable loss of data, try to make a habit of creating regular backups of the data you've stored in the unit.
- Roland assumes no liability concerning the restoration of any stored content that has been lost.
- Never strike or apply strong pressure to the display.
- Use caution not to scratch the surface of a desk or table on which you place this instrument.
- When disposing of the packing carton or cushioning material in which this unit was packed, you must observe the waste disposal regulations that apply to your locality.
Using External Memories
- Please observe the following precautions when handling external memory devices. Also, make sure to carefully observe all the precautions that were supplied with the external memory device.
- Do not remove the device while reading/ writing is in progress.
- To prevent damage from static electricity, discharge all static electricity from your person before handling the device.
Caution Regarding Radio Frequency Emissions
- The following actions may subject you to penalty of law.
- Disassembling or modifying this device.
- Removing the certification label affixed to the back of this device.
- Using this device in a country other than where it was purchased.
- Do not use this product closer than 22 cm (8–11/16 inches) from where a cardiac pacemaker is implanted. Doing so may affect the operation of the cardiac pacemaker

Documents / Resources
References
Download manual
Here you can download full pdf version of manual, it may contain additional safety instructions, warranty information, FCC rules, etc.
Download Roland Aerophone Pro AE-30 - Digital Wind Instrument Manual
Advertisement


Need help?
Do you have a question about the Aerophone Pro and is the answer not in the manual?
Questions and answers