Advertisement
Quick Links
Advertisement

Related Manuals for Vantrue Sonnet 1 PRO


Summary of Contents for Vantrue Sonnet 1 PRO
- Page 1 2 Channel Voice Controlled Smart Dash Cam User Manual Sonnet 1 PRO (S1 PRO)
- Page 2 Hey, find us here: www.vantrue.net/contact facebook.com/vantrue.live...
-
Page 3: Table Of Contents
CONTENTS What’s in the box? Camera Overview Installation Basic Operation Specifications Warning Warranty & Support... -
Page 4: What's In The Box
G. Electrostatic H. Crowbar I. Dust-free Cloth Stickers*2 2 Channel Voice Controlled Smart Dash Cam Quick User Guide SONNET 1 Pro (S1 Pro) J. Warning K. 3M Adhesive L. Quick User Stickers*2 Stickers*2 Guide Optional Accessory... -
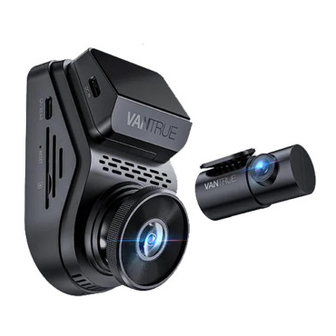
Page 5: Camera Overview
2. Camera Overview VTE22L1577 2 inch IPS Screen Front-Facing Camera Type-C USB Port for Rear Camera Reset Button MicroSD Card Slot Type-C USB Port for Charging Microphone Type C USB Port for Rear Camera Cable Rear Camera Rear Camera Indicator Light Serial Number - 2 -... - Page 6 Button Instruction No. Buttons Instruction In menu settings and file browsing, short press to display the previous option, long press to scroll up to display options; In playback mode, short press to fast forward; During video recording, short press to start/stop recording;...
- Page 7 During video recording, short press to capture a picture; In playback mode, short press to pop up the delete Menu. LED Indicator Steady green light In standby status Blinking green light Camera is recording LED Indicator Screen Overview Loop recording for 1 min Loop recording for 3mins 2.4G Wi-Fi ON Loop recording for 5mins...
-
Page 8: Installation
Please insert a memory card (memory card capacity: 32GB-512GB, card speed: U3/Class10/A2, recommend Vantrue U3 microSD card) into the card slot according to the direction indicated in the below picture, until a "click" sound is heard in the card slot, indicating that the memory card is inserted correctly. - Page 9 The dash cam has specific requirements on the card speed of the memory card. For reliable operation, please use memory card speed: U3/Class10/A2, we recommend using a VANTRUE SD card(sold separately). • The microSD card should be formatted once a month to maximize the lifetime of the memory card.
- Page 10 3.2.3 Power On Dash Cam, Select the Installation Position Before installation, please power on the dash cam and check whether the shooting angle of the front and rear lens is appropriate through the recording view. 3.2.4 Installing the Electrostatic Stickers Thoroughly clean the windshield with water or alcohol, then wipe it with a dry cloth.
- Page 11 • Please clean the lens with the dust-free cloth provided by VANTRUE. 3.2.7 Wire Storage Car Charger Cable: Use the crowbar to stuff the car charger cable under the rubber seal of the A-pillar and windshield.
- Page 12 Rear Camera Cable: Carefully store the rear camera cable in the direction shown in the picture. 3.3 APP Download Please scan the QR code for the relevant version below to download the APP and install it. Note: After this camera is successfully connected to your mobile phone through WiFi, it can perform real- time video preview, change camera settings, download files without internet connection, and play back videos...
- Page 13 After turning on the WiFi function of the camera, please click "+" to find “S1 PRO” in the “Sonnet Series” through Vantrue APP, choose the right dash cam to connect, then the APP will automatically connect to the camera, and display the current real-time recording situation of the camera.
- Page 14 Note: • Before connecting to WiFi, please make sure the WiFi function of your smartphone is enabled. • The initial password for this device is only used for initial login. In order to prevent potential security risks, please be sure to change the initial password after the initial login to prevent others from logging into your device without authorization or other adverse consequences.
- Page 15 3.5 APP Operation Camera Setting Mileage Statistics Lens correction line Full-screen Icon Microphone ON/OFF Stop Recording Icon Camera Display Switch Album Snapshot After the APP is successfully connected to the camera, you can perform the following operations: Video preview: In the real-time preview interface, you can switch to the full-screen preview mode by clicking the full-screen icon or placing the phone horizontally, click the window switch icon to switch...
- Page 16 OTA upgrade: You can upgrade the S1 PRO dash cam via APP, please refer to 4.2.12 for more details. 3.6 APP Upgrade Open the "Vantrue" APP, connect to Wi-Fi, and enter "Settings> About> Detect New Version". The App will automatically detect whether its version is the latest version.
-
Page 17: Basic Operation
4. Basic Operation 4.1 Menu Settings The S1 PRO dash cam has 3 function menus, which are: record settings, system settings, and file browsing. You can set your dash cam according to your requirements with these function settings. Press the button to pause the video first, then press button to enter the menu settings. - Page 18 L. Stamp: Enable or disable the watermark stamp on video and photos. The watermark stamp includes time and date label, VANTRUE label, license plate number, GPS location information, and speed label. All are enabled by default.
- Page 19 effect of videos in parking mode. P. Parking Collision Detection: The power saving mode is turned on by default. After turning on the collision detection mode, you can choose power saving mode or fast start mode. Q. Motion Detection Area: The motion detection range of the front and rear areas can be adjusted respectively.
- Page 20 options: 15 Days, 1 Month, and Off. The default is off. When the time is up, you can choose "OK" to format, or choose "Next" to recalculate. G. Date & Time: There are two ways to set the time and date: Automatic GPS update: GPS automatic update is •...
- Page 21 50Hz or 60Hz frequency according to different regions. M. System Info: Check the current model, firmware version, and the Vantrue official website. N. Certifications: You can view the certification information of the S1 PRO camera. O. Default Settings: Reset the device back to factory settings.
- Page 22 Note: The suffix A represents the files recorded by the front camera, the suffix B represents the files recorded by the rear camera. 4.2 Key Features 4.2.1 Loop Recording After inserting the memory card and connecting the power, the dash cam will automatically turn on and enter loop recording.
- Page 23 4.2.2 Event Recording Event video is triggered by the G-sensor (Gravity Sensor), which can be automatically triggered or manually locked. During driving, in case of special circumstances, the camera will automatically lock for event recording or you can manually lock it by pressing button for event recording.
- Page 24 When the event video file reaches the upper limit, the new event video file will automatically overwrite the old event video file. It is recommended to periodically check and save your event video files to avoid loss. • Lock recording will not trigger in either of the following situations: Loop recording is off or Time lapse recording is on.
- Page 25 Record Setup 16/20 Collision Detection in Parking Mode Time Lapse Power Saving Mode Parking Mode Quick Start Mode Low Light Night Vision ... Collision Detection in P... Note: • The power-saving mode/quick start mode will only take effect after the collision detection is turned on. If the collision detection is turned off or other parking monitoring modes are selected, this function will not take effect.
- Page 26 You can wait for 5 minutes to start automatically. long press the button to begin manually. • Install the Vantrue ACC hardwire kit and the dash cam • will directly enter after the car is stopped the engine (the ACC hardwire kit needs to buy separately).
- Page 27 Low Framerate mode) will be saved in the normal video folder. In order to prevent the video in parking mode from being overwritten in a loop, please check and save the required files in time to prevent loss. Collision Detection When collision detection is enabled, the icon will be displayed on the recording interface, indicating that the...
- Page 28 mode and enter normal recording, restarting the 5-minute entry mechanism. Motion Detection When the motion detection is turned on, the icon will be displayed on the recording interface, indicating that motion detection has been turned on. Please go to “Motion Detection Area” to set the area range. 1440P +1080P 30FPS 00:00:37 09-01-2023...
- Page 29 motion detection mode will not work. Low Bitrate Recording When Low Bitrate recording is enabled, the icon will be displayed on the recording interface, depending on whether you choose 1080P 15FPS or 720P 15FPS. 720P+720P 15FPS 1080P+1080P 15FPS 00:00:37 00:00:37 09-01-2023 10:39:07 MP/H...
- Page 30 Low Framerate mode When the low framerate mode is selected, the camera will record according to your selection among 1FPS/5FPS/10FP/15FPS. For example, if you select 1FPS and the current video resolution frame rate is 30FPS, the camera will generate a 30FPS video per second.
- Page 31 4.2.7 Mileage Statistics The S1 PRO dash cam can record, analysis and statistics your driving time, driving distance, altitude, driving speed, and other information according to the GPS information. You can click to download mileage information in the APP, and the mileage information will be saved in the APP as a picture or PDF file.
- Page 32 4.2.8 Voice Assistant You can also control the camera with voice commands, such as take photo, video start, turn on/off WiFi, lock the video, etc. Currently supported languages are English, Japanese, Russian, and Chinese. For more detailed voice commands, please check System Settings >...
- Page 33 GMT-08:00 by selecting your time zone, such as Los Angeles. If you do not know the time zone of your location, you can use WiFi to connect to the Vantrue App and confirm that the automatic time adjustment function in the APP is turned on.
- Page 34 4.2.11 Viewing and Deleting Video/Photos a.Viewing and Deleting files on the Camera -Playback Files After clicking "Files", enter any folder, and after opening the video folder, you can press the button to select the next file, and delete the file during playback. 20220408_140633_0001_E_B.MP4 Event Video Delete This File?
- Page 35 b. Viewing and Deleting files on Computer Connect the included TYPE-C USB data cable to the camera and the computer. After the connection is successful, the icon will appear on the display of the camera to transfer data, and then you can view and delete the video files in the computer folder.
- Page 36 When connecting to a desktop computer, it is recommended to use the USB port on the back of the host computer. Viewing and Deleting on the “Vantrue” APP. After the camera is successfully connected to the mobile phone through WiFi, it can play back, download and delete files in the mobile APP.
- Page 37 4.2.12 Upgrading Firmware Option 1: Upgrade via PC After downloading the latest S1 PRO firmware via Vantrue Official Website, place the file into the root directory of the memory card, insert it back into the dash cam, power on to upgrade.
- Page 38 - 35 -...
-
Page 39: Specifications
5. Specifications The specifications of this product may change without prior notice due to product improvements. Model S1 Pro Chips Novatek high-performance processor Image Sensor Sony Sensor G-sensor Built-in triaxial sensor WiFi Built-in 2.4GHz&5GHz Screen 2’’ IPS Screen Camera Angle Front: 160°... -
Page 40: Warning
• Firmware upgrade will be carried out from time to time to further improve the product, please pay attention to the official notice of VANTRUE according to the specific upgrade. • This product can record and save images of vehicle accidents, but it does not guarantee that all accident images can be recorded. - Page 41 Do not subject the product to strong shocks or • vibrations, which may damage the product and cause malfunction or inoperability. • Do not use chemical solvents or cleaning agents to clean the product. • The ambient temperature range for normal use of this device is -20 degrees Celsius to 60 degrees Celsius.
-
Page 42: Warranty & Support
7. Warranty & Support Warranty The VANTRUE® S1 PRO Dash Cam comes with a full 12 months warranty. If you register your product on our official site (www.vantrue.net/register), you can extend the warranty to 18 months. Support If you have any questions regarding your product, please solve it in the following ways: 1.
Need help?
Do you have a question about the Sonnet 1 PRO and is the answer not in the manual?
Questions and answers