Advertisement
Table of Contents
- 1 Table of Contents
- 2 General Information
- 3 Package Contents
- 4 Myairvo 2 and Accessories
- 5 Setting up Myairvo 2 for First Use
- 6 Advanced Settings
- 7 Acceptance/Performance Checks
- 8 Servicing
- 9 Appendix A: Iec60601-1-2 Emc Tables
- 10 Appendix C: Default Values
- 11 Appendix D: Troubleshooting
- Download this manual
Advertisement
Table of Contents

Related Manuals for Fisher-Price myAIRVO 2

Summary of Contents for Fisher-Price myAIRVO 2
- Page 1 myAIRVO ™ Technical Manual...
- Page 2 This page has intentionally been left blank.
-
Page 3: Table Of Contents
130621 and above. OTHER REFERENCES • Refer to the myAIRVO 2 User Manual for detailed instructions for use , and watch the included instructional DVD. • If the unit is ever used by multiple patients, the unit must be cleaned and disinfected between patients according to instructions in the Disinfection Kit Manual (900PT600). -
Page 4: General Information
1. GENERAL INFORMATION The myAIRVO 2 is a humidifier with integrated flow generator that delivers warmed and humidified respiratory gases to spontaneously breathing patients through a variety of patient interfaces. PACKAGE CONTENTS myAIRVO 2 humidifier myAIRVO 2 User Manual myAIRVO 2 Swingtag... -
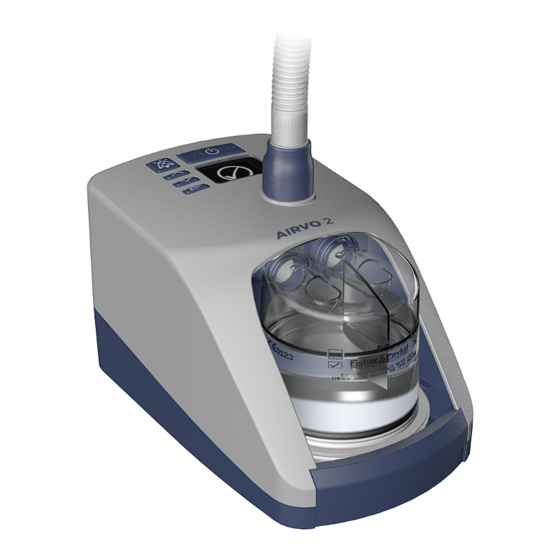
Page 5: Myairvo 2 And Accessories
2 AND ACCESSORIES MUTE ON/OFF (STANDBY) Patient interface Heated breathing DISPLAY tube DOWN MODE WATER BAG OXYGEN INLET PORT HEATED BREATHING TUBE CONNECTION PORT MEASUREMENT POINT OF DISPLAYED DEW POINT TEMPERATURE CHAMBER PORTS COMPACT STAND SERIAL PORT POWER CORD... -
Page 6: Setting Up Myairvo 2 For First Use
2. SETTING UP myAIRVO 2 FOR FIRST USE 1. REMOVE THE MYAIRVO 2 FROM ITS PACKAGING Place the myAIRVO 2 on the 900PT400 compact stand. 2. CONNECT THE POWER CORD For PT100AZ, PT100EE, PT100EW, PT100UK: Plug the power cord connector into the socket on the back of the myAIRVO 2. - Page 7 5. SWITCH ON UNIT Switch on the unit by pressing the On/Off button. 6. WARM-UP The unit will begin to warm up. You will see a warm-up symbol on the screen. “Warm-up” symbol 7. READY FOR USE The “Ready for Use” symbol means that the system is ready for the patient to use.
-
Page 8: Advanced Settings
Press the Mode button to confirm the change and/or move on to the next screen. Note that the unit will reset itself if it is switched between AIRVO 2 and myAIRVO 2 modes. LANGUAGE You can set the AIRVO 2 / myAIRVO 2 to one of 15 language settings: English Nederlands Svenska Deutsch Português... - Page 9 Note that, for Oxygen display, this is a measurement only, not a control setting. The operator changes the measured oxygen fraction by altering the myAIRVO 2 target flow setting and the flow of oxygen connected to the unit (e.g. from a flowmeter) - there is no closed-loop control.
- Page 10 Note that, for Oxygen display, this is a measurement only, not a control setting. The operator changes the measured oxygen fraction by altering the myAIRVO 2 target flow setting and the flow of oxygen connected to the unit (e.g. from a flowmeter) - there is no closed-loop control.
- Page 11 FLOW INCREMENT SETTINGS This screen defines the “Flow Increment Settings” for the myAIRVO 2 when in either Default Mode or Junior Mode. You can define the flow rate above which the increments are 5 L/min and below which the increments are 1 L/min.
- Page 12 DISINFECTION STOP-GATE SETTINGS This screen is not relevant for myAIRVO 2. This screen defines the “Disinfection Stop-Gate Settings” for the AIRVO 2. Refer to the AIRVO 2 Technical Manual before making any changes. To change the environment settings: Hold the Up and Down buttons for 3 seconds to “unlock”...
-
Page 13: Acceptance/Performance Checks
3. ACCEPTANCE/PERFORMANCE CHECKS This section contains performance checks which can be carried out on the myAIRVO 2, however there is no requirement to carry out these checks on a routine basis. These checks test the basic functioning of the unit, the operation of the flow sensor as well as the audible alarm signal. -
Page 14: Servicing
4. SERVICING AIRVO 2 and myAIRVO 2 humidifiers do NOT require routine servicing or calibration. The only checks that can be carried out are the Acceptance/Performance Checks in the previous section, and the Electrical Safety Test detailed below. WARNING UNDER NO CIRCUMSTANCES SHOULD THE... -
Page 15: Appendix A: Iec60601-1-2 Emc Tables
14 of 17 APPENDIX A: IEC60601-1-2 EMC TABLES Appendix A: IEC60601-1-2 EMC tables Guidance and manufacturer's declaration - electromagnetic emissions The device is intended for use in the electromagnetic environment specified below. The customer or the user of the device should ensure that it is used in such an environment. - Page 16 16 of 17 Guidance and manufacturer's declaration - electromagnetic immunity The device is intended for use in the electromagnetic environment specified below. The customer or the user of the device should ensure that it is used in such an environment. IEC60601 test Immunity test Compliance level...
- Page 17 APPENDIX B: INTERFACE FLOW CHART myAIRVO 2 Environment Settings Hold Junior Mode 100% New Target Settings myAIRVO 2 English V6.72 Hold Hold Hold Hold Hold Hold Hold Press Press Press Press Press Press myAIRVO 2 English Hold Press Press Press...
- Page 18 DISINFECTION Any key Time Press Press Later 1000 hours use - Replace filter Press Later Filter timer remains at 1000 Filter timer is hrs + reset to 0 hrs Press Press Wait for time out 60s...
-
Page 19: Appendix C: Default Values
APPENDIX C: DEFAULT VALUES The following values are default non-alarm settings set by the factory: Parameter Model Mode Value Unit Default set dewpoint AIRVO 2 or myAIRVO 2 Default °C temperature AIRVO 2 or myAIRVO 2 Junior °C Max set dewpoint... - Page 20 Is the myAirvo 2 being used in a cold happened before it Had the user just connected or How far through the or hot room? Was it stored overnight appeared.
- Page 21 Is the myAirvo 2 being How long had the Did the myAirvo 2 power outlet. used in a cold or hot room? myAirvo 2 been display a “Check leaks”...
- Page 22 For more information please contact your local Fisher & Paykel Healthcare representative Australia Spain Manufacturer Tel: +34 902 013 346 Fisher & Paykel Healthcare Ltd Fisher & Paykel Healthcare Pty Limited Fax: +34 902 013 379 15 Maurice Paykel Place 36-40 New Street, East Tamaki, Auckland 2013 PO Box 167...
Need help?
Do you have a question about the myAIRVO 2 and is the answer not in the manual?
Questions and answers