Table of Contents
Advertisement
Quick Links
Advertisement
Table of Contents

Related Manuals for Lyx Pro LyxJam LYXEDS750

Summary of Contents for Lyx Pro LyxJam LYXEDS750
- Page 1 7-PIECE ELECTRONIC DRUM KIT SKU: LYXEDS750 Sound Module Operations Guide...
-
Page 2: Table Of Contents
TABLE OF CONTENTS FEATURES SAFETY PRECAUTIONS FCC NOTICE CONTROL PANEL OVERVIEW RESETTING THE MODULE REAR PANEL OVERVIEW KIT PERFORMANCE DISPLAY PLAYING WITH PATTERNS SONG AND TONE LIST CARE AND MAINTENANCE SPECIFICATIONS... -
Page 3: Features
Thank you for purchasing the LyxPro™ Electronic Drum Kit. This Sound Module Operations Guide is intended to provide you with guidelines to ensure that operation of this product is safe and does not pose risk to the user. Any use that does not conform to the guidelines described in this guide may void the limited warranty. Please read all directions before using the product and retain this guide for reference. -
Page 4: Fcc Notice
- Strong vibrations • This drum contains digital circuitry and could cause interference if placed too close to radio or television receivers. If interference occurs, move the drum further away from the affected equipment. FCC NOTICE This equipment has been tested and found to comply with the limits for a Class B digital device, pursuant to Part 15 of the FCC Rules. -
Page 5: Control Panel Overview
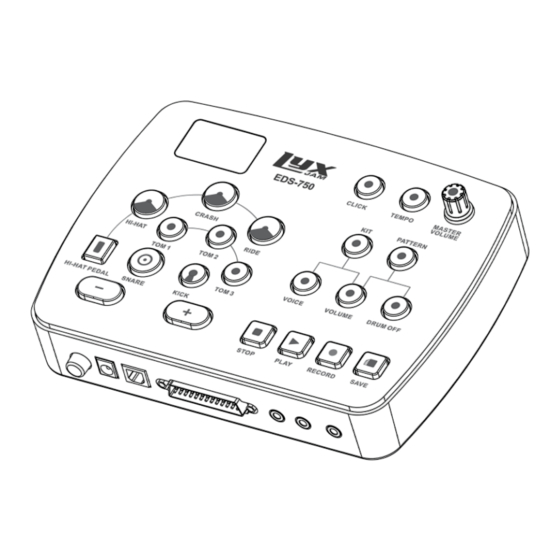
CONTROL PANEL OVERVIEW LED Display 2. CLICK: Activates or deactivates the metronome. 3. TEMPO: Changes the tempo of the metronome. Also used for recording and pattern playing. 4. MASTER VOLUME: Turn this knob clockwise to increase the master volume, or counterclockwise to decrease it. KIT: Enter drum kit selection mode. -
Page 6: Rear Panel Overview
REAR PANEL OVERVIEW Power Switch: Turns the sound module on/off. NOTE: Please do not try to turn the sound module back on immediately after turning it off. Allow five (5) seconds to pass between power cycling in order for the electronic circuits to properly reset. 2. - Page 7 Editing a Kit You can change the volume and voice of each pad and save them after selecting a kit. • Press the button that corresponds to the pad you want to edit to select it. The button will light up and blink, so you know you have the correct pad selected.
-
Page 8: Playing With Patterns
• To adjust the volume of the pad while selecting a voice, press the VOLUME button. It will light up and start blinking. • The display will show the current numerical volume of the pad from 0 – 127. Use the +/- buttons to adjust it as you desire. - Page 9 - The indicator will light up and start blinking, while the display blinks the current tempo. - You can use the + or – buttons to increase or decrease the tempo from 40-240 bpm. NOTE: To scroll quickly through options, press and hold the + or –...
- Page 10 the tempo from 40-240 bpm. - To return the tempo to the default value, press the + and – buttons at the same time. - Once you’ve adjusted the tempo to your ideal value, wait three (3) seconds or press the TEMPO button again, and the display will return to the window previously displayed.
- Page 11 • To play your pattern back: - Enter Pattern Mode by pressing the PATTERN button. - Use the +/- buttons to select P51 from the list of patterns. - Press the PLAY button. USB & MIDI Connections The Musical Instrument Digital Interface, or MIDI, is a world-wide standard communication interface. It allows electronic musical instruments and computers to communicate with each other so that instructions and other data can pass between them.
-
Page 12: Song And Tone List
SONG AND TONE LIST KICK LIST HighQ VibraSlap Kick 1 Kick 11 Slap RideCymb2 Kick 2 Kick 12 ScraPush HiBongo Kick 3 Kick 13 ScraPull LowBongo Kick 4 Kick 14 Stick MuteConga Kick 5 Kick 15 SquarClick HiConga Kick 6 Kick 16 MetroClick LowConga... - Page 13 TOM LIST HIHAT LIST Tom 1 Tom 15 HiHat 1 HiHat 17 Tom 2 Tom 16 HiHat 2 HiHat 18 Tom 3 Tom 17 HiHat 3 HiHat 19 Tom 4 Tom 18 HiHat 4 HiHat 20 Tom 5 Tom 19 HiHat 5 HiHat 21 Tom 6...
-
Page 14: Care And Maintenance
CARE AND MAINTENANCE This drum kit will need to be serviced by an authorized serviceperson when or if the following conditions occur: • The power supply cord or plug has been damaged. • Liquid has been splattered into the unit or it has been exposed to rain. •...
Need help?
Do you have a question about the LyxJam LYXEDS750 and is the answer not in the manual?
Questions and answers