
Related Manuals for Rexing DT2


Summary of Contents for Rexing DT2
- Page 1 User Manual The information in this manual is subject to change without notice. Rexing All Rights Reserved www.rexingusa.com...
- Page 2 Activate Your 18-Month Warranty Choose Your & FREE Gift! Activate within 30 days of purchase to claim your free gift and extend your limited 12-month warranty to 18 months. Scan The QR To Activate & Select Your Free Gift https://www.rexingusa.com/productreg/...
- Page 3 (877) 740-8004 Our support team will respond to you as soon as possible. Always a surprise with Rexing Check us out here. • https://www.facebook.com/rexingusa/ • https://www.instagram.com/rexingdashcam/ • https://www.rexingusa.com/support/registration/...
-
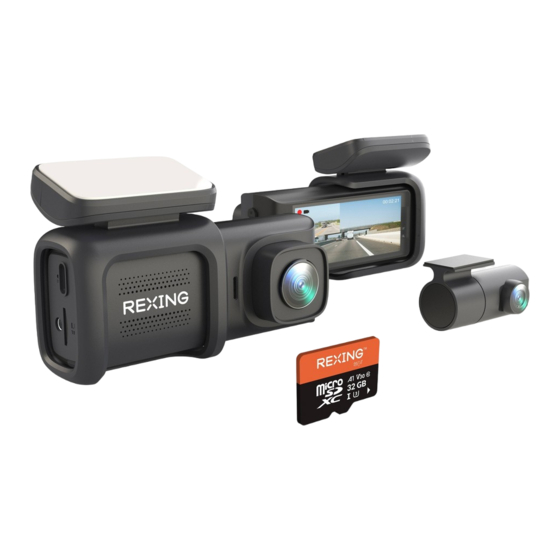
Page 4: Package Contents
The information in this manual is subject to change without notice. Rexing All Rights Reserved www.rexingusa.com Rexing DT2 Dash Cam Cable Management Tool Rear camera with rear camera cable Users Manual Type-C Data Cable (for transferring files only) -
Page 5: Camera Overview
Camera Overview 3“ LCD Screen Reset USB-C Button Charging Port Rear Micro SD Camera Card Slot Port Front Camera MENU/ MODE/LOCK Button OK/RECORD / POWER Button TOGGLE DOWN/ VIEW MUTE Button Button... - Page 6 00:00:06 1080 FHD A A B C D E F G 01/ 31 /20 23 03:05:5 7 Recording Mode Battery Charging Recording (On) Plate Number WDR Mode (On) Time G-Sensor Sensitivity Level Current Date Time Recording Time (Current Clip) MIC (ON) Exposure Value Video Resolution Parking Mode (On)***...
-
Page 7: Get Started
Get Started Step 1 Installing Adhesive Mount Place the 3M adhesive on the mount plate and properly orient the mount piece to the roof and hood line of the vehicle. Step 2 Installing the Electrostatic Stickers 2.1 Prepare Your Windshield Thoroughly cleanse your windshield with either water or alcohol. - Page 8 Step 3 Mount the Rear Camera Mount the rear camera as shown below. Use the included rear camera cable to connect the rear camera to the front camera. Rear camera Plug the rear wiring camera into instructions the rear camera port...
-
Page 9: Insert The Memory Card
Step 4 Insert the Memory Card The Rexing DT2 accepts Class 10/ UHS-1 or higher Micro SD memory cards up to 128GB. You will need to insert a memory card before recording. Before inserting or removing a memory card, ensure you've powered down the device. - Page 10 To ensure the DT2 records to your memory card properly and without error, we strongly recommend you to format the card within the camera when you're using the dash cam for the first time.
- Page 11 To format the memory card, first press the OK button to stop recording. Then press the MENU button twice to enter the Setup Settings. Use the buttons and toggle to the Format. Press the OK button to confirm the format. Press the MENU button twice...
-
Page 12: Basic Operation
Basic Operation Device Power The device is automatically powered on when plugged into a 12V accessory socket or cigarette lighter and receives a charge (i.e.: the vehicle is started). To turn the device on manually, press and hold the OK button until the welcome screen appears. -
Page 13: Menu Settings
Menu Settings Power the camera on, then press the OK button to stop recording. Press the MENU button and switch among video mode, image mode and playback mode. Press the MENU button once to enter the Video Settings, or press the MENU button twice to enter the Setup Settings menu. -
Page 14: Video Recording
Video Recording The camera will automatically start recording when the device receives a charge. The LED lights and the red dot will blink when the device is recording. Press the OK button to stop recording. These indicators will blink when the dash cam is recording 00:00:06 1080 FHD... -
Page 15: Video Playback
Video Playback To playback a video on the device, press the OK button to stop recording. Press and hold the MENU button twice to enter the Playback mode. Use buttons to toggle to the desired video. Press the OK button to play. During playback, use the OK (pause), (fast forward) and (rewind) - Page 16 To playback a video by using an SD card reader, remove the memory card and insert it into an SD card adapter. Place the adapter in the computer. Parking Monitor (Parking Surveillance Mode) Parking monitor provides surveillance on your parked vehicle. When the engine is off, the hardwire kit is used to provide continuous power and protect your car battery from being discharged.
- Page 17 WITHOUT connecting a smart hardwire kit. They may cause a malfunction. Option 2: Motion Detection To use this feature, you need to connect it with a Rexing Intelligent Hardwire Kit (sold separately). Make sure that the Parking Mode is turned off on your dash cam, otherwise it may cause a malfunction.
- Page 18 Taking and Reviewing Photos To take a photo, press OK button to stop recording. Press the MENU button once to enter photo mode. Then press the OK button to take a photo. To view/delete a photo, stop video recording and enter the Playback Mode. Toggle through the videos and photos to the one you want to view/delete.
-
Page 19: Warranty And Support
Warranty & Support Warranty The Rexing DT2 comes with a full 12-month warranty. If you register your product on our official site (https://www.rexingusa.com/support/registration), you can extend the warranty to 18 months. Support If you have any questions regarding your product, please do not hesitate to contact us at care@rexingusa.com,... - Page 20 This device complies with part 15 of the FCC Rules. Operation is subject to the following two conditions: (1) This device may not cause harmful interference, and (2) this device must accept any interference received, including interference that may cause undesired operation.
Need help?
Do you have a question about the DT2 and is the answer not in the manual?
Questions and answers
buttons on side of Rexing DT2. how to turn on the unit. it is plugged in and a green light is blinking
Buttons on side of Rexing DT2 camera. How to turn unit on. it is plugged in and a green light is blinking
can I change the rear picture
rt2 camera
The features of the Rexing DT2 camera include:
- Front and rear camera recording
- Rear camera powered through connection to front camera
- Video from both cameras saved to the same memory card
- Supports micro SD memory cards up to 128GB
- Requires memory card insertion before recording
- Automatically begins recording when powered on
- Operates in temperatures up to 140°F
- Shuts down 3 seconds after power is disconnected
- Recommended to format the memory card in-camera before first use.
This answer is automatically generated
Have a new Dt2 new camera Green light on but, no change when pushing buttons.
@Dennis Gilpin
If the Rexing DT2 camera has a green light on but does not respond when buttons are pressed, first power off the camera by holding the OK button for about 3 seconds. If the device remains unresponsive, disconnect it from the power source and remove the memory card. Wait a few seconds, then reinsert the memory card, reconnect the power, and turn the camera back on. If the issue continues, try formatting the memory card in the camera after powering it on. Always back up important data before formatting.
This answer is automatically generated