Table of Contents
Advertisement
Quick Links
KEFEYA M2 USER'S GUIDE
Contact Us: service kefeya.com
Warm tips:
1. Please ensure type-c cable is connected well with the device interface.
2. This product supports full-featured type-c (charging and video),
integrated one line. If the screen cannot be powered on or
restarted, please supply external power of 12V, 1.25A.
TRIPLE SCREEN
LAPTOP SCREEN EXTENDER
Advertisement
Table of Contents

Related Manuals for KEFEYA M2

Summary of Contents for KEFEYA M2
- Page 1 KEFEYA M2 USER’S GUIDE TRIPLE SCREEN LAPTOP SCREEN EXTENDER Contact Us: service kefeya.com Warm tips: 1. Please ensure type-c cable is connected well with the device interface. 2. This product supports full-featured type-c (charging and video), integrated one line. If the screen cannot be powered on or...
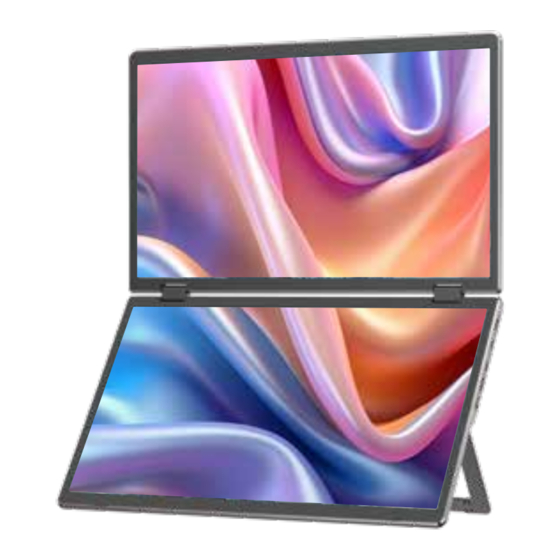
- Page 3 Product Introduction M2 is a 15.6-inch portable dual-screen splitter with a stand, which features a novel structure and strong compatibility. The product adopts a full metal exterior material, making it more sturdy and durable. The screen has full-function TYPE-C and HDMI (MINI) interface for external expansion, with complete interfaces, strong compatibility, faster and more stable data transmission.
-
Page 4: Table Of Contents
2. Display Angle 3. Product Storage Key Definitions Connection Mode 1. Connect M2 with Laptop 2. Connect M2 with Mobile Phone 3. HDMI Connection 4. HUB Connection Driver Installation Audio Settings 1. Change Sound Settings of Windows 10 / Windows 11 2. -
Page 5: Product Attributes
2. Accessories HOST USB-C to USB-C x2 HDMI to MINI HDMI POWER Unpack the package and inspect the contents. If anything is missing or damaged, please contact us at service kefeya.com. 3. Parameters Weight: 1.62 Kg Screen Size: 15.6 Inches... -
Page 6: Installation And Stowing Mode
Installation And Stowing Mode 1. Opening Mode Opening the Stand The maximum opening angle of the screen is 340°. It is strictly prohibited To open the stand, you can adjust it to a to fold it excessively. Please open and maximum angle of 135°. -
Page 7: Product Storage
Installation and Stowing Mode 3. Product Storage Retracting the Screen Retracting the Stand Key Definitions ① To switch to the To rotate the display 180°, large screen press for three seconds, mode, gently then press again for three press for one seconds to return to the second. -
Page 8: Connection Mode
3. HDMI Connection If your laptop has an HDMI interface, you can connect the M2 to your laptop using an HDMI cable. To power the M2, you can use a USB-C to USB-C adapter and connect it to the M2. -
Page 9: Hub Connection
Connection Mode 4. HUB Connection If your device is with Mac OS, you will need to connect the dedicated M2 model hub to activate both screens. Please follow the steps below: please follow these steps: 1. Connect the HUB to the M2 using the Type-C and Mini HDMI interfaces. -
Page 10: Audio Settings
1.2 Select "switch on sound " in pop-up dialog box 1.3 Left click "turn on sound settings" and pop-up the box as provided Here users can set about sound 1. Master volume; 2. Select output device: ( M2 / Speaker ); 3. Device attributes. Sound output... -
Page 11: Change Sound Settings Of Mac Os Pc
2. Change Sound Settings of MAC OS PC 2.1. Choose Apple menu > System Settings 2.2. Click on "Output," and then choose the desired device from the list of available sound output options. output devices:( M2 / Speaker ) ?... -
Page 12: Display Mode
Display Mode 1. Windows 10 / Windows 11 Display Settings 1.1 Right-click a blank area of the desktop. Select 'Display Settings' from the pop-up dialogue box. Left click "Display Settings" to open the settings dialogue box, shown in the figure: Sleep better Night light can help you get to sleep Select a display below to change the settings for it. -
Page 13: Macos 13 Ventura Display Settings And Configuration
Display Mode 2. MacOS 13 Ventura Display Settings 2.1 Enter the “System Preferences” menu 2.2 Configure your monitor In this menu, you can set the resolution and mirror/extend the display you want. 2.3 Arrange Displays To rearrange displays, drag them to the desired position. To mirror displays, hold Option key while dragging them on top of each other. -
Page 14: Transportation, Storage And Safety Information
Transportation, Storage and Safety Information To ensure the safe and proper use of this product and prevent accidents such as electric shock or fire, please read and understand all use requirements and operation procedures before using. Please adhere strictly to the following guidelines: 1. - Page 16 Contact Us For any support you need, feel free to contact us via email at service kefeya.com We are here to help and will do our best to respond within 24 hours.
Need help?
Do you have a question about the M2 and is the answer not in the manual?
Questions and answers