Table of Contents
Advertisement
Advertisement
Table of Contents
Troubleshooting

Related Manuals for ZOLL AutoPulse NXT


Summary of Contents for ZOLL AutoPulse NXT
- Page 1 User Guide 14585-001 Rev. 1...
- Page 2 Copyright © 2023 ZOLL Medical Corporation. All rights reserved. ZOLL and AutoPulse are trademarks or registered trademarks of ZOLL Medical Corporation and/or its subsidiaries in the United States and/or other countries. All other trademarks are the property of their respective owners.
-
Page 3: Table Of Contents
Intended users............................2 Intended patients ........................... 2 System components ..........................2 AutoPulse NXT Platform ........................2 AutoPulse NXT Battery ........................3 AutoPulse NXT Battery Charger ......................3 AutoPulse NXT Band ......................... 3 Accessories............................3 Adjunctive therapies ..........................3 2. Safety Information............................5 Warnings and cautions ........................... - Page 4 Transport, shipping and storage ......................57 Transport ............................57 Shipping............................57 Storage ............................57 Disposal..............................57 10. Warranty & Technical Support....................... 59 ZOLL Factory Limited Warranty for AutoPulse NXT System ..............59 Technical Support..........................60 Appendix A. System Checklist ........................61 www.zoll.com...
- Page 5 Wireless Output Guidance and Manufacturer's Declaration ..............76 RF Transmission Emitted (IEC 60601-1-2)..................76 FCC Notice ............................76 Canada, Industry Canada (IC) Notices ....................76 Appendix D. Performance Report Alerts Table ................... 77 Quick Reference Guide ..........................79 AutoPulse NXT User Guide...
-
Page 6: Introduction
The AutoPulse NXT system is intended for use as an adjunct to manual CPR when effective manual CPR is not possible (e.g., during patient transport or extended CPR when fatigue may prohibit the delivery of effective/ consistent compressions to the victim, or when insufficient EMS personnel are available to provide effective CPR). -
Page 7: Intended Users
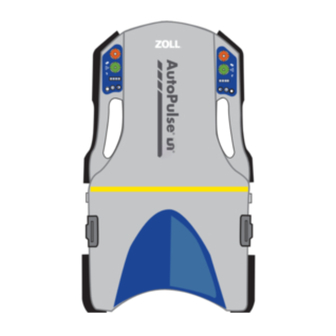
Figure 1.1. System components Number Description Platform Band Battery and spare battery Battery charger AutoPulse NXT Platform The AutoPulse NXT platform (platform), when connected to the band, performs automated chest compres- sions. Controls and indicators are in the user control panels. www.zoll.com... -
Page 8: Autopulse Nxt Battery
Chapter 1. Introduction AutoPulse NXT Battery The AutoPulse NXT battery (battery) supplies power to the platform. The battery can be inserted into the plat- form or battery charger. AutoPulse NXT Battery Charger The AutoPulse NXT battery charger (battery charger) has two charging bays, each with its own indicators. - Page 9 Chapter 1. Introduction This page intentionally left blank. www.zoll.com...
-
Page 10: Safety Information
WARNING. The platform is not intended to be the sole means of carrying the patient. To carry the patient, secure the platform to a transportation device, such as the AutoPulse NXT Quick case carry sheet, gurney, or backboard. During transport, perform regular checks of the patient’s alignment. -
Page 11: Symbols
Caution. Prior to use, inspect the battery charger for damage to the power cord, power cord pins, or battery charger enclosure. If damage is found, there is risk of electric shock. Discontinue use and contact ZOLL for ser- vice. - Page 12 FCC Declaration of Conformity Follow instructions for use Consult the instruction for use Importer Keep away from open flame and high heat. Keep dry Li-ion battery disposal Li-Ion Lot number Manufacturer Manufacture date Country of manufacture Medical device AutoPulse NXT User Guide...
- Page 13 Chapter 2. Safety Information Non sterile STERILE Patent Quantity Rechargeable battery Serial number Single use only Temperature limitation TUV certification (US, Canada, EU) Rheinland Li-Ion Battery Li-Ion Battery Unique Device Identification www.zoll.com...
-
Page 14: Platform
"Mute settings" (page 13) Platform description The AutoPulse NXT platform (platform), when connected to the band, performs automated chest compres- sions. Control and monitor the system with the user control panels. Use the handles to adjust the platform under the patient. -
Page 15: User Control Panel
Illuminated when muted. “Mute settings” on page 13. • Illuminated when Continuous mode is selected. Compression Press to change the "Compres- Green Mode sion mode" (page 12). • Not illuminated when 30:2 mode is selected. Table 3.1: User control panel www.zoll.com... - Page 16 Turn off and then turn on the Flashing and the Battery charge sta- platform. If that does not tus is not flashing clear the error, revert to manual impressions and contact Technical Support afterwards (page 60). Table 3.1: User control panel (Continued) AutoPulse NXT User Guide...
-
Page 17: Compression Mode
3. Press and release the Compression Mode button. The platform beeps once. 4. To change the compression mode back, press and release Compression Mode again. Note. When the platform turns off, the compression mode reverts to the default compression mode. www.zoll.com... -
Page 18: Mute Settings
Mute settings Press Mute to silence ventilation, pause, and low battery beeps for 30 seconds. If mute is activated, the beeps resume when: • 30 seconds have passed. • Mute button is pressed again. AutoPulse NXT User Guide... - Page 19 Chapter 3. Platform This page intentionally left blank. www.zoll.com...
-
Page 20: Band
"Removing the band" (page 19) Band description The AutoPulse NXT Band (band) is a load-distributing band that includes two belts with guards to install on the platform. Connected to the platform, the band automatically adjusts to the patient’s size and provides com- pressions to the patient's chest. -
Page 21: Installing The Band
2. Place the band on top of the platform. Align the yellow lines on the band and platform. 3. Starting on one side of the platform, orient the band in a U shape, with no twists. Caution. Performing compressions with a twisted band may cause skin abrasions or lacerations to the patient. www.zoll.com... - Page 22 4. In the guard port on the platform, check that the spool is oriented so that the slot is facing outward. Caution. Before inserting your fingers into the guard port, ensure that the spools are not moving. Figure 4.2. Platform spool Number Description Release Slot AutoPulse NXT User Guide...
- Page 23 Chapter 4. Band 5. Hold the bottom of the belt with the small end of the pin facing the yellow line. 6. Insert the small end of the pin into the hole closest to the yellow line. www.zoll.com...
-
Page 24: Removing The Band
Removing the band Caution. Do not cut the band before removing from the platform. See “Cut bands” on page 63. 1. Place the platform, with the patient surface facing up on a smooth, flat surface. AutoPulse NXT User Guide... - Page 25 Chapter 4. Band 2. Push the bottom (long side) of the band guard up and lift it out of the guard port. 3. Press the platform release away from the yellow line to release the pin. www.zoll.com...
- Page 26 4. Remove the pin. 5. Pull on the belt to remove it from the platform. 6. Repeat Step 2 through Step 5 with the other side of the band. 7. Discard the band as biohazard waste. AutoPulse NXT User Guide...
- Page 27 Chapter 4. Band This page intentionally left blank. www.zoll.com...
-
Page 28: Battery
"Expected battery life" (page 25) Battery description The AutoPulse NXT battery (battery) is a proprietary, rechargeable, removable lithium-ion battery that is the power source for the platform. WARNING. Always charge a stored battery before placing the battery in active operation. Check the "Battery status indicators"... -
Page 29: Handling New Batteries
If the battery is not in the battery charger, press Status check button to view the battery charge level (Figure 5.2). If the battery is in the battery charger, the battery charge status is displayed in the "Battery charger panel" (page 31). Figure 5.2. Battery status Number Description Status check button Charge indicator Alert indicator www.zoll.com... -
Page 30: Installing And Removing The Battery
Service life of a properly maintained battery with typical use is five years. The battery capacity decreases with use over this time. As a preventive measure, ZOLL recommends replacing batteries at least every five years regardless of the battery’s capacity. ZOLL also recommends purchasing batteries at intervals to eliminate the need to replace all batteries at the same time. - Page 31 Chapter 5. Battery This page intentionally left blank. www.zoll.com...
-
Page 32: Battery Charger
Battery charger description The AutoPulse NXT battery charger (battery charger) is used to charge, test, and maintain up to two AutoPulse NXT batteries. The battery charger has two charging bays, each with its own indicators. When in use, the bat- tery charger continuously tests itself and any batteries in its bays. - Page 33 Chapter 6. Battery Charger Figure 6.1. Battery charger (front) Number Description Charging bays "Battery charger panel" (page 31) Figure 6.2. Battery charger (back) Number Description Circuit breaker www.zoll.com...
-
Page 34: Setting Up The Battery Charger
If the battery's internal temperature is out of range (Table C.5 on page 70), the battery does not charge. The status indicator on the battery charger blinks very slowly until the battery is within the temperature range. AutoPulse NXT User Guide... -
Page 35: Charging The Battery
1. Pull out the finger ring and rotate clockwise to the unlock position. 2. Pull the battery out of the battery charger. Note. Newly-charged batteries can be warm to the touch. This is normal. Figure 6.4. Removing the battery from the battery charger www.zoll.com... -
Page 36: Battery Charger Panel
Battery charge status. Illuminated for the battery in the applicable bay. Battery alert. Illuminated if the battery in the applicable bay is not working. USB transfer status. USB port. To access log files (Service only). Figure 6.5. Battery charger panel AutoPulse NXT User Guide... -
Page 37: Battery Charger Measurement Cycle
After the measurement cycle completes, the battery is either ready to use (battery charge status indicator on the battery charger panel illuminates) or has failed and should be replaced (battery alert indicator on the battery charger panel illuminates). If a battery has failed the measurement cycle, do not use it. Contact "Technical Support" (page 60). www.zoll.com... -
Page 38: Battery Charger Circuit Breaker
1. Unplug the power cord from the wall electrical outlet. Wait one minute. 2. Turn off the circuit breaker. See Figure 6.2, “Battery charger (back),” on page 28. 3. Turn on the circuit breaker. AutoPulse NXT User Guide... - Page 39 Chapter 6. Battery Charger This page intentionally left blank. www.zoll.com...
-
Page 40: Using The System
– is suggested for the roles and positions of users performing compressions and using the system. Your ZOLL representative can provide appropriate instructions based on the setting where you work (EMS or hospital) and the number of clinicians who typically deal with sudden cardiac arrest. -
Page 41: Operating The System
WARNING. Compared to manual chest compression recommendations by the American Heart Association (2020 AHA Guidelines for CPR and ECC), the AutoPulse NXT System delivers circumferential adult chest com- pressions at a lower frequency and, for chest sizes below 10 inches, to a shallower depth of compression. The AutoPulse NXT System’s compression rate is 80 ±5 compressions per minute, and it provides chest displace-... - Page 42 Chapter 7. Using the System 5. Sit the patient up. 6. Slide the platform under the patient. 7. Lower the patient onto the platform. Position the patient’s armpits to align with the yellow line on the platform. AutoPulse NXT User Guide...
- Page 43 WARNING. Press Stop to pause compressions before moving or realigning the patient. Press Start to con- tinue compressions. WARNING. Do not place a strap across or otherwise constrain the movement of the band. WARNING. Check the patient’s chest rise while ventilating during system operation. www.zoll.com...
-
Page 44: Patient Alignment
Caution. Straps or restraints must not alter the alignment of the patient to the platform or interfere with operation of the platform. Ensure that compression and full decompression of the chest is not restricted in any way. AutoPulse NXT User Guide... -
Page 45: Patient Extrication
Defibrillation When the platform is used in conjunction with defibrillators or with other therapeutic devices that must monitor an ECG signal, interruption of the compression cycles may be required to avoid ECG motion artifacts associated with mechanical chest compressions. www.zoll.com... -
Page 46: Ending Treatment
The performance report file an be downloaded from the platform to a FAT-32 formatted USB drive and view in PDF format. The AutoPulse NXT Performance Report files include: • Summary date. Date the summary was generated •... -
Page 47: Downloading The Autopulse Nxt Performance Report
Chapter 7. Using the System Downloading the Autopulse NXT performance report: Ensure the battery is installed in the platform Turn on the platform Insert a USB drive into the USB port Note. The USB indicator on the user control panel should start flashing 4. -
Page 48: Accessories
Quick Case carry sheet General Information The AutoPulse NXT Quick Case Carry sheet is exclusively for use with the AutoPulse® NXT Resuscitation System. The Quick Case™ carry sheet is designed to protect the platform during storage and to transport the platform and patient while the platform is in use. - Page 49 As defects due to usage can not be excluded, it is recommended to examine the fabric for visible damage before each use. ZOLL medical assumes no responsibility for damage caused by improper handling by unauthorized persons or for wear and tear on the material.
- Page 50 The Quick Case™ carry sheet is designed for a maximum patient weight of 181 Kg (400 lbs). Figure 8.1. Quick Case carry sheet outside and inside Number Description Battery indicator window Battery protector cover Carrying handles (4) Backpack straps Handle to position the platform Sheet for carrying the patient Scissors pocket AutoPulse NXT User Guide...
-
Page 51: Attaching The Platform To The Quick Case Carry Sheet
Second fold mark (top blue line) First fold mark (bottom blue line) Final fold mark (yellow) Attaching the platform to the Quick Case carry sheet 1. Fully open the Quick Case carry sheet and attach the top part of the platform wrap. www.zoll.com... - Page 52 Chapter 8. Accessories 2. Place the platform into the platform holding straps. Make sure that the platform fits tightly. 3. Secure the platform to the Quick Case carry sheet using the bottom 2 straps from the platform wrap. AutoPulse NXT User Guide...
-
Page 53: Folding The Quick Case Carry Sheet
4. Place the band on the platform. Place the waist straps (10) into the left and right waist strap loops (9). Folding the Quick Case carry sheet 1. Pull the gray part of the Quick Case carry sheet from the bottom to the top. www.zoll.com... - Page 54 2. Fold the gray part of the Quick Case carry sheet in half from the top to the bottom at the first fold mark (blue line). 3. Fold the gray part of the Quick Case carry sheet in half again, from the top to the bottom at the second fold mark (blue line). AutoPulse NXT User Guide...
- Page 55 Chapter 8. Accessories Fold the gray part of the Quick Case carry sheet in half again, from the top to the bottom, at the final fold mark (yellow line). Fold the left side inwards. www.zoll.com...
-
Page 56: Hygiene Barrier
The hygiene barrier is a plastic platform cover to reduce contamination during use and decrease the need for cleaning. WARNING. Do not use a damaged hygiene barrier WARNING. For single use only. 1. Slip the hygiene barrier over the platform from the bottom to the top of the platform. AutoPulse NXT User Guide... - Page 57 Make sure the openings in the hygiene barrier face the top of the platform, allowing access to the guard ports. WARNING. Align hygiene barrier openings with the battery, air vents and band attachment points. Install a new band. See “Installing the band” on page 16. AutoPulse NXT User Guide...
-
Page 58: Shoulder Restraint
Caution. Do not place the strap over the patient’s neck or over the band. 2. Secure the black straps to the metal attachment points near the patient’s head. www.zoll.com... -
Page 59: Warnings
During active compressions, regularly check to maintain correct patient alignment to the platform and band. AutoPulse NXT User Guide... -
Page 60: Maintenance And Transport
See Appendix A, “System Checklist,” on page 61. The system has no user-serviceable parts. Periodically inspect the system. All repairs or service must be per- formed by qualified service personnel. Contact a ZOLL representative for assistance. Inspecting the platform To inspect the platform: 1. -
Page 61: System Cleaning
Note. Please never use the spin cycle as this may cause damage to the waterproof coating. Dry the NXT Quick case carry sheet at room temperature. Never put in a tumble dryer, dry in direct sunlight or near radiators, or in the vicinity of radiators www.zoll.com... -
Page 62: Cleaning The Shoulder Restraint
WARNING. Heating, burning, or incinerating a battery may result in fire or explosion. Dispose of the platform or battery charger in accordance with local governing ordinances and recycling plans for electronic waste. The band is for single use only. Once used, dispose of the band as bio-hazard waste. AutoPulse NXT User Guide... - Page 63 Chapter 9. Maintenance and Transport This page intentionally left blank. www.zoll.com...
-
Page 64: 10. Warranty & Technical Support
(including without limitation lost profits) directly or indirectly arising from the sale, inability to sell, use or loss of use of any equipment (however caused and on any theory of liability), even if ZOLL has been ad- vised of the possibility of such loss. The foregoing limitations shall not apply to any claims for bodily injury or death to the extent that limitation of damages for such claims are unenforceable or against public policy under any applicable statute or rule of law. -
Page 65: Technical Support
ZOLL provides factory-based technical support for the AutoPulse NXT system and accessories. ZOLL Technical Support can answer questions, provide guidance, and schedule service for your system. In the U.S., contact ZOLL Technical Support at 1-800-348-9011. Outside the U.S., contact your local ZOLL rep- resentative. -
Page 66: Appendix A. System Checklist
If the band guard lock indicator is on, check if the band guards are correctly installed on the platform. • If the alert indicator is on, see Appendix B, “Troubleshooting,” on page 63. If the alert indicator can-not be resolved, contact "Technical Support" (page 60). AutoPulse NXT User Guide... - Page 67 Appendix A. System Checklist This page intentionally left blank. www.zoll.com...
-
Page 68: Appendix B. Troubleshooting
1. Turn off the platform. 2. Make sure the band guards are in place. 3. Turn on the platform. 4. Remove the band guards and pull the remaining band from the platform. See 'Removing the band" on page 19. AutoPulse NXT User Guide... -
Page 69: Retracting Bands
Band not completely unwound from platform To manually remove the band from the platform, pull the band until the band is unwound and the pin is visible and able to be removed. Figure B.1. Band wrapped around platform spool www.zoll.com... -
Page 70: Troubleshooting The Battery
Prepare to replace the battery with a fully charged one bar flashing but the The battery charge is low. battery. Alert indicator is not flashing. Table B.1: Battery troubleshooting (1 of 2) AutoPulse NXT User Guide... -
Page 71: Troubleshooting The Battery Charger
2. Insert the battery into the other battery bay. There might be a battery minated for a battery 3. If the alert indicator illuminates for the other error. bay. battery bay, do not use the battery. Contact "Technical Support" (page 60). Table B.2: Battery charger troubleshooting www.zoll.com... -
Page 72: Appendix C. Technical Specifications
Appendix C. Technical Specifications Appendix C. Technical Specifications The specifications provided in this appendix apply to the AutoPulse NXT System. System Operating Parameters Category Specifications Equal to 20% reduction in anterior-posterior chest depth Chest displacement 50 ± 5% Physiological duty cycle 80 ... -
Page 73: Battery Physical And Environmental Specifications
Short-time per IEC 60601-1 (30 minutes) Table C.3: Platform Environmental Specifications (Continued) Battery Physical and Environmental Specifications Category Specifications Manufacturer ZOLL Circulation, Inc. Model Number 8700-001012-01 Size (LWH) 143 mm x 215 mm x 62 mm (5.6 in. x 8.5 in. x 2.4 in.) Weight 1.67kg (3.68lb) -
Page 74: Battery Charger Physical And Environmental
100 to 240 V AC Operating input frequency 50/60 Hz Input current 5.0 Amps (maximum) Maximum Battery charge time Less than 2 hours at 25ºC (77ºF) Circuit breaker Table C.5: Battery Charger Physical and Environmental Specifications AutoPulse NXT User Guide... -
Page 75: Guidance And Manufacturer's Declaration-Electromagnetic Emissions
The platform and battery charger use RF energy for their inter- RF Emissions Group 1 nal function only. Therefore, its RF emissions are very low and CISPR 11 are not likely to cause any interference in nearby equipment. Table C.6: Guidance and Manufacturer’s Declaration–Electromagnetic Emissions www.zoll.com... -
Page 76: Electromagnetic Immunity Declaration (Eid)
Single phase at 0ºC the battery charger be powered from an inter- 0% U , 250/300 cycles 0% U , 250/300 cycles Voltage interruptions ruptible power supply Table C.7: Guidance and Manufacturer’s declaration –Electromagnetic immunity for the battery charger AutoPulse NXT User Guide... - Page 77 Power frequency (50/ levels characteristic of 60 Hz) magnetic field. 30 A/m 30 A/m typical location in a typi- IEC 61000-4-8 cal commercial or hospi- tal environment. Table C.8: Guidance and Manufacturer’s declaration –Electromagnetic immunity for the platform www.zoll.com...
- Page 78 If abnormal performance is observed, additional measures may be necessary, such as re-orienting or relocating the battery charger. 2. Over the frequency range 150 kHz to 80 MHz, field strengths should be less than 3 V/m. AutoPulse NXT User Guide...
- Page 79 Note 1: At 80 MHz and 800 MHz, the higher frequency range applies. Note 2: These guidelines may not apply in all situations. Electromagnetic propagation is affected by absorp- tion and reflection from structures, objects, and people. Table C.10: Guidance and manufacturer’s declaration – electromagnetic immunity for the platform www.zoll.com...
- Page 80 WARNING. Portable RF communications equipment (including peripherals such as antenna cables and exter- nal antennas) should be used no closer than 30 cm (12 inches) to any part of the system, including cables specified by the manufacturer. Otherwise, degradation of the performance of this equipment could result. AutoPulse NXT User Guide...
-
Page 81: Wireless Output Guidance And Manufacturer's Declaration
Appendix C. Technical Specifications WARNING. Battery charger only: To minimize risk of electric shock, when a potential equalization bus bar is available, connect to the potential equalization port on the back of the battery charger using the ZOLL ground- ing cable or equivalent. -
Page 82: Appendix D. Performance Report Alerts Table
Appendix D. Performance Report Alerts Table The table below provides a list of codes that may be present on an AutoPulse NXT Performance Report. This information is provided to assist in the diagnosis and resolution on an Illuminated Alert indicator... - Page 83 Left user interface alert Motor alert Right user interface alert Motor alert Left user interface alert Motor alert Right user interface alert Motor alert Left user interface alert Motor alert Right user interface alert Motor alert www.zoll.com...
-
Page 84: Quick Reference Guide
Quick Reference Guide Note. Perform manual CPR until the patient is on the platform. Turn on the platform. Position the patient’s armpits at the platform’s yellow line. Close the band and press firmly to attach. Press Start. AutoPulse NXT User Guide... - Page 85 Quick Reference Guide This page intentionally left blank. www.zoll.com...
Need help?
Do you have a question about the AutoPulse NXT and is the answer not in the manual?
Questions and answers