
Related Manuals for HelloBaby HB2688

Summary of Contents for HelloBaby HB2688
- Page 1 HB2688/HB2688-2/HB2688-3 HB2688-4/HB2688RX/HB2688TX Digital Cordless Telephone USER'S GUIDE Model: HB2688/HB2688-2/HB2688-3/HB2688-4 Warming: Charge the handset for 16 hours before use.
-
Page 2: Table Of Contents
3.1. Installing and Charging the Batteries ........13 3.2. Replace battery ..............14 3.3. Connecting the Base Station ...........14 3.4. Connecting the Charger(s) (for HB2688-2/HB2688-3/HB2688-4 models) ..................15 BEFORE USE ..............16 4.1. Check for dial tone ..............16 4.2. Operating range ..............16 5.1. - Page 3 6.12.1. Intercom ................21 6.13. Find the Handset ..............21 CONTACTS (PHONEBOOK) ..........22 7.1. Add a phonebook entry ............22 7.2. Edit a phonebook entry ............23 7.3. Delete a phonebook entry ............23 7.4. View/Dial a contact ...............23 SPEED DIAL............... 23 8.1. To register the direct memories in keys M1, M2, 1, 2 & 3 ....23 PHONE SETTINGS .............
- Page 4 12.5. Set the Auto Answer ..............30 12.6. Date & Time .................31 12.7. Direct Mem ................31 12.8. Alarm Settings ..............31 TELEPHONE BASE SETTINGS ..........31 13.1. De-register a Handset ............31 13.2. Change the dial mode ............32 13.3. Change the Flash Time ............32 13.4.
-
Page 5: Important Safety Instructions
IMPORTANT SAFETY INSTRUCTIONS When using your telephone equipment, basic safety precautions should always be followed to reduce the risk of fire, electric shock and injury, including the following: 1) Read and understand all the instructions. 2) Follow all warnings and instructions marked on the product. 3) Unplug this product from the wall outlet before cleaning. Do not use liquid cleaners or aerosol cleaners. - Page 6 11) To reduce the risk of electric shock, do not disassemble this product, but take it to an authorized service facility. Opening or removing parts of the telephone base or handset other than specified access doors may expose you to dangerous voltages or other risks. Incorrect reassembling can cause electric shock when the product is subsequently used. 12) Do not overload wall outlets and extension cords.
- Page 7 SAVE THESE INSTRUCTIONS Battery • CAUTION: Use Only Supplied Battery. • Do not dispose of the battery in a fire. Check with local waste managment codes for special disposal instructions. • Do not open or mutilate the battery. Released electrolyte is corrosive and may cause burns or injury to the eyes or skin. The electrolyte may be toxic if swallowed. • Exercise care in handling batteries in order not to create a short circuit with conductive materials.
- Page 8 • Electrical power: The telephone base of this cordless telephone must be connected to a working electrical outlet. The electrical outlet should not be controlled by a wall switch. Calls cannot be made from the cordless handset if the telephone base is unplugged, switched off or if the electrical power is interrupted. •...
-
Page 9: What's In The Box
Your telephone package contains the following items. Save your sales receipt and original packaging in case it is necessary to ship your telephone for warranty service: 1 set for HB2688/ HB2688-2/ HB2688-3/ HB2688-4 1 set for HB2688 1 set for HB2688-2... -
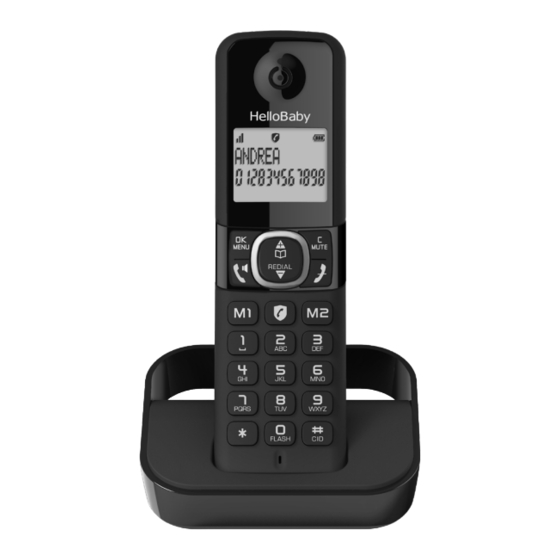
Page 10: Overview
OVERVIEW 2.1. Handset and Display Overview Indicates that an external call is connected or held. Icon blinks when receiving an incoming call. Displays when handset speakerphone is activated. Indicates battery is full charges. - Page 11 There are new voicemail received from your telephone service provider*. • Press to start an intercom conversation or transfer a call (for multi-handset models only). Mute • Mute the microphone during a call. • Delete digits or characters while using the dialing keys. •...
-
Page 12: Connect
Enter the main menu. While in a menu, press to select an item, or save an entry or setting. Displays when the alarm clock is activated. Displays when ringer volume is turned off. Indicates quality of reception’s signal. There are new caller ID log entries*. The Call Blocking function is activated. -
Page 13: Installing And Charging The Batteries
Always use the cables provided in the box. For HB2688-2, HB2688-3, HB2688-4, plug the power adaptor of the charger into a wall power outlet. 3.1. Installing and Charging the Batteries 1) Battery already installed into handset, pull and remove the battery pull Tab to turn ON the handset. -
Page 14: Replace Battery
3.2. Replace battery Slide down to open the battery compartment cover. Place the 2 supplied rechargeable batteries as indicated. Pay extra attention to direction of polarity. Slide the battery compartment cover back. Put the handset on the base and charge for 15 hours before using the handset for the first time. The handset will give a beep when it is properly placed on the base or charger. -
Page 15: Connecting The Charger(S) (For Hb2688-2/Hb2688-3/Hb2688-4 Models)
3.4. Connecting the Charger(s) (for HB2688-2/HB2688-3/ HB2688-4 models) Plug the power adapter into a mains socket. If you have a Broadband line If you connect your telephone to a line with a broadband connection, you will need to insert a DSL filter between the telephone and the telephone line, otherwise you may get interference between the telephone and the broadband, which could cause problems. -
Page 16: Before Use
BEFORE USE 4.1. Check for dial tone Press . If you hear a dial tone, the installation is successful. If you do not hear a dial tone: • Make sure the installation procedures described above are properly done. • It may be a wiring problem. If you have changed your telephone service to digital service from a cable company or a VoIP service provider, the telephone line may need to be rewired to allow all existing telephone jacks to work. -
Page 17: Set Date And Time
to choose ENGLISH, FRANÇAIS OR ESPAÑOL, and Press then press . Then the handset returns to the previous menu. You hear a confirmation tone. 5.3. Set date and time To set the correct time and date on the phone Press when the handset is not in use. SETTINGS, then press Press to choose... -
Page 18: Temporary Tone Dialing
to choose DIAL MODE, and then press Press Press to choose Tone or Pulse. Press to save your selection. Then the handset returns to the previous menu. You hear a confirmation tone. 5.5. Temporary tone dialing If you have pulse (rotary) service only, you can switch from pulse to touch-tone dialing temporarily during a call. -
Page 19: Speakerphone
6.5. Speakerphone During a call, press to switch between the speakerphone and the handset earpiece. When the speakerphone is active, the handset displays 6.6. Volume During a call, press to adjust the listening volume. NOTES • The handset and speakerphone volume settings are independent. •... -
Page 20: Chain Dialing
There are fees for caller ID services. In addition, services may not be available in all areas. 6.9. Chain Dialing Use this feature to initiate a dialing sequence from numbers stored in the phonebook while you are on a call. Chain dialing can be useful if you wish to access other numbers (such as bank account numbers or access codes) from the phonebook. -
Page 21: Delete All Redial Entry
to choose DELETE, press Press then press confirm. 6.11.4. Delete all redial entry Press to enter the redial list. Press to browse the list. to choose DELETE ALL, press Press then press confirm. 6.12. Multiple handset use 6.12.1. Intercom This feature is only applicable where at least two registered handsets. You can register up to 4 handsets to the telephone base. -
Page 22: Contacts (Phonebook)
CONTACTS (PHONEBOOK) You can store up to 100 entries in your list of contacts. Contact entries will automatically be copied to any other handsets you have registered to the base. Any change made on one handset will be updated on all other handsets. 7.1. -
Page 23: Edit A Phonebook Entry
7.2. Edit a phonebook entry In idle mode, press to open your contact list. Press to scroll to the entry you want to edit and press to highlight EDIT and press Press Edit the name by pressing to move cursor left or right. •... -
Page 24: Phone Settings
PHONE SETTINGS 9.1. Handset Settings 9.1.1. Set Ringer melody and volume to select HS SETTINGS. Press to select RING SETUP. Press to select RING VOLUME. Press Press to select the desired ringer volume. There are 6 ringer volume levels including RINGER OFF. Press to confirm. -
Page 25: View And Dial Out In The Caller Id Log
When the caller ID log is full and a new call is received/made, the oldest entry will be deleted automatically. The caller ID log can hold numbers up to 24 digits and names up to 12 characters. Missed call notification If an incoming call has been missed (i.e. -
Page 26: Delete An Entry Or The Entire Caller Id Log
View and edit the name, then press . View and edit the number and press . Choose VIP and MELODY RINGER, then press NOTE: To save a number from Blocklist into Phonebook, it is not allowed and shows DOUBLE NUM. If you decide to delete a number from Blocklist and then save the number into Phonebook, please refer to Section 11.1.4. -
Page 27: Manual Call Block Mode: On
In this second automatic mode, only calls from contacts registered as VIP in your phonebook will go through and cause you phone to ring. Any other number will not ring. When this mode is chosen, VIPS OK is displayed on the LCD in idle mode unless you have missed call. -
Page 28: Edit Numbers In Blocklist
From incoming call numbers list, • Press and hold to access the call list. • Press to select a number. to select ADD to BLIST. • Press , press • Press to show selected number, press to save to Blocklist. 11.1.3. -
Page 29: Vips Only
11.2.2. VIPs only In this restrictive mode, only calls from numbers registered as VIP in your phonebook will go through and make your phone ring. to access Block set. Press to select VIP OK. Press Press , press to validate. 11.3. -
Page 30: Set Ringer Volume
12.1.2. Set Ringer Melody for External Call • Repeat Step 1 to 3 of 12 to select RING SETUP, then press press to select EXT. RING, then press to confirm. • Press to select the desired ringer, then press to confirm. 12.1.3. Set Ringer Volume •... -
Page 31: Set The Auto Answer
12.5. Set the Auto Answer When Auto Answer is on, call answers automatically when you pickup the handset from cradle. Repeat Step 1 to 3 of Section 12 to select AUTO ANSWER, then press • to select ON or OFF. , press •... -
Page 32: Telephone Base Settings
TELEPHONE BASE SETTINGS BASE can be customized according to your preference by accessing BS SETTINGS to select the settings. Press to enter the menu. Press to select BS SETTINGS, press to confirm. to select DELETE HS/ DIAL MODE/ FLASH TIME/ Press CHANGE PIN/ ECO MODE/ AREA CODE then press to confirm the selection. -
Page 33: Registration
• Re-enter the new system PIN code, then press to confirm. NOTE: If PIN correct, handset will go to next step. If PIN incorrect, handset will go back to previous level. 13.5. ECO Mode This power conserving technology reduces power consumption for optimal battery performance. -
Page 34: Reset The Phone
RESET THE PHONE The phone can be reset to the factory settings. After reset, all the settings and caller ID log entries inside the phone will be deleted, except PHONEBOOK remains unchanged. • Press to enter the menu; then to select DEFAULT, then press Display shows CONFIRM?, press •... - Page 35 The battery does not a. Make sure the handset is placed in the charge in the handset telephone base or charger correctly. or the handset battery b. If the battery is completely depleted, charge does not accept charge. the battery for at least 30 minutes before use. c.
-
Page 36: General Product Care
The telephone does a. Caller ID is a subscription service. You must not receive caller ID or subscribe to this service from your telephone the telephone does not service provider for this feature to work on show caller ID during your telephone. -
Page 37: Avoid Water
17.3. Avoid water Your telephone can be damaged if it gets wet. Do not use the handset outdoors in the rain, or handle it with wet hands. Do not install the telephone base near a sink, bathtub or shower. 17.4. Electrical storms Electrical storms can sometimes cause power surges harmful to electronic equipment. - Page 38 including interference that may cause undesired operation. Privacy of communications may not be ensured when using this telephone. To ensure safety of users, the FCC has established criteria for the amount of radio frequency energy that can be safely absorbed by a user or bystander according to the intended usage of the product.
-
Page 39: Limited Warranty
LIMITED WARRANTY What does this limited warranty cover? The manufacturer of this HelloBaby warrants to the holder of a valid proof of purchase (“Consumer” or “you”) that the Product and all accessories provided in the sales package (“Product”) are free from defects in material... - Page 40 What must you return with the Product to get warranty service? 1. Return the entire original package and contents including the Product to the HelloBaby service location along with a description of the malfunction or difficulty; and 2. Include a “valid proof of purchase” (sales receipt) identifying the Product purchased (Product model) and the date of purchase or receipt;...
- Page 41 Please retain your original sales receipt as proof of purchase. Disclaimer and Limitation of Liability HelloBaby and its suppliers assume no responsibility for any damage or loss resulting from the use of this user’s manual. HelloBaby and its suppliers assume no responsibility for any loss or claims by third parties that may arise through the use of this product.
-
Page 42: Safety
SAFETY In the event of an electrical hazard, the mains adapter acts as 120V power isolating device. It should therefore, as a precaution, be installed close to the appliance and be easily accessible. To disconnect the device from the primary power source, the mains adapter must be removed from the 120V AC/60Hz socket. -
Page 43: Technical Specifications
Charger: 6V DC @ 450mA Memory Phonebook Phonebook: 100 memory locations; up to 24 digits and 12 characters Caller ID log: 50 memory locations; up to 24 digits and 12 characters Model No.: HB2688/ HB2688-2/ HB2688-3/ HB2688-4 Ver: 1.0 (EN) Printed in China...
Need help?
Do you have a question about the HB2688 and is the answer not in the manual?
Questions and answers
How to lower ring volume. how to raise listen vol, 100 slots for spam calls how can I check to see the spam calls count is? Thanx