Advertisement
Table of Contents
Contents
TrueCam A7s - Video Recorder Quick Start Guide
PACK CONTENTS

- TrueCam A7s dashcam
- GPS module
- Mount with 3M adhesive pad
- Suction cup mount
- DVR adapter
- Car adapter with two USB ports
- Mini USB cable (3m)
- 3M adhesive cable clips (5x)
- Replacement 3M adhesive pads for attaching mount to windscreen
- Protective cover for storage and carrying
- USB data cable
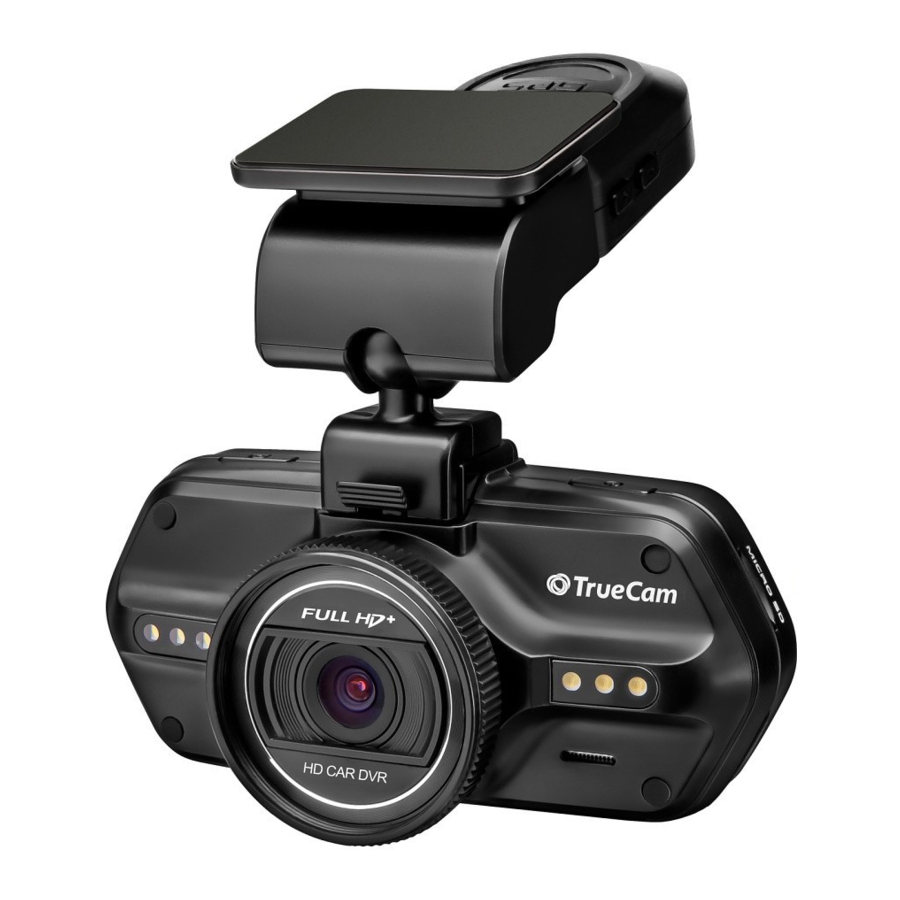
GETTING TO KNOW THE CAMERA / CONTROLS

- Memory card slot
- Mini HDMI output
- LED light
- Lens
- Speaker
- PHOTO button
- Connector to mount
- POWER button
- USB data port
- RESET button
- Microphone
- Status LED blue (lit = camera on, flashing = recording)
- Status LED red (lit = camera powered)
- MENU button
![]()
- PROTECT button
![]()
- MODE button
![]()
- 2.7" LCD
- UP button
- OK button
- DOWN Button
| Button | Menu Navigation and Functions | Playback Mode | Recording Mode |
| POWER | Camera on / off | Camera on / off | Camera on / off |
| UP | Previous file | Previous file | Speedometer on / off |
| DOWN | Next file | Next file | Audio recording on / off |
| OK | Confirm | Start / Stop | Start / stop recording |
MENU  | Video settings / camera settings | Enter menu | Turn on / off illumination |
PROTECT  | No function | Lock / unlock file | Lock / unlock file |
MODE  | Change mode | Back | No function |
| FOTO | Take photo | No function | Take photo |
| RESET | Reset | Reset | Reset |
BASIC SETTINGS AND FUNCTIONS

- Insert the microSD card as shown on the camera (card connectors facing the display).
- Use a Class 10 or higher branded card up to 64 GB.
- Remove card only when the camera is switched off.
- Format the card the first time you use it in the camera.
- Plug the adapter into the cigarette lighter and connect it to the DVR adapter using the USB cable.
- The camera is designed for use only when connected to a power source
- Camera turns on automatically and starts recording.
- For some vehicles you need to turn the ignition key.
BASIC FUNCTIONS
Loop Recording
- Camera automatically splits the video into shorter files and overwrites the oldest unprotected files when the SD card is full.
- This means you don't have to worry about free space on the card
File Protection
- To protect against overwriting a file, press the PROTECT button
![]() whilst recording.
whilst recording.
G-Sensor
- If the G-Sensor detects an impact, it automatically protects the video currently being captured against being overwritten.
- Attention, when the settings are set to high sensitivity and you are driving over uneven surfaces this can cause files to be automatically protected and the filling up of the SD card.
Motion Detection
- The camera automatically starts recording when it detects movement in the lens field of view and stops recording after about 10 seconds.
- If you stop recording manually or turn off the camera, motion detection is disabled.
- The function is for monitoring a parked vehicle, do not use whilst driving.
- To use the motion detection function, the camera must be turned on and connected to the power supply.
GPS module functions
- Includes a database of more than 40,000 static speed cameras throughout Europe.
- Lets you display speed / GPS coordinates in the video.
- Lets you view the speed on the display.
PLACEMENT ON THE GLASS

- The ideal place to attach the dashcam is the space between the windscreen and the rear-view mirror, so that it does not obstruct the driver's view.
- Make sure the glass is clean and dry at the mounting location.
- Ideal bonding temperature is 20°C - 40°C.
- If you are not using the suction cup, remove the film from the 3M adhesive pad on the camera holder.
- Before attaching it to the glass, turn on the camera and point it so it has a clear view.
- Press and hold the 3M pad firmly onto the glass.
GPS INSTALLATION AND SAFETY INSTRUCTIONS

- Connect the GPS Module to the DVR adapter.
- For proper connection of the GPS module and the DVR adapter, it is necessary to apply sufficient force so that there is no visible gap between the GPS module and DVR adapter.
- After connecting to GPS satellites, the module will notify you with a connection message.
- The GPS module records speed, GPS coordinates and alerts you to fixed speed cameras and red-light cameras.
- Safety Precautions:
- Do not operate the camera whilst driving.
- A film-coated or heated windscreen can reduce recording quality and interfere with the GPS module (optional) signal.
- Do not expose the camera to extreme temperatures – especially avoid direct sunlight.
- Make sure that the legislation of the country where you operate the vehicle allows the use of dashcams.
- To prevent injury, the camera must always be placed in the mount when driving and must not obscure your view or block the path of safety elements - particularly airbags.
FURTHER INFORMATION


Visit http://truecam.eu/downloads to find complete instructions, firmware updates, speed camera database updates and the dedicated PC application for playback of videos, including GPS data.

Documents / Resources
References
![truecam.eu]() Manuals and updates | TrueCam - Professional Dashcams | EN
Manuals and updates | TrueCam - Professional Dashcams | EN![truecam.eu]() Manuals and updates | TrueCam - Professional Dashcams | EN
Manuals and updates | TrueCam - Professional Dashcams | EN
Download manual
Here you can download full pdf version of manual, it may contain additional safety instructions, warranty information, FCC rules, etc.
Advertisement


Need help?
Do you have a question about the A7s and is the answer not in the manual?
Questions and answers