Advertisement
Available languages
Available languages
Quick Links
Anker Innovations Limited. All rights reserved. eufy Security and
eufy Security Logo are trademarks of Anker Innovations Limited,
registered in the United States and other countries. All other
trademarks are the property of their respective owners.
QUICK START
GUIDE
SoloCam S340
KURZANLEITUNG
GUÍA DE INICIO
RÁPIDO
GUIDE DE
DÉMARRAGE RAPIDE
GUIDA RAPIDA
SNELSTARTGIDS
GUIA DE INÍCIO
RÁPIDO
5100500XXXX V01
دليل البدء السريع
Advertisement

Related Manuals for eufy Security SoloCam S340


Summary of Contents for eufy Security SoloCam S340
- Page 1 GUIA DE INÍCIO RÁPIDO دليل البدء السريع Anker Innovations Limited. All rights reserved. eufy Security and eufy Security Logo are trademarks of Anker Innovations Limited, registered in the United States and other countries. All other trademarks are the property of their respective owners.
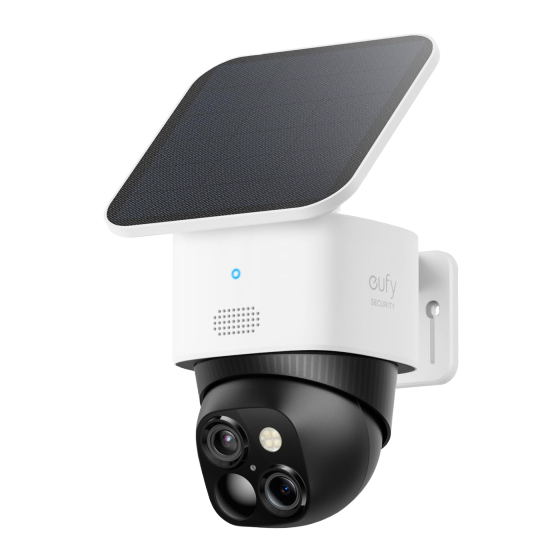
- Page 2 ⑧ Français ④ ⑤ ⑥ ⑦ Italiano Nederlands ⑩ ⑪ ⑫ Português لع َ ر َ ب ِ ية SoloCam S340 Model: T8170 ① ⑦ LED Indicator Wide-Angle Lens ② ⑧ Speaker LED Light ③ ⑨ Telephoto Lens Solar Panel Mounting Hole ④...
-
Page 3: Charging Your Camera
CHARGING YOUR SETTING UP THE CAMERA SYSTEM 1. Download and install the eufy Security Fully charge before first use. app, then sign in or create an account. SYNC 5V/2A 2. Follow the in-app instructions to add the camera to the device list. -
Page 4: Mounting Your Camera
MOUNTING YOUR To ensure that no detection is missed, do not install the camera directly facing the monitoring area. Instead, maintain an angle CAMERA to avoid any potential blind spots. Select a Location and a Height Select a location where you can get the desired view. - Page 5 Select a Solar Panel Location Option 1: Mount the Camera and the Solar Panel Separately (Best for Strong Solar Power) If the camera is blocked, install the solar panel independently and use the provided USB-C extension cable to get strong solar power.
- Page 6 3. Firmly secure the camera onto the mounting bracket. PUSH PUSH 2. Connect the solar panel to the camera using the provided USB-C extension cable. SYNC 08 EN EN 09...
- Page 7 4. Install the mounting bracket of the solar panel in a suitable position. Be careful not to install by mistake. PUSH P U S H 5. Install the solar panel onto its mounting bracket by turning it, then adjust the angle (20º~30º...
- Page 8 1. Secure the solar panel's mounting bracket to the top of the camera. Option 2: Mount the Camera with the Solar Panel Attached (Less Drilling) If the camera is not blocked, install the solar panel directly on the top of the camera. 2.
- Page 9 3. Connect the USB-C connector to the USB-C port of the solar panel. PUSH SYNC 5. Firmly secure the camera onto the mounting bracket and adjust the angle (20º~30º recommended). 4. Drill holes with a 15/64 inch (5.95 mm) drill bit with the included positioning card, then insert the anchors into the holes.
- Page 10 SAFETY Warning: • Replacing a battery with an incorrect type may bypass safeguards and create danger; • The suitable temperature for this device • Disposal of a battery in a fire or other source and accessories is -20°C to 50°C (Charging of significant heat, or by crushing, or cutting, temperature is 0°C to 40°C).
- Page 11 NOTICE Your product is designed and manufactured with high quality materials and components, which can be recycled and reused. Declaration of Conformity This symbol means the product must not be discarded as household waste, and should This product complies with the radio be delivered to an appropriate collection interference requirements of the European facility for recycling.
- Page 12 ② ③ ⑧ ④ SYNC ⑤ ⑥ ⑦ 5V/2A ⑩ ⑪ ⑫ Brandt blauw Opladen Brandt niet Volledig opgeladen SoloCam S340 Oplaadtijd 8 uur Model: T8170 ① ⑦ LED-indicator Groothoeklens ② ⑧ Luidspreker LED-licht ③ ⑨ Montagegat voor Telelens zonnepaneel ④...
-
Page 13: De Camera Monteren
VAN HET MONTEREN SYUSTEEM Kies een locatie en een hoogte 1. Download en installeer de eufy Security Kies een locatie waar je het gewenste zicht app, log vervolgens in of maak een account kunt krijgen. We raden aan de camera twee tot drie meter boven de grond te hangen. - Page 14 Selecteer een locatie voor het Om ervoor te zorgen dat er geen detectie wordt gemist, installeert u de camera niet zonnepaneel recht tegenover het bewakingsgebied. Houd in plaats daarvan een hoek aan om Optie 1: Monteer de camera en het mogelijke dode hoeken te vermijden.
- Page 15 PUSH 2. Sluit het zonnepaneel aan op de camera met de meegeleverde USB-C verlengkabel. 1. Boor gaten met een boor van 6 mm (15/64 inch) met de meegeleverde positioneringskaart en steek vervolgens de pluggen in de gaten. SYNC 102 NL NL 103...
- Page 16 3. Bevestig de camera stevig op de montagebeugel. Let op dat u niet per ongeluk installeert. PUSH PUSH P U S H 104 NL NL 105...
- Page 17 4. Installeer de montagebeugel van het zonnepaneel op een geschikte positie. Optie 2: Monteer de camera met het zonnepaneel bevestigd (minder boren) Als de camera niet geblokkeerd is, installeer dan het zonnepaneel direct bovenop de camera. 5. Installeer het zonnepaneel op de montagebeugel door het te draaien en pas vervolgens de hoek aan (20º~30º...
- Page 18 1. Bevestig de montagebeugel van het 3. Sluit de USB-C-connector aan op de USB- zonnepaneel aan de bovenkant van de C-poort van het zonnepaneel. camera. SYNC 4. Boor gaten met een boor van 6 mm (15/64 inch) met de meegeleverde positioneerkaart en steek vervolgens de ankers in de gaten.
- Page 19 VEILIGHEID PUSH • De geschikte temperatuur voor dit apparaat en de accessoires is -20°C tot 50°C (Oplaadtemperatuur is 0°C tot 40°C). • Gebruik dit apparaat niet in een omgeving met een lagere of hogere temperatuur dan het aanbevolen temperatuurbereik, tenzij in de gebruikers- of instructiehandleiding specifiek wordt aangegeven dat dit veilig kan.
- Page 20 KENNISGEVING Waarschuwing: • Het vervangen van een accu door het verkeerde soort accu kan beveiligingen omzeilen en gevaar Verklaring van conformiteit opleveren; • Als de accu wordt weggegooid in vuur of een Dit product voldoet aan de EU-vereisten met bron van aanzienlijke hitte, wordt geplet of erin betrekking tot radio-interferentie.
Need help?
Do you have a question about the SoloCam S340 and is the answer not in the manual?
Questions and answers
Where can I tell if Wi-Fi is strong on camera