Table of Contents
Advertisement
Advertisement
Table of Contents

Summary of Contents for NICE DIGI Smart Lever X1
- Page 1 Smart Lever User Manual Model: X1...
-
Page 2: Table Of Contents
3.6 Install Interior Assembly 3.7 Installing Batteries 10 - 16 4 User Guide 4.1 System Initialization 4.2 Download the NICE DIGI App 4.3 Sign-up and Login Your Account 4.4 Pair the lock with APP 11-16 4.5 User Management 17 - 18 5.Using Your Lock... -
Page 3: Contact Nice Digi Support
Please must use AA Alkaline Battery and don’t use Lithium Battery or Rechargeable Battery. NICE DIGI TERMS & POLICIES Before use all NICE DIGI products, please read all applicable terms, rules, polices and usage provision found at https://nice-digi.com/pages/privacy-policy. By using your NICE DIGI products, you agree to be bound by the NICE DIGI Privacy Policy. -
Page 4: Product Overview
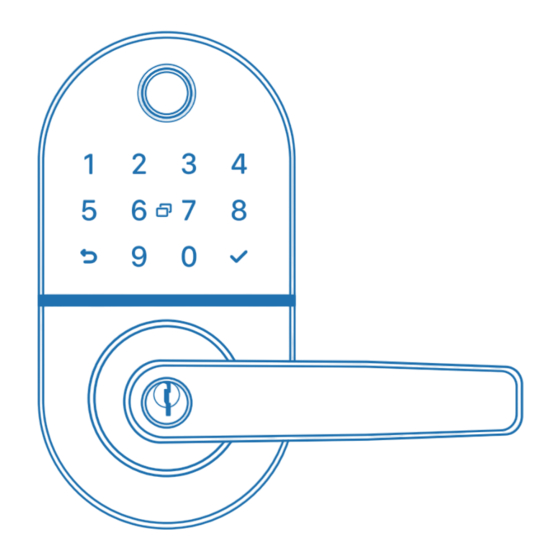
1 Product Overview Fingerprint Reader Anti-peep Keypad Battery Case Key Fob Reader Keyhole Type-C USB (5V) Fingerprint Reader Anti-peep Keypad Used to verify your finger and unlock Used to enter the code and unlock from from outside. outside. Key Fob Reader Battery Case Used to read the key fob and unlock Used to insert 4 AA Alkaline Batteries. -
Page 5: Packing List
2 Packing List Exterior Assembly * 1 Interior Assembly * 1 User Manual * 1 Rubber Plate * 2 60 mm 70 mm Key Fob * 2 Punch Diagram * 1 Mechanical Key * 2 Latch * 1 Screw B * 3 Strike &... -
Page 6: Installation
3 Installation Please scan this QR code to watch the easy step by step installation video before attempting to install your Smart lock. 3.1 Preparing Door Check the door’s dimensions door is between 1- in to 2-in(35mm-50mm)thick. Measure to confirm that the hole in the door is 2- in(54mm). -
Page 7: Install Latch And Strike & Strike Box
3.3 Install Latch and Strike & Strike Box 1 Install strike & strike box on door frame with Screw A. 2 Install latch into door with Screw A. Strike Strike Screw A Attention Check Latch's Status 1) Latch's square hole should place horizontal. 2) If square hole is inclined ,smart lock will get stuck when unlocked. -
Page 8: Adjust The Handles Direction
3.4 Adjust the Handles Direction 1 Confirm the opening direction of your door. 2 Adjust Handles According to Door Opening Direction. Left-Handed Door Right-Handed Door 1. For Exterior Assembly Step2: Step1 : Step3: Turn the handle to adjust Loosen the screw with Tighten the screw after the direction a 3mm Allen wrench... -
Page 9: Install Exterior Assembly
3.5 Install Exterior Assembly 1 Install the waterproof rubber plate to exterior assembly. 2 Install square shaft into spindle hub. 3 Install 2 positioning columns. 4 Install 3 screw casings. 5 Install exterior assembly Install the waterproof rubber plate Install Square Shaft Spindle Metal Dot Press the metal dot, align dot with spindle... -
Page 10: Install Interior Assembly
3.6 Install Interior Assembly 1 Install the waterproof rubber plate. 2 Connect the cable. 3 Secure exterior assembly with screw B. Install the waterproof rubber plate Connect the wire Secure exterior assembly with screw B... -
Page 11: Installing Batteries
Then the voice prompts "Initialization Successful" to complete the reset. Note: Long press for more than 8 seconds will fail to reset. 3 Complete the initialization, and start to pair the lock with NICE DIGI APP. 4.2 Download the NICE DIGI App Scan the Nice Digi QR Code to download the app or search"Nice Digi"... -
Page 12: Sign-Up And Login Your Account
4.3 Sign-up and Login Your Account Register a new account (Email Address) or log in with an existing account. 4.4 Pair the lock with APP 1 Turn on Bluetooth on your smartphone and stay near the lock (within 3 meters). 2 Click “Add Device”... - Page 13 4.5.2 Share Access Permission With Members 4.5.2.1 Add New Members 1 Touch "Member" on App. 2 Click the "+" at the top right to name the member. 4.5.2.2 Add Member Passcodes 1 Touch "Member" on App. 2 Click the member you want to add a passcode. Warm Tips: Please save your user passcodes in time since they cannot display on the App.
- Page 14 4.5.2.3 Add Key Fob 1 Touch "Member" on App. 2 Click the member you want to add a key fob. 3 Place a key fob near to the key fob reader to enroll. 4.5.2.4 Add Fingerprint 1 Touch "Member" on App. 2 Click the member you want to add a Fingerprint.
- Page 15 4.5.2.5 Authorize APP Permission 1 Select the member you want to authorize APP permission, click "Setting" on the top right to bind the new member‘s account. 2 Choose to authorize as Administrator or Common Member together to manage the lock. 3 The authorized user needs to accept the invitation on their app.
- Page 16 (1) Your phone near to the lock with Bluetooth communication distance(3 meters). Then you can update and view all unlocking records; (2) Beyond the Bluetooth distance, you need to connect the extra Wi-Fi Gateway (NICE DIGI sold separately) to remotely update and view all unlocking activities of the door lock.
- Page 17 (Option) If you want to remote control your lock via APP anywhere, you need an extra WiFi Gateway (NICE DIGI sold separately) to connect your lock to the WiFi network. (Refer to the manual for WiFi Gateway to connect) Remote unlocking is already enabled by default.
-
Page 18: Using Your Lock
Enter 6-9 digit code and press " " reader to unlock. to unlock. 3.Key Fob 4.Smartphone Swipe your key fob on the keypad Use your smartphone to unlock. of the lock to unlock. Please refer to the guide in NICE DIGI App. - Page 19 5.2 Reset the Lock Please note all dates will be erased if you reset your lock to factory default. 1 If you are using Nice Digi App as an administrator, please click "Remove Device" to delete your locks. 2 You can also long-press the Reset Button on the back of the Interior. Stop pressing after you hear the ”beep“...
-
Page 20: Faqs
1. Why can't I search for the lock on the App when I'm pairing it? A: Please complete the initialization of the lock before pairing it. Connect to Network or WiFi, and turn on your phone's Bluetooth within 3 meters of the lock. Please check if the required permissions are authorized for the app.
Need help?
Do you have a question about the Smart Lever X1 and is the answer not in the manual?
Questions and answers
i have rest lockset to factory default my question is how do i program new code to make lock operational
To program a new code for the NICE DIGI Smart Lever X1 after resetting it to factory default, follow these steps:
1. Initialize the Lock – Complete the system initialization process.
2. Download the NICE DIGI App – Install the app and create an account if not already done.
3. Pair the Lock with the App – Connect the lock to the app via Bluetooth.
4. Generate a Temporary Passcode – In the app, go to the passcode settings and select “Temporary” to add a user code.
5. Enter the Code on the Keypad – Input the generated passcode on the door lock keypad and confirm by pressing "√".
Note: The passcode will not be displayed in the app for security reasons.
This answer is automatically generated