Table of Contents
Advertisement
Quick Links
Technical Support and E-Warranty Certificate www.vevor.com/support
VACUUM PUMP
OPERATING MANUAL
We continue to be committed to provide you tools with competitive price.
"Save Half", "Half Price" or any other similar expressions used by us only represents an
estimate of savings you might benefit from buying certain tools with us compared to the major
top brands and doses not necessarily mean to cover all categories of tools offered by us. You
are kindly reminded to verify carefully when you are placing an order with us if you are
actually saving half in comparison with the top major brands.
Advertisement
Table of Contents

Related Manuals for VEVOR 2KQ-2G


Summary of Contents for VEVOR 2KQ-2G
- Page 1 Technical Support and E-Warranty Certificate www.vevor.com/support VACUUM PUMP OPERATING MANUAL We continue to be committed to provide you tools with competitive price. "Save Half", "Half Price" or any other similar expressions used by us only represents an estimate of savings you might benefit from buying certain tools with us compared to the major top brands and doses not necessarily mean to cover all categories of tools offered by us.
-
Page 2: Vacuum Pump
CustomerService@vevor.com This is the original instruction, please read all manual instructions carefully before operating. VEVOR reserves a clear interpretation of our user manual. The appearance of the product shall be subject to the product you received. Please forgive us that we won't inform you again if there are any technology or software updates on our product. - Page 3 INTRODUCTION Welcome to the user manual for your vacuum pump. This vacuum pump is a versatile tool that can be used in a wide range of applications. It's particularly well-suited for tasks like HVAC vacuuming, epoxy and silicone degassing, wood stabilization, and creating milking machines. Additionally, this pump is also commonly used in medical appliances, printing machinery, vacuum packing, gas analysis, and hot-forming plastics.
-
Page 4: Safety Precautions
SAFETY PRECAUTIONS Warning about potential hazards and how to avoid them Your vacuum pump can pose potential hazards if it is not used properly. The most common hazards include electrical shock, fire, or explosion due to pumping flammable, explosive or poisonous gases, or gases that can corrode metals and exert chemical charges. -
Page 5: Getting Started
Do not plug the unit in, unplug it, or use the switch if there are any flammable or explosive gases present. Always unplug the unit before disassembling it to avoid potential hazards. Guidelines for handling hazardous materials Your vacuum pump should not be used to pump flammable, explosive, or poisonous gases, or gases that can corrode metals and exert chemical charges. -
Page 6: Package List
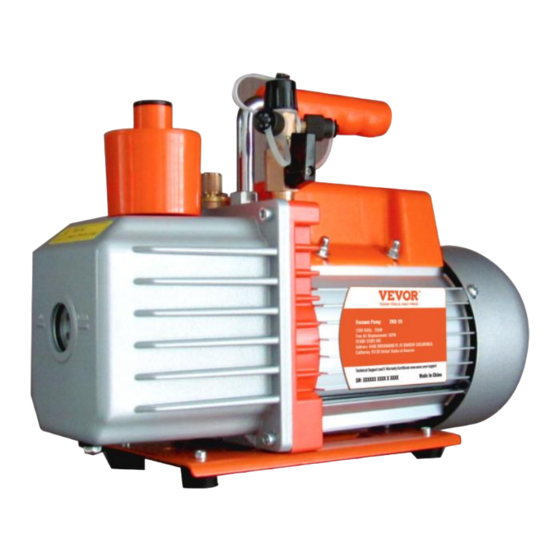
Package contents and specification Model 2KQ-2G 2KQ-3G Voltage 120V/60Hz 120V/60Hz Free Air Displacement Ulitimate Vacuum Motor Intake Fitting 1/4"SAE male; 1/4"SAE male; 3/8"SAE male; 3/8"SAE male; 1/2"ACME male; 1/2"ACME male;; Oil Cpacity Dimensions 320*125*230 335*125*250 Net Weight 10.4 Applicable Refrigerant... - Page 7 Explanation of the vacuum pump's components Steps for setting up the vacuum pump Following these steps will help you set up your vacuum pump correctly and ensure its safe and efficient operation. Before use, remove the oil filling port/oil gas separator and fill it with the recommended vacuum pump oil.
-
Page 8: Installation
INSTALLATION AND MAINTENANCE OF VACUUM PUMP Installation To ensure the proper functioning of the vacuum pump, follow these installation guidelines: The pump should be positioned horizontally and in a dry, ventilated area free of dust and other contaminants. Maintain a clearance of at least 10cm (4 inches) around the pump to ensure proper airflow. -
Page 9: Troubleshooting Guide
Keep the oil clean. If the oil becomes dirty, muddy, or water or other volatile substances get in, it will affect the performance of the pump, and the oil should be replaced. To replace the oil, start the pump and run it for about 30 minutes to make the oil thin. - Page 10 EXPLODED DIAGRAM OF THE PUMP Fan cover Bracket Back-pump stator Screw Gas ballast fitting Screw Snap ring Screener Back-pump cover Screw Screw Gas inlet Cap board Motor back cover Handle O-ring Centrifugal baseplate O-ring Screw Screw O-ring Oil gas separator Bearing Front-pump stator O-ring...
- Page 11 Intermediate connecting Screw block Gasket Screw Capacitor Back-pump vane Motor cover Back-pump rotor Made In China - 10 -...
- Page 12 Technical Support and E-Warranty Certificate www.vevor.com/support...
Need help?
Do you have a question about the 2KQ-2G and is the answer not in the manual?
Questions and answers