Advertisement
Quick Links
Advertisement

Related Manuals for NavSpark PX1175RDP


Summary of Contents for NavSpark PX1175RDP
- Page 1 Getting Started with PX1175RDP Evaluation Board...
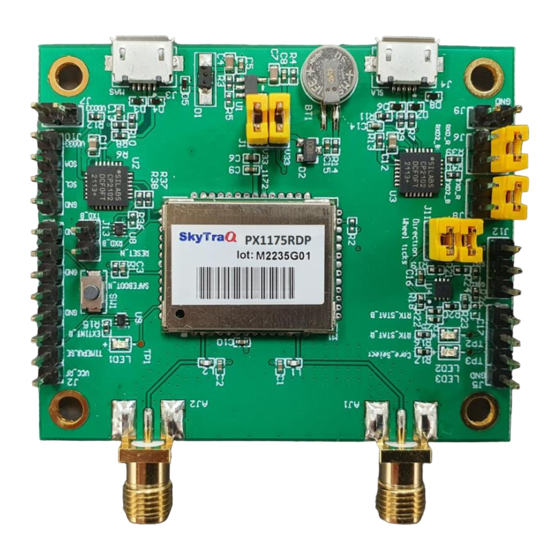
- Page 2 Top View of RTK/DR EVB USB 1 Not Used RF Input Not Used...
- Page 3 Install USB Driver from Silicon Lab Site https://www.silabs.com/developers/usb-to-uart-bridge-vcp-drivers After connecting USB cable to USB1 port, user should see a COM port appear on Device Manager.
- Page 4 Get Windows GNSS Viewer • https://navspark.mybigcommerce.com/content/GNSS_Viewer- CustomerRelease.zip • http://navspark.mybigcommerce.com/content/GNSSViewerUserGuide.pdf...
- Page 5 Interface of RTK/DR EVB (1/3)
- Page 6 Interface of RTK/DR EVB (2/3) NAME DESCRIPTION USB_1 USB port for NMEA out, RTK correction & binary command in, 115200 USB_2 jumper A/B must be shorted USB port for updating firmware to R-chip, and C/D must be open, 115200 RTK_STAT_B Status signal Low : RTK Fix for Heading Blink : RTK Float for Heading...
- Page 7 Interface of RTK/DR EVB (3/3) NAME DESCRIPTION Push button for manual reset to the module TIMEPULSE One-pulse-per-second (1PPS) time mark output, 3.3V LV-TTL. The rising edge synchronized to UTC second when getting 3D position fix. The pulse duration is about 100msec at rate of 1 Hz. Jumper G/H, E/F Jumper G/H, E/F must be short for normal use.
- Page 8 EVB Usage (1/3) Not Used USB 1 1. Connect RTK antennas to RF_IN1 2. Connect wheel-tick signal to SPD (optional*) 3. Connect direction signal to DIR (optional*) 4. Connect ground return for SPD/DIR 5. Run GNSS Viewer on Windows laptop 6.
- Page 9 EVB Usage (2/3) Configure NTRIP Connection Setting...
- Page 10 Result on GNSS Viewer After NTRIP Client getting RTK correction data and EVB receiving signal testing outdoors under open sky, the receiver will go from 3D Fix to RTK Float to RTK Fix state.
- Page 12 Automotive Dead-Reckoning Usage • The PX1175RDP EVB should be placed in a fixed orientation relative to the vehicle • Connect vehicle wheel-tick signal to SPD header pin • Connect vehicle forward/reverse signal to DIR header pin (optional) • Connect USB1 to laptop to perform evaluation...
- Page 13 Odometer-less Dead-Reckoning Usage • The PX1175RDP EVB should be placed in a fixed orientation relative to the vehicle • Connect USB1 to laptop to perform evaluation using GNSS Viewer...
- Page 14 Firmware Update (1/2) To update firmware to PX1175RD EVB: • 1. Unzip the firmware file • 2. Connect EVB USB1 to a Windows PC running GNSS Viewer. Connect GNSS Viewer to the EVB. • 3. Select the unzipped .bin file with “Master” in filename using the small button on right of the Download button.
-
Page 15: Firmware Update
Firmware Update (2/2) • 5. Connect EVB USB2 to a Windows PC running GNSS Viewer using USB cable. Connect GNSS Viewer to the EVB. • 6. Select the unzipped .bin file with “Slave” in filename using the small button on right of the Download button. •... - Page 16 EVB Schematic 1/3 PX1175R...
- Page 17 EVB Schematic 2/3...
- Page 18 EVB Schematic 3/3...
Need help?
Do you have a question about the PX1175RDP and is the answer not in the manual?
Questions and answers