Advertisement
Table of Contents
- 1 Table of Contents
- 2 Safety Precautions and Usage Statements
- 3 Parts List
- 4 Base Overview
- 5 Quick Reference Guide
- 6 Installation Guide
- 7 Remote Control
- 8 Remote Control Pairing
- 9 Emergency Battery Backup Box
- 10 Connecting Strap
- 11 Syncing Two Bases
- 12 Headboard Brackets (Not Included)
- 13 Troubleshooting
- Download this manual
Advertisement
Table of Contents

Related Manuals for TEMPUR ERGO 2.0


Summary of Contents for TEMPUR ERGO 2.0
- Page 1 ERGO 2.0 OWNER’S MANUAL Customer Service AU: 1300 306 062 | NZ: 0800 483 6789...
-
Page 2: Table Of Contents
table of contents Safety Precautions and Usage Statements ............1-2 Parts List . -
Page 3: Safety Precautions And Usage Statements
Attention: Important Safety Disclaimers Read all instructions before using your TEMPUR ERGO adjustable base. SAVE THESE INSTRUCTIONS. Children and Small Pets: Children and pets can be crushed or killed if they become entrapped in To reduce the risk of shock, burns, fire or injury: moving parts of the bed . - Page 4 . NOTE: Exceeding the recommended weight restrictions could damage your TEMPUR-PEDIC ERGO and void your warranty. For best performance, you should enter and exit the TEMPUR-PEDIC ERGO while it is in the flat or fully lowered position .
-
Page 5: Parts List
parts list Before discarding the packing materials, ensure all the parts are accounted for. All electronics and components that need to be installed are located in boxes under the base or attached to the frame. Wireless Remote Control (1) AAA Batteries (3) Mattress Retainer Bar (1)* Legs (6) Power Cord (1) -
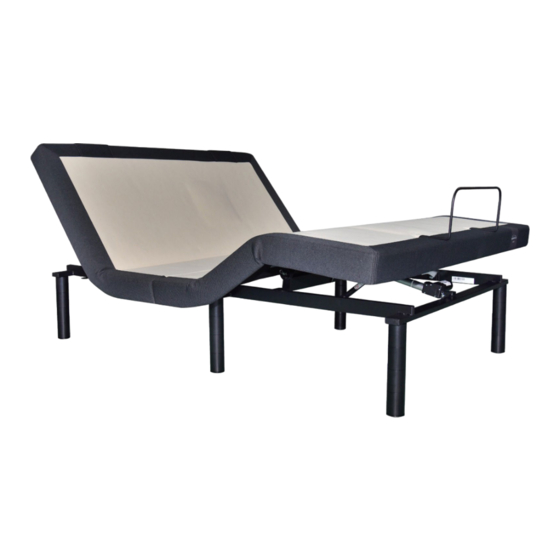
Page 6: Base Overview
base overview Control Box Battery Backup Box Underbed Light USB Ports Massage Motor Head Motor Underbed Light Massage Motor Foot Motor USB Ports Underbed Light... -
Page 7: Quick Reference Guide
quick reference guide Not to scale . For illustration purposes only . Read all instructions before beginning installation . Control Box Power Supply Power Cord connection ports to head and foot motors (massage and lift). Installed Input under the base. Power Cord USB Charging Ports Splitter... -
Page 8: Installation Guide
installation guide Always use two people when setting up the base . STEP 1 STEP 4 Place the bed base box in a desired location with the If installing a split unit, see page 13. bottom of the box facing up . Remove the binding straps and packing materials, making Locate the battery backup box sure not to puncture the box with any sharp objects . - Page 9 installation guide STEP 7 STEP 10 To install the mattress retainer bar, insert each end of the bar Carefully flip the base over on to its legs . Important: Two into the holes at the foot of the platform . people are required to move the bed base .
-
Page 10: Remote Control
remote control Remote Control arrives paired to the adjustable base . Three (3) AAA batteries are required to operate the remote . MASSAGE Head Zone Massage Control Activates simple steady-state massage and toggles through 2 intensity levels . Low, high and off. - Page 11 remote control Remote Control arrives paired to the adjustable base . Three (3) AAA batteries are required to operate the remote . ADJUST PRESET Head Position Adjustments Zero-G ‡ ® Use to raise and lower the head section of Adjusts your legs to relieve pressure off the your adjustable base .
-
Page 12: Remote Control Pairing
The remote is no longer in Child Lock . process again or call Tempur-Pedic customer service: The remote and adjustable base will work AU: 1800 763 498 | NZ: 0800 452 914... -
Page 13: Emergency Battery Backup Box
emergency battery backup box Two (2) 9 Volt batteries are required to operate the battery backup box feature and are NOT included . OVERVIEW For emergency use only, in case of a power outage . In the event that the base is stuck in an articulated position during a power outage, the battery backup box will return the base to a flat position. -
Page 14: Connecting Strap
connecting strap (optional) Connecting straps are secured to the base frame upon delivery . OVERVIEW If a split setup is being installed, plastic connecting straps are provided (one per base) to secure the bases together . Use both straps to secure the head and foot portions together. -
Page 15: Syncing Two Bases
syncing two bases (optional) A Sync Cord is included with Twing Long and Split Cal King size bases . The Sync Cord connects the two control boxes to a single remote for the synchronization of two bases . STEP 1 STEP 6 Unplug the base(s) from power source. -
Page 16: Headboard Brackets (Not Included)
headboard bracket installation guide (optional) Headboard Brackets are an optional accessory and are not included. A hex key is included with the accessory kit to complete installation. b.) To install the T-Bracket, slide the T-Bracket through the STEP 1 end of the headboard bracket. Align the flat side of the a.) Align the hole in the bracket to the brass sleeve into T-Bracket plate to the mounting holes on the headboard. -
Page 17: Troubleshooting
troubleshooting If one or more functions on the bed base have stopped operating: ADJUSTABLE BASE • Check under the bed base to verify that the wired connections are secure and that there are no cords or bedding obstructing the movement of the base . •... - Page 18 Tempur Customer Service Australia: 1300 306 062 New Zealand: 0800 483 6789 Email: info@tempur.com.au Web: www.tempur.com.au V003_03/2022...
Need help?
Do you have a question about the ERGO 2.0 and is the answer not in the manual?
Questions and answers