
Summary of Contents for L3Harris XL Extreme Series
- Page 1 Operator’s Manual 14221-1800-2050 Rev. G, November 2023 XL Extreme™ Series Portable Radios...
- Page 2 L3Harris products comply with the Restriction of the Use of Certain Hazardous Substances in Electrical and Electronic Equipment (RoHS) Directive. This manual is published by L3Harris Technologies without any warranty. Improvements and changes to this manual necessitated by typographical errors, inaccuracies of current information, or improvements to programs and/or equipment, may be made by L3Harris Technologies at any time and without notice.
-
Page 3: Table Of Contents
14221-1800-2050, Rev. G TABLE OF CONTENTS Section Page 1. REGULATORY AND SAFETY INFORMATION ..............8 SAFETY CONVENTIONS .................... 8 OVER-TEMPERATURE CONDITION ................8 RATED TRANSMITTER RF OUTPUT POWER ............8 SAFETY TRAINING INFORMATION ................9 1.4.1 RF Exposure Guidelines ................... 9 1.4.2 Electromagnetic Interference/Compatibility ............. - Page 4 14221-1800-2050, Rev. G TABLE OF CONTENTS Section Page RELATED PUBLICATIONS ..................27 5. BASIC OPERATION ......................29 RADIO CONTROLS ....................29 BEFORE FIRST USE ....................32 POWER ON AND SET VOLUME ................32 VIDA ID ........................32 5.4.1 User Login....................... 32 5.4.2 Provisioning ....................
- Page 5 14221-1800-2050, Rev. G TABLE OF CONTENTS Section Page 5.27 DTMF ......................... 57 5.28 AUDIO PLAYBACK ....................58 5.29 START SCAN ......................59 5.30 STOP SCAN ......................60 5.31 MONITOR AND SQUELCH TYPES (CONVENTIONAL ONLY) ......... 61 5.32 NUISANCE DELETE ....................61 5.33 FAILSOFT ........................
- Page 6 6.20.7 OTAR Configuration ..................99 6.21 P25 CONVENTIONAL FALLBACK ................99 6.22 EMERGENCY CHECK-IN TIMER ................100 7. PROGRAMMING ........................ 101 L3HARRIS DEVICE MANAGEMENT ............... 101 PROGRAMMING VIA RPM2 ..................102 EDIT CHANNEL (ANALOG AND P25 CONVENTIONAL ONLY) ......102 OTAP ........................104 PROGRAMMABLE BUTTONS AND SWITCHES .............
- Page 7 14221-1800-2050, Rev. G TABLE OF CONTENTS Section Page APPENDIX B WI-FI PROGRAMMING .................. 120 APPENDIX C SCBA BLUETOOTH CONFIGURATION ............126 APPENDIX D CONFIGURING ENCRYPTION ..............128 LIST OF FIGURES Figure 4-1: Radio Assembly ......................24 Figure 4-2: Remove the Battery ....................25 Figure 4-3: Universal Device Connector ..................
-
Page 8: Regulatory And Safety Information
Failure to comply with these precautions or with specific warning elsewhere in this manual violates safety standards of design, manufacture, and intended use of the product. L3Harris assumes no liability for the customer’s failure to comply with these standards. The WARNING symbol calls attention to a procedure, practice, or the like, which, if not correctly performed or adhered to, could result in personal injury. -
Page 9: Safety Training Information
“General Population” in an uncontrolled environment. The XL-400P/XL-400P-NA portable radio has been tested and complies with the FCC RF exposure limits for “Occupational Use Only.” In addition, this L3Harris radio complies with the following Standards and Guidelines regarding RF energy and electromagnetic energy levels and evaluation of such levels for exposure to humans: •... -
Page 10: Electromagnetic Interference/Compatibility
EU/AU/FCC/IC RF exposure compliance requirements are not exceeded. However, to provide the best sound quality to the recipients of your transmission, L3Harris recommends you hold the microphone at least 2 in (5 cm) from mouth, and slightly off to one side. -
Page 11: Part 15
14221-1800-2050, Rev. G 1.5.1 Part 15 This device complies with Part 15 of the FCC Rules. Operation is subject to the following two conditions: 1. This device may not cause harmful interference, and 2. This device must accept any interference received, including interference that may cause undesired operation. -
Page 12: Antenna Care And Replacement
14221-1800-2050, Rev. G 1.6.2 Antenna Care and Replacement Do not use the portable radio with a damaged or missing antenna. A minor burn may result if a damaged antenna comes into contact with the skin. Replace a damaged antenna immediately. Operating a portable radio with the antenna missing could cause personal injury, damage the radio, and may WARNING violate FCC regulations. -
Page 13: Renseignements Sur La Réglementation Et Sécurité
La radio portative XL-400P/XL-400P-NA a été testée et est conforme aux limites d’exposition aux RF de la FCC pour une « Utilisation professionnelle seulement ». De plus, cette radio L3Harris est conforme aux normes et directives suivantes quant à l’énergie des RF et aux niveaux d’énergie électromagnétique, ainsi qu’à... -
Page 14: Directives Sur L'exposition Aux Rf
FCC en matière d’exposition aux RF. Cependant, pour offrir la meilleure qualité sonore aux auditeurs de votre transmission, L3Harris recommande de tenir le microphone à au moins 5 cm (2 po) de votre bouche et légèrement déplacé sur un côté. -
Page 15: Interférence/Compatibilité Électromagnétique
2.2.2 Interférence/Compatibilité Électromagnétique Pendant les transmissions, cette radio L3Harris produit de l’énergie des RF qui peut causer de l’interférence avec d’autres appareils ou systèmes. Pour éviter de telles interférences, fermez la radio dans les zones où il est indiqué de le faire. N’utilisez PAS le transmetteur dans des zones sensibles aux radiations électromagnétiques, comme les hôpitaux, les avions et les sites de... -
Page 16: Conseils D'utilisation
14221-1800-2050, Rev. G CONSEILS D’UTILISATION L’emplacement et l’état de l’antenne sont importants pour l’utilisation d’une radio portative. L’utilisation de la radio dans des zones de faible élévation, sous des lignes électriques ou des ponts, à l’intérieur d’un véhicule ou dans un immeuble à ossature métallique, peut réduire la portée de l’appareil de manière considérable. -
Page 17: Avion
14221-1800-2050, Rev. G 2.5.3 Avion Éteignez toujours une radio portative avant d’embarquer à bord d’un • avion ! Ne l’utilisez au sol qu’avec la permission de l’équipage. • NE l’utilisez PAS durant le vol ! MISE EN GARDE • 2.5.4 Détonateurs Électriques Pour prévenir la détonation accidentelle des détonateurs électriques, n’utilisez PAS de radios bidirectionnelles à... -
Page 18: Class I, Division 2 Option
CAUTION - The battery used in this device may present a risk of fire or explosion when heated above 100°C (212°F) or incinerated . Replace battery with the L3Harris Part No. referenced in battery guide 14221-1800-2030 only. Use of another battery may present a risk of fire or explosion. WARNING Battery replacement instructions: Remove battery by 1) depressing battery latches then 2) remove battery from radio chassis. -
Page 19: Class I, Division 2 Accessories
14221-1800-2050, Rev. G EXPLOSION HAZARD – In addition to any simple single-ended coil antenna and carrying case option, only the following L3Harris accessories may be used with this radio: WARNING CLASS I, DIVISION 2 ACCESSORIES PART NUMBER DESCRIPTION NFPA 14100-4700-22... -
Page 20: Intrinsically Safe Device Entity Parameters
14221-1800-2050, Rev. G PART NUMBER DESCRIPTION NFPA Headset, Light Weight, Behind the Head, Dual In-Ear, In-Line 12082-0650-11 Headset, Light Weight, Behind the Head, Dual In-Ear, Pigtail 12082-0650-12 INTRINSICALLY SAFE DEVICE ENTITY PARAMETERS Intrinsically Safe Device Entity Parameters: • V max (or Ui) = 8 V dc ... - Page 21 14221-1800-2050, Rev. G When required by the manufacturer’s control drawing, the associated apparatus must be • connected to a suitable ground electrode per the National Electrical Code (ANSI/NFPA 70), the Canadian Electrical Code, or other local installation codes, as applicable. The resistance of the ground path must be less than 1 ohm.
-
Page 22: Introduction
BeOn on XL Extreme Series Portable Radios. NOTE The XL Extreme Series Portable Radio is a P25 converged, multiband Land Mobile Radio. Designed for anyone who needs to communicate with multiple agencies or across multiple bands, the XL Extreme Series Portable Radio delivers mission-critical connectivity. -
Page 23: Radio Models
BASIC SETUP 4.4.1 Assemble the Radio Only use an L3Harris charger approved for the battery chemistry. Injury could occur from improper charger use. WARNING Do not over-tighten the antenna as damage could result. Torque should not exceed 20 in lbs. This torque is measured at a grip point one inch above the antenna’s base. -
Page 24: Figure 4-1: Radio Assembly
14221-1800-2050, Rev. G Battery packs shipped in shutdown mode (i.e., 14100-4000-07, RevA) require waking before use. To wake a battery pack, place it in the charger (with or without radio attached; radio on or off) for less than one minute. NOTE 1. -
Page 25: Removing The Battery
14221-1800-2050, Rev. G 4.4.2 Removing the Battery To remove, press and hold the two tabs at the bottom of the battery and then pull battery up and out of the radio. Figure 4-2: Remove the Battery 4.4.3 Removing the Optional Belt Clip or D-Post Remove the battery before removing the belt clip or D-Post. -
Page 26: Cleaning
3. Follow up by wiping off the radio with clean damp cloth using warm water only. 4. Wipe dry with clean cloth. OPTIONS AND ACCESSORIES Only use L3Harris approved accessories. Refer to L3Harris’ Product and Services catalog for the complete list of options and accessories available. Contact L3Harris for requirements not contained in this list: Always use the correct options and accessories (battery, antenna, speaker/mic, etc.) for the radio. -
Page 27: Related Publications
14221-1800-2050, Rev. G Battery packs shipped in shutdown mode (i.e., 14100-4000-07, RevA) require waking before use. To wake a battery pack, place it in the charger (with or without radio attached; radio on or off) for less than one minute. NOTE Table 4-1: Options and Accessories DESCRIPTION... - Page 28 BeOn Configuration and Use Feature Manual 14221-1800-8010 XLP Radio Software Release Notes 14221-2100-2010 L3Harris Device Management User’s Manual 14221-2100-8030 L3Harris Device Management Software Release Notes. 14221-1800-6000 XL Extreme Speaker Microphone Product Manual 14221-1600-2150 Single-Bay Desktop Charger Operator's Manual 14221-1600-2110 XL Extreme Vehicular Charger Operator's Manual 14221-1600-2120 XL Extreme Six Bay Li-ion/Polymer Battery Charger Operator’s Manual...
-
Page 29: Basic Operation
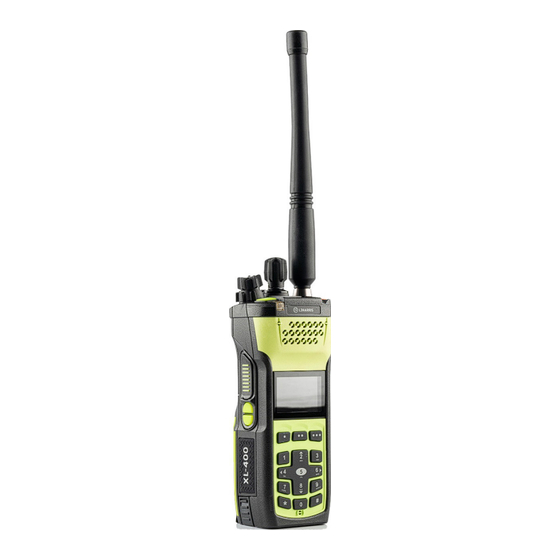
14221-1800-2050, Rev. G BASIC OPERATION RADIO CONTROLS Figure 5-1: Radio Controls... -
Page 30: Figure 5-2: Xl Extreme Speaker Microphone Controls
14221-1800-2050, Rev. G Figure 5-2: XL Extreme Speaker Microphone Controls For more information on using the Fire Remote Speaker Microphone, refer to Product Manual 14221-1800-6000. NOTE Table 5-1 describes the default functions of buttons, knobs, and controls. Most can be programmed for different functions; see Section 7.5 for more information. NOTE Table 5-1: Radio Controls, Indicators, and Connectors CONTROL/INDICATOR... - Page 31 14221-1800-2050, Rev. G CONTROL/INDICATOR FUNCTION User-programmable switch. By default, selects one of four channel banks (see A/B/C/D Switch Section 5.12). Used to select a commonly used function as an alternative to navigating menus. This User-Programmable is configured via programming using Radio Personality Manager 2 (RPM2). See Buttons Section 7.5.1 for the options that can be programmed to these buttons.
-
Page 32: Before First Use
14221-1800-2050, Rev. G BEFORE FIRST USE Make sure the radio has: Fully charged battery • Antenna attached • Personality and radio programmed using RPM2 • Encryption keys loaded if using encrypted channels • Personality activated • POWER ON AND SET VOLUME The power switch and volume control are the same knob on top of the radio (see Figure 5-1). -
Page 33: Provisioning
14221-1800-2050, Rev. G 5.4.2 Provisioning If provisioning is enabled via radio programming and the user has successfully logged in, the VIDA User Personality configured in the UAS is provisioned to the radio. When no VIDA Provisioned database is available, the radio will operate using the RPM2-programmed personality. -
Page 34: Front Display
14221-1800-2050, Rev. G 5.5.2 Front Display Figure 5-4 shows a sample front display while on the idle screen. The idle screen appears after power up or after exiting from the menus. Figure 5-4: Sample Idle Front Display The radio can be programmed to display the User ID on the System line of the display. - Page 35 14221-1800-2050, Rev. G ICON DESCRIPTION ICON DESCRIPTION ICON DESCRIPTION Battery Level OTAR Registering Scanning Enabled 100% Capacity Battery Level OTAR Rekeying Emergency 75% Capacity Battery Level Transmit Power Level High RX Mail 50% Capacity Battery Level Transmit Power Level Low Noise Cancellation Enabled 25% Capacity Battery Level...
-
Page 36: Mandown
14221-1800-2050, Rev. G MANDOWN If enabled via radio programming, the following conditions can be configured to trigger a Mandown condition: • MOTION - Mandown is declared with lack of motion. TILT - Mandown is declared when the radio is tilted. •... -
Page 37: Predefined Menu Layouts
14221-1800-2050, Rev. G PREDEFINED MENU LAYOUTS Depending on radio programming, some menu options described in this manual may not be available. The radio supports three predefined menu layouts: Full, Custom, and Restricted. Table 5-4 details what is available in each layout: The Custom predefined menu layout allows the administrator to customize the list of menu items that are available to the radio user. - Page 38 14221-1800-2050, Rev. G CUSTOM MENU FULL RESTRICTED (Default Settings) OTAR Rekey KVL Mode KVL Mode LLA Message Menu Radio Status Radio Message Textlink Messages Textlink Forms Textlink Mailbox Faults Program Menu Activate Plan Activate Profile Maintenance Menu Radio Info Reset Overtemp Event Battery TCXO Tuning P25 Tests...
-
Page 39: Menu
14221-1800-2050, Rev. G MENU Press the Menu/Select button while on the idle display to access the menu. Press the left or right navigation buttons to scroll through the top-level menus and press the up or down navigation buttons to scroll through the sub-menus. Refer to Figure 5-1 for button location. While in a menu, press the Menu/Select button to choose, activate, or toggle the selected item;... - Page 40 14221-1800-2050, Rev. G MENUS DESCRIPTION UTILITY MENU: AUDIO SETTINGS: Mute or unmute the speaker audio. • SPEAKER (MUTE/UNMUTE) Enable or disable Noise Cancellation. See Section 5.17. • NOISE CANCELLATION Enable or disable Push-To-Talk (PTT). Disable PTT to prevent accidental keying, such as •...
- Page 41 • POSITION FORMAT LONG DD), Latitude/Longitude Degrees Minutes Seconds (LAT/LONG DMS), LAT/LONG DM, Military Grid Reference System (MGRS), or Universal Transverse Mercator (UTM). When Enabled, the radio sends GPS data to a L3Harris-supplied PC client using RNDIS • SA OVER NETWORK networking.
-
Page 42: Alert Tones
14221-1800-2050, Rev. G MENUS DESCRIPTION Toggle mobile main audio path on/off when Stealth Mode is enabled. • MOBILE MAIN AUDIO PATH ENABLED • VOICE ANNUNCIATION ENABLED Toggle voice annunciation on/off when Stealth Mode is enabled. Toggle channel/group knob enabled/disabled when Stealth Mode is enabled. -
Page 43: Select Zone/System
14221-1800-2050, Rev. G 5.11 SELECT ZONE/SYSTEM A System is a group of channels or talkgroups that share a common set of parameters as programmed using RPM2. For example, a Trunking system defines the parameters needed to communicate on an infrastructure by agency or geographical region, such as WACN, System ID, Talkgroups, etc. -
Page 44: Lock/Unlock Keypad
14221-1800-2050, Rev. G Numeric Channel Entry A button on the radio can be programmed for Numeric Channel Entry, which allows the user to enter the talkgroup/channel number directly from the keypad. The radio can be programmed for one of the following Numeric Channel Entry options: When a Zone is selected on the radio, Numeric Channel Entry performs a lookup using the •... -
Page 45: Receive A Group Call
14221-1800-2050, Rev. G To transmit a group call: 1. In P25 Conventional, the talkgroup for the selected channel may be overridden as follows: Press the Menu/Select button to access the main menu. 2. Press the left or right navigation buttons to display the CALL menu. 3. -
Page 46: Individual Calls
14221-1800-2050, Rev. G 5.15 INDIVIDUAL CALLS An individual call is used to make a call to one radio as opposed to a group of radios. 5.15.1 Add/Edit Contact from the Radio 1. Press Menu/Select button to access the main menu. 2. -
Page 47: Receiving An Individual Call
14221-1800-2050, Rev. G 4. Use the up or down navigation buttons to highlight the unit to call and press the Menu/Select button, or select KEYPAD to enter the Unit ID. 5. Press PTT to make the call. When transmitting an Individual Call, the radio displays the called radio’s name or Unit ID. -
Page 48: User Profiles
14221-1800-2050, Rev. G 5.16 USER PROFILES XL Series radios support User Profiles (also referred to as “My Profile”). A User Profile is a grouping of preset configurations that allow the user to change radio operation based on current activity/scenario. For example, the radio can be programmed with profiles named Noisy, Fire, etc., and the radio user can switch profiles on the radio depending on the environment they are entering. -
Page 49: Noise Cancellation
7.5.1. NOTE 5.17 NOISE CANCELLATION XL Series portable radios feature L3Harris’ proprietary noise suppression capability to provide clear and crisp voice quality in high-noise environments. This can be used in any mode, including analog and digital communications. The radio has two microphones; one located at the top of the radio (primary) and one on the bottom (secondary). -
Page 50: Using Noise Cancellation
14221-1800-2050, Rev. G 5.17.2 Using Noise Cancellation When using the noise cancellation feature, observe the following: Verify NOISE CANCELLATION is enabled (see Section 5.17.1). • Talk within two (2) inches of the primary microphone (see Figure 5-5). • • Ensure the primary and secondary microphones are not covered. See Section 5.17.4 for more information on the primary and secondary microphones. -
Page 51: Ptt Options
14221-1800-2050, Rev. G 5.18 PTT OPTIONS The radio can be programmed via RPM2 with one of the following PTT options: Radio and Accessory - In this mode, when the radio is PTTed, the audio source will • correspond with the PTT source. If the source of PTT is radio, the audio is routed via the radio microphone. -
Page 52: Enable/Disable Encryption
14221-1800-2050, Rev. G 5.20 ENABLE/DISABLE ENCRYPTION A switch or a button on the radio can be programmed to enable/disable encryption. See Section 7.5 for the various options that can be programmed to the radio buttons and switches. NOTE Turn encryption on or off via the SECURITY menu: 1. -
Page 53: Channel Guard (Analog Conventional Only)
14221-1800-2050, Rev. G 5.22 CHANNEL GUARD (ANALOG CONVENTIONAL ONLY) Channel Guard is L3Harris’ trademark for CTCSS (tone squelch) and CDCSS (digital tone squelch). The Channel Guard menu is only accessible if the System is setup for CG SEL in the radio’s personality. -
Page 54: Use Talkaround To Bypass Repeater (Analog And P25 Conventional Only)
14221-1800-2050, Rev. G 5.23 USE TALKAROUND TO BYPASS REPEATER (ANALOG AND P25 CONVENTIONAL ONLY) You can bypass the repeater system to communicate directly with other radios on your current channel’s receive frequency. This is useful if you are out of range of a repeater or if a repeater is busy. -
Page 55: Type 99 Operation
5.24 TYPE 99 OPERATION Type 99 is L3Harris' name for in-band, two-tone sequential signaling. It is a conventional signaling protocol used to control the muting and unmuting of a radio. This signaling is commonly used for selective calling of individual units or groups of units in a conventional system. -
Page 56: Disable After Ptt
14221-1800-2050, Rev. G 4. Press the Menu/Select button to change T99 TOGGLE between ENABLED and DISABLED. T99 is displayed in the top of the radio display when Type 99 is enabled. A button or switch can be programmed to enable/disable Type 99 (see Section 7.5). 5.24.2 Disable After PTT If this option is programmed using RPM2, Type 99 is disabled after the radio user activates the... -
Page 57: Telephone Interconnect
14221-1800-2050, Rev. G 5.26 TELEPHONE INTERCONNECT 1. Press the Menu/Select button to access the main menu. 2. Press the left or right navigation buttons to display the CALL menu. 3. Press the up or down navigation buttons to highlight PHONE CALL and press the Menu/Select button. -
Page 58: Audio Playback
14221-1800-2050, Rev. G 5.28 AUDIO PLAYBACK The Audio Playback feature allows the user to playback a previously received call. Recordings are stored in the radio’s RAM and are not persistent across power cycles. The radio stores the last five recorded calls, up to one minute each. A button on the radio can be programmed to replay the last recorded call. -
Page 59: Start Scan
14221-1800-2050, Rev. G 5.29 START SCAN This procedure assumes that the scan list has been added and the radio is not in active scan. Refer to Section 6.13 for scan setup or Section 5.30 for stopping scan. Refer to Section 6.14.1.1, Section 6.14.1.2, and Section 6.14.1.3 for home and priority channel descriptions. -
Page 60: Stop Scan
14221-1800-2050, Rev. G If a switch is programmed for start/stop scan, the menu for starting and stopping scan is disabled. NOTE See Section 7.5 for the various options that can be programmed to the radio buttons and switches. NOTE 5.30 STOP SCAN 1. -
Page 61: Monitor And Squelch Types (Conventional Only)
14221-1800-2050, Rev. G See Section 7.5 for the various options that can be programmed to the radio buttons and switches. NOTE 5.31 MONITOR AND SQUELCH TYPES (CONVENTIONAL ONLY) The monitor function allows you to temporarily turn off selected squelch to monitor for traffic that may not normally break squelch. - Page 62 14221-1800-2050, Rev. G 3. Press the up or down navigation buttons to highlight SCAN LISTS and press the Menu/Select button. 4. Press the up or down navigation buttons to highlight the scan list and press the Menu/Select button. When scanning is started, indicates the active scan list;...
-
Page 63: Failsoft
14221-1800-2050, Rev. G 11. Press the BACK soft key to exit the scan list display. 5.33 FAILSOFT 5.33.1 Conventional Failsoft (EDACS Only) In the unlikely event of an EDACS system failure, communications can take place in Conventional Failsoft mode. The radio is automatically directed to a communications channel set up for this purpose. -
Page 64: Receiving An Emergency Call
14221-1800-2050, Rev. G The radio goes through transmit and receive cycles if so configured. Speak into the microphone while the radio is transmitting or press PTT to talk. 3. To exit emergency, power cycle the radio or select EXIT EMERGENCY from the CALL menu. If enabled via programming, clear an emergency by pressing the button programmed for the Monitor/Clear function and then the emergency button. -
Page 65: Mdc Ptt Id Receive Handling
14221-1800-2050, Rev. G If MDC signaling on PTT release is enabled using RPM2, the radio transmits post-call MDC signaling when PTT is released. IF STE is enabled using RPM2, the MDC post-call signaling is transmitted after STE is sent • on PTT release only. -
Page 66: Beon Operation
Radio (LMR) services onto the broadband capable third generation (3G) and 4G/LTE cellular networks. This includes the ability to provide highly integrated interoperability services between BeOn users on the cellular network and users of traditional LMR networks. L3Harris’ VIDA ®... -
Page 67: Wi-Fi Client Selection
Nuisance Delete 5.37.2 Wi-Fi Client Selection XL Extreme Series Portable Radios support up to 24 different Wi-Fi networks configurable via programming, with an option to select one of the configured networks as default. These 24 Wi-Fi networks are considered radio administrator approved and Trusted Wi-Fi Networks (TWiN) on which the radio can operate. - Page 68 14221-1800-2050, Rev. G 2. From here, select a network from the list, add a network, view details about the selected network, or remove the selected network. 3. Select ADD NEW to add a new network. 4. Highlight and select SSID. Use the keypad on the radio to enter the SSID and press the ENTER softkey.
-
Page 69: Stealth Mode
14221-1800-2050, Rev. G 5.38 STEALTH MODE For some users, it is important to be able to turn off the radio’s display lights and side tones, but not the radio traffic. For example, in covert operations, lights and sounds could inadvertently expose an otherwise unobservable radio user. -
Page 70: Advanced Operations
14221-1800-2050, Rev. G ADVANCED OPERATIONS VIEW/CHANGE PERSONALITIES Personalities contain radio programming information such as frequencies, channels, stations, and talk groups. Up to ten different personalities can be stored in the radio, but only one can be active at a time. 6.1.1 View Personalities 1. -
Page 71: Change Active Personality
14221-1800-2050, Rev. G 6.1.2 Change Active Personality To change the active personality: 1. At main display, press the Menu/Select button to access the main menu. 2. Press the left or right navigation buttons to display the UTILITY menu. 3. Press the up or down navigation buttons to highlight PROGRAM and press the Menu/Select button. -
Page 72: Situational Awareness (Sa) - P25 Conventional Only
14221-1800-2050, Rev. G SITUATIONAL AWARENESS (SA) – P25 CONVENTIONAL ONLY Situational Awareness is a feature in which the radio receives SA position from other units configured to send the SA packets. The SA display shows the positions of the other radios (units) relative to the radio. -
Page 73: User-Defined Zones/Systems
14221-1800-2050, Rev. G 8. Press the up or down navigation buttons to zoom the display distance of current unit. 9. Press the OPTIONS soft key. From here, select UNIT INFO to display details about the selected unit, select REFRESH to update information, or select EXIT. USER-DEFINED ZONES/SYSTEMS 6.3.1 Command Tactical Zone... -
Page 74: Mixed System Zone
14221-1800-2050, Rev. G 8. After adding all desired channels/groups, press the BACK soft key. 9. Activate the Command Tactical Zone by selecting the SET ACTIVE soft key on the USER DEFINED screen, or by pressing the Menu/Select button when <USER DEFINED> is highlighted on the Zone menu. -
Page 75: Info Menu
14221-1800-2050, Rev. G CH INFO MENU The Channel Information (CH INFO) menu displays information about the currently selected channel. The information displayed varies between conventional and trunked systems. The Channel Information (CH INFO) menu display is only available if a Channel Edit Password has been programmed via RPM2. -
Page 76: Display Settings
14221-1800-2050, Rev. G TONES - Enable or disable alert tones (see Table 5-6). • KEYPAD TONES - Enable or disable keypad tones. When enabled, the radio plays a tone • when a button on the keypad is pressed. 5. Press the BACK soft key to exit menu. DISPLAY SETTINGS To change display settings: 1. -
Page 77: Gps Settings
14221-1800-2050, Rev. G FRONT DISPLAY OFF - Turns the front display off completely. Press the Menu/Select • button to turn the front display back on. When the front display is turned off, the only button functions that are allowed are: ... -
Page 78: Position Info
Decimal Degrees (LAT LONG DD), Latitude/Longitude Degrees Minutes Seconds (LAT/LONG DMS), LAT/LONG DM, Military Grid Reference System (MGRS), or Universal Transverse Mercator (UTM). SA OVER NETWORK - When Enabled, the radio sends GPS data to an L3Harris-supplied • PC client using RNDIS networking. -
Page 79: Wi-Fi
14221-1800-2050, Rev. G WI-FI The XL Extreme Series Portable Radio supports programming via Wi-Fi. Refer to 0 for information on configuring Wi-Fi. ISED restricts 5150-5250 MHz to indoor use only. CAUTION To enable Wi-Fi programming mode on the radio: 1. Ensure the radio is powered off. -
Page 80: Bluetooth
14221-1800-2050, Rev. G Refer to Section 5.37.2 for more information about Wi-Fi Client selection. NOTE 6.10 BLUETOOTH The BLUETOOTH menu item only appears if enabled using RPM2 and if the feature is installed. NOTE 6.10.1 Enable Bluetooth To enable Bluetooth: 1. -
Page 81: Pair Devices
14221-1800-2050, Rev. G 6.10.2 Pair Devices Up to 10 pre-paired Bluetooth RSMs with unique IDs can be saved/stored in the radio’s memory for automatic reconnection. To pair devices: 1. Press the Menu/Select button to access the main menu. 2. Press the left or right navigation buttons to display the UTILITY menu. 3. -
Page 82: Reconnecting To Covert Bluetooth Microphone 12082-0684-01
14221-1800-2050, Rev. G 10. Pairing progress is displayed. • For Bluetooth 2.0 devices, a pin code screen appears. Enter the pin code and select OK. For Bluetooth 2.1 devices, a PASSKEY accept/deny screen appears. Select ACCEPT. • Accept the passkey on the Bluetooth 2.1 device as well. 11. -
Page 83: Clock Settings
14221-1800-2050, Rev. G 5. If the LED is blinking between light red and dark red, then the amp is in programming mode. If you try to pair with the amplifier in this mode, it will identify itself as an RI version. Turn off power and restart from step 1. -
Page 84: Select Language
14221-1800-2050, Rev. G 5. Battery information is displayed (state, voltage, capacity, chemistry, etc.). Use only L3Harris approved batteries. Injury could occur from using an incorrect battery. WARNING 6.13 SELECT LANGUAGE To change the language displayed by the radio: 1. Press the Menu/Select button to access the main menu. -
Page 85: Default, Priority 1, And Priority 2 Channels
14221-1800-2050, Rev. G When using Preemptive Priority Scan, the frequencies in the list need to be unique. NOTE 6.14.1 Default, Priority 1, and Priority 2 Channels 6.14.1.1 Default Channel This is the currently selected channel and is the channel you transmit on by default when you press PTT while the radio is actively scanning and is not responding to a just received call. -
Page 86: Vote Scan (Analog And P25 Conventional Only)
14221-1800-2050, Rev. G 6.14.3 Vote Scan (Analog and P25 Conventional Only) If vote scan is enabled via RPM2, the radio automatically selects the strongest signal ensuring that the best audio quality is delivered to the user. If vote scan is enabled, the radio is always scanning. -
Page 87: Set Or Remove Priority 1 And Priority 2 Channels
14221-1800-2050, Rev. G 7. Press the up or down navigation buttons to select ADD CHAN/DELETE CHAN, SET PRI1, SET PRI2, REMOVE PRI, or NUISANCE/ADD BACK. When a channel is not grayed out in the list, DELETE CHAN appears. When a channel/group is grayed out (not in list), ADD CHAN appears. -
Page 88: Custom Scan Lists
14221-1800-2050, Rev. G 6.14.6 Custom Scan Lists The Mixed Zone Scan (MZS) feature gives the user the capability to scan based on a custom scan list that is assigned at the system level. The Custom Scan (CS) list can contain System and Channel/Group configurations across P25 Trunked, P25 Conventional, and Analog Systems. -
Page 89: Wide Area System Scan (P25 Trunked And Edacs)
14221-1800-2050, Rev. G 6. Press the up or down navigation buttons to highlight the newly added scan list and press the VIEW/EDIT soft key. 7. Press the left or right navigation buttons to display the desired system. 8. Press the up or down navigation buttons to highlight the desired group/channel and press the OPTIONS softkey. -
Page 90: Site Lock
14221-1800-2050, Rev. G 6.14.8 Site Lock The Site Lock feature provides a list of available, adjacent sites that the user can lock the radio to. This restricts the radio from roaming between sites. Up to 512 sites can be programmed to the radio. -
Page 91: Radio Message
14221-1800-2050, Rev. G To send a radio status: 1. Press the Menu/Select button to access the main menu. 2. Press the left or right navigation buttons to display the MESSAGES menu. 3. Press the up or down navigation buttons to highlight RADIO STATUS and press the Menu/Select button. -
Page 92: Radio Textlink
14221-1800-2050, Rev. G 4. Use the up or down navigation buttons and the Menu/Select button to highlight and select the desired message. 6.17 RADIO TEXTLINK Radio TextLink provides short text messaging functionality for radios. Due to the difficulty of entering text messages on a radio, predefined "canned" messages and predefined replies can be stored in the radio. -
Page 93: Radio Textlink Forms
14221-1800-2050, Rev. G 6.17.2 Radio TextLink Forms Form messages are displayed and stored in the radio as a message in which each field to be filled is indicated by a question mark (?) followed by one or more asterisks (*). The number of asterisks indicates the maximum number of alphanumeric characters allowed for that field. -
Page 94: View Received Messages
14221-1800-2050, Rev. G 6.17.3 View Received Messages When the icon appears on the idle display, there are Radio TextLink messages waiting to be read. To view received Radio TextLink messages: 1. Press the Menu/Select button to access the main menu. 2. -
Page 95: Tone Encode
• 5. If you view but do not delete the fault, the alert icon goes away on the idle display. 6. Contact L3Harris for assistance with diagnosing a fault. 6.19 TONE ENCODE Tone Encode is a generic tone encoding scheme for call identification when transmitting on a conventional system. -
Page 96: Encryption
4. Press the YES softkey to remove the keys. This will also remove the keysets. 6.20.2 Protected Keys The Protected Keys feature transfers P25 Voice Keys from L3Harris Key Loader to the radio that have been wrapped (AES) or encrypted (DES) with Key Protection Keys (KPKs). KPKs are nothing more than unprotected Key Encryption Keys (KEKs). -
Page 97: Select Keyset
14221-1800-2050, Rev. G 3. Press the up or down navigation buttons to highlight GLOBAL ENCRYPTION. Press the Menu/Select button. 4. Press the up or down navigation buttons to highlight the desired Global Key and press the Menu/Select button to enable Global Encryption. 5. -
Page 98: View Key List
14221-1800-2050, Rev. G 6.20.5 View Key List To view the key list: 1. Press the Menu/Select button to access the main menu. 2. Press the left or right navigation buttons to display the SECURITY menu. 3. Press the up or down navigation buttons to select KEY LIST and press the Menu/Select button. -
Page 99: Otar Configuration
OTAR is the over-the-air-rekeying from a KMF and must be enabled for the digital only channel using RPM2. For OTAR operation, the appropriate KEKs must be loaded into the radio using the L3Harris Key Loader or a KVL device. The KMF Configuration must include the RSI of the KMF and the appropriate Message Number Period. -
Page 100: Emergency Check-In Timer
14221-1800-2050, Rev. G 6.22 EMERGENCY CHECK-IN TIMER The Emergency Check In Timer is an added safety feature for a radio user who may be in a dangerous environment. If this timer expires before being cancelled by the radio operator, an emergency is declared. -
Page 101: Programming
RPM2 installed. L3HARRIS DEVICE MANAGEMENT L3Harris Device Management is a web-based application that allows the user to collect basic status and version information, read and program personalities, and program firmware in XL radios over LTE or secure Wi-Fi. -
Page 102: Programming Via Rpm2
14221-1800-2050, Rev. G PROGRAMMING VIA RPM2 Radio Personality Manager2 (RPM2) is used to program the XL Extreme Series Portable Radio. With RPM2, you can fully program the radio using cable 12082-0410-A1. Removing power during radio programming or programming the radio with low battery power could corrupt installation of firmware. - Page 103 14221-1800-2050, Rev. G 6. Highlight and select the parameter to edit. For P25 channels, modify remaining channel settings: CHANNEL NAME - The Channel Name cannot be changed from this screen; RPM2 is • required to change the Channel Name. RX FREQUENCY - Receive frequency. Note that if the new frequency is invalid, the •...
-
Page 104: Otap
14221-1800-2050, Rev. G TX CHAN GUARD - Squelch type radio uses in transmit. Select None, CTCSS, or • CDCSS. TX TONE - Tone sent by transmitting radio to allow receiving radio to unmute when CTCSS squelch is used in conventional mode. ... -
Page 105: Programmable Buttons And Switches
14221-1800-2050, Rev. G PROGRAMMABLE BUTTONS AND SWITCHES 7.5.1 Programmable Buttons Press the down navigation button while on the main display to view the functions assigned to the programmable buttons. The programmable buttons are programmed using RPM2. A delay of 0 to 10 seconds can be defined using RPM2 for the programmable buttons. - Page 106 14221-1800-2050, Rev. G FUNCTION DESCRIPTION Noise Cancellation Turns Noise Cancellation On/Off. Enable/Disable Nuisance Delete Performs a Nuisance Delete. See Section 5.32 for more information. Numeric Channel Entry Allows number channel entry. OTAR Rekey Initiate an OTAR rekey. See Section 6.20.6. Phone Call Initiate a telephone interconnect call.
-
Page 107: Programmable A/B (Ø/O) Switch
14221-1800-2050, Rev. G 7.5.2 Programmable A/B (Ø/O) Switch The programmable A/B switch can be programmed for multiple functions, including: Table 7-3: Programmable Ø/O Switch Options FUNCTION DESCRIPTION Clear/Secure Enable/disable encryption. Scan Turn scan operation on/off. Stealth Mode Enable/disable Stealth Mode. Talkaround Enable/disable talkaround. -
Page 108: Table 7-5: Indexed Features
14221-1800-2050, Rev. G FUNCTION DESCRIPTION When set, prevents the radio software from responding to the following physical inputs on the radio: Volume Knob Change (power off is not prevented) • 2-Position Switch • Radio Lock Channel Knob • Side User-Programmable Buttons and Keypad (DTMF, programmable, and •... -
Page 109: Programmable Icons
14221-1800-2050, Rev. G PROGRAMMABLE ICONS 7.6.1 Top Display The top display has space for up to seven configurable icons, which can be programmed to display any of the following: Blank • • Signal Strength Battery Status • • Bluetooth enabled •... -
Page 110: Reference
14221-1800-2050, Rev. G REFERENCE MARINE FREQUENCIES Refer to Table 8-1: Marine Frequencies for a list of maritime frequencies per United States Coast Guard (USCG). A radio designated for shipboard use must comply with Federal Communications Commission Rule Part 80. Additional information about operating requirements in the Maritime Services can be obtained from the full text of FCC Rule Part 80 and from the US Coast Guard. -
Page 111: Narrowbanding
14221-1800-2050, Rev. G SHIP SHIP CHANNEL CHANNEL TRANSMIT RECEIVE NUMBER NUMBER 1065 156.275 156.275 Port Operations 1066 156.325 156.325 Port Operations Commercial. Used for Bridge-to-bridge communications in 156.375 156.375 lower Mississippi River. Intership only. 156.425 156.425 Non-Commercial. VDSMS 156.475 156.475 Non-Commercial. -
Page 112: Glossary
14221-1800-2050, Rev. G GLOSSARY Advanced Encryption Standard AES-256 Advanced Encryption Standard, 256-bit AMBE+2 Advanced Multi-Band Excitation implementation 2 ANSI American National Standards Institute ASCII American Standard Code for Information Interchange Celsius Canada CDCSS Continuous Digital Coded Squelch System CH INFO Channel Information Common Key References Continuous Marine Broadcast... - Page 113 14221-1800-2050, Rev. G Key Encryption Key kilo (10 ) Hertz Key Identification Key Management Facility Key Management System Key Set Key Variable Loader (Motorola KVL Device) LAT/LONG DMS Latitude/Longitude Degrees Minutes Seconds LAT LONG DD Latitude/Longitude Decimal Degrees Light Emitting Diode Li-ION Lithium-ION Megahertz...
- Page 114 14221-1800-2050, Rev. G Telecommunications Industry Association Transmit Ultra High Frequency UKEK Unique Key Encryption Key United States USCG United States Coast Guard Universal Time Coordinated Universal Transverse Mercator Volts, Direct Current Very High Frequency VIDA Voice Interoperability Data Access Vessel Traffic Service WEEE Waste from Electric and Electronic Equipment...
-
Page 115: Basic Troubleshooting
INSTALL FAILED Operations failed. Contact L3Harris if problem persists. Install Removal of existing SW Attempt install again and contact L3Harris INSTALL FAILED Operations failed. if problem persists. Mission Plan Mission plan activation failed. Use RPM2 to ensure plan validity. Contact In Progress L3Harris if failures persist. - Page 116 14221-1800-2050, Rev. G SCREEN/ DISPLAYED REASON RESOLUTION MENU ERROR MESSAGE Top-Level USER REGISTRATION The user has either entered Check the System ID and User ID. If they Screen FAILED FOR… the wrong values or the user correct, contact your network is not in the UAS database.
-
Page 117: Otar Errors/Information
IF RADIO INDICATES: 1. INVALID KEYSTORE ZEROIZE NEEDED - This occurs if the radio’s keys were loaded by the L3Harris Key Loader followed by an attempt to load UKEKs with the Key Loader or keys with the Motorola KVL. Fix by performing workaround 1, followed by 2. -
Page 118: Technical Assistance
12. WARRANTY Register this product within 10 days of purchase. Registration validates the warranty coverage and enables L3Harris to contact you in case of any safety notifications issued for this product. Register on-line at the Customer Care center webpage: https://www.l3harris.com/all-capabilities/pspc-customer-care... -
Page 119: Appendix Apreventive Maintenance
CAUTION After any immersion, shake and dry off the XL Extreme Series portable radio to remove excess liquid, especially from the audio openings. CAUTION If any damage is found which requires removal of the RF shield, return the radio to L3Harris for service. -
Page 120: Appendix Bwi-Fi Programming
14221-1800-2050, Rev. G APPENDIX B WI-FI PROGRAMMING Due to numerous issues with discovering and programming radios connected to Enterprise Wireless networks, it is strongly suggested that a single Access Point Wireless network be used for programming radios with RPM2. See Section B.7 for more information. -
Page 121: Figure 12-1: Options Network Configuration
14221-1800-2050, Rev. G B.3 CONFIGURE THE PERSONALITY For a radio to be programmed over Wi-Fi, the active personality on the radio must be configured for connecting with the values that were set in Section B.2. The following steps detail how to configure an existing radio personality. -
Page 122: Figure 12-4: Enable Wi-Fi In Rpm2
14221-1800-2050, Rev. G B.4 CONFIGURE THE RPM2 APPLICATION To ensure that RPM2 can discover radios over Wi-Fi, ensure that the Enable Wi-Fi checkbox is checked on the RPM2 Preferences screen as shown in Figure 12-4. This checkbox is unchecked by default. Figure 12-4: Enable Wi-Fi in RPM2 Also, as shown in Figure 12-4, the Service Name must be updated to reference the value in the active personalities for the radios you need to discover. -
Page 123: Figure 12-5: Enable Wi-Fi Programming Mode On Radio
14221-1800-2050, Rev. G B.5 PUT THE RADIO IN WI-FI PROGRAMMING MODE To put the radio in Wi-Fi programming mode: 1. Turn the radio off and remove the USB cable (optional). 2. Press and hold the bottom portion of the PTT switch and either of the two side YELLOW buttons on power-up to enter WIFI Programming mode 3. -
Page 124: Table 12-1: Wi-Fi Feature Support
14221-1800-2050, Rev. G B.6 DISCOVERY AND PROGRAMMING IN THE RPM2 APPLICATION 1. Start RPM2. 2. Disconnect the radio from the programming cable. 3. Select the Radio tab and click the Wi-Fi connection button 4. When the Wi-Fi connection button is pressed, a “Discovering Wi-Fi Radios” message is displayed for several seconds and the radios connected to that access point with that Service Name populate the connection list. - Page 125 14221-1800-2050, Rev. G B.7 RPM2 WI-FI SUPPORT FOR ENTERPRISE NETWORKS. Enterprise Networks have certain limitations when it comes to Discovering/Programming Radios in RPM2. There is a 4500 second (75 minute) caching affect inherent to implementation with the Cisco ® Wi-Fi solution that utilizes the Access Point (AP)/Wireless LAN Controller (WLC) components.
-
Page 126: Appendix Cscba Bluetooth Configuration
14221-1800-2050, Rev. G APPENDIX C SCBA BLUETOOTH CONFIGURATION Refer to the vendor documentation for your SCBA for device-specific programming and configuration instructions. NOTE This appendix provides radio configuration instructions to enable Bluetooth pairing with SCBA. Refer to RPM2 User’s Manual 14221-1100-2060, as necessary when performing the steps in this section. - Page 127 Requires RPM2 R6A or later and XLP R6A or later. Consult with your L3Harris radio technician before adjusting any of these settings.
-
Page 128: Appendix Dconfiguring Encryption
D.1 CREATE KEYS USING L3HARRIS KEY ADMIN L3Harris Key Admin is part of the L3Harris Key Manager and is used by the Crypto Officer (CO). The CO creates a Master Set of keys from which a Distribution Set is produced. Using the Key Admin software, the CO can save keys into Distribution key files for technicians to use in radios. - Page 129 14221-1800-2050, Rev. G 7. In RPM2, select P25 OPTIONS P25 OTAR/Keystores and set the following, referring to the RPM2 online help as necessary: a. Click Create to add a Keystore or edit the Default Keystore. b. Check Enable OTAR Options. c.
- Page 130 14221-1800-2050, Rev. G 8. Click Next to validate the password and continue. If the password is incorrect, the screen will display an error message. 9. Ensure USB is selected in the drop-down and click Next. 10. Select the radio from the drop-down and click Load. 11.
- Page 131 14221-1800-2050, Rev. G 3. The Radio will indicate that KVL LLA Mode is active. 4. Once KVL LLA Mode is activated, the KVL-5000 can be used to provision the radio with LLA keys. The radio will remain in KVL LLA Mode until the user exits this state. D.3 PROTECTED KEYS The Protected Keys feature transfers P25 Voice Keys, from Key Loader to the radio, that have been wrapped (AES) or encrypted (DES) with Key Protection Keys (KPKs).
- Page 132 About L3Harris Technologies L3Harris Technologies is an agile global aerospace and defense technology innovator, delivering end-to-end solutions that meet customers’ mission-critical needs. The company provides advanced defense and commercial technologies across air, land, sea, space and cyber domains.
Need help?
Do you have a question about the XL Extreme Series and is the answer not in the manual?
Questions and answers