Rongta Technology RP325, RP326, RP327, RP328- RP32X Series 80mm Thermal Receipt Printer Manual
- Command set (90 pages) ,
- Operation manual (7 pages)
Advertisement
- 1 Product Introduction
- 2 Appearance and Components
- 3 Technical Parameters
- 4 Installation and Operation of the Unit
- 5 The Switch, Key and Indicator Light of the Unit
- 6 Serial Interfaces of the Unit
- 7 Parallel Interfaces of the Unit
- 8 USB Interface
- 9 Ethernet Interfaces of the Unit
- 10 Cashbox Interfaces of the Unit
- 11 Cleaning the Device
- 12 Release the Jammed Knife
- 13 Troubleshooting
- 14 Driver Installation
- 15 Safety Instructions
- 16 Documents / Resources
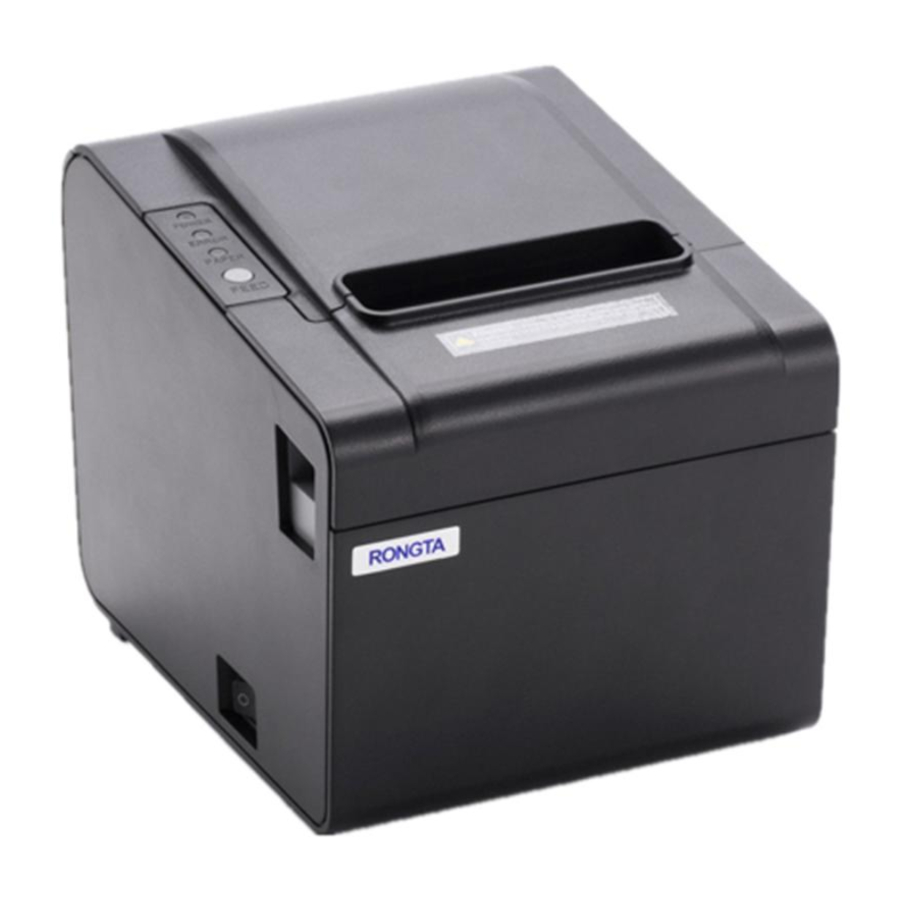
Product Introduction
Thank you for purchasing the RP32X series thermal receipt printer produced by our company. This thermal receipt printer provides you with safe, reliable and efficient printing quality at a reasonable economic price, At the same time, RP32X series is widely used in supermarkets, hospitals, restaurants, banks, gas stations, road and bridge toll collection and other fields due to its super functions and easy operation.
Main Features
- High printing quality
- Low noise
- Support cashbox drive
- The attractive appearance
- Reasonable structure, simple use and maintenance
- Built-in data buffer that receives print data when printing
- Support USB port, serial port (RS_232), parallel port, WIFI, Ethernet port and cashbox interface (subject to actual model interface)
- The characters can be enlarged, bolded, underlined. And it can adjust the line spacing and the left-right spacing for printing
- Supports bitmap downloading and graphic printing with different densities
- Realize high-speed printing equivalent to calling built-in and cartridge font in the mode of driver printing (dot map)
- Low power consumption and low operation cost (color tape and ink cartridge are not required)
- It is compatible with ESC/POS print instruction set
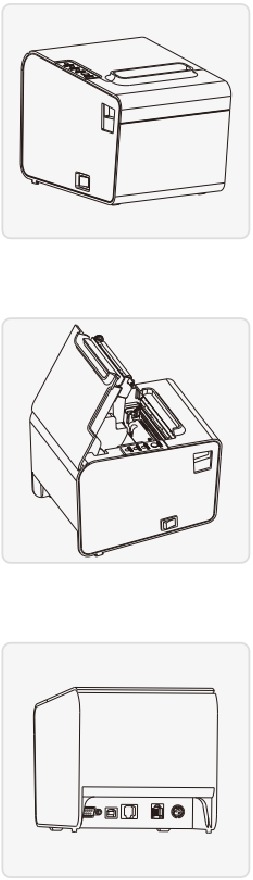
Appearance and Components
Model RP325
Front View

Inside View

Rear View

Application Field
- Cashier system of places of entertainment
- Cashier system of retail monopoly
- Catering cashier system
- Wireless Bluetooth printing cashier system
- Postal logistics receipt printing system
- Hotel receipt printing system
Model RP326
Front View

Inside View

Rear View

Application Field
- Cashier system of places of entertainment
- Cashier system of retail monopoly
- Catering cashier system
- Wireless Bluetooth printing cashier system
- Postal logistics receipt printing system
- Hotel receipt printing system
Model RP327
Front View

Inside View

Rear View

Application Field
- Cashier system of places of entertainment
- Cashier system of retail monopoly
- Catering cashier system
- Wireless Bluetooth printing cashier system
- Postal logistics receipt printing system
- Hotel receipt printing system
Model RP328
Front View

Inside View

Rear View

Application Field
- Cashier system of places of entertainment
- Cashier system of retail monopoly
- Catering cashier system
- Wireless Bluetooth printing cashier system
- Postal logistics receipt printing system
- Hotel receipt printing system
Technical Parameters
Printing Parameters
| Model | RP325\RP326\RP327\RP328 |
| Printing method | Thermal line printer |
| Printing speed | 250mm's |
| Printing paper width | 79.5  0.5 mm 0.5 mm |
| Effective resolution | 203 dpi (8 dot/mm) |
| Outside diameter of paper roll | 80 mm |
| Thicness of printing paper | 0.06-0.08mm |
| Effectve printing width | 72mm or 48mm (Alternative: compatible with 58mm paper) |
| Dot density | 576dot/line or 384dot/line |
| Character size | ASCII Font A: 12x24 ASCII Font B: 9x17 Chinese character 24x24 |
| Line space | 3.75mm (Use the command to adjust the line space) |
| Size of receive buffer | Non-page mode: 4Kbytes Page mode: 1M (alternative) |
| Print character | |
| ASCIl character set | 12x24 dot, 1.25 (width)X3.00 (height)mm |
| National Standard Class l and II Chinese Character Font | 24x24 dot, 3.00 (width)X3.00 (height)mm |
| Type of bar code | UPCA/UPCE/EAN13/EAN8/CODE39/125/CodeBar/CODE 128/CODE93/CODE11/MSI/QRCORE/PDF417 |
| Extonded character able | PC437. Katakana, PC850, PC860. PC863. PC865. WPC1252. PC866, PC852, PCA868 etc., 50 international languages in total |
| Power supply | |
| Power adapter | AC 100 ~ 240V |
| Input power supply | DC24v  2.5A 2.5A |
| Cashbox output | DC24v 1A |
| Service life | |
| Service life | The service life of print head: 150 kilometers The service life of inner diffusion knife: one million times |
| Environmental requirements | |
| Working environment | Operating temperature: 0~45°C, operating humidity: 20-90% |
| Storage environment | Storage temperaure: -10-60°C, storage humidity: 10-90% |
| Environmental conditions | |
| Drive | WIN2003/WINXP/WIN7/WIN8/WIN10/LINUX/Mac, |
| Print command | ESC/POS/OPOS command compatible |
| Character printing | It supports double width and double height printing of AN K characters, custom characters and Chinese characters; adjusts dot pattens of character spacing for printing: |
| printing of dot patterns | It supports printing of dot patterns with different densities and downloaded graphics |
- The pictures are for reference only, please subject to practicality
Device Indicators
| Type of printing paper Thermal paper rolls recommended | Thermal printing paper |
| Type of paper rolls | Specifications: AF50KS-E Manufacturer: Jujo Thermal Oy(Finland) Specifications: TF-50KS-E Manufacturer: Nippon Paper Industries Co., Lid |
 Attention Attention
|
Device Interfaces
| Diagram | Type | Illustration |
 | USB | Universal USB Interface (Standard Type B) |
 | Serial interface | Db9 female connector interface, communication baud rate is 9600bps, 38400bps, 19200bps or 115200bps optional (adjusting via DIP switch data structure is parity-free, a-bit data bit, 1-bit stop bit: RTS/CTS and XON/XOFF handshake protocols are supported |
 | Parallel interface (25PlN) | 25PlN ParaIlel (male connector) bidirectional parallel interface, a-bit parallel interface, support BUSY/nAck handshake protocol B |
 | Network interface | Standard RJ45-BP interface, 10M/100M transmission speed with self-adaptation, 100M network LED indication, data communication LED indication. |
 | Cashbox control | The 6-wire RJ-11 socket, DC 24V/1A power signal to drive the cashbox. |
 | Power interface | Power plug DC 24V. |
 Note: The interface is optional or customized, and the specific interface is subject to the actual object.
Installation and Operation of the Unit
Device Unpacking
Check the parts;
Before use, make sure the accessories are included in the package(the following picture is an example), If any thing is missing, contact the supplier or manufacturer, The specific accessories may not be included depending on the printer model.
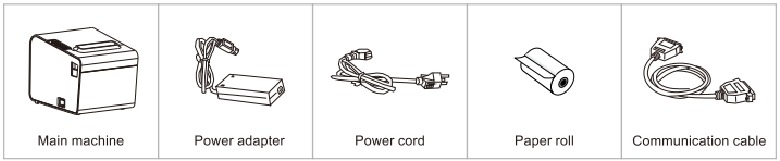
The pictures are for reference only, please subject to practicality.
Connecting the Device
- Make sure that both the printer and the PC host are turned off, plug the matching data communication cable into the printer's data interface, and plug the other end into the serial port/parallel port /USB/ network port of PC host.
- If equipped with an electrically openable cashbox, insert the RJ-11 connector on the cashbox into the cashbox interface of the printer (the specifications of the cashbox must conform to the printer cashbox drive specifications).
- Connect to the special power adapter of the printer.
Use the special power adapter for the printer. The connection diagram is as follows:

Attention:
- First plug the power plug DC24V of the printer, then switch on the AC220V power supply, and then turn on the power switch. Do not reverse the sequence, otherwise the machine will be damaged.
- Using an improper power adapter will make the printing quality worse and even damage the printer.
- Do not connect the telephone line to the cashbox interface, otherwise the printer and telephone may be damaged.
- When plugging in the printer power cord, please hold the arrow position of the printer power connector with your hand (do not plug in the cord of the pri nter power cord with your hand). Forcibly plucking the flexible cord of the printer power connector or pulling the printer power cord may cause damage to the printer or the power adapter.
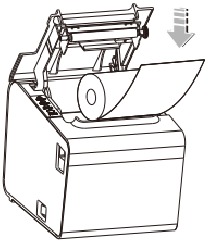
Loading Paper
The RP32X series thermal receipt printer uses 80mm thermal paper rolls and adopts an easy paper loading mechanism, which is very convenient for paper loading.
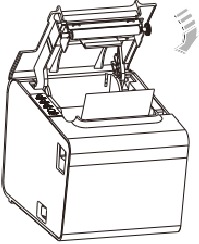
The Installation Method of Thermal Paper is as Follows:
- Open the upper cover of the printer.
- Insert the roll paper.
![]()
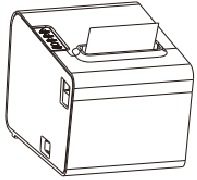
- Pull out a part of paper, and close the cover as shown below.
![]()
![]()
- Tear off the paper with the cutter.
The Switch, Key and Indicator Light of the Unit
Power Switch
The power switch controls the flow of power to the printer.
RP325/RP326/RP327: When the "-"switch is pressed, the printeris turned on;
When the "O" of the switch is pressed, the printer is turned off.
RP326: Long press the power button to turn on the printer, long press the power button to turn off the printer after power on.
Attention: Make sure the power supply is connected before turning on the printer.
Keys and Indicators
The keys and indicator panel as shown in the following figure:
The function description of keys and indicators:
FEED key
Press the FEED button once to advance paper or hold down the FEED button to feed paper continously.
Hold down the FEED button and turn on the product at the same time to print the self-test.
POWER indicator (green)
When connected to the power supply, it always lights up:
when connected with WIFI interface, it blinks when not connected successfully; and when connected successfully, it always lights up.
ERROR indicator (red)
The ERROR indicator will flashing when occour paper shortage, paper jam, printer head overheating, print head error or other abnormalities.
PAPER indicator (red)
Paper detection light, the printer is out of paper when the light is on. Once paper is supplied, the light turn off.
Self-Test of the Device
Self-test can detect whether the printer is working normally. If the Self-test list sample can be printed correctly, it indicates that everything is normal except the connection interface with the host computer, otherwise overhaul is required. In the self-test, it will print the software version number, print density, interface type, English characters and some Chinese characters in sequence.
The operation method Of self-test is: after the printer is connected, press and hold the feed key first and then turn on the power supply of the printer. First, the printer will reset and detect, and release the feeding button less than 5 seconds after the reset is completed. At this moment, the printer will carry out self-test and print the self-inspection list sample.
Special Functions of the Device
WIFI function (alternative)
WiFi is a technology that allows electronic devices to connect to a WLAN. Currently, the company's printers use 2.4G RF frequency band. There is a password for protection for the connection to WLAN; However, it can also be public, thus allowing any device within WLAN range to be connected. For specific WIFI setting steps, please refer to the "WIFI" setting in the integrated tool setting manual.
Bluetooth function (alternative)
Bluetooth is a radio technology that supports short-distance communication of equipment (generally within 10m). It can conduct wireless information exchange among many devices including mobile phones, PDA, wireless headphones, notebook computers, related peripherals, etc. The Bluetooth standard is IEEE802.15, which works in the 2.4GHz band, and the bandwidth is 1 MB/s.
Bluetooth pairing and printing (only valid for printers with Bluetooth)
The RP32X series Bluetooth printer needs to be paired with the main device driving the printer before working, and the pairing process is initiated by the main device.
The general pairing method is as follows:
- Turn on the printer.
- The main device searches for external Bluetooth device.
- If there are multiple external Bluetooth device, select the printer corresponding to BDA address (see self-test page for details).
- Enter the initial password "0000" or "1234"
![]()
- Complete the pairing.
Please refer to the Bluetooth function description of the main device for the specific pairing method.\Nhen pairing, the RP32X series thermal receipt printer with Bluetooth interface must be on,
Note: During pairing, please do not turn on multiple printers at the same time, otherwise you may not be able to judge which printer was successfully paired.
After successful pairing, other host computers can still be paired with the printer, and each printer can be paired with up to 8 host computers. If more upper computers are paired with printers, the host computer paired with the printer at the earliest will be automatically removed from the pairing list by the printer. At this time, if this host computer needs to drive the printer for printing, it needs to be paired again.
(For multi-connected Bluetooth only)
Use Bluetooth interface for printing (only valid for the printers with Bluetooth)
For host computers with virtual Bluetooth serial ports (such as mobile phones using SMART PHONE, POCKET PC, PALM, notebook computer, etc.), after successful pairing, printing data can be sent to the printer via the virtual Bluetooth serial port for printing. If the host computer does not have a virtual Bluetooth serial port, when you want to drive the printer for printing, please consult the supplier of the host computer.
Paper running out function (alternative)
The paper running out function is to detect the status of the printer's paper bin through the photocoupler sensor, and then display the status through the paper lamp on the printer. The specific display is as follows: if the height of the paper roll in the printer paper bin is greater than the height of the photocoupler, that is, the printer paper roll is large relatively, the paper lamp is off; if the height of the printer paper roll is less than the height of the photocoupler, the paper lamp is always on.
Serial Interfaces of the Unit
The serial interface of RP32X series thermal receipt printer adopts RS-232 standard.
The communication baud rate is 9600bps, 19200bps, 38400bps or 115200bps optional (adjusting via DIP switch). It is parity-free, 8-bit data bit, 1-bit stop bit; RTS/CTS and XON/XOFF handshake protocols are supported.
The functions of each pin of the printer serial interface are defined as follows:
| Pin number | Model | Signal source | Description |
| 2 | TXD | Printer | The printer sends data to the host. |
| 3 | RXD | Host | The printer receives data from the host. |
| 8 | RTS | Printer | This signal reflects the current status of printer. A high electrical level indicates that the printer is "busy' and cannot receive data, while a low electrical level indicates that the printer is "ready" and can receive data. |
| 5 | GND |  | Signal ground |
| 6 | DTR | Printer | Same as RTS signal (pin 8). |
Schematic diagram of connection between printer serial interface and POS host serial interface:

Parallel Interfaces of the Unit
The parallel interface socket of the RP32X series thermal receipt printer is a 25PlN parallel socket with 8-bit parallel transmission, it supports BUSY/nAck handshake protocol (subject to the actual object).
The functions of each pin of printer parallel interface socket are defined as follows:
| Number of 25 PIN | Signal name | Signal source | Description |
| 1 | ISTB | Host | Data strobe trigger pulse, read data at falling edge |
| 2 | DATA2 | Host | These signals respectively represent the first to eighth bit information of parallel data. The signal is "high" electrical level when the logic is "1" and "low" electrical level when the logic is "0". |
| 3 | DATA3 | Host | |
| 4 | DATA4 | Host | |
| 5 | DATA5 | Host | |
| 6 | DATA6 | Host | |
| 7 | DATA7 | Host | |
| 8 | DATA8 | Host | |
| 9 | DATA9 | Host | |
| 10 | nAck | Printer | Printer response signal. It indicates that the printer has received the data of previous byte |
| 11 | BUSY | Printer | "High" electrical level indicates that the printer is "busy" and cannot receive data. |
| 12 | Paper-out |  | It indicates whether there is a paper shortage Paper-out PE. |
| 13 | Select | Printer | Pull up electrical level to "high" by resistor |
| 18-25 | GND | | Ground, logic "low" electrical level |
| 15 | NError(nFault) | Printer | Pull up electrical level to "high" by resistor |
USB Interface
The printer's USB interface socket is standard USB type-B
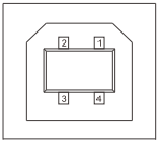
| PIN | SIGNAL NAME |
| 1 | VBUS |
| 2 | D- |
| 3 | D+ |
| 4 | GND |
Ethernet Interfaces of the Unit
The Ethernet interface socket of thermal receipt printer is standard RJ45-8P, it supports 10M/100M network, and the transmission speed is adaptive.
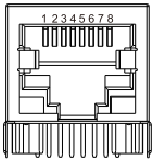
| Pin number | Descri ption | Illustration |
| 1 | TX+ | Send differential line+ |
| 2 | TX- | Send differential line- |
| 3 | RX+ | Receive differential line+ |
| 4 | NC | No function |
| 5 | NC | No function |
| 6 | RX- | Receive differential line- |
| 7 | NC | No function |
| 8 | NC | No function |
Cashbox Interfaces of the Unit
The cashbox interface of the printer adopts Rd-Il standard, 6-wire socket, and outputs DC 24V/1A power signal to drive the cashbox. Insert the RJ-11 crystal connector of the cashbox into the cashbox interface to open the cashbox through the printer.
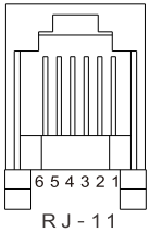
The functions of each pin of the cashbox interface of the printer are defined as follows:
| Pin number | Signal | Description |
| 1 | GND | Power supply ground |
| 2 | Dk1 | Negative pole of cashbox 1# |
| 3 | DK-1N | Start detection |
| 4 | PWR | Positive pole of power supply/cashbox |
| 5 | Dk2 | Negative pole of cashbox 2# |
| 6 | GND | Power supply ground |
Note: Select the above interface definition and buy cashbox
Cleaning the Device
Cleaning the Unit Head
Clean the print head when one of the following conditions occurs to the printer:
- Printing is not clear;
- A vertical column of the printed page is not clear;
- The paper feeding noise is high.
The print head cleaning steps are as follows:
- Disconect the power cord, open the upper cover and remove the paper if exists.
- If printing has just been completed, wait for the print head to cool completely;
- Clean the printer head with a soft cotton moistened with ethyl alcohol.

- After waiting for absolute ethyl alcohol to volatilize completely, close the upper cover and try printing again.

Cleaning the Sensor
Clean the paper shortage sensor when one of the following conditions occurs to the printer:
- In the printing process, the printer occasionally stops printing and alarms for paper shortage;
- It does not give alarms for paper shortage.
The paper shortage sensor cleaning steps are as follows:
- Turn off the power supply of the printer, open the upper cover, and remove the paper if there is any;
- Wipe off the dust and stain on the sensor surface with soft cotton cloth (which should be dried) dipped in absolute ethyl alcohol.
- After waiting for absolute ethyl alcohol to volatilize completely, close the upper cover and try to start the machine again.
Cleaning the Printing Rubber Roller
When one of the following conditions occurs to the printer, the printing rubber roller should be cleaned:
- Printing is not clear;
- A vertical column of the printed page is not clear;
- The paper feeding noise is high.
The printing Rubber Rollers cleaning steps are as follows:
- Turn off the power of the printer and open the upper cover;
- Use a soft cotton cloth (which should be dried) dipped in a neutral detergent to wipe off dust and stains on the surface of the printing rubber roller;

- Close the upper cover after the cleaning agent is completely volatilized.

Attention:
- The power supply must be turned off during the daily maintenance of the printer.
- Do not touch the surface of the print head with hands and metal objects, and do not scratch the surface of the print head, printing rubber roller and sensor with tweezers and other tools.
- The organic solvents such as gasoline and acetone shall not be used.
- Wait until absolute ethyl alcohol is completely volatilized, then turn on the power supply to continue printing.
Release the Jammed Knife
When the knife of printer is jammed, the upper cover of the printer cannot be opened. The printer shall be powered off and restarted, If the jammed knife is not reset, the power supply of the printer shall be turned off, the front cover of the printer (as shown in the left figure) is opened, and the jammed knife can be released by reversing the gear.
(The gear is in the position as shown in the following figure)

Troubleshooting
When the printer fails, it can be handled according to the method in this section. If the problem cannot be solved, please contact the distributor or manufacturer.
The indicator on the control panel is not on
Check whether the power cord is properly plugged into the printer, power adapter, and power outlet or not. Check if the printer's power switch is on.
The indicator is normal, while the printer does not work
Run the self-test to check whether the printer can work properly, If you cannot perform self-test, please contact your distributor or the technical service personnel.
If the self-test can be performed normally, check the following:
- Check the interfaces at both ends of the connection line between the printer and the computer. At the same time, confirm whether the connection meets the specifications of printer and computer.
- The data transfer settings between the printer and the computer may be different. You can use self-test to print out the printer's interface settings.
If the printer cannot print, please contact your distributor or the technical service personnel.
Driver Installation
There are two ways to drive the thermal receipt printer, one is to install the driver directly under Windows 9X/7/8/10/ME/2000/XP/Linux/MAC, the other is to use the port for direct driving.
Installation for Windows
Add the printer to Windows and assign the driver files in the driver disk to Windows. You can start printing only by calling the print command in the program. In this way, the printer driver of Windows actually converts characters into graphic dot matrix for printing.
The Port direct drive
In this way, there is no need to use a driver, only the characters need to be directly output to the port, and the built-in and cartridge font inside the printer is used to realize the conversion and printing of the characters. Using the port direct drive way, the printing mode is also changed from page printing mode to line printing mode, making printing control more convenient. If the port direct drive mode is used, the instruction set needs shall be used to control the printing of the printer, and the ESC/POS command set has been integrated inside the thermal receipt printer.
Safety Instructions

Do not touch the paper cutting knife or paper-tearing knife of the printer.
The print head is a heating component. Do not touch the print head and its surrounding components when the printer is still warm in temperature.
Do not touch the surface of the thermal print head and connectors, to avoid electrostatic damage to the print head.
This product is only suitable for the use in non-tropical climates.
Before operating and using the printer, please carefully read the following items and strictly observe the use rules.
- Please install the printer on a stable surface to avoid printer suffered from any vibration and shocks.
- Stop using keeping the product in any case of unusual circumstances such as the presence of high temprature, high humidity and serious pollution.
- Connect the printer's power adapter to an appropriate grounding socket. Avoid using the same socket with large motors or other equipment that may cause voltage fluctuation of power supply.
- Do not get the product wet. Do not insert foreign objects(e.g. metal) into the product, and once it occurs, immediately turn off the power supply.
- Never use the printer without paper, otherwise it will seriously damage the printing rubber roller and thermal head.
- Unplug the product from the power outlet if the printer is idle for a long time.
- Do not disassemble or modify the product personally.
- Use only the power adapter specified in this instruction.
- In order to ensure the printing quality and prolong the service life of the product, it is recommended to use the recommended or equivalent thermal printing paper.
- Do not plug/unplug the product with the product powered on.
- When plugging and unplugging the printer power cord, please hold the arrow position of the printer power connector with your hand, not the cord of the printer power cord.
- Please keep this manual for the future use and reference.
Rongta Technology (Xiamen) Group Co., Ltd.
ADD: No.88, Tonghui South Road, Tongan, Xiamen, China.
WEB: www.rongtatech.com
TEL: 0086-592-5666129
FAX: 0086-592-5659169

Documents / Resources
References
Download manual
Here you can download full pdf version of manual, it may contain additional safety instructions, warranty information, FCC rules, etc.
Advertisement


Need help?
Do you have a question about the RP325 and is the answer not in the manual?
Questions and answers