
Related Manuals for Philips HTS7540/93


Summary of Contents for Philips HTS7540/93
- Page 1 Register your product and get support at www.philips.com/welcome HTS7540 User manual...
-
Page 3: Table Of Contents
4 Get started Insert the remote control batteries Find the correct viewing channel Use the Home menu Select menu display language Set up network Use Philips EasyLink 5 Play Play a disc Play video Play music Play photo Play from USB device... -
Page 4: Important
Macrovision copyright 1 Important This product incorporates copyright protection technology that is protected by method claims of certain U.S. patents Safety and important notice and other intellectual property rights owned by Macrovision Corporation and other rights owners. Use of this copyright Warning protection technology must be authorized •... - Page 5 HD and DTS-HD Advanced Digital Out are trademarks of DTS, Inc. © 1996-2008 DTS, Inc. All Rights Reserved. The USB-IF Logos are trademarks of Universal Serial Bus Implementers Forum, inc. Java and all other Java trademarks and logos are trademarks or registered trademarks of Sun Microsystems, Inc.
-
Page 6: Care
Care Caution • Never use solvents such as benzene, thinner, cleaners available commercially, or anti-static sprays intended for discs. Clean discs Wipe the disc with a micro À bre cleaning cloth from the centre to the edge in a straight line movement. -
Page 7: Your Product
BD-Live Congratulations on your purchase, and Connect this product to the movie studios welcome to Philips! To fully beneÀ t from the website via the LAN port to access a variety support that Philips offers, register your product of up-to-date content (e.g. refreshed previews at www.philips.com/welcome. -
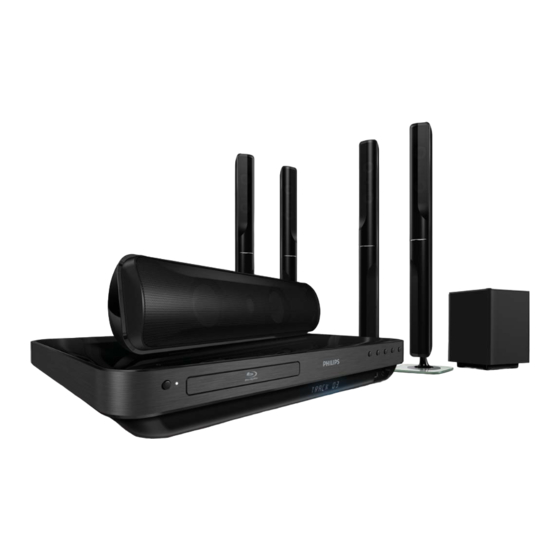
Page 8: Product Overview
Product overview Remote control Main unit c d e f g h ( Standby-On ) Turn on the Home Theater System or switch to standby mode. b Disc compartment c Display panel d IR sensor Detect signals from the remote control. Point the remote control directly at the sensor. - Page 9 c Source buttons n TREBLE / BASS • DISC / POP-UP MENU : Switch to Change treble or bass. Use with +/- . disc source. Access to disc menu o SOUND MODE during play. Select a sound mode. • RADIO : Switch to FM radio. p Numeric buttons •...
- Page 10 ( Fast Backward / Fast Forward ) Fast backward or fast forward. Press repeatedly to change the search speed. BACK Return to a previous menu screen. | TOP MENU Access the main menu of a video disc.
-
Page 11: Connect
3 Connect Make the following connections to use your Home Theater System. For a comprehensive interactive guide, see www.connectivityguide. philips.com. Basic connections: • Video • Speakers and subwoofer • Power Place this Home Theater System near to Optional connections: the TV •... - Page 12 Option 1: Connect to the HDMI jack Option 2: Connect to the component video jack HDMI OUT HDMI IN Connect the HDMI cable to the HDMI OUT jack on this Home Theater System and the HDMI input jack on the TV. •...
-
Page 13: Connect Speaker Cables To Speakers
Option 3: Connect to the Video Connect speaker cables to (CVBS) jack speakers VIDEO Match the color of the cable to the VIDEO IN terminal tab. Press the terminal tab down and insert the stripped end of the speaker cable, Connect a composite video cable (not then release. -
Page 14: Connect Speakers And Subwoofer
Connect speakers and Connect radio antenna subwoofer FM (75 Ω) ANTENNA Connect the FM antenna to the FM75 jack on this Home Theater System (for some models, this cable is already connected). Extend the FM antenna and À x its ends to the wall. -
Page 15: Connect Audio Cables/Other Devices
Connect audio cables/other Connect audio from a cable box, recorder or games console devices You can choose to connect to analog or digital Route the audio from other devices to this jacks depending on the device capabilities. Home Theater System to enjoy audio play with multi-channel surround capabilities. - Page 16 Connect to coaxial jack Connect to optical jack OPTICAL OPTICAL COAXIAL DIGITAL IN DIGITAL IN COAXIAL OPTICAL DIGITAL OUT DIGITAL OUT Connect a coaxial cable (not supplied) Connect an optical cable (not supplied) to the DIGITAL-IN-COAXIAL jack to the DIGITAL-IN - OPTICAL jack on this Home Theater System and the on this Home Theater System and the COAXIAL/DIGITAL output jack on the...
-
Page 17: Connect Lan
• Use an RJ45 straight cable. Do not use a crossover cable. • Internet access to Philips website for software update may not be allowed, depending on the router you use or the Internet Service Provider’s policy. Contact your Internet Service Provider for more information. -
Page 18: Get Started
Go to the lowest channel on your up with the markings inside the case. TV, then press the Channel Down Slide the cover back into position. button until you see the Philips or the Home menu screen. Note • Press SOURCE button repeatedly on the remote control of your TV. -
Page 19: Use The Home Menu
Use the Home menu • You can set the default language for DVD disc, see (‘Adjust settings’ > ‘Video Setup’ > [Disc Menu] ). Play Disc Settings Press ( Home menu ). Set up network • Select [Play Disc] to start disc play. •... -
Page 20: Use Philips Easylink
TV and other connected devices. See devices (if supports one-touch standby) TVs/devices manual for details. switch to standby mode simultaneously. You can now enjoy the following Philips System Audio Control EasyLink controls. When you play a device which its audio... - Page 21 Select [System Audio Control] > [On] . Read the on-screen instructions and press OK to select [Continue] . » The Home Theater System scans and displays the valid devices. Press OK to select [Continue] . Philips TV Aux1 Recorder Aux2 Coaxial DVD player Optical Select a connected device on the left of the menu, then press .
-
Page 22: Play
Information on disc contents 5 Play The contents of a disc are generally divided into sections or folders (groups of titles/À les) as shown below. Play a disc BD-video, DVD-video title 2 title 1 Caution chapter 1 chapter 2 chapter 1 chapter 2 chapter 3 •... -
Page 23: Play Video
Play video Change video play Play a title. Control video play Use the remote control to change the video play. Play a title. Use the remote control to control the Button Action title. AUDIO Selects an audio language or channel. Button Action SUBTITLE Selects a subtitle language for... - Page 24 Display menu Quick skip to a speciÀ c time During play, press OPTIONS . » The play options menu is displayed. Select [Time Search] in the menu, then press OK . Press the Numeric buttons to change the time where you want to skip to, then BD-video disc press OK .
- Page 25 View video play from different camera Play BD-video angles Blu-ray video disc has a larger capacity and supports features such as high-deÀ nition During play, press OPTIONS . » videos, multi-channel surround sounds, The play options menu is displayed. interactive menus and so on. Select [Angle List] in the menu, then Insert a BD-video disc.
-
Page 26: Play Music
Select the language to play, then press Button Action OK . AUDIO Selects an audio language or channel. SUBTITLE Selects a subtitle language for Enjoy BD-LIVE video. (applicable only to BD Live enabled BD-Video) Stops play. Additional contents such as movie trailers, •... -
Page 27: Play Photo
Button Action Note Pauses play. • For disc recorded in multiple sessions, only the ( Play ) Starts or resumes play. À rst session is played. Stops play. • This product does not support MP3PRO audio format. Skips to the next track. •... -
Page 28: Play From Usb Device
Control photo play Press BACK to return to the main menu. Play photo slideshow. Navigate to the photo folder/album and Use the remote control to control the press OK to start slideshow play. photo. » Slideshow begins and continues till the end of the photo folder or album. -
Page 29: Play From Portable Media Player
Play from radio Note • If the device does not À t into the USB jack, Check if the FM antenna has been connected connect it through a USB extension cable. to this Home Theater System. If not, connect • Not all digital cameras are supported. - Page 30 Listen to radio Search and store radio stations individually Press RADIO . Press RADIO . Use the remote control to control the radio. Press » It starts searching until a radio station Button Action is detected. Selects a preset radio station. Repeat step 2 until you tune to the radio Tunes the radio frequency up or station you wish to store.
-
Page 31: Adjust Sound
6 Adjust sound Option Description 5 CH Enhance the stereo channel STEREO output by duplicating the sound output to the center and rear Control the volume speakers. Ideal for party music. MULTI- Multi-channel surround output: Press +/- to increase or decrease the CHANNEL/ DTS, Dolby TrueHD and Dolby volume. -
Page 32: Adjust Settings
7 Adjust settings [Subtitle] Selects the default subtitle language for disc play. You can customize various kinds of settings as [Disc Menu] you prefer. Refer to the following instructions to Selects the language for disc menu. navigate through the setup menus. Note Note •... -
Page 33: Audio Setup
[Picture Settings] Note Selects a predeÀ ned set of picture color settings. • If the setting is not compatible with your TV, a blank screen appears. Wait for 15 seconds for • [Standard] – Original color setting. auto recover or press HDMI repeatedly until •... -
Page 34: Preference Setup
[Night Mode] Makes loud sound level softer and soft sound • level louder so that you can watch the disc at The test tone is emitted from the speaker while adjusting the volume level. a low volume, without disturbing others. •... -
Page 35: Easylink Setup
[Auto Standby] [Parental Control] Turns off or turns on standby switching mode. Restricts access to discs that are unsuitable It is an energy saving feature. for children. These types of discs must be • [On] - Switches to standby after 30 recorded with ratings. -
Page 36: Advanced Setup
[On] - Enables system audio control feature. Then proceed to [Audio Input [EasyLink] Mapping] to scan and map all the Your product supports Philips Easylink, which connected devices. uses the HDMI CEC (Consumer Electronics • [Off] - Disables system audio control Control) protocol. - Page 37 There is more detailed description available, to À nd out if a newest software version is see ‘Getting Started’ > ‘Set up network’. available at the Philips website that you may download and install on this Home Theater System. [Software Download]...
-
Page 38: Update Software
Disconnect the power cord for a few seconds and connect again to reboot the Home Theater System. Update software via USB Go to www.philips.com/support to check the latest software version available for this Home Theater System. Create a folder named ‘UPG’ in the root of a USB Á... -
Page 39: Specià Cations
Radio 9 Specifications • Tuning range: FM 87.5-108 MHz (50 kHz) • Signal-to-noise ratio: FM 50 dB • Frequency response: FM 180 Hz ~ 9 kHz / ±6dB Note • SpeciÀ cation and design are subject to change without notice •... - Page 40 Laser SpeciÀ cation • Laser Type: • BD Laser Diode: InGaN/AIGaN • DVD Laser Diode: InGaAIP • CD Laser Diode: A IGaAs • Wave length: • BD: 405 +5nm/-5nm • DVD: 650 +5nm/-10nm • CD: 790 +10nm/-20nm • Output power: •...
-
Page 41: Troubleshooting
• Make sure that the disc contains high- deÀ nition video. If you contact Philips, you will be asked for the • Make sure that the TV supports high- model and serial number of your product. The deÀ... - Page 42 No surround sound effect from the speakers. ‘No entry’ sign appears on the TV. • Press SURR. SOUND to select a correct • The operation is not possible. surround sound setting. • Ensure that the source you play is Unable to access BD-Live feature. recorded or broadcast in surround •...
-
Page 43: Glossary
11 Glossary DivX Video-On-Demand This DivX CertiÀ ed ® device must be registered in order to play DivX Video-on- Demand (VOD) content. To generate the registration code, locate the DivX VOD section in your device setup menu. Go to AVCHD vod.divx.com with this code to complete the AVCHD is a new format (standard) for high registration process and learn more about... - Page 44 HDCP High-bandwidth Digital Content Protection. A À le format with a sound data compression This is a speciÀ cation that provides a secure system. MP3 is the abbreviation of Motion transmission of digital contents between Picture Experts Group 1 (or MPEG-1) Audio different devices (to prevent unauthorized Layer 3.
- Page 45 O: Indicates that this toxic or hazardous substance contained in all of the homogeneous materials for this part is below the limit requirement in SJ/T11363 – 2006. X: Indicates that this toxic or hazardous substance contained in at least one of the homogeneous materials used for this part is above the limit requirement in SJ/T11363 - 2006.
- Page 48 © 2009 Koninklijke Philips Electronics N.V. All rights reserved. sgptt_0930/93...