
Subscribe to Our Youtube Channel
Summary of Contents for Nova CAMBRIDGE NOV-CD-4005B
- Page 1 ASSEMBLY INSTRUCTIONS CAMBRIDGE FIREPIT TABLE SKU: NOV-CD-4005B / NOV-CD-4005G 2021 V1.0 IMPORTANT NOTICE THIS BOOKLET CONTAINS USEFUL INFORMATION ABOUT WARRANTY & CARE INSTRUCTIONS. PLEASE KEEP FOR FUTURE REFERENCE.
-
Page 2: Parts List
ASSEMBLY INSTRUCTIONS PARTS LIST Table Box Part Part Name Leg Panel Table Top Side Panel Side Panel With Door Glass M6 x 20mm Washer Allen Key... - Page 3 ASSEMBLY INSTRUCTIONS PARTS LIST Firepit System Box Windguard Box Part Part Name Firepit System Stainless Steel Lid Cover Onyx Coloured Fireglass Rectangular Winguard Panel Rectangular Winguard Panel Top Connector For Windguard Bottom Connector For Windguard...
-
Page 4: Safety Advice
ASSEMBLY INSTRUCTIONS SAFETY ADVICE BEFORE YOU START: • Ensure that you read this manual before starting to assemble your item(s). • Check that you have all parts from the above part list. Do not throw away any packaging until you are confident that you have all parts. •... - Page 5 • Please only use this product for its intended purpose as outdoor furniture within a residential environment. Failure to do so will void your warranty. • Nova Outdoor Living holds no responsibility for any damages caused due to normal wear and tear, incorrect assembly, misuse and/or negligence •...
- Page 6 ASSEMBLY INSTRUCTIONS ASSEMBLY STEP 1 Loosely secure the leg panel with the M6 x 20mm screws.
- Page 7 ASSEMBLY INSTRUCTIONS ASSEMBLY STEP 2 Loosely secure the second leg panel with the M6 x 20mm screws.
- Page 8 ASSEMBLY INSTRUCTIONS ASSEMBLY STEP 3 Loosely secure the side panel with the M6 x 20mm screws.
- Page 9 ASSEMBLY INSTRUCTIONS ASSEMBLY STEP 4 Loosely secure the side panel with door with the M6 x 20mm screws. ITS TIME! Now tighten all the screws with the provided Allen key (H)
- Page 10 ASSEMBLY INSTRUCTIONS ASSEMBLY STEP 5 Secure the glass onto the table top ensuring the suction cups are flat. COMPLETE Assembly of the table is now complete!
- Page 11 ASSEMBLY INSTRUCTIONS FIREPIT SYSTEM ASSEMBLY STEP 1 Remove the firepit system control panel nuts. Keep the nuts to one side.
- Page 12 ASSEMBLY INSTRUCTIONS FIREPIT SYSTEM ASSEMBLY STEP 2 Lower the gas firepit system into the centre of the table glass, positioning the regulator, hose and control panel through the table hole before lowering the system into place.
- Page 13 ASSEMBLY INSTRUCTIONS FIREPIT SYSTEM ASSEMBLY STEP 3 Attach the firepit control panel to the table base frame. Tighten the control panel onto the frame using the previously removed nuts. COMPLETE Assembly of the firepit is now complete!
- Page 14 ASSEMBLY INSTRUCTIONS FIREPIT SYSTEM ASSEMBLY STEP 4 Carefully fill the firepit system with the fireglass ensuring the pilot cover is not obstructed. Ensure the gas pipes under the table are not kinked and all wiring is connected. PIN: 0359 03837...
- Page 15 ASSEMBLY INSTRUCTIONS FIREPIT SYSTEM ASSEMBLY STEP 5 Remove the battery cover. Place 1 x AAA battery into the ignition, ensuring the negative side is inserted first.
- Page 16 ASSEMBLY INSTRUCTIONS WINDGUARD ASSEMBLY STEP 1 Loosen all the grub-screws in the connectors with a Phillips screwdriver (not supplied). Loosely position each windguard panel, one at a time, using the top and bottom connectors until a rectangular windguard is formed. Do not tighten any screws until the windguard is formed.
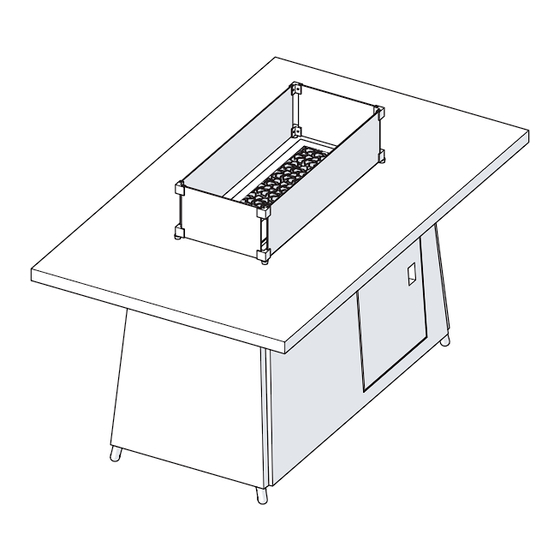
- Page 17 ASSEMBLY INSTRUCTIONS WINDGUARD ASSEMBLY STEP 2 Tighten all the grub screws (once the windguard is formed) using a Phillips screwdriver (not supplied) and position it onto the table top around the firepit. SAFETY ADVICE We recommend tightening the grub-screws occasionally after use.
-
Page 18: Troubleshooting
ASSEMBLY INSTRUCTIONS TROUBLESHOOTING • Ensure the black wire from the system is connected to the igniter. • 1 x AAA battery must be inserted into the ignition, position within the control panel. • Ensure the pilot cover is free from the Onyx glass. -
Page 19: Warranty Information
ASSEMBLY INSTRUCTIONS CARE, MAINTENANCE & WARRANTY INFORMATION Our range of Rattan Furniture is designed for continual outdoor use. The aluminium frame and weatherproof synthetic weave ensures that you can leave it outside all year round (excluding cushions). Always use place mats, coasters, and tablecloths to help protect against dropped items and scratches on the glass.
Need help?
Do you have a question about the CAMBRIDGE NOV-CD-4005B and is the answer not in the manual?
Questions and answers