Aroma 20 cup Digital Rice & Grain Multicooker ARC-5200SB Manual
- Instruction manual (12 pages)
Advertisement
- 1 PARTS IDENTIFICATION
- 2 BEFORE FIRST
- 3 TO CLEAN
- 4 TROUBLESHOOTING
- 5 Error Code Chart
- 6 COOKING RICE
- 7 QUICK RICE
- 8 Quick Rice Comparison Table
- 9 MULTIGRAIN
- 10 Rice & Water Measurement Table
- 11 Multigrain & Water Measurement Table
- 12 DELAY TIMER
- 13 SLOW COOK
- 14 STEAM
- 15 STEAM & COOK GRAIN
- 16 Steaming Tables
- 17 SOUP
- 18 SAUTE-THEN-SIMMER
- 19 EGGS
- 20 REHEAT
- 21 OATMEAL
- 22 CAKE
- 23 RISOTTO
- 24 RECIPES
- 25 IMPORTANT SAFEGUARDS
- 26 SERVICE & SUPPORT
- 27 Documents / Resources
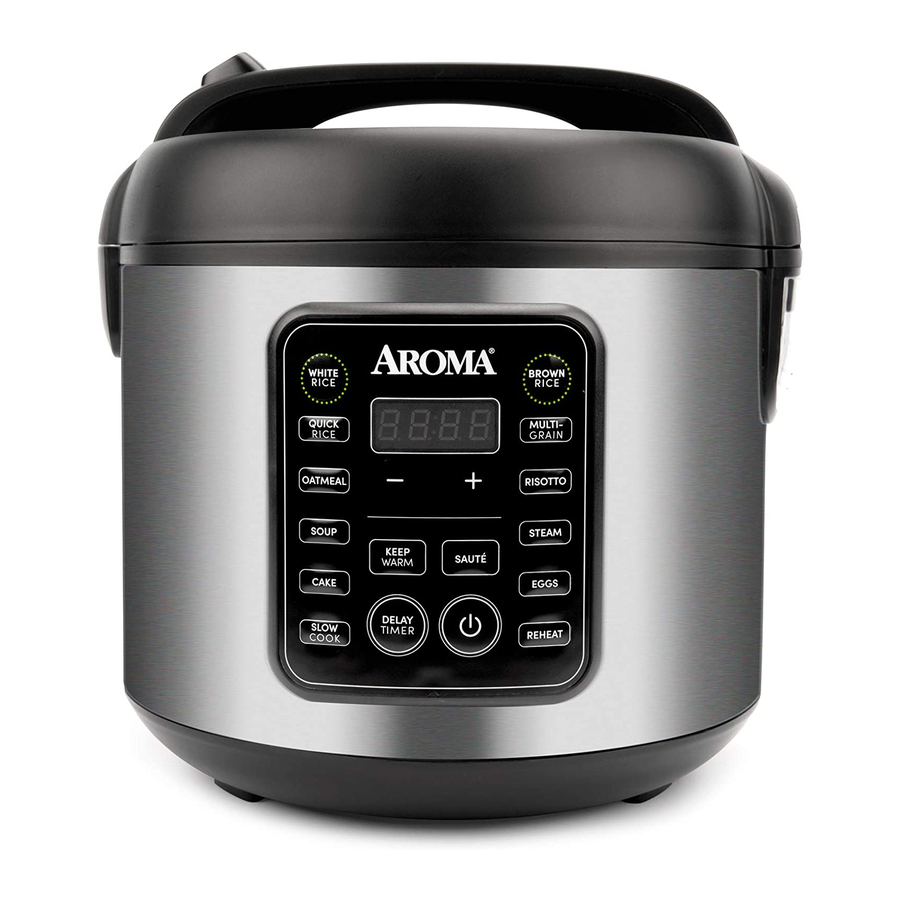
PARTS IDENTIFICATION

Digital Controls
(  )
)
Turns the cooker on/off or cancels a current function.
Keep Warm
Perfect for keeping food at a ready-to-serve temperature
(+) or (=)
Allows you to adjust times for Steam, Delay Timer, Slow Cook, Eggs and Soup.
Delay Timer
Allows for food to be ready right when if's needed. Add ingredients in the morning and come home to delicious meals ready to eat!
Slow Cook
Slow cooks meals from 2 to 10 hours with the press of a button.
Soup
Great for preparing all kinds of savory soups or broths.
Steam
Using the included steam tray, steaming healthy sides and main courses has never been easier.
Oatmeal
Quick and healthy breakfast with no need to stir. Use with the Delay Timer to prepare oatmeal overnight and have it ready-to-eat in the morning!
Cake
Easily bakes cakes and other sweet treats that involve batter.
Sauté-then-Simmer
Patented technology produces high heat at the beginning of the cook cycle then automatically switches to simmer mode once liquid is added. Great for crafting homemade Spanish rice, chili stir frys and much more!
White Rice
Cooks fluffy, delicious rice automatically.
Brown Rice
Ideal for cooking brown rice to perfection
Multigrain
Cooks tough-to-cook whole grains including quinoa, barley and bulgur.
Quick Rice
A great time-saving option for rice in a pinch.
Reheat
Great for re-heating leftovers
Risotto
Prepares rich and creamy one-pot risottos in no time.
Eggs
Sets time from 6 to 14 minutes to make soft or hard boiled eggs.
BEFORE FIRST
- Read all instructions and important safeguards.
- Remove all packaging materials and check that all items have been received in good condition.
- Tear up all plastic bags and dispose of them properly as they can pose a risk to children.
- Wash steam vent and all other accessories in warm, soapy water. Rinse and dry thoroughly.
- Remove the inner pot from cooker and clean with warm, soapy water. Rinse and dry thoroughly before returning to cooker.
- Wipe cooker body clean with a damp cloth.
TO CLEAN
- Remove the steam vent when cooker is completely cooled.
- Remove the condensation collector.
- Soak the inner pot and all accessories or wash them in the top rack of the dishwasher.
- Wipe cooker body clean with a damp cloth.
- Thoroughly dry cooker body and all accessories.
- Reassemble for next use.
Note:
- Do not use harsh abrasive cleaners, scouring pads or products that are not considered safe to use on nonstick coatings.
- If washing in the dishwasher, a slight discoloration to the inner pot and accessories may occur. This is cosmetic only and will not affect performance.
- Any other servicing should be performed by Aroma Housewares.
TROUBLESHOOTING
Rice is too dry/hard after cooking
If your rice is dry or hard/chewy when the cooker switches to Keep Warm, additional water and cooking time will soften the rice. Depending on how dry your rice is, add 1/2 to 1 cup of water and stir thoroughly. Close the lid and press the White Rice button. When cooker switches to Keep Warm mode, open the lid and stir the rice to check the consistency. Repeat as necessary until rice is soft and moist.
Rice is too moist/soggy after cooking
If your rice is still foo moist or soggy when the cooker switches to Keep Warm, use the serving spatula to stir the rice. This will redistribute the bottom (moist) part of the rice as well as release excess moisture. Close the lid and allow to remain on Keep Warm mode for 10-30 minutes as needed, opening the lid and stirring periodically to release excess moisture.
Helpful Hints:
The provided rice cooker cup is the equivalent to a 3/4 standard US cup

Note:
- Because of different varieties of rice, results may vary. Refer to these troubleshooting tips to help you achieve the desired consistency.
Error Code Chart
If an error shows on the digital display, the following chart will help explain the next course of action.
| Display Code | Meaning | Action |
E1 | Bottom sensor circuit | Contact Aroma Customer Service Center at 1-800-276-6286. |
E2 | Bottom sensor short circuit | Allow to cool for 5 to 10 minutes then restart. If problem persists, contact Aroma Customer Service Center at 1-800-276-6286. |
E5 | Top sensor open circuit | Contact Aroma Customer Service Center at 1-800-276-6286. |
E6 | Top sensor short circuit | Allow to cool for 5 to 10 minutes then restart. If problem persists, contact Aroma Customer Service Center at 1-800-276-6286. |
COOKING RICE
- Using the provided measuring cup, add rice to the inner pot.
- Rinse rice to remove excess starch. Drain.
- Fill with water to the line which matches the number of cups of rice being cooked.
- Place the inner pot into the cooker and close the lid securely.
- Plug the power cord into an available 120V AC wall outlet.
- Press the (
![]() ) button to turn on the cooker.
) button to turn on the cooker. - Press White Rice or Brown Rice, depending on the type of rice being cooked. The cooking indicator light will illuminate.
- The unit will beep and the display will begin a chasing pattern. The cooker will now begin cooking.
- The cooker will count down the final 6 minutes of cook time.
- Once finished, the cooker will beep and automatically switch to Keep Warm.
- For better results, stir the rice with the serving spatula to distribute any remaining moisture.
- When finished serving rice, turn the cooker off by pressing (
![]() ) and unplugging the power cord.
) and unplugging the power cord.
Note:
- Before placing the inner pot into the cooker, check that it is dry and free of debris. Adding the inner pot when wet may damage the cooker.
- Rice should not be left in the cooker on Keep Warm for more than 12 hours.
Helpful Hints:
To add more flavor to rice, try substituting a favorite meat or vegetable broth or stock. The ratio of broth/stock to rice will be the same as water to rice.
For approximate rice cooking times and suggested rice/water ratios, see the "Rice & Water Measurement Table".
QUICK RICE
- Using the provided measuring cup, add rice to the inner pot.
- Rinse rice to remove excess starch. Drain.
- Fill with water to the line that matches the number of cups of rice being cooked.
- Place the inner pot into the cooker and close the lid securely.
- Plug the power cord into an available 120V AC wall outlet.
- Press the (
![]() ) button to turn on the cooker then press Quick Rice to begin cooking.
) button to turn on the cooker then press Quick Rice to begin cooking. - The cooking indicator light will illuminate. The unit will beep and the display will begin a chasing pattern.
- The cooker will count down the final 6 minutes of cook time.
- Once rice is finished, the cooker will beep and automatically switch to Keep Warm.
- For better results, stir the rice with the serving spatula to distribute any remaining moisture.
- When finished serving rice, furn the cooker off by pressing (
![]() ) and unplugging the power cord.
) and unplugging the power cord.
Note:
- Cooking times are approximate. Altitude, humidity and outside temperature will affect cooking time.
- Opening the lid during the cooking cycle causes a loss of heat and steam. Cooking time may be prolonged if the lid is opened before the rice is finished.
- Due to extra soaking time needed for brown rice, the Quick Rice function is best for white rice.
Quick Rice Comparison Table
| White Rice Uncooked Cups* | Cooking Time with Quick Rice Function | Approx Time Savings Compared to White Rice Function |
| 2 Cups | 24-29 Min. | 4-5 Min. |
| 4 Cups | 27-32 Min. | 4-5 Min. |
| 6 Cups | 30-35 Min. | 4-5 Min. |
| 8 Cups | 32-37 Min. | 4-5 Min. |
| 10 Cups | 36-41 Min. | 4-5 Min. |
* Cups referenced are with the included measuring cup.
MULTIGRAIN
- Using the provided measuring cup, add grain to the inner pot.
- Rinse grain to remove excess starch. Drain.
- Fill with water according to the "Multigrain & Water Measurement Table".
- Place the inner pot into the cooker and close the lid securely.
- Plug the power cord into an available 120V AC wall outlet.
- Press the (
![]() ) button to turn on the cooker.
) button to turn on the cooker. - Press the Multigrain button to begin cooking. The cooking indicator light will illuminate.
- The unit will beep and the display will begin a chasing pattern.
- The cooker will count down the final 10 minutes of cook time.
- Once finished, the cooker will beep and automatically switch to Keep Warm.
- For better results, stir the grain with the serving spatula to distribute any remaining moisture.
- When finished serving, turn the cooker off by pressing (
![]() ) and unplugging the power cord.
) and unplugging the power cord.
Note:
- Before placing the inner pot into the cooker, check that it is dry and free of debris. Adding the inner pot when wet may damage the cooker.
- Some grains require a much longer cooking cycle than others due to the extra bran layers on the grains. The Multigrain and Brown Rice functions on this cooker allow extra time and adjusted heat settings in order to cook the grains properly. if it appears the cooker is not heating up immediately on the Multigrain and Brown Rice settings, this is due to a low-heat soak cycle that precedes the cooking cycle to produce better results.
- Food should not be left in the cooker on Keep Warm for more than 12 hours.
Helpful Hints:
If you misplace the measuring cup, a 3/4 standard US cup is an exact replacement.
Rice & Water Measurement Table
| Uncooked Rice Cups* | Rice Water Line (inside pot) | Approx. Cooked Rice Yield* | Cooking Times |
| 2 Cups | Line 2 | 4 Cups | White Rice: 27-32 Min. Brown Rice: 36-41 Min. |
| 3 Cups | Line 3 | 6 Cups | White Rice: 28-33 Min. Brown Rice: 39-45 Min. |
| 4 Cups | Line 4 | 8 Cups | White Rice: 29-34 Min. Brown Rice: 42-48 Min. |
| 5 Cups | Line 5 | 10 Cups | White Rice: 31-36 Min. Brown Rice: 45-51 Min. |
| 6 Cups | Line 6 | 12 Cups | White Rice: 33-38 Min. Brown Rice: 48-54 Min |
| 7 Cups | Line 7 | 14 Cups | White Rice: 34-39 Min. Brown Rice: 51-57 Min |
| 8 Cups | Line 8 | 16 Cups | White Rice: 36-41 Min. Brown Rice: 54-60 Min. |
| 9 Cups | Line 9 | 18 Cups | White Rice: 38-43 Min. Brown Rice: 57-63 Min. |
| 10 Cups | Line 10 | 20 Cups | White Rice: 40-45 Min. Brown Rice: 60-66 Min. |
*Cups referenced are with the included measuring cup
(1 Rice Measuring Cup = 3/4 U.S. Cup)

Note:
- For softer grains, simply add more water.
- This chart is only a general measuring guide, grain/water measurements may vary.
- Cooking times are approximate. Altitude, humidity and outside temperature will affect cooking times.
- Opening the lid during the cooking cycle causes a loss of heat and steam. Cooking time may be prolonged if the lid is opened before the rice is finished.
Multigrain & Water Measurement Table
| Grain | Uncooked Grain | Liquid | Approx. Cooked Grain Yield | Max. Uncooked Grain* | Function | Cooking Times |
| Arborio | 1 Part | 2 Parts | 2 Parts | 5 Cups | Steam/Risotto | 12-17 Min. |
| Barley | 1 Part | 2 Parts | 2.5 Parts | 2 Cups | Delay Timer & Multigrain | 5 Hours |
| Bulgur | 1 Part | 2 Parts | 2.5 Parts | 7 Cups | Multigrain | 35-50 Min. |
| Couscous | 1 Part | 1 Part | 2 Parts | 10 Cups | White Rice | 29-60 Min. |
| Quinoa | 1 Part | 1.5 Parts | 2.5 Parts | 6 Cups | White Rice | 32-48 Min. |
| Oatmeal | 1Part | 2.5 Parts | 2 Parts | 4 Cups | Oatmeal | 35-42 Min. |
*Cups referenced are with the included measuring cup
(1 Rice Measuring Cup = 3/4 US Cup)

Note:
- Rinse grains before placing into the inner pot to remove excess bran and starch. This will help reduce browning and sticking to the bottom of the pot.
- When cooking barley, you must use the Delay Timer for 4 hours in combination with the Multigrain function. The additional soaking time will ensure good flavor and texture.
- For best results when cooking barley or bulgur, let both grains sit on Keep Warm for 10 minutes before serving.
DELAY TIMER
- Using the provided measuring cup, add rice, grain, or oatmeal to the inner pot.
- Rinse to remove excess starch. Drain.
- If cooking rice or grain, refer to the "Rice & Water Measurement Table" or the "Multigrain & Water Measurement Table" and fill with water accordingly. If cooking oatmeal, fill with water according to the package instructions.
- Place the inner pot into the cooker and close the lid securely.
- Plug the power cord into an available 120V AC wall outlet.
- Press the (
![]() ) button to turn on the cooker.
) button to turn on the cooker. - Press the Delay Timer button. Press (+) to increase time in one hour increments. It may be set to have rice ready in 1 to 15 hours for White Rice or Oatmeal and 2 to 15 for Brown Rice or Multigrain.
- Once the needed time is selected, press the White Rice, Brown Rice, Oatmeal or Multigrain button, depending on the type of grain being cooked.
- The digital display will count down from the time selected.
- Once food begins cooking, a chasing pattern will be in the display.
- The cooker will count down the final 10 minutes of cook time
- Once rice or grain is finished, the cooker will beep and automatically switch to Keep Warm.
- When finished serving rice, turn the cooker off by pressing (
![]() ) and unplugging the power cord.
) and unplugging the power cord.
Note:
- Due to the longer cooking time needed, Brown Rice and Multigrain may only be delayed for 2 hours or more.
- Food should not be left in the rice cooker on Keep Warm for more than 12 hours.
Helpful Hints:
If you misplace the measuring cup, a 3/4 standard U.S. cup is an exact replacement.
For approximate rice and grain cooking times and suggested rice/water ratios, see the "Rice/Grain & Water Measurement Table".
SLOW COOK
- Add food to be slow cooked to the inner pot.
- Place the inner pot into the cooker and close the lid securely.
- Plug the power cord into an available 120V AC wall outlet.
- Press the (
![]() ) button to turn on the cooker.
) button to turn on the cooker. - Press Slow Cook. The digital display will show a flashing "2" to represent 2 hours of slow cook time.
- Press (+) or (-) to increase or decrease cook time by one hour, up to 10 hours. After 10 hours, it will cycle back to 2 hours.
- Once the needed cooking time is selected, the cooker will beep to indicate it is setting at the displayed time. The display will stop flashing to indicate it has set.
- The cooker will begin to slow cook. The digital display will count down in one minute increments from the selected time.
- Once food is finished, the cooker will beep and automatically switch to Keep Warm.
- Open the lid to check food for doneness. If fully cooked, remove food for serving.
- When finished serving, turn the rice cooker off by pressing (
![]() ) and unplugging the power cord.
) and unplugging the power cord.

The rice cooker will not switch to Keep Warm until all liquid is boiled away or if set time set has expired. Follow the recipe carefully and do not leave the rice cooker unattended.
Do not use the provided serving spatula to slow cook. It is not intended to be used in contact with high temperatures.
Use a long-handled wooden or heat-safe spoon to stir food while slow cooking.
Note:
- Slow cooking requires a small amount of liquid. Without liquid, the cooker will automatically switch to Keep Warm.
STEAM
- Using the provided measuring cup, add 3 rice measuring cups of water to the inner pot.
- Place the inner pot into the cooker.
- Place food to be steamed onto the provided steam tray.
- Place the steam tray into the cooker and close the lid securely.
- Plug the power cord into an available 120V AC wall outlet.
- Press the (
![]() ) button to turn on the cooker.
) button to turn on the cooker. - Press the Steam button. The digital display will show a flashing "0:05" to represent five minutes of steam time.
- Press (+) or (-) to increase or decrease steaming time by one minute, up to 30 minutes. After 30 minutes, it will cycle back to five minutes.
- Once the time is selected, the cooker will beep to indicate it is setting at the displayed time. The display will stop flashing to indicate it has set.
- When the water reaches a boil, the digital display will count down in one minute increments from the selected time.
- Once the selected time has passed, the cooker will beep and switch to Keep Warm.
- Check steamed food for doneness. If finished steaming, carefully remove food to prevent overcooking. Wear a protective, heat-resistant glove when removing to prevent possible injury.
- When finished steaming, turn the cooker off by pressing (
![]() ) and unplugging the power cord.
) and unplugging the power cord.
Helpful Hints:
Smaller foods may be placed on a heat-proof dish and then placed onto the steam tray. Parchment paper or aluminum foil may be used as well. Place the paper/foil in the center of the steam tray and ensure it does not create a seal along the bottom of the steam tray. For best results, it is recommended to puncture small holes in the paper/foil.
For suggested steaming times and water amounts, see the "Meat & Vegetable Steaming Tables".
STEAM & COOK GRAIN
- Using the provided measuring cup, add rice or grain to the inner pot.
- Rinse rice to remove excess starch. Drain.
- Refer to the "Rice & Water Measurement Table" or the "Multigrain & Water Measurement Table" and fill with
- Place the inner pot into the cooker and close the lid securely.
- Plug the power cord into an available 120V AC wall outlet.
- Press the (
![]() ) button to turn on the cooker.
) button to turn on the cooker. - Press White Rice, Brown Rice or Multigrain, depending upon the type of grain being cooked.
- The cooking indicator light will illuminate. The unit will beep and the display will begin a chasing pattern. The cooker will now begin cooking.
- Place food to be steamed onto the provided steam tray.
- Using caution to avoid escaping steam, open the lid.
- Place steam tray into the cooker and close the lid securely.
- When food is finished steaming, remove the steam tray. Use a protective, heat-resistant glove when removing to avoid possible injury.
- Allow the cooker to continue cooking. The digital display will show a countdown for the final 10 minutes of cook time.
- Once grain is finished, the cooker will beep and automatically switch to Keep Warm.
- For best results, stir with the serving spatula to distribute any remaining moisture.
- When finished serving, turn the cooker off by pressing (
![]() ) and unplugging the power cord.
) and unplugging the power cord.
Note:
- Do not attempt to cook more than 5 cups of uncooked rice if steaming and cooking rice simultaneously
- It is possible to steam at any point during the grain cooking cycle. However, it is recommended that you steam during the end of the cycle so that steamed food does not grow cold or become soggy before the rice is ready.
- Food should not be left in the cooker on Keep Warm for more than 12 hours.
Helpful Hints:
Refer to the "Meat & Vegetable Steaming Tables" for hints and approximate steaming times.
See the "Rice & Water Measurement Table" for approximate rice cooking times.
Steaming Tables
Meat Steaming Table
| Meat | Steaming Time | Safe Internal Temperature |
| Fish | 25 Min. | 140°F |
| Chicken | 30 Min. | 165°F |
| Pork | 30 Min. | 160°F |
| Beef | Medium = 25 Min. Medium-Well = 30 Min. Well = 33 Min. | 160°F |
Vegetable Steaming Table
| Vegetable | Steaming Time |
| Asparagus | 9-11 Min. |
| Broccoli | 6-8 Min. |
| Cabbage | 5-7 Min. |
| Carrots | 11-13 Min. |
| Cauliflower | 7-9 Min. |
| Corn on the Cob | 12-16 Min. |
| Green Beans | 9-11 Min. |
| Peas | 4-6 Min. |
| Potatoes | 28-33 Min. |
| Spinach | 2-4 Min. |
| Squash | 9-11 Min. |
| Zucchini | 9-11 Min. |
* To steam, it is recommended to add 3 cups of water using the provided measuring cup.
Helpful Hints:
Since most vegetables only absorb a small amount of water, there is no need to increase the amount of water when steaming a large serving of vegetables.
Steaming times may vary depending upon the cut of meat being used.
To ensure meat tastes its best, and to prevent possible illness, check that meat is completely cooked prior to serving. If it is not, simply place more water in the inner pot and repeat the cooking process until the meat is cooked.
Note:
- Altitude, humidity and outside temperature will affect cooking times.
- These steaming charts are for reference only. Actual cooking times may vary.
- It is possible to steam at any point during the grain cooking cycle. However, it is recommended that you steam during the end of the cycle so that steamed food does not grow cold or become soggy before the rice is ready.
SOUP
- Add ingredients to the inner pot.
- Place the inner pot into the cooker and close the lid securely.
- Plug the power cord into an available 120V AC wall outlet.
- Press the (
![]() ) button to turn on the cooker.
) button to turn on the cooker. - Select Soup and press (+) or (-) to increase or decrease time by 1 hour increments. Soup can be set 2 to 8 hours.
- Once the time is selected, the cooker will beep to indicate it is setting at the displayed time. The display will stop flashing to indicate it has set.
- When the liquid reaches a boil, the digital display will count down in one minute increments from the selected time.
- Using caution to avoid escaping steam, open the lid and stir occasionally with a long-handled wooden spoon.
- Once complete, the cooker will automatically switch to Keep Warm.
- When finished serving, turn the cooker off by pressing (
![]() ) and unplugging the power cord.
) and unplugging the power cord.
When cooking time has expired, the rice cooker will go into Keep Warm. Follow the recipe carefully and do not leave the rice cooker unattended.
Do not use the provided serving spatula or soup ladle to cook soup or sauté. They are for serving, and are not intended to be used in contact with high temperatures.
Use a long-handled wooden or heat-safe spoon to stir food while cooking soup or sautéing.
Note:
- Before placing the inner pot into the rice cooker, check that it is dry and free of debris. Adding the inner pot when wet may damage the cooker.
SAUTE-THEN-SIMMER
- Plug the power cord into an available 120V AC wall outlet.
- Press the (
![]() ) button to turn on the cooker.
) button to turn on the cooker. - Add a thin layer of oil to the inner pot then press the Sauté-then-Simmer button. Close the lid and allow the oil to preheat for 2-4 minutes.
- Add ingredients to be sautéed to the inner pot. Stir occasionally with a long-handled wooden utensil to sauté evenly.
- Add any other called for ingredients and liquid to the inner pot then securely close the lid. After a few minutes, the cooker will automatically switch to simmer mode.
- Once the meal has cooked, the cooker will beep and automatically switch to Keep Warm.
- When finished serving, turn the cooker off by pressing the (
![]() ) button and unplugging the power cord.
) button and unplugging the power cord.
EGGS
- Using the provided measuring cup, add 3 rice measuring cups of water to the inner pot.
- Place the inner pot into the cooker.
- Place up to 9 large eggs in the provided steam fray.
- Place the steam tray into the cooker and close the lid securely.
- Plug the power cord into an available 120V AC wall outlet.
- Press the (
![]() ) button to turn on cooker.
) button to turn on cooker. - Press Eggs and use the (+) or (-) buttons to adjust the cook time between 6 minutes (for soft boiled) and 14 minutes (for hard boiled).
- Once the time is selected, the cooker will beep to indicate it is setting af the displayed time.
- The display will stop flashing to indicate it has set. When the water reaches a boil, the digital display will count down in one minute increments from the selected time.
- Once the selected time has passed, the cooker will beep and switch to Keep Warm.
- Use caution when opening the lid as there will be escaping steam. Using a utensil, remove the eggs and place in a cold bath of water to prevent eggs from cooking further.
- When finished removing eggs, turn the cooker off by pressing (
![]() ) and unplugging the power cord.
) and unplugging the power cord.
Note:
- Before placing the inner pot into the rice cooker, check that it is dry and free of debris. Adding the inner pot when wet may damage the cooker.
- Food should not be left in the cooker on Keep Warm for more than 12 hours.
REHEAT
- Place food into inner pot. Make sure food is stirred and not clumped. If food is dry, stir in a small amount of water.
- Press the (
![]() ) button to turn on the cooker.
) button to turn on the cooker. - Press the Reheat button.
- The cooker will beep and a chasing pattern will be in the display.
- Once the reheating is complete, the cooker will automatically switch to Keep Warm.
- When finished serving, turn the cooker off by pressing (
![]() ) and unplugging the power cord.
) and unplugging the power cord.
OATMEAL
- Using the provided measuring cup, add oatmeal to the inner pot.
- Fill with water according to packaging instructions or refer to the "Multigrain & Water Measurement Table".
- Place the inner pot into the cooker and close the lid securely.
- Plug into an available 120V AC outlet. Press the (
![]() ) button to turn on the cooker.
) button to turn on the cooker. - Press Oatmeal to begin cooking.
- The cooking indicator light of the selected function will illuminate.
- Once cooking is complete, the cooker will automatically switch to Keep Warm.
- When finished serving, turn the cooker off by pressing (
![]() ) and unplugging the power cord.
) and unplugging the power cord.
CAKE
- Prepare one pre-packaged cake mix according to the instructions.
- Spray the inside of the inner pot with nonstick spray then pour the cake mixture into the inner pot
- Place the inner pot into the cooker and close the lid securely.
- Plug the power cord into an available 120V AC wall outlet.
- Press (
![]() ) to turn the cooker on.
) to turn the cooker on. - Press Cake. The cooker will beep to indicate it has set.
- Once cooking is complete, the cooker will automatically switch the Keep Warm.
- When finished serving, turn the cooker off by pressing (
![]() ) and unplugging the power cord.
) and unplugging the power cord.
Note:
- Cooking time cannot be adjusted for the Cake function
RISOTTO
- Plug the power cord into an available 120V AC wall outlet.
- Press the (
![]() ) button to turn on the cooker.
) button to turn on the cooker. - Add a thin layer of oil to the inner pot then press the Risotto button. Close the lid and allow the oil to preheat for 2-4 minutes.
- Open the lid and add aromatics or other ingredients to sauté. Stir occasionally with a long-handled wooden utensil to sauté evenly.
- When finished sautéing, add any other desired ingredients to the inner pot and stir to combine.
- Add in the risotto's liquid base. Close the lid and allow the cooker to heat and simmer.
- When the cooking cycle is completed, the cooker will beep and automatically switch to Keep Warm.
- When finished serving the risotto, turn the cooker off by pressing (
![]() ) and unplugging the power cord.
) and unplugging the power cord.
Note:
- The Risotto function uses out patented Sauté-then-Simmer technology that begins by applying high heat for sauteing then automatically switches to simmer mode once liquid is added
RECIPES
Frittata
| 2 | bell peppers, diced |
| 1 cup | baby spinach |
| 1 | zucchini, sliced into thin rounds |
| 8 | eggs |
| 1 cup | half and half |
| 4 tbsp | cheddar cheese, grated |
| 2 tbsp | olive oil |
| ---- | salt and pepper, to taste |
Heat up olive oil in the inner pot by selecting the Sauté-then-Simmer function. Add the bell pepper, spinach, and zucchini. Close the lid and allow the veggies to cook. Stir occasionally with a long-handled wooden spoon. In a separate bowl, whisk together the eggs, cheese, salt, pepper, and half-and-half. Once the vegetables are slightly softened, add the egg mixture and close the lid. The cooker will continue cooking and automatically switch to Keep Warm. When frittata is ready, flip onto a plate and serve.
SERVES 12.
Jambalaya
| 2 lbs | spicy smoked sausage |
| 2 lbs | shrimp, peeled and deveined |
| 3 cups | white rice |
| 4 oz. | chicken broth |
| 1/2 | jalapeno, diced |
| 2 tbsp | creole seasoning |
Cut the sausage in half, lengthwise, then into 1/4" half circles. Add all ingredients to the inner pot and mix well. Place the inner pot in the cooker and close the lid. Select the White Rice function. The cooker will automatically switch to Keep Warm when ready. Stir well and serve in bowls with additional seasoning.
SERVES 8.
Pulled Pork
| 2 lbs | boneless pork loin |
| 1/2 | yellow onion, sliced |
| 5 tbsp | chili powder |
| 8 oz. | BBQ sauce |
| 1/2 cup | water |
Add all of the ingredients to the inner pot. Close the lid and set for 7 hours on Slow Cook by pressing the (+) and (-) buttons to adjust the cook time. When done, shred with a fork and serve on slider buns.
SERVES 12.
One-Pot Pasta
| 2 cups | bow tie pasta |
| 2 2/3 cups | chicken broth |
| 1 cup | marinara sauce |
| 1 cup | parmesan cheese |
| 1 tsp | olive oil |
| ---- | basil leaves for garnish (optional) |
Combine all ingredients except the parmesan cheese in the inner pot. Ensure they are evenly mixed. Close the lid and press White Rice. Allow to cook, opening the lid and stirring a few times throughout the cooking cycle. When the cooker switches to Keep Warm, open the lid and stir in the cheese until melted. Serve hot and garnish with basil leaves.
SERVES 4.
For additional recipes, visit us at www.AromaCo.com or at www.AromaTestKitchen.com
IMPORTANT SAFEGUARDS
Basic safety precautions should always be followed when using electrical appliances, including the following:
![]()
Read all instructions carefully before first use.- Do not touch hot surfaces. Use the handles or knobs.
- Use only on a level, dry and heat-resistant surface.
![burn hazard]()
![shock hazard]()
To protect against fire, electric shock and injury to persons, do not immerse cord, plug or the appliance in water or any other liquid. See instructions for cleaning.- Close supervision is necessary when the appliance is used by or near children.
- Unplug from outlet when not in use and before cleaning. Allow unit to cool before putting on or taking off parts and before cleaning the appliance.
- Do not operate any appliance with a damaged cord or plug or after the appliance malfunctions or has been damaged in any manner. Contact Aroma customer service for examination, repair or adjustment.
![burn hazard]()
![shock hazard]()
The use of accessory attachments not recommended by Aroma Housewares may result in fire, electrical shock or injury.- Do not use outdoors.
- Do not let cord touch hot surfaces or hang over the edge of a counter or table.
- Do not place on or near a hot gas or electric burner or in a heated oven.
- Do not use the appliance for anything other than its intended use.
- Extreme caution must be used when moving the appliance containing rice, hot oil or other liquids.
- Do not touch, cover or obstruct the steam vent on the top of the cooker as it is extremely hot and may cause scalding.
- Use only with a 120V AC power outlet.
- Always unplug from the plug gripping area. Never pull on the cord.
- The cooker should be operated on a separate electrical circuit from other operating appliances. If the electrical circuit is overloaded with other appliances, the appliance may not operate properly.
- Always make sure the outside of the inner pot is dry prior to use. If the inner pot is returned to the cooker when wet, it may damage or cause the product to malfunction.
- Use extreme caution when opening the lid during or after cooking. Hot steam will escape and may cause scalding.
- Food should not be left in the inner pot with the Keep Warm function on for more than 12 hours.
- To prevent damage or deformation, do not use the inner pot on a stove top or burner.
- To disconnect, first power off the unit, then remove the plug from the wall outlet.
![]()
To reduce the risk of electrical shock, cook only in the removable inner pot provided.- Do not wrap or tie cord around appliance.
![]()
Intended for countertop use only.![]()
Spilled food can cause serious burns. Keep appliance and cord away from children. Never drape cord over edge of counter, never use outlet below counter, and never use with an extension cord.![]()
To avoid spills and burns, do not carry cooker by the lid handle.![]()
Do not use for deep frying.- Do not immerse in water.


Short Cord Instructions
A short power-supply cord is provided to reduce the risks resulting from it being grabbed by children, and becoming entangled in or tripping over a longer cord.

Spilled food can cause serious burns. Keep appliance & cord away from children.

NEVER
- Drape cord over edge of counter.
- Use outlet below counter.
- Use extension cord.
Polarized Plug
 This appliance has a polarized plug (one blade is wider than the other); follow the instructions below:
To reduce the risk of electric shock, this plug is intended to fit into a polarized outlet only one way. If the plug does not fit fully into the outlet, reverse the plug. If it still does not fit, contact a qualified electrician. Do not attempt to modify the plug in any way.
If the supply cord is damaged, it must be replaced by the manufacturer, its service agent or a similarly qualified person in order to avoid a hazard.
THIS APPLIANCE IS FOR HOUSEHOLD USE ONLY.
SERVICE & SUPPORT
In the event of a warranty claim, or if service is required for this product, please contact Aroma customer service toll-free at:
1-800-276-6286
M-F, 8:30am-4:30pm, Pacific Time
Or we can be reached online at:
CustomerService@AromaCo.com
Aroma Housewares Company
6469 Flanders Drive, San Diego, CA 92121, U.S.A.
1-800-276-6286 | www.AromaCo.com
M-F, 8:30am - 4:30pm, Pacific Time
Stay connected for more recipe ideas and monthly giveaways!

www.AromaTestKitchen.com

/AromaHousewares
©2021 Aroma Housewares Company | All rights reserved.

Documents / Resources
References
![www.aromaco.com]() Kitchen Countertop Cooking Products - Aroma Housewares
Kitchen Countertop Cooking Products - Aroma Housewares![www.aromatestkitchen.com]() Rice Cooker Recipes - Slow Cook, Steam and Grill - Aroma Housewares
Rice Cooker Recipes - Slow Cook, Steam and Grill - Aroma Housewares
Download manual
Here you can download full pdf version of manual, it may contain additional safety instructions, warranty information, FCC rules, etc.
Download Aroma 20 cup Digital Rice & Grain Multicooker ARC-5200SB Manual
Advertisement


Need help?
Do you have a question about the ARC-5200SB and is the answer not in the manual?
Questions and answers