Advertisement
- 1 AEEZO Frame Overview
- 2 AEEZO Dream 01 Specifications
- 3 Initial Setup
- 4 Download the Frameo App on Your Phone
- 5 Connecting to a Frame
- 6 Sharing Photos & Videos from Frameo to an AEEZO Frame
- 7 Quick Menu
- 8 Detailed Settings Menu
- 9 My frame
- 10 Manage photos
- 11 My Friends
- 12 Display
- 13 Slideshow
- 14 Wi-Fi
- 15 Notifications
- 16 Backup and Restore
- 17 Help & About
- 18 Warranty & Contact Us
- 19 Documents / Resources

AEEZO Frame Overview

- Frame Stand
- Power Button
- Hold the power button for about 5 seconds to power on the frame.
- When the frame is on, press the power button once to turn the screen on or off.
- Hold the power button for about 2 seconds to get power off options. To avoid any possible damage to the frame, please do not unplug the power adapter from the frame while the device is on.
- Reset Button
- Micro USB Port
The micro USB port is for use with flash storage devices (USB/thumb drive) for importing and exporting photos. In order to use this function, you will need an adapter which is not included with the frame. Note that photos cannot be displayed directly from a USB drive. Additionally, the frame cannot be connected to a computer via the micro USB port. - microSD Card Slot
microSD cards can be used to import photos to the frame. Photos can also be exported to a microSD card from the frame to make a backup or move to a computer, etc. Note that photos cannot be displayed directly from a microSD card. Please ensure that your microSD card is using FAT32 or NTFS file system. If not, you can reformat the card to one of these file systems. - DC (Power) Port
- Speakers
AEEZO Dream 01 Specifications
| Screen | 9.7-inch Touchscreen |
| Resolution | 2048 x 1536 2K IPS FHD display |
| Wi-Fi | 5GHz / 2.4GHz |
| CPU | Quad-core A53 1.8G |
| GPU | Mali-T760 732MHz |
| RAM | 2G DDR3 |
| Storage* | 16G |
*Storage specifications refer to capacity before formatting. Actual formatted capacity will be less.
Initial Setup
- Plug in the power adapter included in the box to turn on the frame.
- You may need to wait for up to 15 seconds as the Frameo system is loading.
- Follow the prompts to set up the frame. You can use the touchscreen to navigate through the setup menus.
- First start by selecting a language. This will be used as the system language and in all menus.
- Connect your frame to the internet by selecting a Wi-Fi network and entering the password.
- If a newer version of the Frameo software is available, then you will be prompted with an update dialog. It is recommended that you update your frame immediately if prompted.
- Enter your name and the location where you will place the frame (e.g. "John Smith" and "Living room," "Kitchen," or "Office.") Finally, set the time zone.
- Select a language

- Connect to Wi-Fi

- Update to the latest version

- Enter your name


Your frame is now online. You can proceed to link your frame to mobile devices and start sharing photos and videos.
Download the Frameo App on Your Phone

To share your special moments with AEEZO digital photo frames from anywhere in the world, start by downloading the free app Frameo on your mobile device.
Search "Frameo" in the App Store (iOS) or on Google Play (Android) to download Frameo:


Or scan the QR code below:

Follow the prompts in the app to set up your profile, including your name and profile picture.
Connecting to a Frame
In order to send pictures to an AEEZO frame, you need to connect to the frame using the Frameo App. Follow the steps below to connect.
- Tap the add friend icon
![]() on your frame. A box will appear with a unique code which is valid for 12 hours.
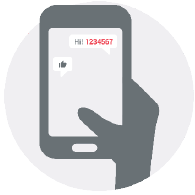
on your frame. A box will appear with a unique code which is valid for 12 hours. - Now go to the Frameo app on your phone and click the add friend icon
![]() in the top right corner, then enter the code from the frame. Your mobile app is now connected to the frame.
in the top right corner, then enter the code from the frame. Your mobile app is now connected to the frame. - Share the frame code with your friends or family. They can add the frame and start sharing photos to the frame. There is no limit to the number of mobile users that can connect to the frame.
 on your frame. A box will appear with a unique code which is valid for 12 hours.
 in the top right corner, then enter the code from the frame. Your mobile app is now connected to the frame.
- Download the Frameo app on your phone
![]()
- Click the add friend icon on your frame
![]()
- Share the code
![]()
- Enter the code in the Frameo app
![]()
- You can now send photos from your phone to the frame
![]()


Sharing Photos & Videos from Frameo to an AEEZO Frame
Once you have connected to a frame on the mobile app, you can select photos and videos to share to the frame. If sharing from your gallery, you can send up to 10 photos at a time or send one short video (up to 15 seconds). You can also take photos or video directly in the app.
The Frameo app

Quick Menu
Simply tap the screen once, and the quick menu will appear. You can use this menu to adjust/hide the current photo and to access the gallery or other settings.

Gallery
View all photos stored in the frame. Settings Enter the detailed settings menu.
Hide photo
Tap this to make the current photo no longer appear in the slideshow. The photo will not be deleted.
Fit to frame
The photo will be fully displayed on the frame in either orientation. Extra background space will be blurred out. This only applies to the current photo.
Fill frame
The photo will be cropped to fully fill the screen in either orientation. (Note: you can set the default display mode for all photos in Settings - Slideshow)
Adjust photo
Adjust which part of the photo is displayed while using fill frame mode.
Detailed Settings Menu
Tap the screen to access the quick menu, then tap the Settings icon  to view detailed settings and options for the frame. In settings, you can personalize your frame to meet your needs.

Detailed Settings Menu
My frame
Frame name
Changes the name of your frame. This name will also be seen by friends and family in their list of connected frames in the Frameo app.
Frame location
Changes the listed location of your frame. This location is displayed on your friends' and family's list of connected frames to help distinguish them from each other.
Set language
Sets the system language used throughout your frame.
Set time zone
Sets the time zone that will be used on your frame for features like sleep mode.
Manage photos
Photos stored
Shows total number of photos/videos on the frame and amount of available storage space.
Show/hide photos
Select which photos to hide by clicking them once. Hidden photos will not be displayed in the slideshow, however, they will not be deleted and can always be unhidden for future use. Use  to hide or show all photos.
Delete photos
Select photos that you want to permanently delete from your frame by clicking them once. Use  to select or deselect all. Then click the trash can icon
  in the top right corner to permanently delete.
Import photos
You can import photos from a microSD card or USB flash drive. Insert the microSD card or USB flash drive, then select the photos that you want to import to your frame. Use  to select or deselect all. Then click the import button in the top right corner to start importing. If both microSD card and USB drive are inserted into the frame, it will only recognize the one that was inserted last. At this time, videos cannot be imported from external storage.
Export photos
You can use a microSD card or USB flash drive to export all photos from the frame to external storage. Note that the frame does not support being plugged into a computer directly via USB.
My Friends
This page contains a list of all people that are allowed to send photos to your frame.
Friend settings
Here you can give permission for the friend to share the frame code with others. You can also delete a friend if you no longer want to receive photos from them.
Delete friend
To remove a person from your friends list, tap delete friend. They will no longer have permission to send photos to your frame. You also have the option to delete all photos from this person at the same time.
Add friend
To allow a new person to send you photos, simply tap the add friend button  and share the frame code with that person. They will be added automatically once they connect to the frame through the mobile app.
Display
Brightness level
Adjust the brightness level of the screen.
Sleep mode
Sleep mode allows you to reduce power consumption by automatically turning off and waking up the device at set times. The default setting turns off the screen at 11:00 pm and wakes it up at 7:00 am. You can adjust the start/end time as desired.
 Note: Your frame is not powered down while sleep mode is on, so it will not affect your ability to receive photos.
Slideshow
Timer
Define the duration each photo is displayed.
Show caption
Friends can add captions to photos when they share them to the frame. Check this option to display captions in the slideshow. Uncheck to hide captions.
Fill frame
You can choose between two modes as the default way to display photos.
Fill frame: Photos will be cropped to fully fill the screen in either orientation.
Fit to frame: Photos will be fully displayed on the frame in either orientation. Extra background space will be blurred out.
Photo display order
You can choose to display photos ordered by date or shuffled.
Video
You can adjust video volume, turn on/off autoplay, and change video playback mode.
Wi-Fi
Select a Wi-Fi network to connect to. If you are connecting to a network with a captive portal, a web browser icon should appear in top right corner of the screen. Click it to open a browser where you can enter credentials to access the network.
Notifications
Turn on/off notifications for a variety of items and adjust notification volume.
Backup and Restore
Back up frame to external storage
To back up the photos on the frame to a microSD card, follow the below steps:
step 1: Insert microSD card into the microSD card slot.
step 2: Tap the screen and go to "Settings"
step 3: Go to "Backup and Restore"
step 4: Tap "Back up frame to external storage"
When complete, you will see "Last successful backup: (Date & Time)" appear underneath.
Note: Any existing backup on the microSD card will be overwritten!
Automatic backup
If checked, your frame will automatically make a backup within 30 hours of you receiving new photos or making changes on your frame.
Reset frame
Removes all data from your frame. This will permanently remove all your photos/videos, friends, and settings.
Help & About
Share anonymous analytics data
Sharing anonymous analytics data helps tremendously with improving the Frameo software. We understand if you do not wish to share this data with us. Set as checked if you wish to help us improve Frameo. Set unchecked to deny the sharing of anonymous analytics data.
Guide
Opens the quick start guide that is shown during initial setup of the frame.
Check for update
Check for available software updates and download/install them on your frame.
Warranty & Contact Us
Thanks for choosing an AEEZO Digital Photo Frame. We provide lifetime customer support and a one-year quality warranty. If you have any questions or problems with our products, feel free to contact us at support@aeezotech.com or call +1-866-666-0702. We typically respond within 24 hours.
Your satisfaction is our priority.

Documents / Resources
References
Download manual
Here you can download full pdf version of manual, it may contain additional safety instructions, warranty information, FCC rules, etc.
Advertisement


Need help?
Do you have a question about the Dream 01 and is the answer not in the manual?
Questions and answers