Advertisement
BEFORE FIRST USE
- Remove all packaging, stickers, and labels from the air fryer, including the tape securing the basket to the unit.
- To pull out the basket for cleaning, secure the unit with one hand and pull the basket handle straight back with the other hand.
- Thoroughly clean the basket and crisper tray with hot water, dishwashing liquid, and a non-abrasive sponge.
- Wipe the inside chambers and outside of the air fryer with a moist cloth.
- NOTE: During the first few uses, there might be a "hot plastic" smell. this is perfectly normal in new air fryers as the material is heated for the first time. the smell will go away after the first few uses.

Do not put anything on top of the air fryer.
Do not place the air fryer against a wall or against other appliances It is important to leave at least 4 inches of free space above and around all sides of the air fryer to allow for proper ventilation.
Do not fill the basket with oil, frying fat, or any other liquid; this appliance works by circulating hot air.
To avoid the risk of fire:
- NEVER place the air fryer on a gas or electric stovetop, even if the stovetop is off.
- If using parchment paper or other liner, always be sure there is food on top of the liner to weigh it down and keep it safely secured in place.
Oil Spray
NOTE: When spraying food for a crispier finish, we recommend using regular cooking oil instead of cooking spray, as the latter may damage the accessories.

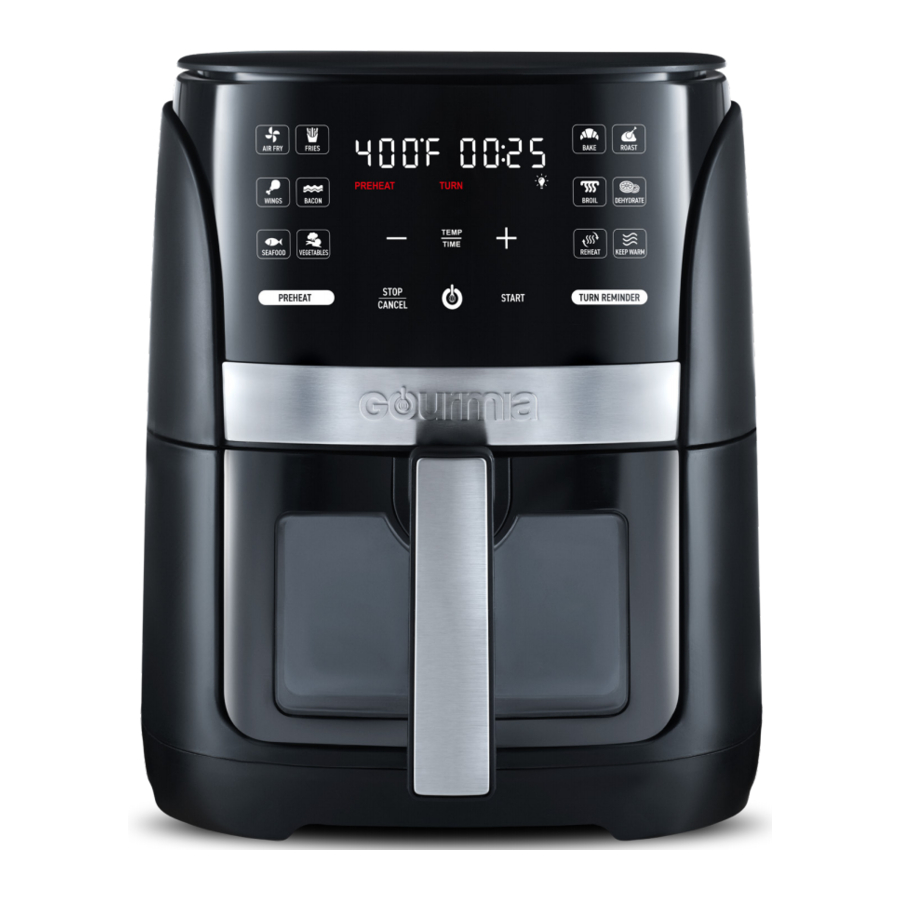
KNOW YOUR AIR FRYER

Crisper Tray
Place the crisper tray into the bottom of the basket.

NOTE: The silicone bumpers on the crisper tray should be left on during use They are food grade and BPA-free The bumpers can be removed for cleaning
Control / Display Panel

Tap PREHEAT to enable or disable preheating Set before tapping START.
PREHEAT will appear in red on the display when preheat is enabled.
Tap TURN REMINDER to enable or disable a turn reminder halfway through cook time. Set before tapping START.
TURN will appear in red on the display when turn reminder is enabled.
Display Messages and Sound
Below are messages and indicators for guided cooking prompts.
Air fryer is preheating.

Air fryer is done preheating, ready for food.

Air fryer is ready for you to turn or toss your food.

Cooking has ended.

Toggle Fahrenheit and Celsius
To toggle between displaying temperature in Fahrenheit (°F) and Celsius (°C), press and hold  .
.
Mute Air Fryer
To silence the air fryer's beeping sound, press and hold  . Press and hold again to turn the sound on.
NOTE: The air fryer will still beep for guided cooking prompts.
USING YOUR AIR FRYER
A step-by-step guide on setting up and getting started with your new Gourmia Air Fryer.
Set up Your Air Fryer
- Place air fryer on a stable, level, and heat-resistant surface.
![]()
- Place the crisper tray into the bottom of the basket and slide the basket into the air fryer.

- Plug air fryer into an outlet.
![]()
- Tap power icon to turn on air fryer.
![]()


Select Your Settings
- Tap desired preset The display will show the preset's temperature and time.

- Tap
![]() to adjust temperature / time.
to adjust temperature / time.
Tap plus and minus icons to increase and decrease temperature / time.

- Tap PREHEAT/TURN REMINDER to enable or disable these settings. PREHEAT/TURN appear in red on the display when those settings are enabled.

PREHEAT and TURN REMINDER are on by default for select presets. See Presets Chart.


Preheat/Start Cooking
Adding Your Food with preheat enabled:
- Tap START.

- Display will show
![]() (Pre Heat). Air fryer begins preheating.
(Pre Heat). Air fryer begins preheating.

- Once preheated, air fryer will beep and display will show
![]() (Add Food).
(Add Food).

![]()
The basket will be hot! Do not touch hot surfaces. - Remove the basket carefully, place food inside, and return it to the air fryer to automatically begin cooking.

NOTE: If the basket is not removed, the cook time will begin regardless.

 (Pre Heat). Air fryer begins preheating.


Adding Your Food if preheat is Disabled:
- Remove the basket, place food inside, and return it to the air fryer.

- Tap START.


IMPORTANT NOTICE:

Use Caution when removing the basket during / after cooking—hot steam may escape!

The basket and food will be hot!
Do not touch hot surfaces.

Do not use sharp or metal utensils which can scratch the nonstick surface.
Turn Reminder
If TURN REMINDER is disabled skip to End of Cooktime.
- Halfway through cook time, air fryer will beep and display will show
![]() (Turn Food).
(Turn Food).

- Remove basket carefully and place on heat-resistant surface.
If basket is not removed, cooking will continue.
![]()
- Turn or toss the food using non-metal tongs.

- Return the basket to the air fryer to automatically resume cooking.
![]()


End of Cooktime
- When your selected cook time has elapsed, the air fryer will beep and the display will show
![]() (End).
(End).

- Remove the basket carefully and place it on a heat-resistant surface Remove food from the basket using non-metal tongs.


Do not turn the basket upside down, as any excess oil collected on the bottom of the basket can drip onto food. Additionally, the hot crisper tray may fall out of the basket and cause a burn.
Pause / Stop / Cancel Cooking
Tap  to stop cooking.
Tap START to resume cooking.
Tap twice to cancel cooking.

NOTE: Removing the basket from the air fryer during cooking will stop cooking. Returning the basket to the air fryer will automatically resume cooking.
Turn off Air Fryer
Press the power icon to turn off the air fryer.
Unplug the air fryer from the outlet when not in use.

Presets Chart

- indicates PREHEAT and TURN REMINDER can be enabled or disabled by tapping PREHEAT and/or TURN REMINDER before tapping START.
COOKING TIPS
For an extensive list of foods and their ideal amounts, temperature and time settings, along with preparation notes, see the Air Fry Cooking Chart and Dehydrate Chart.
- Check food for desired doneness a few minutes before cook time elapses and cook a little longer if necessary.
- Always ensure raw proteins reach food-safe temperature.
- Air fryers perform similar to ovens; follow oven instructions on item packaging or recipe.
- Snacks that can be prepared in an oven can also be prepared in the air fryer.
- Smaller ingredients usually require a slightly shorter cook time than larger ingredients.
- Preheating the air fryer before adding food will generally deliver the best results (see PREHEAT).
- When cooking multiple batches in a row, only preheat before the first batch.
- Turning or tossing food halfway through cook time will deliver evenly browned and crispy results (see TURN REMINDER).
- Toss fresh potatoes with 1 tablespoon of oil for a crispy exterior Air fry the ingredients within a few minutes after adding the oil.
- Do not cook foods that will produce a large amount of grease in the air fryer.
- Place a baking pan or an oven-safe dish or pan in the basket to bake a cake or quiche or to air fry fragile or filled ingredients.
CLEANING AND MAINTENANCE


NEVER IMMERSE CORD, PLUG, OR AIR FRYER IN WATER OR ANY OTHER LIQUID.
Do not use metal kitchen utensils or abrasive cleaning material to clean the basket or crisper tray, as this may damage the nonstick coating.
Cleaning
- Clean the air fryer after every use.
- Unplug the air fryer from the outlet before cleaning.
- Let the air fryer cool down completely before cleaning.
Remove the basket from the air fryer to cool it down quicker. - Clean the basket and crisper tray in the dishwasher's top rack only, or with hot water, dish soap, and a non-abrasive sponge.
- If residue is stuck to the bottom of the basket, fill it with hot water and dish soap and let it soak.
- Wipe the outside of the air fryer with a moist cloth.
- Clean the inside of the air fryer with hot water, dish soap and a cleaning brush to remove any food residue.
- Ensure the air fryer is completely dry before using.
Storage
- Unplug the appliance and let it cool down
- Make sure all parts are clean and dry
- Store the appliance in a clean and dry place
Environment
Do not throw away the appliance with the normal household waste at the end of its life, but hand it in at an official collection point for recycling. By doing this, you help to preserve the environment.
Guarantee and Service
If you need service or information or if you have a problem, please visit www.gourmia.com or contact your distributor.
TROUBLESHOOTING
| PROBLEM | POSSIBLE CAUSE | SOLUTION |
| The air fryer does not work | The air fryer is not plugged in. | Plug the main plug into a grounded wall socket. |
| The timer has not been set. | Tap + and - icons to set the required cook time to turn on the air fryer. | |
| The basket is not put into the air fryer properly. | Slide the basket into the air fryer properly. | |
| The basket does not fit inside the air fryer | The basket is overfilled. | Do not fill the basket beyond max line. |
| The ingredients did not cook | The set temperature is too low. | Tap + and - icons to set the required temperature setting. |
| The cook time is too short. | Tap + and - icons to set the required cook time. | |
| Food is cooked unevenly | Some foods especially smaller items need to be tossed or flipped halfway through the cook time. | Toss or flip food halfway through the cook time. (See TURN REMINDER). |
| Food is not crispy enough | The air fryer basket was overfilled. Many foods need oil to brown and crisp properly. | Cook in smaller batches, keep food in a single layer. Coat food with a small amount of oil. |
| White smoke comes out of the air fryer | You are preparing greasy ingredients. | When you fry greasy ingredients in the air fryer, a large amount of oil will leak into the basket. The oil produces white smoke and the basket may heat up more than usual. This does not affect the air fryer or the end result. |
| The basket still contains grease residue from previous use. | White smoke is caused by grease heating up in the basket. Make sure you clean the basket properly after each use. | |
Display shows (E1) (E1) | NTC open circuit | Please contact customer service |
Display shows (E2) (E2) | NTC short circuit | Please contact customer service |
Display shows (E3) (E3) | NTC temperautre over 500°F | Please contact customer service |
IMPORTANT SAFEGUARDS
Read all instructions before using the electric appliance. The following basic precautions should always be followed:
- This appliance is not intended for use by children or persons with reduced physical, sensory or mental capabilities, or lack of experience and knowledge, unless they have supervision.
- Close supervision is necessary when any appliance is used near children. Children should be supervised to ensure that they do not play with the appliance. Cleaning and user maintenance shall not be done by children unless they are supervised.
- Check if the voltage indicated on the appliance corresponds to the local main voltage before you connect the appliance.
- Do not use the appliance if the plug, the main cord or the appliance itself is damaged. Always make sure that the plug is inserted properly into a wall outlet.
- Do not operate any appliance with a damaged cord or plug, after the appliance malfunctions, or if the appliance has been damaged in any manner. Return the appliance to the nearest authorized service facility for examination, repair, or adjustment.
- Do not let the cord hang over the edge of the table or counter, nor let it touch hot surfaces.
- To protect against electric shock, do not immerse cord, plugs, or appliance in water or other liquid.
- Do not plug in the appliance or operate the control panel with wet hands.
- Never connect this appliance to an external timer switch or separate remote-control system in order to avoid a hazardous situation. To disconnect, turn off the appliance, then remove the plug from wall outlet.
- Do not place the appliance on or near combustible materials such as a tablecloth or curtain. The accessible surfaces may become hot during use. Do not place on or near a hot gas or electric burner, or in a heated oven.
- Do not place the appliance against a wall or against other appliances. Leave at least 4 inches of free space on the back and sides and 4 inches of free space above the appliance. Do not place anything on top of the appliance.
- Do not use the appliance for any other purpose than described in this manual. The use of accessory attachments not recommended by the appliance manufacturer may cause injuries.
- Do not leave the appliance unattended when plugged in.
- Extreme caution must be used when moving an appliance containing hot oil or other hot liquids.
- Do not touch the hot surfaces; use the handle. During air frying, hot steam is released through the air outlet openings. Keep your hands and face at a safe distance from the steam and from the air outlet openings. Also be careful of hot steam and air when you remove the basket from the appliance.
- After using the appliance, avoid contact with the hot metal inside.
- Unplug from outlet when not in use and before cleaning. Allow the appliance to cool before cleaning.
- Immediately unplug the appliance if you see dark smoke coming from the appliance. Wait for the smoke emission to stop before you remove the basket from the appliance.
- Do not use outdoors.
- For household use only.
Cord and Plug Safety
- A short power-supply cord is provided to reduce risk of becoming entangled in or tripping over a longer cord.
- Extension cords may be used if care is exercised in their use.
- If an extension cord is used:
- The marked electrical rating of the extension cord should be at least equal to the electrical rating of the appliance; and
- The longer cord should be arranged so that it will not drape over the countertop or tabletop where it can be pulled on by children or tripped over.
Electrical Polarized Plug
This unit has a polarized plug (one blade is wider than the other). To reduce the risk of electric shock, the plug is intended to be used by inserting it into the electrical outlet only one way. If the plug does not fit securely into the outlet, reverse the plug and re-insert. If it still does not fit, contact a qualified electrician for assistance. Do not modify the plug in any way.

| POWER | 120V~ 60Hz 1500W |
Register your product at www.gourmia.com/warranty
For customer service, questions or comments
Visit gourmia.com
Email info@gourmia com
Call 888.552.0033
Mon-Thu 9:00 a.m. to 6:00 p.m. ET
Fri 9:00 a.m. to 3:00 p.m. ET
Languages: English, Spanish, French
 @gourmia

Documents / Resources
References
Download manual
Here you can download full pdf version of manual, it may contain additional safety instructions, warranty information, FCC rules, etc.
Download Gourmia GAF616 - 6 QT Digital Window Air Fryer Manual
Advertisement


Need help?
Do you have a question about the GAF616 and is the answer not in the manual?
Questions and answers