Advertisement
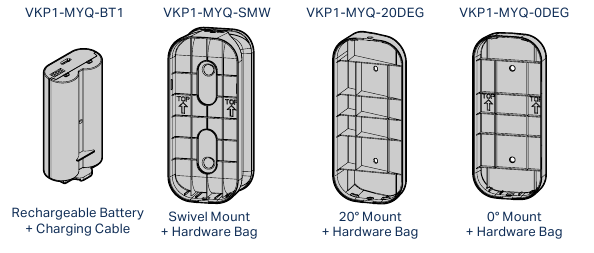
What's in the Box
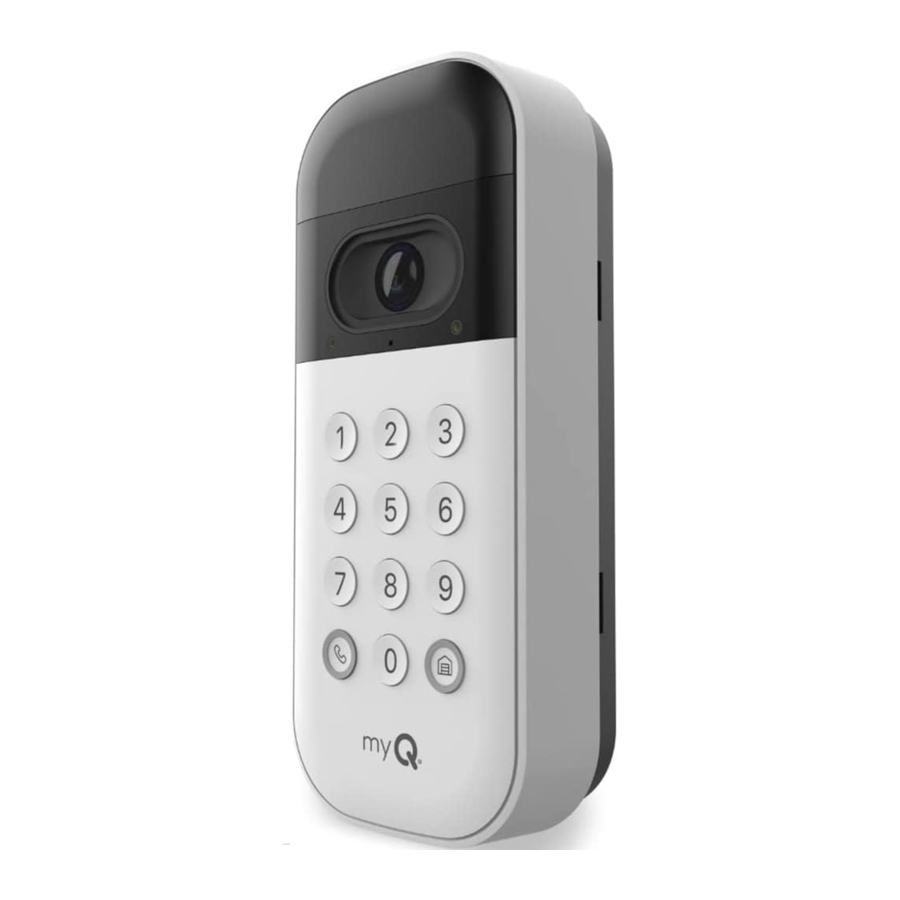
VKP1-MYQ MC | VKP1-LM MC

Video Keypad Accessories:
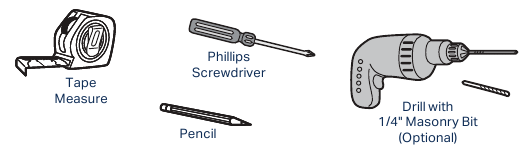
Recommended Tools:
Specifications
For use with residential garage door openers manufactured after January 1, 1993. Make sure your garage door opener has a working light bulb because it is a programming indicator.

Video Keypad Setup
Charge the Battery
Detach the back cover of your Video Keypad, remove the battery by pushing the battery's bottom tab up, and remove the protective cover.

Plug the battery into a USB power source using the cable provided. Please fully charge the battery before setting up your Video Keypad. The battery is fully charged and ready to use when the LED light on the battery changes from red to green.

NOTE: Charging your battery can take up to 10 hours.
Re-insert the battery and attach the back cover. The cover will click into place once secure. Your device will begin to power on and the Video Keypad's LED indicator will cycle through multiple colors during the reboot sequence before flashing blue.
Download the myQ App
The myQ mobile app will guide you through setting up your Video Keypad. With your smart phone, download myQ by either:
- Scanning the second QR code on the packaging insert
- Searching for "myQ" in your phone's app store
- Visiting myQ.com/app on your phone's browser
Have your Wi-Fi password available before proceeding.
Get Connected
To connect your Video Keypad, stay near your installed garage door opener. Do not mount the keypad until a later step.
In the myQ app, select the![]() icon from the home screen and select Device.
icon from the home screen and select Device.
When prompted, select Video Solution, followed by Video Keypad, and follow the in-app instructions.
Once you've completed setup within the app, let's verify your keypad is connected to your opener and able to operate the garage door:
- Enter the PIN you created on your keypad
- Press the Home Button
![]()
- Confirm the door has moved
Install Mounting Bracket
Select a location to mount your Video Keypad at a minimum height of 5 feet (1.5 m) out of reach of small children. When selecting a mounting location, consider the visual you want the camera to capture and the convenience of its placement:
- Are there any other entry points to my home I want to view?
- Is there a direction down the street I would prefer to see?
- Which side of my home is more likely to have activity I'd like to view?
- Is the keypad installed in a location that is convenient to access?
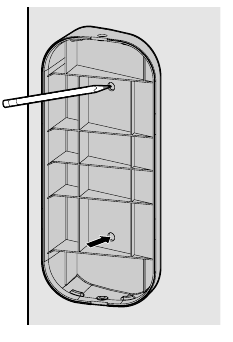
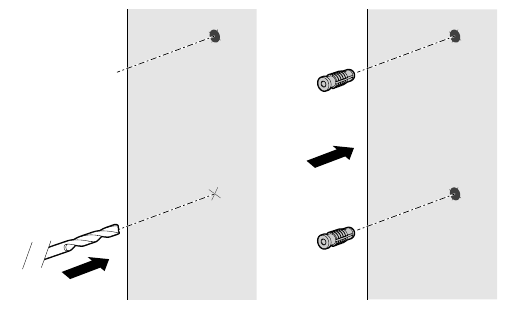
Begin by using the included mounting bracket as a template to mark the position of the bracket's mounting holes with a pen or pencil. Please note, the location of the holes may differ from your existing keypad (if applicable).
If installing your Video Keypad on stucco, brick, or concrete:
Drill holes in your wall with a 1/4" masonry bit, then insert the included wall anchors by pushing them into place or lightly tapping with a hammer. If installing on wood or vinyl siding the wall anchors are not needed, and you can skip this step.
Position the mounting bracket so that the Video Keypad is at your preferred orientation. If using the 20° mount, the bracket can be flipped to adjust the angle depending on your surroundings. We recommend positioning the keypad to be angled toward your driveway.
Using the two Mounting Screws and a Phillips screwdriver, secure the bracket by driving the screws into the wall (or anchors, if installed) through the mounting holes until flush with the bracket.
Secure to Mounting Bracket
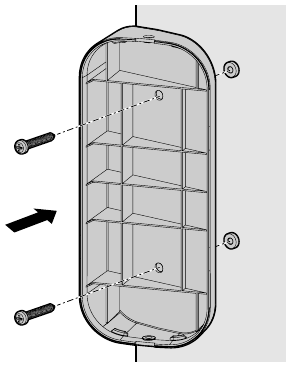
If using the 20° or 0° mounting bracket, slide the top of the Video Keypad into the ridges at the top of the bracket, then push the bottom of the keypad into the bracket.
If using the swivel mount, push the Video Keypad directly into the mount to snap it into place with the ridges on the sides of the bracket.

When removing the Video Keypad from any of the mounting brackets, firmly grasp the device from the bottom, then pull out and up.
Once your Video Keypad is attached to the mounting bracket, use a Phillips screwdriver to tighten the included short security screw into the bottom of your device to secure it into place.

DO NOT USE any screw other than the included short security screw to secure your Video Keypad. Using the wrong screw could damage the device.
Using Your Video Keypad
- To open your garage, enter an assigned PIN and then press the Home Button
![]()
- For one-touch close when your garage is open, press the Home Button
![]()
- To create an alert in the myQ app and see video in real time, press the Call Button
![]()
- Assign up to 16 unique PIN codes for family, friends and guests to open the garage door in the myQ app
- Live stream HD video 24/7 with night vision and 2-way audio
- Customize notifications and settings using the myQ app
Video Storage Plan
- What Is a myQ Video Storage Plan?
A myQ Video Storage Plan allows you to record and view videos for up to 30-days so you can see what's happening in and around your garage even when you've missed a live event. - What Additional Features Do I Get?
Enhanced features such as People Detection and Rich Notifications enable more meaningful and actionable insights. View and filter recordings in the app or download and share your videos. - How Much Does It Cost?
Plans start at $3.99 USD/month, with additional savings options for annual plans. - How Do I Explore These Features?
Your Video Keypad automatically comes with a free 30-day trial. Easily subscribe to a myQ Video Storage Plan at any time via the account settings of your app.
| Features | Included | Subscription |
| Personalized PINs | ✔ | ✔ |
| Video Calling | ✔ | ✔ |
| 2-Way Audio | ✔ | ✔ |
| Live Video Streaming | ✔ | ✔ |
| Motion Detection | ✔ | ✔ |
| Activity Alerts | ✔ | ✔ |
| Person Detection | ✔ | |
| Video Event History | ✔ | |
| Rich Notifications | ✔ |
Additional Resources
- Contact Us
For additional information or assistance, please visit: support.chamberlaingroup.com
Or give us a call:
+1 (800) 528-5880 - One Year Limited Warranty
The Chamberlain Group LLC ("Seller") warrants to the first consumer purchaser of this product that it is free from defect in materials and/or worksmanship for a period of 1 year from the date of purchase.
Because Seller cannot control the quality of products sold by unauthorized sellers, this limited warranty applies only to Products that were purchased from Seller or an authorized reseller in the United States or Canada, unless otherwise prohibited by law. Seller reserves the right to reject warranty claims from purchasers for Products purchased from unauthorized sellers, including unauthorized Internet sites.
Please refer to the label on the battery to properly recycle and dispose of the battery.
Troubleshooting
- Reset Wi-Fi
To clear existing Wi-Fi settings and connect to a new network, press and hold the Reset Button for 10 or more seconds before releasing. The LED will become solid blue before slowly blinking blue. Once the LED is blinking blue, open myQ and follow the in-app instructions to connect to a new network. -
Factory Reset
To reset the device and clear all settings, reset the Wi-Fi following the instructions above. Once the LED is blinking blue, press and hold the Reset Button again for an additional 10 or more seconds before releasing. The LED will become solid magenta before transitioning to the device boot sequence.
| LED Color | What It Means | |
 | Solid White | Device online and recording |
 | Slow Blinking White | Call Button pressed |
 | Solid Blue | Bluetooth connected |
| Reset Button pressed to clear Wi-Fi (first press) | ||
 | Slow Blinking Blue | Bluetooth discovery mode |
 | Solid Green | User viewing the live stream |
 | Slow Blinking Green | Device connected to Wi-Fi and is connecting to the Video Cloud |
 | Fast Blinking Green | Valid PIN entered and Home Button pressed |
| Home Button pressed (one-touch close) | ||
 | Fast Blinking Red | Invalid PIN entered and Home Button pressed (PIN failed) |
 | Solid Magenta | Reset Button pressed to factory reset the device and clear all settings (second press) |
 | Slow Blinking Magenta | Firmware update in progress |
 | Fast Blinking Amber | Valid PIN entered and Home Button pressed with remaining battery capacity 5% or less |
 | Alternating: Blue → Green | Device has Wi-Fi credentials, connecting to network |
 | Alternating: Magenta → Amber → Blue → Green | Device reboot in progress |

Documents / Resources
References
Download manual
Here you can download full pdf version of manual, it may contain additional safety instructions, warranty information, FCC rules, etc.
Download myQ VKP1-MYQ, VKP1-LM - Smart Garage Video Keypad Manual
Advertisement


Need help?
Do you have a question about the VKP1-MYQ and is the answer not in the manual?
Questions and answers