Freecam C310 - Solar Powered WiFi Camera Manual
- User manual (2 pages) ,
- User manual (2 pages)
Advertisement
Features
The C310 is a smart mobile wifi-camera which utilizes a solar power battery.
- C310 has built-in solar panel and rechargeable battery that make the camera self sustaining with power. (Varying regions with different amounts of sunlight will affect the battery life)
- Using solar technology and low power consumption management, the C310 can operate for an extended time without recharging.
- The C310 is in low power when in sleep mode and recording when in active mode. It is in sleep mode by default but will switch to active mode and record when "woken up".
- The C310 can be manually "woken up" with one-click by a mobile phone anywhere.
- The C310 can be automatically "woken up" if it detects movement within its field of vision. In this case the camera will start to record automatically and the user will be alerted.
- Infrared LED lights provide clear visuals at night or low light situations as well.
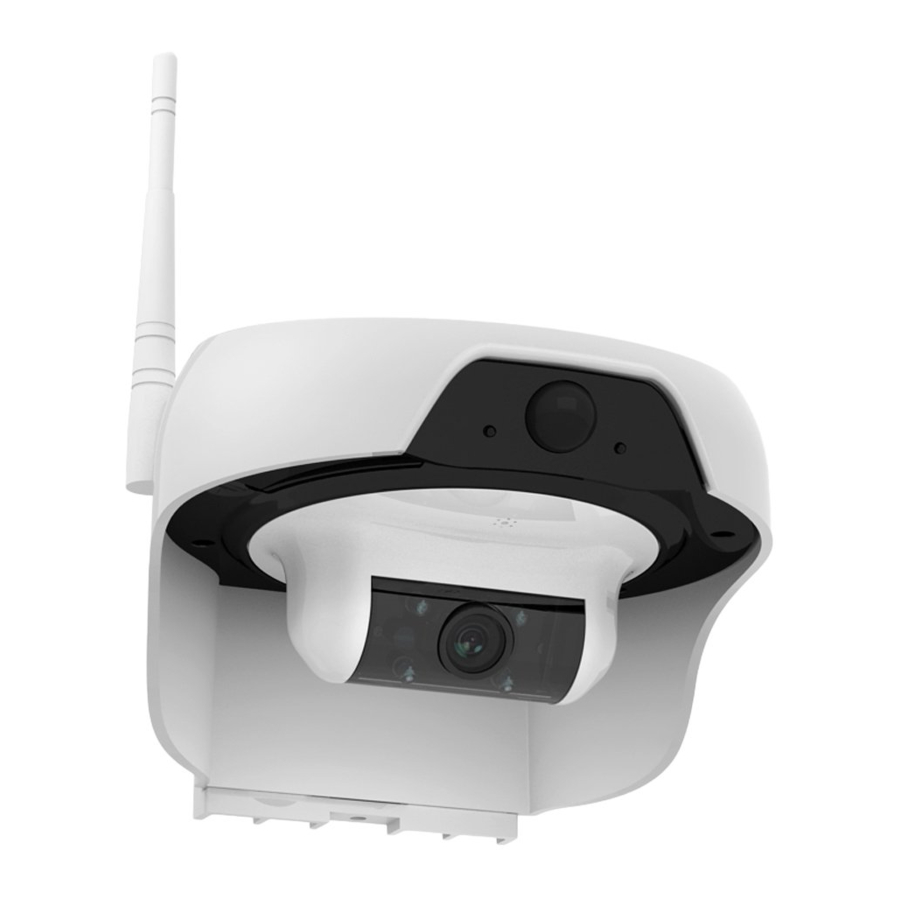
Exterior Diagram
Prior to operation of the camera, please carefully read and follow the installation and operation instructions.

- Infrared light
- Photosensitive device
- PIR sensor
- Lens
- Antenna
- Solar charge panel
- WiFi reset button
- Charging socket
- Power supply switch
- Mounting base bracket
- WiFi status indicator
- Charging indicator
Indicator Light Status
| Indicator light status | Status | Solution |
| Power, indicator green light | Solar charging indicator, brightness changs base on the solar radiant inersity | |
| Power, indicator yellow light | Power adapter charging indicator, it goes off after its fully charged. | |
| WiFi indicator Blue light blinks | Waiting for connecting | |
| WiFi Indicator Red light blinks | Connecting to WiFi | If it blinks over 1 minute and still can't connect success, please reset device and check the router's WiFi signal |
| WiFi indicator off | Normal working or power off |
Mobile Application Operation
- Power-On
- Install APP
App Name: Doby- Search "Doby" in the Apple store or Google Play store and download from the store.
![www.apple.com]()
![play.google.com]()
OR - Scan the QR code to download the app.
![]()
- Search "Doby" in the Apple store or Google Play store and download from the store.
- Register and Login:
Open the app and press [Register] to register a new account number. Choose [Login] if you have an existing account. - Add Camera


- After a successful registration and login, enter [Home]
- Press on the [+] in the up right corner
- Then select [Camera]
![]()

- Startup Camera
- Follow the instruction on the APP, press and hold the WIFI button for 3 seconds till the blue light blinks.
- Tap "Blue light is blinking" to enter the WIFI configuration page.
![]()

- Add Device
For Android & IOS Systems- Enter "go to setup"
- Select "DOG-**-*******"password is "11111111"
- Go back to DOBY APP and put WIFI name and WIFI password. Then "Next"
![]()


WiFi Reconfigure
When the password is wrong, or your network changes, you can reconfigure WiFi as shown below:
Please turn on the camera and wait for the WiFi status indicator light on, then press the WiFi reset button for 3-5 seconds until the WiFi status indicator blue light is blinking, and add camera by APP again.
- View Live Video
- On the [Home] page, select the intended device's number
- Press the play button to enter live video feed
- Playback video
Click on the time display on the live video page to select the specific date you are looking for. The recorded videos are marked with blue bar in the timeline. (You may also slide time bar to search) Click "![]() " button to playback video.the play button to enter live video feed
" button to playback video.the play button to enter live video feed
![]()
- Menu Bar
 " button to playback video.the play button to enter live video feed
-
![]() Camera: Capture the current live broadcasting screen and save it to thesmartphone album.
Camera: Capture the current live broadcasting screen and save it to thesmartphone album. ![]() Audio: Tap on speaker icon to hear sound from the camera's location.
Audio: Tap on speaker icon to hear sound from the camera's location.![]() Microphone: C310 model does not support this function (2 way audio).
Microphone: C310 model does not support this function (2 way audio).![]() Full screen: View the live video feed in landscape mode.
Full screen: View the live video feed in landscape mode.![]() Security: turn ON/OFF motion delection
Security: turn ON/OFF motion delection
 Audio: Tap on speaker icon to hear sound from the camera's location.
 Microphone: C310 model does not support this function (2 way audio).
 Full screen: View the live video feed in landscape mode.
 Security: turn ON/OFF motion delection
- Messages
Motion detection alerts
![]()

![]() Video saving,
Video saving,![]() Video sharing
Video sharing![]() Favorite video, store in【Daily great】
Favorite video, store in【Daily great】
 Video saving,
 Video sharing
 Favorite video, store in【Daily great】
- Daily great
Favorite video album.
![]()

-
![]() Settings: View device information and adjust settings
Settings: View device information and adjust settings
![]()
- (Device info): Rename your camera. Check the CID, MAC and the system version, you can also check the battery capacity and standby time.
- (WiFi): Select your network WIFI
- (Security):
[Motion detection]; ON/OFF
[Sensitivity]; Adjust between low, middle, or high
[From]: Select time to starts motion detection settings.
[To]: Select time to stop motion detection settings.
[Repeat weekly]: Repeat day selects from Monday to Sunday. - (Video settings):
[Detect alarm video]: Camera will records video for 30 seconds when motion is detected.
[Never]: select never record videos. - (Reverse): Video reverse ON/OFF is optional
- (Delete Device): Delete the current device.

- Me
![]()

- [Friends]: You can add friends from a QR code or add from your contacts.
- [Share device]: Your videos can be shared with your friends, maximum 5 persons.
- [Help & Feedback]: Learn how to use your DOBY APP from here and send us feedback with your any opinions and suggestions.
- [Settings]: Get notifications ON/OFF. Check APP version#.
- PIR Motion Detection
![]()

- If an object moves within 5 meters in front of the camera, motion detection will be triggered.
- Alarm message will be sent through push notification on the APP.
- Screenshot / live video feed / playback video will be sent.
- WiFi re-configuration
Re-configaration is necessary when change router
- Turn on the camera. WiFi indicator flashes.
- Press and hold the reset button for 3-5 sec, till the WiFi indicator flashes blue.
- Repeat the camera adding procedure.(Refer to 4.2;4.3)
Installation Illustration
The C310 can be mounted on a post or on a wall. The wall must be thick enough to hold three times the weight of the camera.
- Prior to setup and selecting location of installation:
- Confirm steady wifi signal (at least two grids of signals). If the signal is not strong enough, you may install a WiFi booster or repeater to extend the WiFi coverage.
- Select an area with sufficient sunlight. Ideally, position the camera under direct sunlight.
- Avoid areas with moving objects that may disturb the camera.
![]()
- Wall Mount Setup
- Remove the sticker and place it on the wall, where you wish to setup your camera.
- Drill holes in the 3 marked circles and insert the green expansion screw into the hole. (See Fig. 2.2)

- Align the holes of the mounting bracket with the expansion screws and secure the bracket into place. (See Fig. 2.3)

- Install the camera onto the bracket and secure it in place the screw.


- Post Mount Setup
- Bind the mounting bracket onto the post or pole with the plastic ribbons and tighten them as much as possible. (See Fig.2.4)

- Install the camera onto the bracket and secure it in place the screw.
- Bind the mounting bracket onto the post or pole with the plastic ribbons and tighten them as much as possible. (See Fig.2.4)

- Regional Sunlight Distribution (see Fig. 2.6). Identify the distribution of sunlight according to the region in which you are in. (You may need to regularly charge the camera for regions in which peak sunshine duration is within 1.0-2.9).

Note: Peak sunshine reflects the maximum solar irradiance that can be amassed – 1000 w/m2. - Operation time of this camera is determined by amount of solar charging and the number of times the camera is triggered and awoken. Fig. 2.7 depicts the relationship between these factors. Refer to Fig. 2.7 to estimate the camera's continuous working time.

- Notes:
PIR sensor is a high-sensitivity detector which is used for infrared detection of object motion. However, motion detection can be triggered by the change of background lighting change, passing by vehicles or the blowing leaves.
![caution]()
If the camera detects false alarm frequently, please use "PIR shield sheet" to reduce motion detection area. If this does not resolve the issue, you have option to turn off the motion detection function by selecting "security" option in APP and turn off the "motion detection" function in "Protection" menu. - PIR Shield Sheet Installation:


- PIR (Passive Infrared) sensor detects changes in heat signature to distinguish movement. Therefore, motion detection can be triggered by changes in sunlight; a fast moving cloud layer, automobiles passing by, and objects flying in the wind may all trigger the sensor.
- If you feel the sensitivity is too high and the device is being triggered too frequently, you may install a PIR shield sheet.
- Install the PIR shield according to Fig. 2.8.1.

- Bend the shield sheet in the five places according to Fig. 2.8.2

Note: The shaded area can change with an appropriate amount according to the bending angle of the shield sheet.


- Note: The shaded area can change with an appropriate amount according to the bending angle of the shield sheet.
Product Dimension
(Dimension: mm)

Accessories

- Installation sticker × 1
- Mounting base bracket × 1
- Screw set × 1
- PIR shield sheet × 1
- Charging cable × 1
- Operation instruction of the product× 1
- Zip tie x 2
Technical Parameters
| Item | Specification |
| Product model | Solar Intelligent WiFi camera |
| Lens | 3.6mm / M12/90 degrees |
| Video | H.264 encoding |
| Audio | Support one way audio |
| WiFi | Support IEE802.11b / g / n protocols(2.4GHz) |
| Infrared fill light | Support |
| PIR Motion Detection | Motion detect range ≈ 15 Feet (5 meters) |
| Cycle time | If there is no operation within 30 seconds after trigger is started, enter the sleep state |
| Network P2P Connection | Support |
| Battery power indicator | APP support |
| Standard solar panel | Maximum output current is 150mA@5.5V, which will change according to solar intensity and incident angle |
| Expandable storage space | Expandable storage space: Built-in 16GB Micro TF card |
| Standby Time | 6,800mA, up to 8 months based on 10 events per day. |
| Event Recording | Record up to 2500 event (30 sec) without charging. 8 hours sunlight allows 480 event recording daily. |
| Dimension | 7" X 7" X 8" (161 X 155 X 108 mm) |
| Net weight | 1.7 Lb |
| Waterproof level | IP 55 |
Common problems and solutions
- Q: What do I do when I get error message when I try to add camera.
A: There are several causes leading to equipment adding failure:
- Time-out error during adding camera on the App.
Solution: If the WiFi status indicator blinks red over one minute, please press the reset button for 3-5 seconds until the WiFi status indicator becomes blinking blue, then confirm if the router signal is strong enough and input correct router password to re-add the camera. - On some Android phones, App prompts a message "Please input the default password, 11111111"
Solution: The failure is caused by abnormal connection between mobile phone and camera hot spot.
Please access to WiFi setup interface of your mobile phone to connect to the camera hot spot "DOG-***" manually. Then return to the app to add the camera. If this does not work, please turn off the mobile phone WiFi and turn it back on again. Repeat the above manual connection method to add the camera.
- Q: Can solar intelligent WiFi camera C310 work all the time? What happens when the battery is fully drained?
A: The equipment can be used for long-term in case of 4-5 days of sun irradiation charging every month and 10-20 times of triggering actions. If it displays as low battery:
- Minimize waking up the camera from false alarm by installing PIR shield.
- Charge the camera using power adapter provided.
- Q: How to access the recorded video on micro TF card built-in inside the camera?
A: The videos stored in the camera can be searched and playback using "Doby" app installed on your mobile phone. - Q: What do I do if I did not receive the verification code when I signed up?
A: Please kindly check if your phone is out of service, If not, please reboot to try. - Q: What does it mean when the app says "network connection failure"?
A: There are several reasons for a network connection failure.
Two of the main reasons are that a user typed in the wrong password and there is a weak wifi signal. In some cases, a router has a special setting (such as hotels) where you need to log in to the company web page to verify portal to get access to internet. The camera won't work with this kind of router setting. - Q: My device keeps on going "offline".
A:
- Please make sure the wifi password is correct.
- Please make sure you have an internet access from your router.
- Please check if wifi have special setting(such as hotels) need to log in to the web page to verify portal to get access to internet. This function is not available for now.
- Q: I cannot connect to see the live video on my phone.
A: Please check the data traffic on the up right corner. If it is not 0Kb, and your app keeps on searching or cannot connect, this probably caused by short bandwidth of your internet service. (Please check with your internet provider to make your that you have at least 40kb/s feasible bandwidth). - Q: Can more than one person access the camera to view videos?
A: More than one person can access the camera to view live videos, BUT the camera would not allow more than one person to access the camera at the same time. - Q: My alarm does not work even after I clicked Protection.
A: Please check if your camera is on "At home" mode. If your camera is on "at home" mode, all device will be on the standby status where motion detection, message notification or recording function stops functioning. - Q: If device do not have TF card in it, will it record video?
A: Camera needs TF card to be able to record. - Q: How much data does my camera use?
A: Live video will need about 2Mb per minute. If you use audio function, it need about 0.4Mb more per minute. - Q: My app cannot find a camera.
A: Please make sure that wifi is connected on your phone.
Then check if the wifi indicator on your camera is blinking blue light. If not, please press the wifi set up button for 3 seconds until the wifi indicator light blinks. - Q: How long can TFcard record?
A: If you use 16GB memory card, motion detection recording mode will last a year based on 10 events a day.
* Please follow the link: www.freecamglobal.com ;
for more FAQ(Frequently Asked Questions) solutions
Shenzhen Leshi Video Technology Co., Ltd.

Documents / Resources
References
Download manual
Here you can download full pdf version of manual, it may contain additional safety instructions, warranty information, FCC rules, etc.
Advertisement


Need help?
Do you have a question about the C310 and is the answer not in the manual?
Questions and answers