Table of Contents
Advertisement
Quick Links
M5Stack smart CAT-CIV display - User Guide
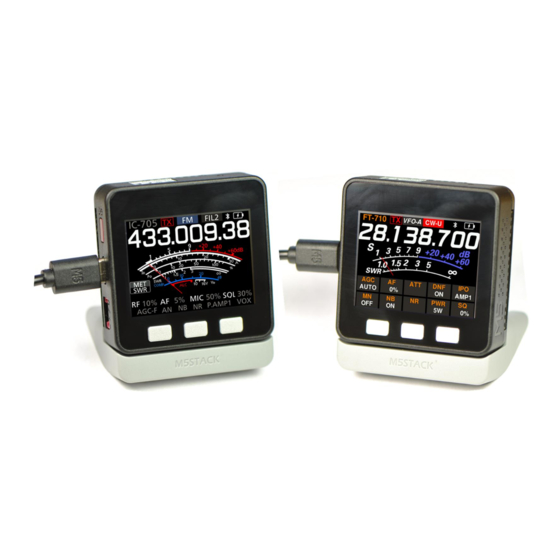
M5Stack smart CAT/CIV display
The M5Stack smart CAT/CIV display that is Bluetooth connected to, and displays in real-time the current
information from your Icom and Yaesu radios. It currently supports the Icom IC-7100, IC-7300, IC-9700
and IC-705 radios. It also supports the Yaesu FT-710, FT-991 and FT-DX10 radios.
It displays information such as the tuned frequency, mode, filters, S/SWR/ALC/COMP/ID/VD/PO meters
as well as several other concurrent settings.
The display and software are designed to allow for easy future firmware upgrades.
Copyright 2023 ZUM Radio, Inc
1
Rev 1.0
Advertisement
Table of Contents

Summary of Contents for ZUM Radio M5Stack
- Page 1 M5Stack smart CAT-CIV display - User Guide M5Stack smart CAT/CIV display The M5Stack smart CAT/CIV display that is Bluetooth connected to, and displays in real-time the current information from your Icom and Yaesu radios. It currently supports the Icom IC-7100, IC-7300, IC-9700 and IC-705 radios.
-
Page 2: Table Of Contents
Icom IC-7300 setup: ..........................7 Icom IC-9700 setup: ..........................10 Icom IC-705 setup: ..........................13 Icom IC-705 first time pairing to M5Stack: ..................15 Icom IC-705 - Subsequent pairing to the display ................20 Icom IC-705 - Automatic Bluetooth pairing ..................23 Yaesu FT-710 setup: .......................... -
Page 3: M5Stack Smart Cat-Civ Display Specifications
USB-C firmware programming cable 1 Year Warranty Software libraries used: The M5Stack Smart CAT-CIV Display uses portions of two open-source projects. License information can be found at the links below. FreeType Project Portions of this software are copyright © 2022 The FreeType Project (www.freetype.org). -
Page 4: Radio Setup
M5Stack smart CAT-CIV display - User Guide Radio setup: Icom IC-7100 setup: Press the “SET” button to enter the configuration menus. Use the UP and DOWN arrows to scroll through the options and then press the “Connectors” button. Copyright 2023 ZUM Radio, Inc... - Page 5 M5Stack smart CAT-CIV display - User Guide Use the UP and DOWN arrows to scroll through the options and then press the “CI-V” button. Ensure the “Baud Rate” is set to 9600, the “Address” is set to 88h and the “Transceive” is set to “OFF”.
- Page 6 M5Stack smart CAT-CIV display - User Guide Ensure power is turned off to the radio. Next, connect the BT-7100/7300 Bluetooth adapter to the back of the IC-7100 radio as shown in this image. You can watch a YouTube video showing the same steps here: https://youtu.be/T5bGWe-m2nY...
-
Page 7: Icom Ic-7300 Setup
M5Stack smart CAT-CIV display - User Guide Icom IC-7300 setup: Press the “MENU” button on the front of the radio. Next, press the “SET” button. Use the UP and DOWN arrows to scroll through the options and then press the “Connectors” button. - Page 8 M5Stack smart CAT-CIV display - User Guide Use the UP and DOWN arrows to scroll through the options and then press the “CI-V” button. Ensure the “Baud Rate” is set to 9600, the “Address” is set to 94h and “CI-V Transceive” is set to “OFF”.
- Page 9 M5Stack smart CAT-CIV display - User Guide Ensure power is turned off to the radio. Next, connect the BT-7100/7300 Bluetooth adapter to the back of the IC-7300 radio as shown in this image. You can watch a YouTube video showing the same steps here: https://youtu.be/mk3XrnPRTdI...
-
Page 10: Icom Ic-9700 Setup
M5Stack smart CAT-CIV display - User Guide Icom IC-9700 setup: Press the “MENU” button on the front of the radio. Next, press the “SET” button. Use the UP and DOWN arrows to scroll through the options and then press the “Connectors” button. - Page 11 M5Stack smart CAT-CIV display - User Guide Use the UP and DOWN arrows to scroll through the options and then press the “CI-V” button. Ensure the “Baud Rate” is set to 9600, the “Address” is set to A2h and “CI-V Transceive” is set to “OFF”.
- Page 12 M5Stack smart CAT-CIV display - User Guide First, make sure power is turned off to the radio. Next, connect the BT-9700 Bluetooth adapter to the back of the IC-9700 radio as shown in this image. You can watch a YouTube video showing the same steps here: https://youtu.be/lLcgeCNjJWo...
-
Page 13: Icom Ic-705 Setup
M5Stack smart CAT-CIV display - User Guide Icom IC-705 setup: Press the “MENU” button on the radio. Next press the “SET” button. Use the UP and DOWN arrows to scroll through the options and then press the “Connectors” button. Copyright 2023 ZUM Radio, Inc... - Page 14 M5Stack smart CAT-CIV display - User Guide Use the UP and DOWN arrows to scroll through the options and then press the “CI-V” button. Ensure the “CI-V Address” is set to A4h, the “CI-V Transceive” is set to “OFF” and the “CI-V USB Echo Back”...
-
Page 15: Icom Ic-705 First Time Pairing To M5Stack
M5Stack smart CAT-CIV display - User Guide Icom IC-705 first time pairing to M5Stack: Press the “MENU” button on the radio. Next, press the “SET” button. Use the UP and DOWN arrows to scroll through the options and then press the “Bluetooth Set” button. - Page 16 M5Stack smart CAT-CIV display - User Guide Use the UP and DOWN arrows to scroll through the options and ensure “Bluetooth” is “ON”. Use the UP and DOWN arrows to scroll through the options and press the “Pairing/Connect” button. Next, press the “Device Search” button.
- Page 17 M5Stack smart CAT-CIV display - User Guide Next, press the “Search Data Device” button. The IC-705 will take a few seconds to find all the available Bluetooth devices nearby. It should find the device called “ZUM-BT-M” Copyright 2023 ZUM Radio, Inc...
- Page 18 M5Stack smart CAT-CIV display - User Guide Wait for the search to complete and press the “ZUM-BT-M” device from the list of Bluetooth devices. Press the “YES” button when asked if you want to connect the radio to the Bluetooth device.
- Page 19 M5Stack smart CAT-CIV display - User Guide Next, confirm the passkey. This number is random. Press “CONFIRM” to continue. After a few more seconds the IC-705 should now show that it is “Connected.” to the display. It should show “Connect”. Press the back button a number of times to return to the radio main screen.
-
Page 20: Icom Ic-705 - Subsequent Pairing To The Display
M5Stack smart CAT-CIV display - User Guide Icom IC-705 - Subsequent pairing to the display Press the “MENU” button on the radio. Next press the “SET” button. Use the UP and DOWN arrows to scroll through the options and press the “Bluetooth Set” button. - Page 21 M5Stack smart CAT-CIV display - User Guide Ensure “Bluetooth” is “ON”. Use the UP and DOWN arrows to scroll through the options and press the “Pairing/Connect” button. Next press the “ZUM-BT-M” button to start the pairing. Copyright 2023 ZUM Radio, Inc...
- Page 22 M5Stack smart CAT-CIV display - User Guide Press the “YES” button when asked if you want to connect the radio to the Bluetooth device. It should show “Connecting…” for a few seconds. It should show “Connect”. Press the back button a number of times to return to the radio main screen.
-
Page 23: Icom Ic-705 - Automatic Bluetooth Pairing
M5Stack smart CAT-CIV display - User Guide Icom IC-705 - Automatic Bluetooth pairing After the radio has been sucessfully paired to the display, it should automatically connect each time the radio is powered on. Assuming the display is on and ready to pair, it should give the “ZUM-BT-M Connected.”... -
Page 24: Yaesu Ft-710 Setup
M5Stack smart CAT-CIV display - User Guide Yaesu FT-710 setup: Press the “FUNC” button on the radio. Next press the “OPERATION SETTING” button. Next press the “GENERAL” button and ensure the TUL/LIN PORT is set to “CAT-3”. Copyright 2023 ZUM Radio, Inc... - Page 25 M5Stack smart CAT-CIV display - User Guide Use the UP and DOWN arrows to scroll through the options and ensure “CAT-3 RATE” is set to “9600bps” and “CAT-3 TIMEOUT TIMER” is set to “10msec”. Lastly press “BACK” a number of times to return to the main screen.
-
Page 26: Yaesu Ft-991 Setup
M5Stack smart CAT-CIV display - User Guide Yaesu FT-991 setup: Press the “MENU” button on the radio. Use the “MULTI”-wheel to scroll to menu items “031”, “032”, and “033”. Ensure that “CAT RATE” is “9600bps”, “CAT TOT” is “10msec” and “CAT RTS” is “DISABLE”. Next, press the “MENU” button to return to the main screen. - Page 27 M5Stack smart CAT-CIV display - User Guide Ensure power is turned off to the radio. Next, connect the BT-991/DX10 Bluetooth adapter to the back of the FT-991 radio as shown in this image. Copyright 2023 ZUM Radio, Inc Rev 1.0...
-
Page 28: Yaesu Ft-Dx10 Setup
M5Stack smart CAT-CIV display - User Guide Yaesu FT-DX10 setup: Press the “FUNC” button on the radio Next, press the “OPERATION SETTING” button. Copyright 2023 ZUM Radio, Inc Rev 1.0... - Page 29 M5Stack smart CAT-CIV display - User Guide Next press the “GENERAL” button, and use the UP and DOWN arrows to scroll through the options and ensure “CAT RATE” is set to “9600bps”, “CAT TIMEOUT TIMER” is set to “10msec” and “CAT RTS” is set to “OFF”.
-
Page 30: Display Settings
M5Stack smart CAT-CIV display - User Guide Display Settings: The display has three buttons called “Button A”, “Button B” and “Button C”. The function for each button can change for each screen. ButtonA ButtonB ButtonC On the side of the display, there is a red reset button which is right above the USB-C connector which supplies the power. -
Page 31: First Startup
M5Stack smart CAT-CIV display - User Guide First startup: Each time the display is powered on, it will show the splash screen which includes the firmware version number. The first time the display is powered up, it will automatically go to the Configuration screen after the splash screen. -
Page 32: Radio Setup For Icom Radios
M5Stack smart CAT-CIV display - User Guide Radio Setup for Icom radios: From the Configuration screen, use “Prev” and “Next” buttons to move the cursor over “Radio setup” and then press the “Select” button . The “Prev” and “Next” buttons are used to switch between “Icom” and “Yaesu” radios. Press the “Select”... - Page 33 M5Stack smart CAT-CIV display - User Guide The “Prev” and “Next” buttons are used to switch among the supported Icom “Radio model”. Press the “Select” button to confirm the selected radio model. The “Prev” and “Next” buttons are used to change the “Radio addresses”. Make sure the address displayed matches the address configured in your Icom radio.
- Page 34 M5Stack smart CAT-CIV display - User Guide From within the Configuration menu, press the “Select” button to return the display to run mode. Copyright 2023 ZUM Radio, Inc Rev 1.0...
-
Page 35: Configuring Yaesu Radios
M5Stack smart CAT-CIV display - User Guide Configuring Yaesu radios: From the Configuration screen, use “Prev” and “Next” buttons to move the cursor over “Radio setup” and then press the “Select” button . The “Prev” and “Next” buttons are used to switch between “Icom” and “Yaesu” radios. Press the “Select”... - Page 36 M5Stack smart CAT-CIV display - User Guide The “Prev” and “Next” buttons are used to switch among the supported Yaesu “Radio models”. Press the “Select” button to confirm the selected radio model. This will return to the main menu. From within the Configuration menu, press the “Select” button to return the display to run mode.
-
Page 37: Set Clock
M5Stack smart CAT-CIV display - User Guide Set clock: The Display hardware does not have a built-in Real Time Clock. It will not be able to retain the set time after power is removed. From the Configuration screen, use “Prev” and “Next” buttons to move the cursor over “Set clock” and then press the “Select”... - Page 38 M5Stack smart CAT-CIV display - User Guide The “Prev” and “Next” buttons are used to change the “Hour” value for the clock. Press the “Select” button to confirm the hour. The “Prev” and “Next” buttons are used to change the “Minute” value for the clock. Press the “Select”...
- Page 39 M5Stack smart CAT-CIV display - User Guide The “Prev” and “Next” buttons are used to change the “Second” value for the clock. Press the “Select” button to confirm the second. This will return to the main menu. From within the Configuration menu, use”Prev” and “Next” buttons to move the cursor over “Exit”.
-
Page 40: About
M5Stack smart CAT-CIV display - User Guide About: From the Configuration screen, use”Prev” and “Next” buttons to move the cursor over “About” and then press “Select”. The display will change to the About screen with software version information as well as copyright information. -
Page 41: Power Off
M5Stack smart CAT-CIV display - User Guide Power off: From the Configuration screen, use the “Prev” and “Next” buttons to move the cursor over “Power off” and then press the “Select” button. The display will turn off immediately. You can wake the display by either pressing the Reset button or ButtonA. -
Page 42: Pairing Progress
M5Stack smart CAT-CIV display - User Guide Pairing progress: Once the Display is configured for a specfic radio (other than the IC-705), it will attempt to pair to the Bluetooth adatper connected to the radio. Once connected, it will then show the CAT/CIV screen. - Page 43 M5Stack smart CAT-CIV display - User Guide When the Display detects that it has become disconnected from radio, an error message and progress message will be shown on the screen. When the Display detects that the IC-705 has become disconnected, an error message and progress message will be shown on the screen.
-
Page 44: Operating Display
M5Stack smart CAT-CIV display - User Guide Operating Display: Switching between two VFOs: Each time ButtonC is pressed, the display switches between showing the two VFOs in the radio if there are two. If not, it remains showing the single VFO frequency. -
Page 45: Selecting Yaesu Meter
M5Stack smart CAT-CIV display - User Guide Selecting Yaesu meter: Each time ButtonA is pressed, the display changes the meter shown. It first cycles through all the needle meters (SWR, ID, PO, VDD, ALC and COMP) and then to the bar graph meters (SWR, ID, PO, VDD, ALC and COMP). -
Page 46: Troubleshooting
M5Stack smart CAT-CIV display - User Guide Troubleshooting: Display no longer responds to FT-710 radio: This is a known issue with the FT-710. After a long period of inactivity, the radio appears to turn off the CAT port where the Bluetooth adapter is plugged. The only know solution is to turn off the FT-710 radio and then turn it on again. -
Page 47: Updating Firmware
M5Stack smart CAT-CIV display - User Guide Updating firmware: Plug the M5Stack into your computer using the short USB programming cable that was included with your purchase. Using Device Manger, find the COM port number for your M5Stack. Download the M5Stack Display firmware from the ZUM Radio website: https://zumradio.com/downloads.html#precompiled... - Page 48 M5Stack smart CAT-CIV display - User Guide Run the program from your Windows computer. You may see an “Unknown Publisher” warning from Windows. Press the “Run” button to continue. Select the COM port number you found using Device Manager. Copyright 2023 ZUM Radio, Inc...
- Page 49 M5Stack smart CAT-CIV display - User Guide Set the “Baud” rate to “921600” Finally press the “Burn” button. This will start the flashing process. You may see another “Unknown Publisher” warning from Windows. If son, press the “Run” button to continue.
- Page 50 M5Stack smart CAT-CIV display - User Guide A new window will open and display the flashing progress. It should take about a minute to complete. Copyright 2023 ZUM Radio, Inc Rev 1.0...
-
Page 51: Support
M5Stack smart CAT-CIV display - User Guide Support: The primary location for support for ZUM Radio products is via the ZUM Radio Facebook support group: https://www.facebook.com/groups/249802742395450/ Copyright 2023 ZUM Radio, Inc Rev 1.0...
Need help?
Do you have a question about the M5Stack and is the answer not in the manual?
Questions and answers