
Related Manuals for MACHENIKE M-GAME G5 Pro


Summary of Contents for MACHENIKE M-GAME G5 Pro
- Page 1 G5 PRO USER MANUAL 使用说明书 WARRANTY CARD 保修卡 *Read manual before use. Keep for reference* *使用本产品前请仔细阅读说明书,妥善保存以备参考*...
-
Page 2: Safety Precautions
Safety Precautions Precautions Do not spray flammable insecticides or sprays near the controller. Do not allow liquids such as water or juice to come into contact with the device. This may cause the keys to malfunction or become damaged. Do not unplug the USB cable with wet hands. Do not use the device in damp or hot places, such as bathrooms. -
Page 3: Packing Contents
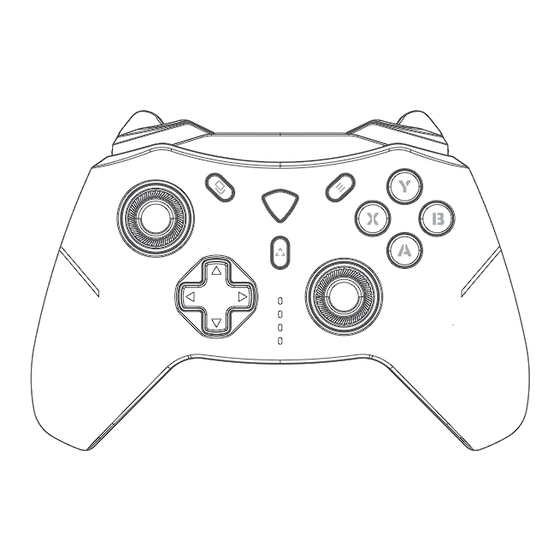
PACKING CONTENTS 1 x Gaming Controller 1 x User manual 1 x 2.4G dongle 1 x USB data cable (Limited to Tri-Mode Edition) Maintenance Please clean the controller with a soft dry cloth or a special cleaning cloth. -Do not use solvents, including but not limited to gasoline, diluents, alcohol, kit -chen detergents, or chemical cleaning cloths. - Page 4 BUTTON LAYOUT HOME Button BACK Button Menu Button ( ) ( ) Left Hall ABXY Button Linear Joystick (L3) Directional Right Hall Pad (D-pad) Linear Joystick (R3) FN Button Indicator light Hall Linear Trigger LT Hall Linear Trigger RT (L2) (R2) Bumper LB Bumper RB...
- Page 5 The G5 PRO has one key wake-up function. Before wireless con -nection, please select the corresponding device mode: Tri-Mode Edition: 2.4G mode - device name: MACHENIKE G5Pro; 1# indicator light flashes. PC/iOS mode - device name: Xbox Wireless Controller; 2# indicator light flashes. Switch mode - device name: Pro Controller;...
- Page 6 Enter Pairing Mode : Press and hold the Home button for 3 seconds in the off state. When the indicator light flashes quickly, it enters pairing mode. Connect to the corresponding device name mentioned above to complete pairing. Switch Pairing Device : press and hold the Home button for 5 seconds to turn off...
- Page 7 5. When not in use, press and hold the Home button to turn off the controll -er, or the controller will automatically turn off after 5 minutes of inactivity. 6. After the controller is turned off, the dongle indicator light will flash slow -ly,indicating that it is waiting for the controller to reconnect.
- Page 8 3.In the Windows system, open Settings, click on Bluetooth & other devi -ces, then click on Add Bluetooth or other devices. 4.Select "Xbox Wireless Controller" from the list of Bluetooth devices, and after successful pairing, the 2# indicator light will stay on for 2 seconds and then show the battery level.(Dual-Mode Edition:1# indicator light will stay on for 2 seconds and then show the battery level.) 5.When not in use, the controller can be turned off...
- Page 9 COMPATIBILITY iOS Mode - iOS and for iPad OS Compatible with iOS 16 system version. If there are changes in the related permissions in subsequent iOS updates, the iOS update shall prevail with -out further notice. The trigger supports linear travel function and requires game matching. Supports Home button wake-up of the controller and quick reconnection function.
- Page 10 Switch Mode⸺NINTENDO SWITCH When in Switch mode, it is recommended to press and hold the Fn + A button combination for three seconds to switch to the Sw -itch layout. The controller will vibrate once to indicate the switch. This product can connect to both Switch console and PC in Switch mode.
- Page 11 4# LED indicator flashes quickly, then the controller enters pairing mode. 3. Open the device settings and search for and connect to "MACHENIKE G5Pro" in Bluetooth settings. 4. After pairing is successful, the 4# LED indicator will stay on for 2 seconds and then return to power level indication.
- Page 12 FEATURES Multi-platform compatibility with PC, Switch, iOS, Android, and Harmony OS. Convenient mode switching through gear selection without the need for com -plex combinations or memorization. Adjustable brightness levels for lighting settings. Powerful exclusive MACHENIKE custom PC driver software.
- Page 13 EXPANDED FEATURES Lighting Brightness Adjustment: Press FN + D-pad ← to cycle through the overall brightness levels of the cont -roller’ s lighting. Press FN + D-pad → to change the lighting effects, cycling through constant on/breathing/streaming/off. To avoid backlight interference with yourself and others during nigh -ttime use, it is recommended to use this function to turn off...
- Page 14 PROGRAMMING BUTTON MACRO DEFINITION To program macro buttons: 1. With the controller connected, press the Fn+M1/M2,The decorative lig -ht strip will flash continuously, indicating that the gamepad has entered recording mode.If it does not flash, please repeat this step. 2. Record the required function buttons in order. A/B/X/Y/Up/Down/Left/ Right/LB/LT/RB/RTand left and right joysticks are supported.
- Page 15 With the controller in a connected state, simultaneously press the [Fn] button and the [LT]/[RT] button to enable the quick trigger function for [LT]/[RT] (once enabled, the trigger will output full keystrokes through -out the entire range, suitable for FPS game with rapid fire). MACHENIKE official website: https://global.machenike.com/...
- Page 16 RESET When the controller is unresponsive or unable to identify the working mode during operation or access, you can pull out the USB cable of th -e controller and reconnect it, or use the manual mode to select into t -he corresponding working mode.
-
Page 17: Specifications
SPECIFICATIONS ITEM DATA Operating Current On light effect <100mA--off light effect <55mA Sleep Current <30uA Vibration Current 80-150mA Input Power Battery Capacity Charging Time Approx.2-4 hours Use Distance Range CONTROL SECTION Up, down, left, right and four corners, Direction buttons * 1 group eight-direction cross key. - Page 18 Switch the controller mode to adapt to differe Mode toggle switch -nt devices. The controller will enter sleep mode after about 5 minutes of inactivity, and the controller light goes out. TERMINAL SECTION DCIN wired device connection USB-A to Type-C About 0.8 meters USB cable length...
- Page 20 1 x 手柄 1 x 使用说明书、 保修卡、 合格证 1 x USB充电数据线 1 x 2.4G接收器(仅限三模版)...
- Page 21 HOME键 返回键 菜单键 ( ) ( ) 左霍尔摇杆 四功能按键 (L3) 装饰灯带 十字方向键 右霍尔摇杆 (R3) FN键 通道指示灯 霍尔线性扳机LT 霍尔线性扳机RT (L2) (R2) 肩键LB 肩键RB (L1) (R1)
- Page 22 模式切换键 M1编程键 充电触点 M2编程键 产品拥有一键唤醒功能,在无线连接之前请先选择对应的设备模式 三模版: 2.4G模式⸺设备的名称: MACHENIKE G5Pro; 1#指示灯闪烁。 PC/iOS模式⸺设备的名称: Xbox Wireless Controller; 2#指示灯闪烁。 Switch模式--设备的名称:Pro Controller;3#指示灯闪烁。 Android模式--设备的名称:MACHENIKE G5Pro;4#指示灯闪烁。 双模版: PC模式⸺设备的名称: Xbox Wireless Controller; 1#指示灯闪烁。 iOS模式⸺设备的名称: Xbox Wireless Controller; 2#指示灯闪烁。 Switch模式--设备的名称:Pro Controller;3#指示灯闪烁。 Android模式--设备的名称:MACHENIKE G5Pro;4#指示灯闪烁。 进入配对模式: 关机状态下长按Home键3秒,指示灯快闪时,则进入配对模式 连接以上对应的设备名称即可。 更换配对设备: 长按5秒Home键手柄关机后,再选择设备对应的模式,长按 Home键3秒进入配对模式重新配对即可。...
- Page 23 2.4G模式⸺支持PC\Switch\安卓TV(仅限三模版) 2.4G模式采用独立私有协议, 拥有更低延迟。 2.4G接收器可自动识别PC模式/Switch模式/安卓模式。 2.4G模式支持在Switch主机端使用陀螺仪轴感应功能。 连接步骤⸺2.4G无线连接 1、 在关机情况下将背后拨档开关拨至2.4G档位; 2、 将接收器插入电脑/Switch底座/安卓TV的USB口, 单击接收器尾部按钮, 指示灯快闪, 则进入配对状态; 3、 长按手柄正面Home键约3s,直至1#指示灯快闪,则手柄进入配对模式; 4、 手柄靠近接收器自动配对, 成功后并震动提醒。 手柄指示灯常亮2秒返回实时 电量显示, 接收器尾部指示灯常亮, 则手柄配对成功。 ( 注: PC配对成功--手柄 1&2#指示灯常亮; Switch配对成功--手柄1&3#指示灯常亮; 安卓TV配对成 功--手柄1&4#指示灯常亮) 5、 在不使用时, 通过长按Home键关机, 或5分钟不操作手柄自动关机; 6、 手柄关机后, 接收器指示灯慢闪, 进入等待手柄回连状态; 下次使用时可通 过短按Home键唤醒手柄,并自动回连。 状态指示灯 尾部开关...
- Page 24 PC模式⸺电脑蓝牙模式 Windows操作系统推荐使用本手柄的PC模式, 同时兼容Switch模式 PC模式,广泛应用于微软和Steam平台的3A级大作及最新的游戏 Switch模式即Switch Pro,可在Windows操作系统上通过Steam调用陀螺 仪功能具体使用体验和兼容性需根据不同游戏适配而定。 连接步骤⸺蓝牙连接 1、 在关机情况下将背后拨档开关拨至PC档位; 2、 长按正面Home键约3s,直至2#指示灯快闪(双模版为1#指示灯快闪),则手 柄进入配对模式; 3、 在Windows系统中打开设置-蓝牙和其他设备-添加设备-蓝牙; 4、 在搜索到的蓝牙设备中选中 “Xbox Wireless Controller” 手柄, 配对成功后 2#指示灯常亮(双模版为1#指示灯常亮)2秒返回实时电量显示; 5、在不使用时,可通过长按Home键关机,或5分钟不操作手柄后自动关机; 6、手柄拥有蓝牙记忆功能,下次使用时可通过短按Home键唤醒手柄, 自动回连电脑。 连接步骤⸺有线连接 1、 在关机情况下, 通过附赠的数据线直接连接电脑和手柄, 即可使用。...
- Page 25 iOS模式⸺苹果iOS及iPad OS 可兼容于iOS16系统版本,若后续iOS对相关权限有变更则以iOS变更为 准, 恕不另行通知。 扳机支持线性行程功能,需游戏匹配; 支持Home键唤醒手柄,极速回连功能; 连接步骤⸺蓝牙连接 1、 在手柄关机的情况下将背后拨档开关拨至iOS档位; 2、 长按正面Home键约3s,直至2#指示灯快闪,则手柄进入配对模式; 3、 打开手机设置-蓝牙,搜索并连接 “Xbox Wireless Controller” ; 4、 配对成功后, 2#指示灯常亮2秒返回实时电量指示。 注:此模式需游戏原生支持手柄操作方可使用。...
- Page 26 Switch模式⸺NINTENDO SWITCH 在Switch模式时,建议使用组合键Fn+A长按三秒,切换为Switch布局, 手柄振动一次提示; 本产品在Switch模式下,既可连接Switch主机,也兼容连接PC电脑; 支持Home键唤醒手柄及远程主机唤醒功能; 支持陀螺仪功能, 需在支持此功能的游戏设置中开启; 扳机不支持线性行程功能,由于Switch平台限制导致非产品问题; 个别游戏不支持Switch Pro手柄时, 也无法使用本手柄操作,此问题为游 戏限制,非产品问题。 连接步骤⸺蓝牙连接 1、 在手柄关机的情况下将背后拨档开关拨至Switch档位; 2、 长按正面Home键约3s,直至3#指示灯快闪,则手柄进入配对模式; 3、 在Switch主页面中打开手柄--更改握法/顺序,等待手柄出现即可。 连接步骤⸺有线连接 1、 在Switch设置中开启有线手柄的功能,并将Switch主机插入官方标配的 多功能底座中; 2、 在手柄关机的情况下,使用数据线连接手柄与底座即可。...
- Page 27 Android模式⸺安卓 视 连接步骤⸺蓝牙连接 1、 在手柄关机的情况下将背后拨档开关拨至Android档位; 2、 长按正面Home键约3s,直至4#指示灯快闪,则手柄进入配对模式; 3、 打开设备设置-蓝牙,搜索并连接 “MACHENIKE G5Pro ” 即可。 4、 配对成功后, 4#指示灯常亮2秒返回实时电量指示。 注:此模式需游戏原生支持手柄操作方可使用 连接步骤⸺有线连接 1、 在关机情况下, 通过附赠的数据线直接连接设备和手柄, 即可使用。 霍尔系统校准操作 霍尔摇杆、 霍尔扳机校准操作: 1、 关机状态下[ ]键+[Home]键+[B]键同时按开启校准, 校准时指示灯交替闪烁; 2、 摇杆校准: 左右摇杆慢速打满, 完整转动三圈以上; 3、 扳机校准: [ LT ]键+[RT]键各按到底一次; 4、 最后按[ ] 键一次完成校准并自动关机。...
- Page 28 多平台兼容,PC电脑、Switch、iOS、安卓、鸿蒙 便捷的模式切换,通过拨档选择,无需复杂组合记忆 可调亮度等级的灯光设置 灯光亮度调整 按Fn+十字键←, 可循环调整手柄整体灯光亮度。 按Fn+十字键→, 可更改灯带效果, 在常亮/呼吸/流光/关闭等中循环切换。 按Fn+十字键↑/↓, 可提升/降低手柄振动强度, 共0-4五档可调。 手柄内置600mAh锂电池,续航时长为5-8小时。 体感模拟功能 按Fn+R3, 可开启/关闭手柄体感模拟右摇杆功能。 飞鼠功能 按Fn+L3, 可开启/关闭手柄左摇杆飞鼠功能(当前仅有线/Andriod模式下支持) 配置切换功能 手柄内置四套配置文件,按Fn+Home, 可在4套配置文件中循环切换。同时伴有 指示灯和颜色变化。...
- Page 29 1、在手柄已连接状态下,同时按下Fn键+M1/M2键此时装饰灯条持续闪烁, 表示已进入录制状态,若未闪烁请重复此操作。 2、依次录入需要设置的功能键,支持A/B/X/Y/上/下/左/右/LB/LT/RB/RT及左 右摇杆 3、设置完成后短按对应宏键(M1/M2),手柄的装饰灯条背光停止 闪烁,并 恢复至之前的模式,表示完成设置。 注:清除M1当前宏定义操作:手柄工作状态下,同时按FN+M1,手柄的装饰 灯带背光持续闪烁,然后再按一下M1键,手柄的装饰灯带背光停止闪烁,则 清除当前自定义功能。其他宏键清除步骤同理。 支持TURBO的按键:A/B/X/Y/上/下/左/右/LB/LT/RB/RT 手动TURBO功能:当A键开启手动TURBO时需要手动按住A,才会触发 开启TURBO功能:按住FN+A再松开,此时A键开启手动连发功能,再次按下 FN+A,此时A键开启自动连发功能,再次按下FN+A,则为关闭连发功能 注:FN+A/B/X/Y可以开启A/B/X/Y的TURBO功能 快速扳机功能 1、在手柄已连接状态下,同时按下Fn键+LT/RT键即可开启LT/RT的快速扳机 功能(开启后扳机全行程均以满键值输出,适合射击游戏开枪扫射) 死区切换功能 1、在手柄已连接状态下,同时按下左摇杆(Ls)和右摇杆(Rs),可以同时 切换左右摇杆0死区和有死区。(手柄左右摇杆出厂默认有死区)...
- Page 30 拓展功能 模式切换 (2.4G/有线模式下) [A]+[B]+[HOME]同时长按3s可循环切换Xinput/Dinput/Switch模式,并有 对应指示灯指示 机械师官网:https://www.machenike.com...
- Page 31 开启灯效<100mA--关闭灯效<55mA <30uA 80-150mA Xbox 多功能键*1 编程键*2 背键M1、M2可自定义所需按键。 返回键*1 返回上级菜单,Switch中为 - 功能。 菜单键*1 打开菜单界面,Switch中为 + 功能。 拨档开关*1 切换手柄模式,适配不同设备 约0.8米...
- Page 32 五金件 马达组件 电池组件...
- Page 33 MACHENIKE产品保修承诺 1、在用户按本技术使用说明书正确使用该产品的前提下,本产品自购买 1、在用户按本技术使用说明书正确使用该产品的前提下,本产品自购买 之日起一年内免费保修。 之日起一年内免费保修。 2、我方因下列使用者个人的原因而造成的故障将不提供免费保修服务。 2、我方因下列使用者个人的原因而造成的故障将不提供免费保修服务。 如: 如: (1)擅自拆装、改装该产品而造成的故障; (1)擅自拆装、改装该产品而造成的故障; (2)在使用、搬运的过程中不慎摔打、跌落、进液、供电规格不符而造 (2)在使用、搬运的过程中不慎摔打、跌落、进液、供电规格不符而造 (2)在使用、搬运的过程中不慎摔打、跌落、进液、供电规格不符而造 (2)在使用、搬运的过程中不慎摔打、跌落、进液、供电规格不符而造 (2)在使用、搬运的过程中不慎摔打、跌落、进液、供电规格不符而造 成的故障; 成的故障; (3)因缺乏合理的保养而造成的故障; (3)因缺乏合理的保养而造成的故障; (4)没有按使用说明书正确指示进行操作; (4)没有按使用说明书正确指示进行操作; (5)第三方厂品、服务或行为导致的故障或损坏等等。 (5)第三方厂品、服务或行为导致的故障或损坏等等。 3、在要求提供免费保修服务时,您必须提供清晰、完整和准确的销售发 3、在要求提供免费保修服务时,您必须提供清晰、完整和准确的销售发 票和保修卡,购买产品时,可要求销售商提供上述上述销售发票和保 票和保修卡,购买产品时,可要求销售商提供上述上述销售发票和保 修卡。 修卡。 4、保修范围外的维修服务,将按规定收费。 4、保修范围外的维修服务,将按规定收费。 保修卡 尊敬的用户: 感谢您选购本公司产品,我公司将按照《中华人民共和国消费者权 益保护法》和国家技术监督局、国家工商行政管理局、财政局关于《 部分商品修理更换退货责任规定》的有关规定,为您提供保修服务, 请认真填写此卡并妥善保管,以便日后凭此卡维修。 客户姓名: 电子邮件:...
- Page 34 产品性能故障表 送修日期 性能故障描述 工程师签字 完成日期 备注: 1、请妥善保管此卡,保修时需出示此卡及购买凭证。 2、产品自购买之日起,凭购买凭证整机免费保修1年。 3、下列情况不属于免费服务范围,但可实行收费维修、终身 服务; 1)不能出示保修说明及发票; 2)发票涂改; 3)意外因素或使用不当造成损坏; 4)未经我司许可,自行修理造成的损坏; 5)超过三包有效期,经修复仍可继续使用;...
Need help?
Do you have a question about the M-GAME G5 Pro and is the answer not in the manual?
Questions and answers