
Related Manuals for NEC PD04VW QR 46 55


Summary of Contents for NEC PD04VW QR 46 55
- Page 1 PD04VW QR 46 55 46" - 60" 125 lb (117 - 152 cm) (57 kg) ČEŠ TÜR 2017-06-06 #:126-9191-2 (2019-05-03)
- Page 2 WARNING ENG - This product is designed to be installed on plywood, wood stud, solid concrete or cinder block walls. Hardware is included for wood stud and plywood installation. Before installing make sure the supporting surface will support the combined load of the equipment and hardware. Screws must be tightly secured. Do not overtighten screws or damage can occur and product may fail.
- Page 3 AVVERTENZA ITL - Questo prodotto è indicato per l’installazione su pareti di legno compensato, con montanti di legno, in calcestruzzo solido o a mattoni di cemento. Sono compresi i dispositivi di fissaggio per l’installazione su montanti di legno e legno compensato. Prima di iniziare l’installazione, accertarsi che la superficie di supporto sia in grado di sorreggere il carico combinato unità/dispositivi di fissaggio.
- Page 4 Symbols Símbolos Symboles Symbole Symbolen WARNING Simboli ADVERTENCIA ČEŠ Symboly Skip to step. ADVERTISSEMENT Symboly Continúe con el ACHTUNG Screws must get at least three Símbolos paso. WAARSCHUWING full turns and fit snug. Semboller TÜR Passez à l’étape. AVVERTENZA Los tornillos tienen que dar, Weiter mit Schritt.
- Page 5 Tools Needed for Assembly. Herramientas necesarias para el ensamblaje. Outils nécessaires au montage. To properly tighten screws: Tighten until screw Für den Zusammenbau erforderliche Werkzeuge. head makes contact, then tighten another 1/2 Voor montage benodigd gereedschap. turn. Do not overtighten screws. Attrezzi necessari per l’assemblaggio.
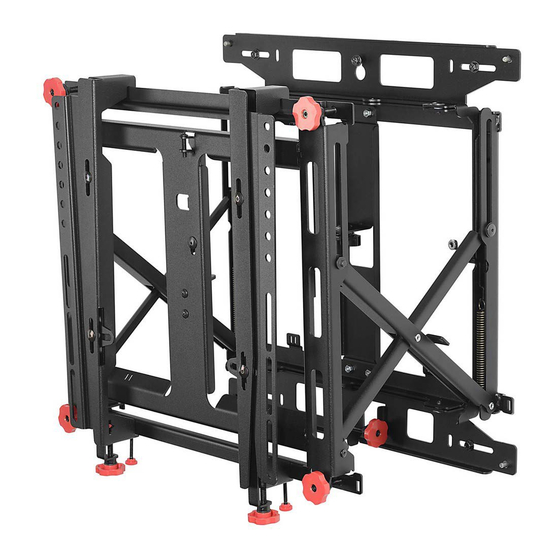
- Page 6 Parts (Before beginning, make sure you have all parts shown below). Piezas (antes de iniciar, asegúrese de tener todas las piezas siguientes). Pièces (avant de commencer, assurez-vous d’avoir toutes les pièces illustrées ci-dessous). Teile (Achten Sie vor Beginn der Arbeiten darauf, dass alle unten abgebildeten Teile vorhanden sind). Onderdelen (hoort u zich ervan te overtuigen dat u alle onderdelen hebt, die hieronder te zien zijn).
-
Page 7: Table Of Contents
I ( 4 ) J ( 4 ) K ( 4 ) L ( 4 ) M6 x 12mm M6 x 25mm M8 x 12mm M8 x 25mm M ( 8 ) N ( 8 ) O ( 4 ) 520-9571 520-1031 20-1128 M6/M8 washer... - Page 8 Optional. Reference (DS-VWRS series) instructions for additional information (sold separately). Opcional. Consulte las instrucciones de los (serie DS-VWRS) para obtener más información (vendidas por separado). Facultatif. Reportez-vous aux instructions des modèles (gamme de DS-VWRS) pour plus de renseignements (vendue séparément). Fakultativ.
-
Page 9: I ( 4 )
Wood stud wall. Plywood. Pared de madera. Madera contrachapada. Mur en bois. Contreplaqué. Holzwand. Sperrholz. Houten muur. Multiplex. Parete di legno. Legno compensato. Dřevěná stěna. Překližka. ČEŠ ČEŠ Drevená stena. Preglejka. Parede de madeira. Contraplacado. Ahşap duvar. Kontraplak. TÜR TÜR Concrete/Cinder block. - Page 10 WARNING ENG - When installing Peerless wall mounts on a wood stud wall covered with plywood, verify that the wood studs are a minimum of 2" x 4" nominal size and plywood is a minimum Grade BC, 1/2" (13 mm) thick. Plywood may be covered by gypsum board (drywall) up to 5/8"...
- Page 11 2a-1 Locate display center for bottom left display. Localice el centro de la pantalla inferior izquierda. Localisez le centre de l'écran inférieur gauche. 9-1/2" Bestimmen Sie die Bildschirmmitte des unteren (241mm) linken Bildschirms. Bepaal het midden van het linkerscherm op de onderste rij.
- Page 12 2a-4 Level wallplate. Mark mounting holes on plywood (must be minimum Grade BC, 1/2" (13mm) thick.) Nivele la placa de pared. Marque los puntos de los agujeros de montaje en el contrachapado (tiene que ser de Grado BC como mínimo, de un grosor de 1/2" (13mm.)) Mettre de niveau la plaque murale.
- Page 13 2a-6 2a-7 1/4" (6mm) 3/8" (10mm) 2a-8 Level wallplate. Mark mounting holes on plywood (must be 1/2" (13mm) minimum thickness). Nivele la placa de pared. Marque los puntos de los agujeros de montaje en el contrachapado (tiene que tener un grosor mínimo de 1/2" (13 mm)). Mettre de niveau la plaque murale.
- Page 14 2a-9 Drill mounting holes into supporting surface (2.5" (64mm) minimum depth required). Taladre los agujeros de montaje en la superficie de apoyo; se requiere una profundidad mínima de 5/32" 2.5" (64mm). (4mm) Percez les trous de fixation dans la surface de support, une profondeur minimale de 2,5 po (64mm) est requise.
- Page 15 WARNING ENG - When installing Peerless wall mounts on a wood stud wall covered with gypsum board (drywall), verify that the wood studs are a minimum of 2" x 4" nominal size. Do not install over gypsum board thicker than 5/8". When installing more than one display horizontally to a wood stud wall, the wall must be reinforced with a plywood backing (must be minimum Grade BC, 1/2"...
- Page 16 2b-1 Locate display center for bottom left display. Localice el centro de la pantalla inferior izquierda. Localisez le centre de l'écran inférieur gauche. 9-1/2" Bestimmen Sie die Bildschirmmitte des unteren (241mm) linken Bildschirms. Bepaal het midden van het linkerscherm op de onderste rij.
-
Page 17: M ( 8 )
2b-4 Use stud finder to locate and mark stud center lines. Marque las líneas centrales del montante. Marquez la ligne médiane du montant. Markieren Sie die Ständer-Mittellinien. Markeer het midden van de balken. Contrassegna le linee centrali dei montanti. ČEŠ Vyznačte střední... - Page 18 2b-6 2.5" (64mm) 5/32" 5/32" (4mm) (4mm) Drill mounting holes into supporting surface (2.5" (64mm) minimum depth required). Taladre los agujeros de montaje en la superficie de apoyo; se requiere una profundidad mínima de Mounting hole must center on stud. 2.5"...
- Page 19 WARNING ENG - When installing Peerless wall mounts on a concrete wall, the wall must be at least 8" thick with a minimum compressive strength of 2000 psi. When installing Peerless wall mounts on a cinder block wall, the cinder blocks must meet ASTM C-90 specifications and have a minimum nominal width of 8".
- Page 20 AVVERTENZA ITL - In sede d’installazione dei sostegni Peerless per parete su una parete in calcestruzzo solido, la parete deve avere uno spessore minimo di 20 cm, con una resistenza alla compressione di almeno 2000 psi (140 kg/cm2). In sede d’installazione dei sostegni Peerless per parete su una parete a mattoni di cemento, i mattoni di cemento devono soddisfare le specifiche ASTM C-90 ed avere una larghezza nominale minima di 20 cm.
-
Page 21: J ( 4 )
2c-1 Locate display center for bottom left display. Localice el centro de la pantalla inferior izquierda. Localisez le centre de l'écran inférieur gauche. 9-1/2" Bestimmen Sie die Bildschirmmitte des unteren (241mm) linken Bildschirms. Bepaal het midden van het linkerscherm op de onderste rij. - Page 22 2c-4 Level wallplate. Mark mounting holes. Marque los orificios de montaje. Marquez les trous de fixation. Markieren Sie die Montagelöcher. Markeer montagegaten. Contrassegna I fori di montaggio. Vyznačte montážní otvory. ČEŠ Vyznačte montážne otvory. Marque os furos de montagem. 9" 9"...
- Page 23 1b-3 2c-6 Insert anchor flush to concrete. Inserte el anclaje a ras con el concreto. Insérez la cheville d’ancrage au ras du béton. Setzen Sie den Dübel bündig mit dem Beton abschließend ein. Breng anker aan gelijk met beton. Inserire il fermo a paro col calcestruzzo. ČEŠ...
- Page 24 Verify that adapter brackets are nominal before proceeding. Verifique que los soportes adaptadores estén en la misma posición antes de proceder con la instalación. Assurez-vous que les supports adaptateurs sont dans la position nominale avant de procéder à l'installation. Vergewissern Sie sich vor den nächsten Schritten, dass alle Adapterhalterungen die vorgeschriebene Stellung aufweisen.
- Page 25 Remove quite retirez entfernen verwijderen rimuovere ČEŠ odstranit odstrániť remova çıkartın TÜR Optional security screws. Tornillo de seguridad opcional para trabar el soporte cerrado. Vis de sécurité facultative pour verrouiller le support en position fermée. Optionale Sicherheitsschraube zum Verriegeln der Halterung. Facultatieve veiligheidsschroef om de bevestiging mee in de gesloten positie vast te zetten.
-
Page 26: K ( 4 )
MAX VESA 400X400 VESA 600X400 4b-1 Use of spacers is optional. Uso de espaciadores opcional. Facultatif utilisation d’entretoises. Fakultativ Verwendung von Abstandhaltern. Facultatief gebruik van tussenringen. Uso opzionale di distanziatori. ČEŠ Volitelné použití rozpěr. Voliteľné použitie rozpierok. Opcional utilize espaçadores. Ayırıcıların ísteğe bağli kullanımı. - Page 27 4b-1 P (2) P (2) Q (4) Q (4) 2017-06-06 #:126-9191-2 (2019-05-03)
- Page 28 4b-2 Use of spacers is optional. Uso de espaciadores opcional. Facultatif utilisation d’entretoises. Fakultativ Verwendung von Abstandhaltern. Facultatief gebruik van tussenringen. Uso opzionale di distanziatori. Volitelné použití rozpěr. ČEŠ Voliteľné použitie rozpierok. Opcional utilize espaçadores. Ayırıcıların ísteğe bağli kullanımı. TÜR M (2) N (2) N (2)
- Page 29 Remove quite retirez entfernen verwijderen rimuovere odstranit ČEŠ odstrániť remova çıkartın TÜR Tighten. Apretar. Serrer. Anziehen. Aandraaien. Stringere. ČEŠ Utáhněte. Utiahnite. Apertar. Sıkmak. TÜR 2017-06-06 #:126-9191-2 (2019-05-03)
- Page 30 Optional: cable management Opcional: manejo de cables Facultatif: gestion des câbles Fakultativ: Kabelführung Facultatief: kabelbeheer Opzionale: gestione dei cavi ČEŠ Volitelné: vedení kabelů Voliteľné: vedenie káblov Opcional: gestão de cabos İsteğe bağli: kablo yönetimi TÜR 2017-06-06 #:126-9191-2 (2019-05-03)
- Page 31 Tighten. Apretar. Serrer. Optional. Anziehen. Opcional. Aandraaien. Facultatif. Stringere. Fakultativ. Utáhněte. ČEŠ Facultatief. Utiahnite. Opzionale. Apertar. Volitelné. ČEŠ Sıkmak. TÜR Voliteľné. Opcional. İsteğe bağli. TÜR Optional: adjustment Opcional: ajuste Facultatif: réglage Fakultativ: instellung Facultatief: aanpassing Opzionale: regolazionei Volitelné: nastavení ČEŠ Voliteľné: nastavenie Opcional: ajuste İsteğe bağli: ayarı...
- Page 32 2017-06-06 #:126-9191-2 (2019-05-03)
- Page 33 Optional: adjustment Opcional: ajuste Facultatif: réglage Fakultativ: instellung Facultatief: aanpassing Opzionale: regolazionei ČEŠ Volitelné: nastavení Voliteľné: nastavenie Opcional: ajuste İsteğe bağli: ayarı TÜR 2017-06-06 #:126-9191-2 (2019-05-03)
- Page 34 10-1 Loosen. Afloje. Optional. Desserrez. Opcional. Lösen. Facultatif. Losdraaien. Fakultativ. Allentare. Facultatief. Uvolnit. ČEŠ Opzionale. Uvoľniť. Volitelné. ČEŠ Desaperte. Voliteľné. Gevşetin. TÜR Opcional. İsteğe bağli. TÜR 10-2 Fully extend for servicing only. Close after servicing. Extiéndalo totalmente solo para realizar reparaciones. Ciérrelo después de realizarlas. Entièrement déployé...
- Page 35 10-3 Loosen. Afloje Desserrez Lösen Losdraaien Allentare ČEŠ Uvolnit Uvoľniť Desaperte Gevşetin TÜR 2017-06-06 #:126-9191-2 (2019-05-03)
-
Page 36: L ( 4 )
LIMITED FIVE-YEAR WARRANTY Peerless Industries, Inc. (“Peerless”) warrants to original end-users of Peerless products will be free from defects in material and ® workmanship, under normal use, for a period of five years from the date of purchase by the original end-user (but in no case longer than six years after the date of the product's manufacture). - Page 37 BESCHRÄNKTEN FÜNFJÄHRIGEN GARANTIE Peerless Industries, Inc. („Peerless”) übernimmt gegenüber den ursprünglichen Endnutzern von Peerless®-Produkten die Gewährleistung, dass diese unter normalen Einsatzbedingungen für fünf Jahre ab Datum des Kaufs durch den ursprünglichen Endnutzer (aber in keinem Fall länger als sechs Jahre nach Herstellungsdatum des Produkts) frei von Material- und Verarbeitungsfehlern sind. Peerless repariert oder ersetzt nach eigenem Ermessen ein Produkt, das dieser Garantie nicht entspricht, oder erstattet den Kaufpreis dafür.
- Page 38 OMEZENÁ PĚTILETÁ ZÁRUKA Peerless Industries, Inc. (“Peerless”) zaručuje původním koncovým uživatelům výrobků Peerless®, že budou bez vad na materiálu a provedení, za podmínky běžného používání, po dobu pěti let od data nákupu původním koncovým uživatelem (ale v žádném případě ne déle než...
- Page 39 BEŞ YILLIK SINIRLI GARANTİ Peerless Industries, Inc. (bundan sonra “Peerless” olarak anılacaktır) Peerless® ürünlerinde normal kullanım koşulları altında orijinal son kullanıcının satın alma tarihinden itibaren beş yıl süreyle (ama her halükarda ürünün üretim tarihinden itibaren en fazla altı yıl süreyle) malzeme ve işçilik arızaları...
- Page 40 Peerless-AV Peerless-AV Europe Peerless-AV de Mexico 2300 White Oak Circle Unit 3 Watford Interchange, Ave de las Industrias 413 Aurora, IL 60502 Colonial Way, Watford, Herts, Parque Industrial Escobedo Email: tech@peerlessmounts.com WD24 4WP, United Kingdom Escobedo N.L Mexico 66050 Ph: (800) 865-2112 Customer Care Servicio al Cliente Fax: (800) 359-6500...