Table of Contents
Advertisement
Quick Links
Advertisement
Chapters
Table of Contents

Related Manuals for Horiba Scientific LAQUAtwin B-74 Series


Summary of Contents for Horiba Scientific LAQUAtwin B-74 Series
- Page 1 取扱説明書 コンパク ト硝酸イオンメータ B - 74X CODE:GZ0000297062D...
- Page 2 測定手順について 本項では測定する手順の概略について記載しています。 それぞれの手順の詳細については本文を参照してください。 ① 電源を入れる ON/OFFスイッチを長押しします。 ② 校正をする 正確な測定のために1日1回は、 必ず行ってください。 ① 2000 ppm 標準液を入れる。 ②遮光蓋を閉める。 ③ CAL スイッチを長押しします。 ・ が点灯したら完了です。 ④水で洗い流します。 ⑤MEAS スイッチを押して 測定モードに移ります。...
- Page 3 ③ 測定をする ①試料液を滴下する。 ②遮光蓋を閉める。 ③ が点灯したら、 測定完了です。 値をホールドする場合は MEAS スイッチを押します。 ④ ご使用後 水で洗い流した後、電源を切り 遮光蓋を閉めて保管してください。 測定部に液が残った状態での保管は避けてください。 ご使用状況にあわせて各種設定が変更できます。 ・測定単位変更 ・温度測定モード ・校正点数変更 ・乗算補正 ・加算補正 ・電圧測定モード ・校正値変更 より正確な測定のためには2点校正が有効です。 試料液で事前に測定部を2回ほど洗っておくとより正確な測定ができます。 詳細は本文 7 ページ 〜 27 ページを参照してください。...
- Page 4 はじめに 本書は、 コンパクト硝酸イオンメータ B-74X を取り扱う方を対象に書か れています。 ご使用になる前に、本書を必ずお読みください。お読みになった後は必 要なときにすぐに取り出せるように大切に保管してください。 製品の仕様・外観は、改良のため予告なく変更することがあります。 また、本書に記載されている内容も予告なく変更される場合がありま す。あらかじめご了承ください。 本書は、日本語で作成された原文です。 保証と責任の範囲 本製品の保証期間は納入後 1 年間です。万一、保証期間中に弊社の責任 による故障が発生した場合は、無償にて修理または部品の交換をしま す。ただし、次のような場合は保証の対象から除外します。 誤操作による故障の場合 弊社以外で修理や改造をした場合 不適切な環境で使用した場合 本書記載以外の方法で使用した場合 弊社の責任外の事故による場合 災害による場合 本体落下による故障の場合 腐食・さびなどによる故障、または外観の劣化 センサ、標準液などの消耗品 本製品の故障による損害、データの抹消による損害、その他本製品を使 用することによって生じた損害について、弊社は一切その責任を負いか ねますので、ご了承ください。 ...
-
Page 5: Table Of Contents
目次 本製品について ........................1 セ ッ ト の内容 ................1 別売消耗品 ................... 2 各部の名称 と 機能........................ 3 取 り 扱い上のご注意......................5 基本の取 り 扱い........................7 電池の取 り 付け / 取 り はず し ............7 セ ンサの取 り 付け / 取 り はず し ........... 8 電源... - Page 6 付録 ............................28 Q&A ................... 28 仕様 ................... 30 妨害イ オ ン影響 ................. 31...
-
Page 7: 本製品について
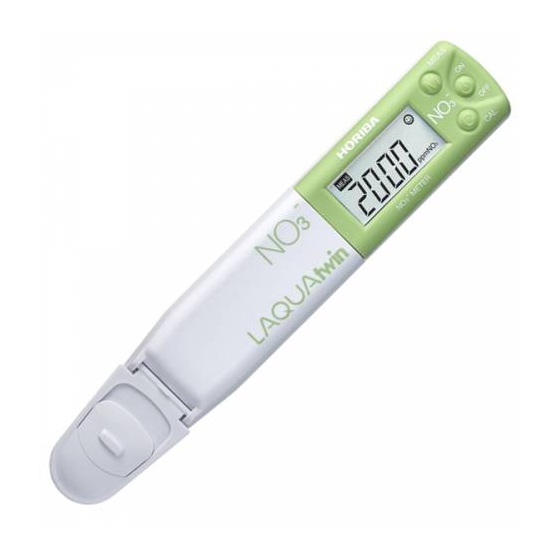
本製品について コンパクト硝酸イオンメータ B-74X は、HORIBA 独自の平面センサを採用 したコンパクトな硝酸イオン(NO )計です。少量のサンプルで水溶液の 濃度を測定できます。 セットの内容 B-741 B-742 B-743 本体形式 (作物体用) (土壌用) (一般理化学用) S040 センサ B-741 B-742 本体 B-743 保管ケース B-741 用 キャリング ケース B-742 用 CR2032 電池 30 ppm 150 ppm 300 ppm 専用標準液 2000 ppm 5000 ppm スポイト... -
Page 8: 別売消耗品
B-741 B-742 B-743 本体形式 (作物体用) (土壌用) (一般理化学用) B-741 クイック B-742 マニュアル B-743 別売消耗品 部品番号 品名 仕様 用途 3200459870 センサ S040、NO B-741、B-742、B-743 3200053535 Y044、NO 30 ppm B-742 低濃度 3200053536 Y045、NO 150 ppm B-743 低濃度 3200053514 Y042、NO 300 ppm B-741 低濃度、B-742 高濃度 標準液... -
Page 9: 各部の名称と機能
各部の名称と機能 名称 説明 試料を載せる測定部です。液絡部(A 部)と応答膜(B 平面センサ 部)で構成されていて、両方が試料で覆われていないと 正確な測定ができません。 センサを遮光するための蓋です。センサは光の影響を受 けるため、遮光蓋を閉じて測定してください。 遮光蓋をサンプリングシート押さえ蓋に交換した場合 遮光蓋 (15 ページ参照)は、他のもので覆ってセンサ部を遮光 してください。 CR2032(2 個) リチウム電池 校正モードから測定モードへの切り替え、測定モードに おける測定値ホールド実行 / 解除、特殊設定モードにお MEAS スイッチ ける各種設定開始 / 確定の操作に使用します。 ON/OFF スイッチ 電源 ON/OFF の操作に使用します。 校正開始、特殊設定モードおよび各種設定の項目切り替 CAL スイッチ えの操作に使用します。... - Page 10 名称 説明 防水パッキン 本体を防水するパッキンです。 ストラップ取付穴 ストラップを取り付けるための穴です。 測定値ホールド中、測定値が安定するまでの間は点滅し、 MEAS アイコン 測定値が確定すると点灯します。 CAL アイコン 校正中は点滅し、校正が完了すると点灯します。 バッテリアラーム 電池が消耗し交換が必要になると点灯します。 周囲の温度が使用温度範囲(5 ~ 40C)外のとき点滅し 温度アラーム ます。 安定マーク 測定値が安定したとき点灯します。 測定値表示 測定値、設定値、状態を示す値などが表示されます。 測定値表示(14)の表示値に対応する測定単位が点灯し ます。 硝酸イオン濃度が表示されているときに点灯する測定単 位として ppm NO または mg/L NO を設定できます。 測定単位表示 また、硝酸態窒素濃度が表示されているときに点灯する 測定単位として ppm NO -N または mg/L NO -N を設定...
-
Page 11: 取り扱い上のご注意
取り扱い上のご注意 本体・センサ センサは消耗品です。センサを破損したり、性能が劣化した場合、新 品のセンサに交換が必要です(センサの修理はできません) 。 ストラップを持って本体・センサを振り回さないでください。 防水性能を保つため、 センサ取り付け時に以下のことを確認してくだ さい。 ・防水パッキンに傷や汚れがないこと ・防水パッキンがよじれたり、溝から浮き上がったりしていないこと ・本体やセンサが変形していないこと 本体のみ、センサのみでは、防水構造になりません。 本体とセンサを確実にセットしてからご使用くださ い。 無理な力を加えたり落としたりしないでください。 直射日光や高温多湿の場所に放置しないでください。 有機溶媒で洗わないでください。 平面センサに傷をつけないよう注意してください。 平面センサ応答膜に水分を残した状態で長時間放置すると、応答膜が 吸水して変形します。使わないときは、乾燥した状態で保管してくだ さい。... - Page 12 以下のような試料はセンサを傷つけ、寿命を短くすることがあります ので、測定しないでください。 有機溶媒、油、接着剤、セメント、アルコール類、強酸 pH 0 ~ 2、強 アルカリ pH 12 ~ 14、界面活性剤など 本製品を初めて使う場合や、数週間使わなかった後の測定では、セン サの応答が遅くなることがあります。このような場合には、高濃度側 の標準液をセンサ部に滴下し 10 分~ 1 時間待ってから使用してくださ い。電源を入れる必要はありません。 試料の種類によっては、値が安定しないことがあります(油脂成分の 多い試料など) 。 平面センサ液絡部に白い粉や液体が生じることがありますが、異常で はありません。水で洗い流してご使用ください。 電池 電池をお子様の手の届くところに置かないでください。 万一飲み込んだときには、ただちに医師に相談してください。 電池を火中に投じないでください。 電池を充電しないでください。 お買い上げいただいたときに付属している電池は、モニタ用ですので 寿命が短い場合があります。...
-
Page 13: 基本の取り扱い
基本の取り扱い 電池の取り付け / 取りはずし 注 記 電池の取り付け / 取りはずしは電源 OFF 状態で行ってください。 電池は 2 個同時に新しいものと交換してください。 電池の取り付け 図のようにバッテリケースに電池の 端を滑り込ませて電池をセットして ください。 電池 電池は必ず CR2032 を 2 個用い、 2 個とも + 金具 側を上にしてください。 電池の取りはずし ボールペンなどを使って図のように取り はずしてください。... -
Page 14: センサの取り付け / 取りはずし
センサの取り付け / 取りはずし 注 記 センサの取り付け / 取りはずしは電源 OFF 状態で行ってください。 センサを取り付けていない状態で電源を ONすると、 バッテリアラーム が点灯することがあります。この場合は、電源を OFF にして、センサ を取り付けた後、再度電源 ON してください。 センサの取り付け 防水パッキン 防水パッキンに傷や汚れがないことを確認 してください。 センサ裏面のツメの穴 a に本体裏面の突起 A が入ればセット完了です。 注 記 このとき、 防水パッキンがよじれないように十分 注意してセットしてください。 センサの取りはずし センサ裏面のツメを浮かして、センサと本 体を少しずらします。 両手でセンサを本体からゆっくりと引き抜... -
Page 15: 電源 On/Off
電源 ON/OFF 電源 ON ON/OFF スイッチを 2 秒以上押します。 電源が ON になり、画面に本体形式番号が 表示されます。 電源 OFF ON/OFF スイッチを 2 秒以上押します。 電源が OFF になります。 保管 水道水などでセンサを洗浄し、柔らかい布や紙などでセンサ部および 本体部の水滴を拭き取ってください。 遮光蓋、および遮光蓋のスライドキャップを閉じて保管してくださ い。 注 記 センサは乾燥した状態で保管してください。 液に浸けた状態での保管は避け てください。... -
Page 16: 校正について
校正 校正について 校正モード 本製品では以下の 3 種類の校正モードを利用できます。 高濃度側 1 点校正モード:高濃度側の測定を行う場合 低濃度側 1 点校正モード:低濃度側の測定を行う場合 2 点校正モード:より高精度の測定を行う場合 初期設定は高濃度側 1 点校正モードです。 校正モードの切り替えについては、21 ページを参照してください。 設定した校正モードと校正結果は電源 OFF 後も保存されます。 ヒント 標準液と比べて 10 倍以上の濃度差がある試料を測定する場合は、2 点校正 をお勧めします。 校正時の注意点 が点滅したまま Err (エラー表示) が点灯し た場合は校正ができていません。標準液の濃度 が間違っていないか確認のうえ、センサを十分... -
Page 17: 高濃度側 1 点校正
高濃度側 1 点校正 高濃度側 1 点校正モードを設定します(21 ページ参照) 。 遮光蓋を開いて、平面センサ全体を覆うように 遮光蓋 高濃度側の標準液を滴下します。 あらかじめ、標準液でセンサを共洗いすると、 より正確な校正が可能です。 遮光蓋を閉じ、CAL スイッチを 2 秒以上押します。 と が点滅し、校正値が表示されます。 校正が確定すると と の点滅が点灯に 変わります。 水道水などでセンサを洗浄し、水滴を取り除 きます。 MEAS スイッチを 1 回(0.5 秒)押して測定 モードに移り、測定に備えます。 低濃度側 1 点校正 低濃度側 1 点校正モードを設定します(21 ページ参照) 。 遮光蓋を開いて、平面センサ全体を覆うように 遮光蓋... -
Page 18: 点校正
2 点校正 より高精度な測定を行う場合に使用してください。 2 点校正モードを設定します(21 ページ参照) 。 遮光蓋を開いて、平面センサ全体を覆うように 遮光蓋 低濃度側の標準液を滴下します。 あらかじめ、低濃度側の標準液でセンサを共洗いす ると、より正確な校正が可能です。 遮光蓋を閉じ、CAL スイッチを 2 秒以上押します。 と が点滅し、校正値が表示されます。 校正が確定すると と の点滅が点灯に 変わります。 低濃度側の校正が確定したら、遮光蓋を開い てセンサの低濃度側の標準液を捨て、水滴を 拭き取ります。 平面センサ全体を覆うように高濃度側の標準液を 遮光蓋 滴下します。 あらかじめ、高濃度側の標準液でセンサを共洗いす ると、より正確な校正が可能です。 遮光蓋を閉じ、CAL スイッチを 2 秒以上押します。 と が点滅し、校正値が表示されます。 校正が確定すると と の点滅が点灯に 変わります。 水道水などでセンサを洗浄し、水滴を取り除... -
Page 19: 試料セット
測定 試料セット 本製品では以下の 4 種類の試料セット方法を利用できます。 滴下:試料量が少ない場合 浸漬:試料量が多い場合 すくい取り:試料の一部をすくい取って測定する場合 サンプリングシート:微粒子を含む試料を測定する場合 注 記 本製品は防水構造となっていますが、 本体全体を水中に没した状態での測定 は避けてください。誤って水中に落とした場合は、速やかに水中から取り出 し、水を拭き取ってください。 滴下 遮光蓋を開いて、平面センサ全体を覆うように試料を滴下します。 遮光蓋を閉じます。 遮光蓋 ヒント 微量測定には付属のサンプリングシートを お試しください。 50 L ~ 100 L の試料で、 平面センサ全体を 覆うことができます。 試料によっては、 サンプリングシート B との反応により測定値に影響が出るこ とがあります。... - Page 20 浸漬 遮光蓋のスライドキャップを開きます。 センサを試料に浸漬して、2 ~ 3 回軽く振ります。 スライドキャップ すくい取り 遮光蓋のスライドキャップを開きます。 センサを試料に浸漬して 2 ~ 3 回軽く振った後、センサ部分で試料 をすくい取ります。 机の上などに置いて、平面センサ全体が試料で覆われていることを確 認してください。 遮光蓋のスライドキャップを閉じます。 スライドキャップ...
- Page 21 サンプリングシート 土壌の抽出液など、微粒子を含む試料を測定する場合、微粒子が測定値に影 響を与えます。微粒子の影響は、別売のサンプリングシート押さえ蓋(部品 番号 3200459736)とサンプリングシート B(部品番号 3200053858)を使 用することで低減できます。 遮光蓋をサンプリングシート押さえ蓋に付け替えます。 サンプリングシート B をセンサの上に置き、サンプリングシート押 さえ蓋を閉じます。 試料 4 ~ 5 滴をサンプリングシート B に滴下します。 遮光蓋 サンプリング シート B サンプリングシート 押さえ蓋 注 記 センサは光の影響を受けますが、 サンプリングシート押さえ蓋ではセンサを 遮光することができません。サンプリングシート押さえ蓋を使う場合は、他 のもので覆ってセンサ部を遮光してください。...
-
Page 22: 測定操作
測定操作 測定値ホールド機能を使わない場合 測定モードであることを確認し、試料をセットします。 の点灯を目安に、表示値を読み取ります。 測定値ホールド機能を使う場合 測定モードであることを確認し、試料をセットします。 が点灯したら、MEAS スイッチを 1 回 (0.5 秒)押します。 測定値ホールド機能が実行され、測定値が安 定するまで が点滅します。 測定値が確定すると、 の点滅が点灯に変 わり、表示値がホールドされます。 表示値を読み取ります。 MEAS スイッチを 1 回(0.5 秒)押します。 測定値ホールド機能が解除され、 の点灯が消えます。 注 記 測定結果が仕様の測定範囲外の場合、測定値表示が点滅します。 測定値ホールド機能を使った場合は、次の測定を行う前に必ず測定値 ホールド機能を解除してください。... -
Page 23: 特殊設定モード
特殊設定モード 特殊設定モードで各種設定および特殊操作を行うことができます。 測定モードで MEAS スイッチを 3 秒以上押すと、 画面表示が全点灯した後、 特殊設定モードになります。 ヒント 何も設定をしないで特殊設定モードから出るには、 ON/OFF スイッチで電源 を切った後、電源を入れなおしてください。 * CAL スイッチの長押しで、連続して切り替わり 全点灯 ます。 ** B-742 の場合の画面例 (B-741、B-743 では kg/10a は表示されません。 ) 自動 MEAS 「7.1 単位設定」 (19 ページ) スイッチ 測定単位を選択できます。 CAL スイッチ * MEAS 「7.2 温度測定モード」 (20 ページ) スイッチ... - Page 24 MEAS スイッチ 「7.6 電圧測定モード」 (24 ページ) センサから出力される電圧値を表示します。 CAL スイッチ * MEAS スイッチ 「7.7 低濃度側校正値設定」 (25 ページ) 低濃度側の校正値を変更できます。 CAL スイッチ * MEAS 「7.8 工場出荷時設定(初期化) 」 (27 ページ) スイッチ 各種設定、および校正値データを工場出荷時の初 期設定に戻します。 CAL スイッチ * 「7.9 ソフトウェアバージョン表示モード」 (27 ページ) ソフトウェアのバージョンを表示します。 CAL スイッチ * 単位設定の画面に戻ります。...
-
Page 25: 単位設定
単位設定 測定単位を選択できます。 測定モードで、MEAS スイッチを 3 秒以上押 して、特殊設定モードにします。 LCD が全点灯した後、右図の表示画面になり ます。 MEAS スイッチを 1 回(0.5 秒)押します。 現在の設定が表示されます。 CAL スイッチを 1 回(0.5 秒)押して、設定を変更します。 CAL スイッチを長押しすると、連続して設定が切り替わります。 硝酸イオン濃度および硝酸態窒素濃度の単位表示を選択できます。 B-742 では、硝酸態窒素濃度の kg/10a 単位表示も選択できます。 硝酸態窒素濃度は、土壌:水 = 1:5 の割合で抽出した試料の測定にの み適用できます。 B-742 のみ 硝酸態窒素濃度 硝酸イオン濃度 kg/10a 単位表示 ppm 単位表示 CAL スイッチを... -
Page 26: 温度測定モード
温度測定モード 内蔵の温度センサで測定した周囲温度を表示します。 測定精度は保証しておりませんので、参考値としてご利用ください。 測定モードで、MEAS スイッチを 3 秒以上押 して、特殊設定モードにします。 LCD が全点灯した後、右図の表示画面になり ます。 CAL スイッチを押して、C 点灯の画面にし ます。 MEAS スイッチを 1 回(0.5 秒)押します。 内蔵の温度センサで測定した周辺温度が表示 されます。 MEAS スイッチを押して、測定モードに戻り ます。... -
Page 27: 校正モード設定
校正モード設定 校正モードを選択できます。 測定モードで、MEAS スイッチを 3 秒以上押 して、特殊設定モードにします。 LCD が全点灯した後、右図の表示画面になり ます。 CAL スイッチを長押しし、 点灯の画面に します。 MEAS スイッチを 1 回(0.5 秒)押します。 現在の設定が表示されます。 CAL スイッチを 1 回(0.5 秒)押して、設定を変更します。 CAL スイッチを長押しすると、連続して設定が切り替わります。 高濃度側 1 点校正 CAL スイッチを 1 回 (0.5 秒) 押す 2 点校正 CAL スイッチを 1 回... -
Page 28: 乗算補正設定
乗算補正設定 測定値に掛ける補正係数(0.01 ~ 9.90)を設定します。補正後の結果が測 定値として表示されます。初期設定は 1.00 です。 試料を希釈・濃縮して測定する際に、必要に応じて設定してください。 注 記 乗算補正機能によって測定範囲が増えたり、 分解能が上がったりすることは ありません。 測定モードで、MEAS スイッチを 3 秒以上押 して、特殊設定モードにします。 LCD が全点灯した後、右図の表示画面になり ます。 CAL スイッチを長押しし、 と A が点灯し ている画面にします。 MEAS スイッチを 1 回(0.5 秒)押します。 現在の設定が表示されます。 CAL スイッチを 1 回(0.5 秒)押すたびに数値が増えます。 CAL スイッチを長押しすると、連続して数値が増加します。 9.90 で... -
Page 29: 加算補正設定
加算補正設定 測定結果に加える補正係数(1000 ~ 1000)を設定します。補正後の結果 が測定値として表示されます。初期設定は 0 です。 測定に用いる溶液や希釈液などに既知の影響がある場合などに使用してく ださい。 注 記 加算補正機能によって測定範囲が増えたり、 分解能が上がったりすることは ありません。 測定モードで、MEAS スイッチを 3 秒以上押 して、特殊設定モードにします。 LCD が全点灯した後、右図の表示画面になり ます。 CAL スイッチを長押しし、 と b が点灯し ている画面にします。 MEAS スイッチを 1 回(0.5 秒)押します。 現在の設定が表示されます。 CAL スイッチを 1 回(0.5 秒)押すたびに数値が増えます。 CAL スイッチを長押しすると、連続して数値が増加します。 1000 で... -
Page 30: 電圧測定モード
電圧測定モード センサから出力される電圧値を表示します。 センサの性能を評価する際や、 独自に校正直線や曲線を作成する際に活用で きます。 測定モードで、MEAS スイッチを 3 秒以上押 して、特殊設定モードにします。 LCD が全点灯した後、右図の表示画面になり ます。 CAL スイッチを長押しし、mV 点灯の画面に します。 MEAS スイッチを 1 回(0.5 秒)押します。 センサから出力される電圧値が表示されます。 MEAS スイッチを押して、測定モードに戻ります。... -
Page 31: 低濃度側校正値設定
低濃度側校正値設定 低濃度側の校正値を下表のとおり変更できます。 独自に校正液を準備する場 合などに使用してください。 本体形式 設定範囲 初期設定 B-741 300 ppm 100 ~ 4900 ppm B-742 30 ppm 30 ~ 290 ppm B-743 150 ppm 62 ~ 1900 ppm 注 記 設定値を変更した場合、再現性が仕様を満たさないことがあります。 試料濃度に近い濃度で校正してください。 測定モードで、MEAS スイッチを 3 秒以上押 して、特殊設定モードにします。 LCD が全点灯した後、右図の表示画面になり ます。 CAL スイッチを長押しし、Lo.ch 点灯の画面... - Page 32 <例> B-743 ( 設定範囲 : 62 ~ 1900ppm) の場合 150 ppm 62 ppm CAL スイッチ CAL スイッチを CAL スイッチを 1 回 (0.5 秒) 押す 1 回 (0.5 秒) 押す 160 ppm 1900 ppm CAL スイッチ...
-
Page 33: 工場出荷時設定(初期化
工場出荷時設定(初期化) 各種設定、および校正値データを工場出荷時の初期設定に戻します。 測定モードで、MEAS スイッチを 3 秒以上押 して、特殊設定モードにします。 LCD が全点灯した後、右図の表示画面になり ます。 CAL スイッチを長押しし、Init 点灯の画面に します。 MEAS スイッチを 1 回(0.5 秒)押します。 が点灯します。 CAL スイッチを 2 秒以上押します。 各種設定値、および校正データが初期化され ます。 初期化が完了すると、End と が点灯しま す。 電源 OFF 後、再度電源を ON にします。 ソフトウェアバージョン表示モード ソフトウェアのバージョンを表示します。 お問い合わせいただいた場合に、確認させていただくことがあります。 測定モードで、MEAS スイッチを 3 秒以上押 して、特殊設定モードにします。... - Page 34 付録 Q&A 測定試料により異なりますが、通常の試料であれば 1500 回 センサの寿命は ? 程度の測定は行えます。ただし、センサの劣化や故障は保証 の対象外です。 2 点校正を行ってください。校正エラーが発生する場合は、 センサの状態を確認 する方法は ? センサが劣化しています。センサを交換してください。 応答膜と液絡部の汚れが主な原因です。センサを水で十分に 2 点校正ができない 洗浄してください。その後、応答膜を柔らかい布や紙で軽く 場合は ? 拭き取ってください。それでも校正できない場合は、センサ を交換してください。 強酸性領域、強アルカリ性領域において pH の影響を受けま す。pH 4 ~ 12 の範囲でお使いください。 塩化物イオン(Cl ) 、油脂類の影響を受けます。海岸付近の 測定を妨害するもの 土壌や、油脂を多く含む作物においては、測定誤差が大きく は ? なります。また、電気伝導率が著しく高い試料においても測 定誤差が大きくなります。 詳細については、31 ページを参照してください。...
- Page 35 B-741(作物体用)と B-742(土壌用)の標準液は、専用標準 液(30 ppm、300 ppm、5000 ppm)を購入してください。こ 標準液は自分で調製 れらの標準液は、硝酸カリウム以外の物質で電気伝導率を調 できますか ? 整しています。 B-743(一般理化学用)の標準液は、硝酸カリウムをイオン交 換水などで溶解して所定濃度に調製することができます。 が点灯している場合、測定値ホールド中です。MEAS ス サンプルを変えても イッチを押して、測定値ホールドを解除してください。 表示値が変わりませ 測定値ホールドを解除しても表示値が変わらない場合は、セ ん。 ンサが破損している可能性があります。センサを交換してく ださい。 周囲の温度が使用温度範囲(5 ~ 40C)外の可能性がありま 測定時、温度アラー ム(C 表示)が点 す。周囲温度が使用温度範囲内であるのに温度アラームが点 滅する。 滅する場合は、センサを交換してください。 電池が正しく設置されていることを確認してください。電池 電源が入りません。 切れの場合は 2 個同時に新品と交換してください。 本体内部 IC の異常の可能性があります。 Er1 表示後、自動的に工場出荷時設定(初期化)モードにな 電源スイッチを入れ...
- Page 36 仕様 B-741 作物体用 B-742 土壌用 B-743 一般用 本体形式 測定原理 イオン電極法 0.3 mL 以上 測定必要試料量 100 ~ 9900 ppm 30 ~ 600 ppm 62 ~ 6200 ppm (mg/L) (mg/L) (mg/L) 測定範囲 6.8 ~ 140 ppm 23 ~ 2200 ppm 14 ~ 1400 ppm (mg/L)...
- Page 37 妨害イオン影響 カリウム カルシウム ナトリウム 硝酸イオン 測定対象 イオン イオン イオン(Na ) (NO ) (K ) (Ca ) mol/L Na mol/L K mol/L NO mol/L Ca に において おいて において において , Rb , Mg : : : : 1 × 10 1 ×...
- Page 38 〒 601-8306 京都市南区吉祥院宮の西町 31 番地 http://www.horiba-adt.jp 製品に関する技術的なお問い合わせ、ご相談は下記へお 願いします。 カスタマーサポートセンター 0120-37-6045 フリーダイヤル 受付時間 9:00 ~ 12:00、13:00 ~ 17:00 (祝祭日を除く月曜日~金曜日) サービスに関するお問い合わせは、最寄りのサービスス テーションへご連絡ください。...
- Page 39 Instruction Manual COMPACT NO METER B - 74X CODE:GZ0000297062D...
- Page 40 Quick Operation Guide This quick operation guide introduces the basic operations. Refer to the respective chapters for further information. Turn ON ① Press the ON/OFF button over 2 seconds to turn ON the meter. Perform calibration at least once a day Calibration ② ...
- Page 41 ③ Measurement ① Pour some drops of sample. ② Close the light shield cover. ③ When lights up, the measurement is completed. To lock the measured value, press the MEAS button. ④ After Use Clean the sensor with water, and then turn OFF the power.
- Page 42 Preface This manual describes the operation of the COMPACT NO METER, B-74X. Be sure to read this manual before using the product to ensure proper and safe operation of the instrument. Also safely store the manual so it is readily available whenever necessary. Product specifications and appearance, as well as the contents of this manual are subject to change without notice.
- Page 43 Regulations EU Regulations Conformable standards This equipment conforms to the following standards: EMC: EN61326-1 Class B, Portable test and measurement equipment RoHS: EN50581 9. Monitoring and control instruments Warning: This product is not intended for use in industrial environments.
- Page 44 Authorised Representative in EU HORIBA UK Limited 2 Dalston Gardens, Stanmore, Middx HA7 1BQ, UK FCC Rules Any changes or modifications not expressly approved by the party responsible for compliance shall void the user's authority to operate the equipment.
- Page 45 Contents Introduction..................1 Items in package ................. 1 Consumable parts sold separately ..........2 Part Names and Functions ..............3 Handling Precautions................5 Basic Handling..................7 Inserting/removing batteries ............7 Attaching/detaching the sensor ........... 8 Power ON/OFF ................9 Storage ..................9 Calibration ..................
- Page 46 Appendix .................... 28 Frequently asked questions ............28 Specifications ................31 Interfering ions ................32...
-
Page 47: Introduction
Introduction The COMPACT NO METER B-74X incorporates HORIBA original flat sensor and enables accurate measurement of nitrate ion (NO ) concentra- tions from a single drop of a sample. Items in package B-741 B-742 B-743 Meter model for crops for soil for geneal-use Sensor S040... -
Page 48: Consumable Parts Sold Separately
B-741 B-742 B-743 Meter model for crops for soil for geneal-use B-741 Quick-start manual B-742 B-743 Consumable parts sold separately Part No. Name Type Application 3200459870 Sensor S040、NO B-741、B-742、B-743 3200053535 Y044, NO 30 ppm B-742 (low concentration) 3200053536 Y045, NO 150 ppm B-743 (low concentration) Standard... -
Page 49: Part Names And Functions
Part Names and Functions Name Description Place a sample on this sensor. This sensor consists of a Flat sensor liquid junction (A) and response membrane (B). Both A and B must be covered with the sample. Shields the sensor from light, which affects the sensor. Close the light shield cover before starting measurement. - Page 50 Name Description Strap eyelet A strap can be attached here. Blinks until the measured value is stabilized, and lights MEAS icon steadily when the measured value is settled, while the reading locking function is active. Blinks during calibration, and lights steadily when calibration 10 CAL icon is finished.
-
Page 51: Handling Precautions
Handling Precautions Meter and sensor The sensor is a consumable part. If it becomes damaged or its performance deteriorates, replace it with a new one (the sensor cannot be repaired). Do not swing the meter and sensor by holding a strap. ... - Page 52 Store the response membrane of the flat sensor in dry conditions. If the response membrane gets wet for a long time, it may become deformed. Do not measure samples such as the following, since they may damage the sensor or shorten its life: Organic solvents, oils, adhesives, cement, alcohols, concentrated acid (0 pH to 2 pH), concentrated alkaline (12 pH to 14 pH) or surfactants.
-
Page 53: Basic Handling
Basic Handling Inserting/removing batteries Note Turn OFF the meter before inserting/removing batteries. Always replace both batteries at once. Do not use old and new batteries together. Inserting the batteries Slide both batteries into battery case as shown. Be sure to use two CR2032 Battery batteries, and put them with the plus... -
Page 54: Attaching/Detaching The Sensor
Attaching/detaching the sensor Note Turn OFF the meter before attaching/detaching the sensor. If the meter is turned ON with the sensor detached, the battery alarm may light up. In this case, turn OFF the meter and attach the sensor, and then turn ON the meter again. -
Page 55: Power On/Off
Power ON/OFF Power ON Press and hold the ON/OFF switch for over 2 seconds. The power is turned ON, and the meter model number is displayed on the LCD. Power OFF Press and hold the ON/OFF switch for over 2 seconds. -
Page 56: Calibration
Calibration About calibration Calibration points The following 3-type calibrations are available. One-point calibration in high concentration: for high concentration measurement One-point calibration in low concentration: for low concentration measurement Two-point calibration: for high accuracy measurement “One-point calibration in high concentration” is set by default. Refer to the instructions on page 21 for switching the calibration points. -
Page 57: One-Point Calibration In High Concentration
One-point calibration in high concentration Set “One-point calibration in high concentration” (refer to page 21). Open the light shield cover and put some drops Light shield of the high-concentration standard solution on cover the flat sensor to cover the entire flat sensor. Washing the sensor with the standard solution beforehand may provide more accurate calibration. -
Page 58: Two-Point Calibration
Two-point calibration Set “Two-point calibration” (refer to page 21). Open the light shield cover and put some drops Light shield of the low-concentration standard solution on cover the flat sensor to cover the entire flat sensor. Washing the sensor with the standard solution beforehand may provide more accurate calibration. -
Page 59: Measurement
Measurement Sample setting The following 4-type sampling setting methods are available. Drop: for a small-amount sample Immersion: for a large-amount sample Scooping: for sampling a part of a sample Sampling sheet: for a sample containing tiny particles Note Although this product is waterproof, avoid immersing it completely. - Page 60 Immersion Open the sliding cap on the light shield cover. Immerse the sensor into the sample and stir gently 2 or 3 times. Sliding cap Scooping Open the sliding cap on the light shield cover. Immerse the sensor into the sample and stir gently 2 or 3 times, and then scoop up some of the sample with the sensor.
- Page 61 Sampling sheet If tiny particles are contained in a sample, such as an extract from soil, the particles influence measurement results. Use the sampling sheet holder cover (part No. 3200459736) and sampling sheet B (part No. 3200053858) sold separately to counteract the influence. Replace the light shield cover with the sampling sheet holder cover.
-
Page 62: Measurement Operations
Measurement operations Without using the reading locking function Confirm that the meter is in the measurement mode, and set a sample on the sensor. Read the displayed value when appears. With using the reading locking function Confirm that the meter is in the measurement mode, and set a sample on the sensor. -
Page 63: Special Setting Mode
Special Setting Mode The special setting mode enables the meter setting and special operations. To enter the special setting mode, press and hold the MEAS switch for over 3 seconds in the measurement mode. All the LCD items appear, then the meter enters the special setting mode. - Page 64 MEAS switch "7.6 Sensor voltage display mode" (page 24) Displays the voltage output from the sensor. CAL switch* MEAS switch "7.7 Low calibration value setting" (page 25) Used to change calibration value. CAL switch* MEAS "7.8 Initialization mode" (page 27) switch All settings and calibration data are reset to the factory default values.
-
Page 65: Measurement Unit Setting
Measurement unit setting Used to select measurement unit. Press and hold the MEAS switch for over 3 seconds in the measurement mode to enter the special setting mode. All items appear on the LCD, and then the display changes as shown above. -
Page 66: Temperature Display Mode
Temperature display mode Displays the ambient temperature measured with the internal temperature sensor. The measurement accuracy is unwarranted. Use the value only as a guide. Press and hold the MEAS switch for over 3 seconds in the measurement mode to enter the special setting mode. -
Page 67: Calibration Point Setting
Calibration point setting Used to select the calibration points. Press and hold the MEAS switch for over 3 seconds in the measurement mode to enter the special setting mode. All items appear on the LCD, and then the dis- play changes as shown right. Press the CAL switch until appears. -
Page 68: Multiplying Compensation Setting
Multiplying compensation setting Used to select the coefficient (0.01 to 9.90) for multiplying compensation. The values after compensation are displayed as results. The initial setting is 1.00. If the sample is diluted/condensed, change this setting as necessary. Note The multiplying compensation function does not change the specified measurement range or product performance. -
Page 69: Adding Compensation Setting
Adding compensation setting Used to select the coefficient (1000 to 1000) for adding compensation. The values after compensation are displayed as results. The initial setting is 0. If measurement is affected by a known factor, change this setting as neces- sary. -
Page 70: Sensor Voltage Display Mode
Sensor voltage display mode Displays the voltage output from the sensor. Use this function to evaluate the sensor performance or to create your own calibration line or curve. Press and hold the MEAS switch for over 3 seconds in the measurement mode to enter the special setting mode. -
Page 71: Low Calibration Value Setting
Low calibration value setting Used to change calibration value for low concentration. The setting range and the initial setting depend on the meter model, as shown the table below. If you prepare a calibration solution originally, change this setting as neces- sary. - Page 72 <Example> For B-743 (Setting range:62 ppm to 1900ppm) 150 ppm 62 ppm CAL switch Press the CAL switch Press the CAL switch for 0.5 seconds. for 0.5 seconds. 160 ppm 1900 ppm CAL switch...
-
Page 73: Initialization Mode
Initialization mode All settings and all calibration data are reset to the factory default values. Press and hold the MEAS switch for over 3 seconds in the measurement mode to enter the special setting mode. All items appear on the LCD, and then the dis- play changes as shown right. -
Page 74: Appendix
Appendix Frequently asked questions Question Answer It depends on measurement samples and conditions. How long is the It should be approx. 1500 measurements for typical samples. sensor's service Note that sensor deterioration and failure are not included in life? the warranty. How can I check the Perform two-point calibration. - Page 75 Question Answer This product cannot measure a sample with a temperature Can I measure high- outside the meter's operating temperature range (5C to 40C). or low-temperature The difference between the sample temperature and ambient samples? temperature increases the measurement error. Perform mea- surement after the sample reaches the ambient temperature.
- Page 76 Question Answer How can I return all the settings of the special setting mode Perform initialization (refer to page 27). to the default settings?
-
Page 77: Specifications
Specifications B-741 B-742 B-743 Model (for crops) (for soil) (for general use) Measurement principle Ion electrode method Minimum sample 0.3 mL or more volume 100 ppm (mg/L) to 30 ppm (mg/L) to 62 ppm (mg/L) to 9900 ppm (mg/L) 600 ppm (mg/L) 6200 ppm (mg/L) Measurement 6.8 ppm (mg/L) to... -
Page 78: Interfering Ions
Interfering ions Sodium Potassium Nitrate Calcium Target , Rb , Mg : : : : 10 1 × 10 1 × 10 1 × 10 : , Sr , Zn : : 4 × 10 1 , Mg 1 × 10 :... - Page 80 31, Miyanonishi-cho, Kisshoin Minami-ku, Kyoto 601-8306, Japan http://www.horiba-adt.jp For any questions regarding this product, please contact your local agency, or inquire from the following website. http://global.horiba.com/contact_e/index.htm...
Need help?
Do you have a question about the LAQUAtwin B-74 Series and is the answer not in the manual?
Questions and answers