Table of Contents
Advertisement
Available languages
Available languages
Quick Links
Operator's
Manual
PRO
E
S
S
I
0
N
A
21" SELF PROPELLED MOWER
Model No. 247.887210
CAUTION:
Before
using
this product,
read this
manual
and follow
all
safety
rules
and operating
instructions.
o SAFETY
ASSEMBLY
OPERATION
MAINTENANCE
PARTS LIST
o ESPANOL
Sears, Roebuck and Co., Hoffman
Estates,
IL 60179, U.S.A.
Visit our website:
www.craftsman.com
FORM1/0. 769-03781
4/14/2009
Advertisement
Table of Contents

Related Manuals for Craftsman 247.887210


Summary of Contents for Craftsman 247.887210
- Page 1 Operator's Manual 21" SELF PROPELLED MOWER Model No. 247.887210 CAUTION: Before this product, read this manual and follow safety rules and operating instructions. Sears, Roebuck and Co., Hoffman using Visit our website: www.craftsman.com o SAFETY ASSEMBLY OPERATION MAINTENANCE PARTS LIST...
-
Page 2: Back Cover
Page5 Trouble Shooting ..Page7 PartsList... Pages 8-11 Espa_ol ... Pages 12-13 Service Numbers ..Craftsman Two Year Limited Warranty Sears, Roebuck and Co., Hoffman Estates, IL 60179 ModelNumber... Serial Number ... Dateof Purchase... Page 20 Page 21... -
Page 3: General Operation
which,if not followed,couldendangerthe personal __IL his symbolpointsout importantsafetyinstructions safetyand/or propertyof yourselfand others.Read and followall instructionsin this manualbefore attemptingto operatethis machine.Failureto complywith these instructionsmay resultin personalinjury.Whenyou seethis symbol, HEEDITS WARNING! Batteryposts,terminals,and relatedaccessoriescontainlead and leadcompounds,chemicalsknownto the State of Californiato cause cancer and reproductiveharm.Washhandsafter handling. CHILDREN Tragicaccidentscan occur if operatoris not alert to presenceof children.Chil- dren areoften attractedto mowerandmowingactivity. -
Page 4: Slope Operation
• If the equipmentshould startto vibrateabnormally,stop the engine and check immediately for the cause.Vibrationis generallya warningof trouble. • Shutthe engineoff andwait untilthe bladecomesto a completestop beforeremovingthe grass catcheror uncloggingthe chute. The cuttingblade continuesto rotatefor a fewseconds afterthe engine is shut off. Neverplace any part of the bodyinthe bladearea untilyou aresure the bladehas stoppedrotating. - Page 5 Do notmow on inclineswith a slopein excessof 15degrees(a riseof approximately 2-1/2feet every 10feet). OperateWALK-BEHIND mowersacrossthe face of slopes,neverup and downslopes. Sight and hold this level with a vertical tree... 15° or a fence post 15°...
- Page 6 This page left intentionally blank.
- Page 7 READ OPERATOR'S M ANUAL. KEEP SAFETY DEVICES ( BLADECONTROL, TRAILING SHIELD, DISCHARGE C OVER, ETC.)IN PLACE ANDWORKING.IF DAMAGED, REPLACE I MMEDIATELY.
- Page 8 IMPORTANT: T his unit is shippedwithoutgasolineor oil in the engine. Be certain to serviceenginewithgasolineand oil as instructedin the Operationsectionbeforestartingor runningyourmachine. NOTE:Referenceto rightand left hand sideof the LawnMoweris observedfrom the operatingposition. OPENING CARTON Cut eachcornerof the cartonverticallyfromtop to bottom. Removeall looseparts. Removeloosepackingmaterial.
- Page 9 The ropeguide,which is connectedto the support rod,is located on the rightsideof the lowerhandle.See Figure3. Holdblade controlagainstupperhandle. Pull starterropeout of the engine.Releasebladecontrol. Slip starterrope intorope guide. Attachcablesto the lowerhandlewith thecable ties alreadyon the lowerhandle.Insertpegson cableties intothe holeson the lowerhandle.See Figure4. Pullcable ties tight and cut off the extra.
- Page 10 ADJUSTMENTS Cutting Height Thecuttingheightadjustmentleverislocatedabovethe rearleft wheel.See Figure7Ainsert. Pull leveroutand awayfrom mower. Moveleverforwardor backfor desiredcuttingheight. Releaselevertowardsmowerdeck. Thefront wheelcuttingheightisdeterminedby selectingone of six positionson eachcasterassembly.To adjustfront cuttingheight,refer to Figure7B and proceedas follows: Removewing nut fromaxle bolt. Slideaxle bolt and wavewasher fromthe assemblyand selecta cuttingheight.
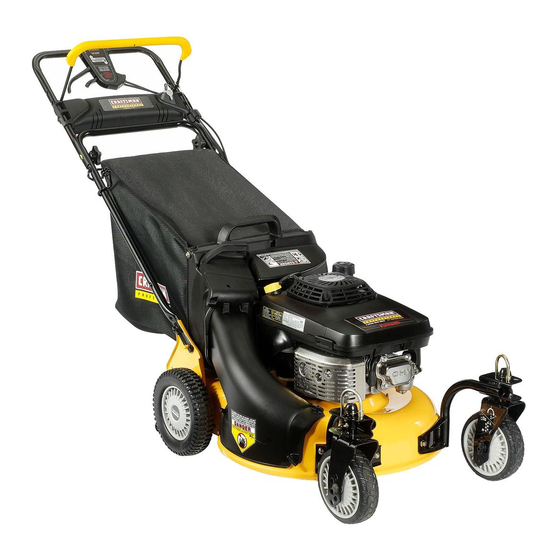
- Page 11 DriveControl ShiftLever RecoilStarter ..Side Discharge Chute BLADE CONTROL Theblade controlis attachedto the upper handleof the mower.See Figure9. Depressand squeezeit againstthe upperhandleto operate the unit. Releaseit to stopengineand blade. This bladecontrolis a safetydevice.Neverattemptto bypassits operations. CUTTING HEIGHT ADJUSTMENT LEVER Thecuttingheightadjustmentleveris locatedabovethe left rearwheel.Toadjust thecutting height,referto the Assemblysection.
-
Page 12: Gas And Oil Fill-Up
Engineexhaust containscarbonmonoxide,an odorlessand deadlygas. Keep hands, Gasolineis feet, hairand looseclothingawayfrom any movingpartson engine and lawn mower. extremely TO START ENGINE Attach sparkplug wireand rubberbootto spark plug. Gastank shouldbe at least 3/4 full beforestarting. Pushprimerbutton3 times. Do not primeon hotdays or to restart a warm engineafter a short shutdown. - Page 13 Disconnectsparkplug wireand groundit to the retainingpost to preventaccidentalstartingwhilethe equipmentis unattended. Waitfor the bladeto stopcompletelybeforeperforminganywork on the moweror to removethe side dischargechute. USING YOUR LAWN MOWER Be sure lawnis clearof stones,sticks,wire, or otherobjectswhich coulddamagelawnmoweror engine.Suchobjectscouldbe accidently thrownby the mowerin anydirectionand cause seriouspersonal injuryto the operatorand others.
-
Page 14: General Recommendations
Always stop e ngine, disconnect spark p lug w ire, and ground against enginebeforeperformingany type of maintenance on yourmachine. GENERAL RECOMMENDATIONS • Alwaysobservesafetyruleswhenperformingany maintenance. • Thewarrantyon this lawnmowerdoesnot coveritemsthat have been subjectedto operatorabuseor negligence. T o receivefull valuefromwarranty,operatormustmaintaintheequipmentas instructedhere. • Changingof engine-governed speedwill voidenginewarranty. - Page 15 Check Engine Checkoil levelbeforeeachoperation.Be sureoil levelismaintained. Removeoil fill dipstickand wipeclean with cloth. Replacedipstickwithoutscrewingitin. Removeand checkoil level.Levelshouldbe at FULLmark. If needed,add oil slowJy-recheck.Do notoverfill. Installand tightendipstick. Donotoverfill.Overfillingwith oil maycausethe engine to not start, hard starting,or engine smoking.If overthe FULLmark on the dipstick,drain oil to reduceoil levelto FULL markon dipstick.
- Page 16 LUBRiCATiON disconnect lAIways stopengine, spark plug, enginebeforeperformingany type of maintenance on yourmachine. Blade Control Lubricatepivot pointson the bladecontrolat least oncea seasonwith lightoil. The bladecontrolmustoperatefreely in bothdirections.See Figure15. Wheels and Casters Lubricatethe wheelsand castersat least oncea seasonwith lightoil (or motor oil). If wheelsare removedforany reason,lubricatethe axle boltand innersurfaceof the wheelwith lightoil.
-
Page 17: Blade Care
ADJUSTING SHIFT LEVER CABLE Periodicadjustmentof the six speedshiftcable maybe necessarydue to normalwearon the cable.Adjustmentis neededif all six speedsdo not work.The adjustablecablebracketis locatedon the left side of the mowerbesidethe engine.See Figure17. Start engineand placeshift leverin the sixth speedposition. Stopengineand disconnectsparkplug wireand groundit against engine. -
Page 18: Replacing Battery
REPLACING BATTERY Batteriescontainsulfuricacid whichmay causeburns. Donot short I circuitor mutilatebatteriesin anyway.Do not putbatteriesin fireas _thesemay burst or releasetoxic materials. Loosenstar knobs securingupper and lowerhandlesand carefullyfoldthe upper handledowntowardthelowerhandleas shownin Figure19. Removethe two screwssecuringbatterycoverto batteryhousing and placethem to the side.See Figure19. Open batterycover,removepositiveand negativeleadsfrom battery,removeand replacewith newbattery.Connectthe positivelead to the positiveside of the batterypack,then connect the negativeside. -
Page 19: Blown Fuse
IMPORTANT: A lwaysplug chargerlead into batterypacklead first, and theninsert batterychargerplug into 120volt standardhousehold outlet.Followthis orderof action everytime you chargethe battery. Use onlythe batterychargersuppliedwith this mower. Replacing Fuse Theelectricstartercircuitand batteryare protectedbya 40 ampere fuse.If thefuse burnsout, the electricstarterwill notoperate.If the unitfails to startwith the electricstarter,performthe followingstepsto checkthe fuse insidethe batteryhousing: Openthe batterycoveras describedin ReplacingBattery.See Figure19. -
Page 20: Preparing The Lawn Mower
Pullstarterrope slowly.This turns the engine'scrankshaftand distributesoil throughthe engine. Add fuel stabilizeror drain fuelfrom engine. Cleandirt and debrisfrom topand all areasaroundengine. Storein a clean,dry area. PREPARING THE LAWN MOWER • Cleanand lubricatemowerthoroughly as describedinthe lubrica- tion instructions. • Donot usea pressurewasheror gardenhoseto cleanyour unit. -
Page 21: Need More Help
Enginefails to start Bladecontroldisengaged. Sparkplug bootdisconnected. Fueltank emptyor stale fuel. Enginenot primed. Faultyspark plug. Blockedfuel line. Engineflooded. Burntfuse.(ElectricStart only) Enginerunserratically Sparkplug bootloose. Blockedfuel line or stalefuel. Ventin gas cap plugged. Wateror dirt in fuel system. Dirtyair cleaner. Engineoverheats Engineoil levellow Air flow restricted Enginehesitatesat high RPMs 1. - Page 22 Self Propelled Mower B Model No. 247.887210 12" "43...
- Page 23 748-0377C Blade Adapter 736-0524B Blade Bell Support 710-1257 Hex Bolt, 3/8-24x 2.5 742-04276S 21"MulchingBlade 710-0653 Screw,1/4-20x 3.75 731-1828 Baffle 954-0460 Belt, 3/8 x 39.24 No. 247.887210 710-0895 964-04093 747-0940A-0637 747-0939 747-0937-0637 631-0071 926-0106 712-04063 731-1874A 732-0819 726-0111 747-0965 925-04323 710-0654A...
- Page 24 Self Propelled Mower B Model No. 247.887210...
- Page 25 ShoulderNut.825x .165Lg. FlatWasher.508 ID x 1.00D 936-0369 782-0566B-0637 PivotArmAssembly 750-0515 Spacer.510ID x .70OD 741-0978 SIv Bearing.504 ID x .830OD 950-1056 ShlderSpacer,.3851D x .715Lg 710-0653 TapScrew 1/4-20x .375 No. 247.887210 " 682-7528-0637 741-0324A 682-7526-0637 918-0263A 734-1857 913-0453 638-0012 941-0522 782-0568-0637 950-0151 710-1315...
- Page 26 Craftsman Engine Model No. 12S605-0607 For Self Propelled Mower iVlodel 247.887210 110SSOPERATORS MANUAq [] 27g_i 48S,ORTBLOOK 358 ENGINE GASKET SET !/ 51 1330 REPAIR MANUAL i i ii sos _i 615 _ 404 <'_ 616 _'' 842_ 163_ !I_. 524 _;...
- Page 27 Craftsman Engine Model No. 12S605-0607 For Self Propelled Mower Model 247.887210 1022 238 _\_ _._%x ¢,,,_&_*',"_ lO29 t_:_ 914A _ 914A _ 914 _ 1095 VALVE GASKET SET f+" % _' i_b-_ 122 :_ ..." k... i976i 718 e_Z 445_:_...
- Page 28 Craftsman Engine Model No. 12S605-0607 For Self Propelled Mower Model 247.887210 633A @ 276 _# 121 CARBURETOR 18276 _J_;'_ OVERHAUL /2s_ 276 _'- 633 _ J 977 CARBURETOR GASKET SET 1631 276 C<b_ 633 C_. 635 o-- 333 i i851...
- Page 29 Craftsman Engine Model No. 12S605-0607 For Self Propelled Mower Model 247.887210 I 1036 EMISSIONS LABEL ] il 211 210i:_ 459 _::_'_¢_ _::=_ 58 689d_ /;i,' 305_i 592 ® 332@# 783A _...
- Page 30 Craftsman Engine Model No. 12S605-0607 For Self Propelled Mower Model 247.887210 692670 CylinderAssembly 399269 Kit-Bushing/Seal ( MagnetoSide) 299819St SeaI-Oil(MagnetoSide) 493429 Head-Cylinder 697230t* Gasket-Cylinder H ead 495786 BreatherAssembly 699833 Gasket-Breather 691125 Screw (BreatherAssembly) 691781 Tube-Breather 692232t Gasket-Crankcase 691137 Screw (CylinderHead) 691680...
- Page 31 Craftsman Engine Model No. 12S605-0607 For Self Propelled Mower Model 247.887210 694543 Screw (FuelTank) 691303 Adjuster-Rocker A rm 691851 Link-Mechanical Governor 792404 Spring-Governor ( Yellow) 227 694864 Bracket-Control 240 298090S Lever-Governor Control 276 271716 Washer-Sealing 287 690940 Screw(DipstickTube) 697590 Muffler...
- Page 32 Craftsman Engine Model No. 12S605-0607 For Self Propelled Mower Model 247.887210 795099 Screw (Brake) 795095 Gear-Pinion 694544 Cover-StarterGear 691031 Stud-RockerArm 847 692047 Seal-O Ring(DipstickTube) 851 493880S Dipstick/TubeAssembly 696842 Adaptor-Wire 795440t* Seal-Valve 691893t Gasket-Exhaust 914 691108 Screw (RockerCover) 914A 691127 Screw (RockerCover)(Usedin Pos. 1 & 2)
- Page 34 Sears, Roebuck and Co., U.S.A. (Sears), the California and the United States Environmental Emission Control System Warranty EMISSIONCONTROL WARRANTY COVERAGEISAPPLICABLE TO CERTI- FIEDENGINESPURCHASEDIN CALIFORNIAIN 1995ANDTHEREAF- TER,WHICHARE USEDINCALIFORNIA,ANDTO CERTIFIEDMODEL California and United The CaliforniaAir ResourcesBoard(CARD),U.S.EPAand Searsare pleased to explainthe EmissionControlSystemWarrantyon your modelyear2000and latersmalloff-roadengine(SORE).In California,newsmall off-roadengines mustbe designed,builtand equippedto meetthe State'sstringentanti-smog standards.Elsewherein the UnitedStates, newnon-road,spark-ignition...
- Page 35 250 hours of actual engine running time. to be emission compliant for 500 hours of actual engine running time. lawn mower is used 20 to 25 hours per year. Therefore, rating would equate to 10 to 12 years. the relative level of emissions...
- Page 36 Congratulations on makinga smartpurchase.YournewCraftsman® Professional p roductis designedand manufactured for years of dependable operation.Butlike all products,it may requirerepairfrom time to time.That'swhen havinga RepairProtectionAgreement c an saveyou moneyand aggravation. Here'swhat the RepairProtectionAgreement*includes: • Expert serviceby our 10,000professional r epairspecialists Unlimitedserviceand no chargefor parts and labor on all covered repairs Productreplacementup to $1500if yourcoveredproductcan't be fixed...
- Page 37 Servicio y Mantenimiento Almacenamiento Soluci6n de problemas ... 42-45 NOmero de servicio ... Garantia de dos aSos de Craftsman Sears, Roebuck and Co., Hoffman Estates, IL 60179 N_rnerode modelo. N_rnerodeserie Fecha de cornpra Registreel nOmero de modelo,nOmero de seriey fechade compra fuera de temporada ...
- Page 38 Lapresencia deeste s imbolo indica que se trata d einstrucciones importantes deseguridad que sedeben respetar enpeligro su seguridad personal y/omaterial Lea ysiga todas iasinstrucciones deeste m anual antes deponer en funcionamiento esta m a.quina. Si n orespeta estas instrucciones provocar iesiones personales.
- Page 39 hasta que e ste s eguro de que lamisma ha detenido • Nunca opere lacortadora si n o tiene colocados posterior apropiado, lacubierta de descarga, lamanija de control de lacuchilla yotros dispositivos protecci6n. Nunca opere lacortadora si l os dispositivos daRados.
- Page 40 movimiento podriavoltearsey causarlesionesseveras.Si en una pendienteopera una podadoraubicadodetrasde la misma,es No podeen inclinacionesmayoresa 15grados(elevaci6naproximada de 2 1/2pies por cada 10pies). Una podadoraen extremadamente dificil mantenerel equilibrioy podriaresbalarsey sufrir lesionesgraves. "O ii _ Alineey sostengaeste nivelcon un Arbolvertical... UOb/e a/_, "_ _arg o d_., _"...
- Page 41 DEAD OPERATOR'S MANUAL. KEEPSAFETY DEVICES ( BLADECONTROL, TRAILING SHIELD, DISCHARGE COVER, E TC.)IN PLACE ANDWORKING.IF DAMAGED, REPLACE I MMEDIATELY.
- Page 42 IMPORTANTE: Esta unidad se envfa sin gasolina ni aceite en el motor. Antes de comenzar o correr ia ma.quinacargue el motor con gasolina y aceite como se indica en la secci6n de operaci6n de este manual. NOTA: Las referencias a los lados derecho e izquierdo de ia cortadora de cesped se hacen observando la ma.quinadesde la posici6n de operaci6n.
- Page 43 La guia de la cuerda, que esta.conectada a lavariiia de sosten, se encuentrasobre el lade derecho de la manija inferior.Vea la Figura3. Sostenga la manija de control de la cuchilla contra la manija superior. Jale la cuerda de arranque para sacarla del motor. Suelte el control de la cuchilla.
- Page 44 AJUSTES AItura de torte La palanca de ajuste de altura de corte se ubica por encima de la rueda izquierda trasera. Veael recuadro de la figura 7A. Tire de la palanca hacia afuera de ia cortadora. Mueva la palanca hacia adelante o hacia atrfis para la altura de corte deseada.
- Page 45 Control de la transmisi6n___ Arrancador de retroceso Tap6n de Tolva de descarga lateral CONTROL DE LA CUCHILLA El control de la cuchilla esta.unido a la manija superior de la cortadora. Vea ia Figura 9. Presione el control de la cuchilia y aprietelo contra ia manija superior para operar la unidad.
-
Page 46: Para Encender
LLENADO DE GASOLINA Y ACEITE Aceite (se envia una botella junto con la unidad) Primer uso Saque la varilla del nivel de aceite. Con ia cortadora de cesped ubicada en suelo nivelado, utilice un embudo para vaciar todo el contenido de la botella de aceite suministrada en el motor. - Page 47 Arrancador el_ctrico: Gire la Ilave de encendido a la derecha para arrancar el motor. Sueite la ilave apenas arranque el motor. Arrancador de retroceso: Tome la manijadel arrancadory saque la cuerda lentamentehastaque el motoralcance ei comienzo del ciclo de compresi6n(la cuerda tirara, u n poco ma.sfuerte en este punto).
- Page 48 Detenga siempre elmotor, desconecte elcable d elabujia y haga m asa contra elmotor antes dereaiizar cuaiquier tarea d emantenimiento mfiquina. RECOMENDACIONES GENERALES • Respete siempre las reglas de seguridad cuando realice tareas de mantenimiento. • La garanfia de esta cortadora no cubre elementos que han estado sujetos al mal uso o la negligencia del operador.
-
Page 49: Filtro De Aire
Inspeccione el aceite del motor Controle el nivel de aceite antes del funcionamiento. Aseg_rese de que se mantenga el nivel de aceite. Extraiga la variila de medici6n de aceite y sequela con un trapo. Vuelvaa colocar iavariiia de medici6nsin enroscarla.Retirelay controle el nivelde aceite.El niveldeberiaestar en lamarcaFULL (lleno) Si es necesario, agregue aceite lentamente y vuelva a controlar. - Page 50 LUBRICACION Detenga siempre el motor, desconecte la bujia y haga masa contra el motor antes de reaiizar cuaiquier tarea de mantenimiento en su ma.quina.j' Control de la cuchilla Lubrique con aceite ligero los puntos de pivote del control de la cuchilla ai menos una vez pot temporada.
- Page 51 AJUSTE DEL CABLE DE LA PALANCA CAiVIBIOS Puede set necesario realizar un ajuste peri6dico del cable de cambios de seis velocidades debido al desgaste normaldel cable. El ajuste es necesario si las seis velocidades no funcionan bien. La mensula ajustable del cable se iocaliza sobre el lado izquierdo de la cortadora de cesped junto al motor.
- Page 52 CAIVIBIO DE LA BATERiA Las baterias contienen _cido sulfOricoque puede causar quernadu- ras. No ponga en corto cirouito ni rnutile las baterias de ninguna rnanera. No coloque las baterias sobre fuego dado que pueden _exp otar o ern t r mater a es t6x cos. Afloje las perillas en estrella que sujetan las manijas inferior y superior y con cuidado doble la manija superior hacia la manija inferior tai come se muestra en ia Figura 19.
- Page 53 IMPORTANTE: Siempre conecte el conductor dei cargador en del paquete de baterias en primer iugar, y iuego inserte el enchufe del cargador de baterias en un tomacorriente residenciai estfindar de 120 voltios. Siga esta secuencia siempre que cargue la bateria. Utilice Qnicamente el cargador de baterias suministrado con esta cortadora de cesped.
- Page 54 Nunca almacene la cortadora de cesped con combustible en el tanque en un espacio cerrado o en fireas con poca ventilaci6n, donde los gases dei combustible puedan alcanzar el fuego, chispas o una luz piloto como ia que tienen algunos homos, calentadores de agua, secadores de ropa o aigOnotto dispositivo a gas.
- Page 55 El motor no arranca Control de ia cuchilla desenganchado. Se ha desconectado el capuch6n de la bujia. El dep6sito de combustible esta.vacio o el combustible se ha echado a perder. El motor no esta.cebado. La bujia no funciona correctamente. La linea dei combustible esta.bloqueada. Motor ahogado.
- Page 56 Sears, Roebuck and Co., U.S.A. (Sears), el Consejo y la Agencia de Protecci6n Ambiental de los Estados Unidos (EPA) Declaraci6n de garantia del sistema de control de emisiones LA COBERTURA DE LA GARANTJA DE CONTROLDE EMISIONESES APLICABLEA LOS MOTORESCERTIFICADOS COMPRADOSEN CALIFOR- NIA EN 1995Y POSTERIORMENTE, QUESE UTILIZANENCALIFORNIA, Declaraci6n de garantJa sobre defectos en el control El Consejode RecursosAmbientalesde California(CARB),la EPA(Agencia...
- Page 57 Busque el periodo de duraci6n Los motores cuyo cumpiimiento con los estAndares de emisi6n Tier 2 de la Comisi6n de Recursos Ambientales de California (CARB) est6 certificado deben exhibir la informaci6n relacionada con el perJodo de duraci6n de las emisiones y la clasificaci6n Roebuck and Co., de los Estados Unidos ponen esta informaci6n a disposici6n El Periodo de Duraci6n de las Emisiones describe el nQmero de horas de tiempo real de funcionamiento el motor cumple con las reglas de emisi6n, descontando...
- Page 58 Felicitaciones por haberrealizadouna adquisici6ninteligente.El productoCraftsman@ Profesional q ue ha adquiridoest,. dise_adoy fabricadopara brindarrnuchosa_os de funcionarniento confiable.Pero cornotodos los productosa vecespuede requerirde reparaciones. Es en ese rnornento cuandoel disponerde un Acuerdode protecci6n para reparaciones le puedeahorrardineroy problernas. A continuaci6nsedetallanlos puntosincluidosen el Acuerdo: •...
-
Page 60: Installation
For expert troubleshooting For repair - in your home - of all major brand appliances, lawn and garden equipment, no matter who made it, no matter who sold it! For the replacement owner's manuals that you need to do-it-yourself. For Sears professional and items like garage door openers and water heaters.