Table of Contents
Advertisement
Advertisement
Table of Contents

Summary of Contents for Alesis Drums NITRO MAX
- Page 1 NITRO MAX DRUM MODULE User Guide English...
-
Page 2: Table Of Contents
TABLE OF CONTENTS (1.0) Introduction ............4 (1.1) Box Contents ..................4 (1.2) Support ....................4 (1.3) Setup ....................5 (1.3.1) Connection Diagram ...................... 5 (1.3.2) Drum Setup and Playing ..................... 6 (2.0) Features ..............7 (2.1) Top Panel ................... 7 (2.2) Rear Panel .................. - Page 3 (4.0) Advanced Functions .......... 18 (4.1) Adjusting Utility Settings ............18 (4.2) Adjusting the Metronome ............19 (4.3) Recording ..................20 (4.4) MIDI Settings .................. 21 (4.5) Connecting to a Bluetooth® Device ........23 (5.0) Appendix ............24 (5.1) Velocity Curves ................24 (5.2) Pad MIDI Note Numbers .............
-
Page 4: (1.0) Introduction
(1.0) Introduction (1.1) Box Contents Nitro Max Drum Module Nitro Max Drum Kit & Accessories Drumeo Drum Lessons Card Quickstart Guide Safety & Warranty Manual (1.2) Support For the latest information about this product (system requirements, compatibility information, etc.) and product registration, visit alesis.com. -
Page 5: (1.3) Setup
(1.3) Setup Items not listed in (1.1) Box Contents are sold separately. (1.3.1) Connection Diagram Computer* Smartphone, MP3 player, etc.* Music Device* 0.5A TRIGGER INPUT AUDIO OUTPUT POWER CYM 2 TOM 4 L/MONO AUX IN Power Speakers* Optional expansion tom and cymbals available separately. -
Page 6: (1.3.2) Drum Setup And Playing
(1.3.2) Drum Setup and Playing Connect your electronic drum kit's pads to the cable snake, then connect the cable snake to the Cable Snake Input on the module's bottom panel. 2. Optional: If you have any additional pads (e.g., an extra tom, an extra crash cymbal), connect them to the module's Tom 4 Input or Crash 2 Input. -
Page 7: (2.0) Features
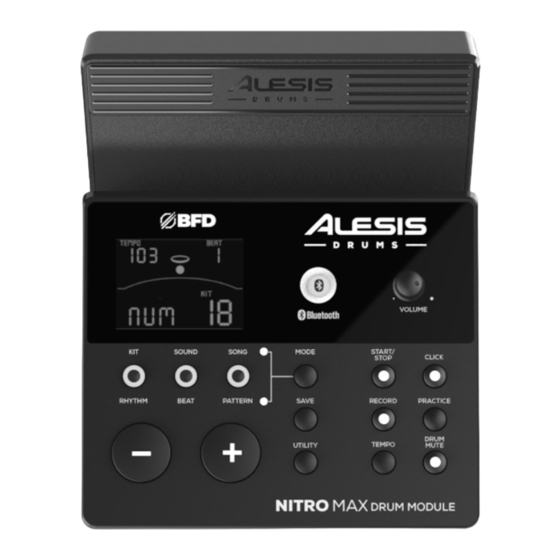
RECORD PRACTICE DRUM UTILITY TEMPO MUTE NITRO MAX DRUM MODULE Display This display shows information relevant to the current settings and functions. Bluetooth® Press this button to pair to a Bluetooth device. The backlit button will be lit solid when a device is paired. If the button is pressed again, pairing mode will be canceled. - Page 8 PRACTICE DRUM UTILITY TEMPO MUTE NITRO MAX DRUM MODULE Kit / Rhythm In Normal Mode, press this button to enter the Kit Menu, where you can select a kit or adjust kit-related settings. In Learning Mode, press this button to select a rhythm (full kit) to play along to or adjust pattern-related settings.
- Page 9 DRUM UTILITY TEMPO MUTE NITRO MAX DRUM MODULE Save While in Kit or Voice mode, press the Save button to save the current kit settings. Use the – / + buttons to select an available save slot, and then press Save again.
- Page 10 PRACTICE DRUM UTILITY TEMPO MUTE NITRO MAX DRUM MODULE 12. Record While in Normal Mode (Kit, Voice, or Song), press this button once to record- arm the module. When armed, the button LED wil flash. To start recording, press Start/Stop or hit a pad. When recording, its LED will light solid. (To stop recording, press Start/Stop again.) See the...
- Page 11 PRACTICE DRUM UTILITY TEMPO MUTE NITRO MAX DRUM MODULE 17. Mobile Device Shelf Place your device here. While the rubber padding will help keep your device still, use caution when playing with force as vibrations from heavy playing may cause the device to move. Please keep your device in landscape mode for the...
-
Page 12: (2.2) Rear Panel
(2.2) Rear Panel 0.5A TRIGGER INPUT AUDIO OUTPUT POWER CYM 2 TOM 4 L/MONO AUX IN Power Input Connect the included power adapter (9V DC, 500mA, center pin-positive) here, then connect the adapter to wall power. Note: To save energy, the drum module will shut down automatically after 30 minutes of no activity. -
Page 13: (2.3) Side Panel
(2.3) Side Panel Phones Output PHONES Connect your 1/8" (3.5 mm) headphones to this output. (2.4) Bottom Panel Cable Snake Input Connect the cable snake included with the Nitro Max Drum Kit to the module here. -
Page 14: (3.0) Basic Functions
(3.0) Basic Functions (3.1) Editing and Saving Drum Kits Important: To edit and save your kits, you must be in Normal Mode, with either the Kit or • Voice button lit. Remember to save your kits after you have entered the settings you want! •... - Page 15 To adjust the pad settings: Make sure the module is in Normal mode (top Mode LED is lit). Hit the pad whose settings you want to adjust. Press the Voice button. Press – / + buttons to change a sound. Press the Voice button again to view and edit these settings on the display: NUM / H-C**: Pad voice (drum, cymbal, or percussion sound) •...
-
Page 16: (3.2) Playing Along With Songs
(3.2) Playing Along With Songs Important: To play songs, you must be in Normal Mode (Kit, Voice, Song). To select and play a song: Press the Song button until NUM appears on the display. 2. Use the – and + buttons to select a song. 3. -
Page 17: (3.3) Playing Along With Beats, Rhythms, And Patterns
(3.3) Playing Along With Beats, Rhythms, and Patterns Important: To play along with Beats, Rhythms, or Patterns, you must be in Learning Mode. Press one of these Learning Mode buttons to select how you want to play: Beat (BEA): Snare drum only •... -
Page 18: (4.0) Advanced Functions
(4.0) Advanced Functions (4.1) Adjusting Utility Settings The Utility menu lets you further customize your pad settings and adjust the module's MIDI settings. To adjust the Utility settings: Press the Mode button so that Normal Mode (Kit, Voice, Song) is active. 2. -
Page 19: (4.2) Adjusting The Metronome
(4.2) Adjusting the Metronome The module's built-in metronome can be used when practicing, performing, recording, or playback. Using the metronome: You can turn the click track (metronome) on or o by pressing the Click button. Adjust its tempo by pressing Tempo and using the – and + buttons to set the new BPM (beats per minute). -
Page 20: (4.3) Recording
(4.3) Recording To record: Press the Mode button so that Normal Mode (Kit, Voice, Song) is active. 2. Press Record. The button's LED will flash and the metronome will turn on automatically. This means the module is record-armed. 3. To start recording, press Start/Stop, or hit any pad. The Record LED will light solid. -
Page 21: (4.4) Midi Settings
Note: Be sure to have an instrument plugin (like BFD player) inserted into the instrument track or MIDI track. 3. Start recording in your DAW. 4. Play your Nitro Max kit! 5. Stop recording in your DAW. Your performance has been recorded. - Page 22 Important: Audio from BFD Player will not be sent out of the Nitro Max's headphone output. 6. In MIDI Input Device, select "Alesis Nitro Max".
-
Page 23: (4.5) Connecting To A Bluetooth® Device
Bluetooth button LED will flash. 3. Navigate to your device’s Bluetooth settings and select Press Alesis Nitro Max. Once your device has been paired, the Bluetooth button LED will be fully lit. Note: If the Bluetooth button is pressed again, pairing... -
Page 24: (5.0) Appendix
(5.0) Appendix (5.1) Velocity Curves Curve 1 Curve 2 Curve 3 Volume Volume Volume Velocity (striking force) Velocity (striking force) Velocity (striking force) Curve 4 Curve 5 Curve 6 Volume Volume Volume Velocity (striking force) Velocity (striking force) Velocity (striking force) -
Page 25: (5.2) Pad Midi Note Numbers
(5.2) Pad MIDI Note Numbers MIDI Note MIDI Note Trigger Trigger Number Number Kick Ride Snare Crash 1 Snare Rim Crash 2 Tom 1 Hi-Hat Open Tom 1 Rim Hi-Hat Half-Open Tom 2 Hi-Hat Closed Tom 2 Rim Hi-Hat Pedal Tom 3 HH Splash Tom 3 Rim... -
Page 26: (5.3) Kits
(5.3) Kits Deep Rock Room Tight Pop Rock Roomy Rock Pop Rock Phat Pop Jazz Tight Rock Jazz Brush Garage Timpani Studio Rock Songo Power Pop 1971's Acoustic 1 Latin Standard 1 Disco Standard 2 TR606 Funk 1 Funk 2 Hip Hop Fusion Electron 1... -
Page 27: (5.4) Sounds
(5.4) Sounds Snr Snare 2 Grch Kick 1976 Kick Rimshot Snr Kick Pwrbd Kick Acro Snare Head Copper Kick R&B Kick Acro Snare Rim Mpx Kick Voice Kick Snr Snare 2 Head Standard Kick 1 Acoust Kick Snr Snare 2 Rim Standard Kick 2 Orchestra Kick Mpx Snare Head... - Page 28 Jazz Latin Snare 808 Snare Classic Tom 1 Big Band Snare 909 Snare Classic Tom 2 Camco Snare Drum Bass Snare 1 Classic Tom 3 Camco Snare Rim Drum Bass Snare 2 Classic Tom 4 Brush Snare 1 TR606 Snare Classic Tom 5 Brush Snare 2 Electronic Snare 1...
- Page 29 Room Tom 6 HipHop Tom 5 808 Tom 2 Funk Tom 1 HipHop Tom 6 808 Tom 3 Funk Tom 2 Jazz Tom 1 808 Tom 4 Funk Tom 3 Jazz Tom 2 808 Tom 5 Funk Tom 4 Jazz Tom 3 808 Tom 6 Funk Tom 5 Jazz Tom 4...
- Page 30 Classic Crash 2 House HH Open Electronic HH Pad Standard Crash 1 Sab HH HF Open 808 HH Pad Zil KNB HH HF Standard Crash 2 House HH Pad Open Standard Crash 3 Zil Big HH HF Open Sab HH Splash Rock Crash 1 Pst HH HF Open Zil KNB HH Splash...
- Page 31 Conga Low Cowbell 1 Mang Luo 1 Open Conga Cowbell 2 Mang Luo 2 Conga Slap Cowbell 3 Mang Luo 3 Cowbell Cowbell 4 Da Luo 1 Timbale Hi Cowbell 5 Da Luo 2 Timbale Low Cowbell 6 Da Po 1 Timpani High Cowbell 7 Da Po 2...
- Page 32 Eight Nine Metronome Bell Metronome Click Clave Click 1 Clave Click 2 Stick Click 1 Stick Click 2 Cow Click 1 Cow Click 2 Fm Click 1 Fm Click 2...
-
Page 33: (5.5) Technical Specifications
(5.5) Technical Specifications Maximum Polyphony Drum Kits 32 Factory kits / 16 User kits Instruments 441 (drums, cymbal, percussion, SFX) Effects Reverb, 3-band equalizer Sequencer Normal Mode: 80 songs Learning Mode: 20 beats, 12 rhythms, 10 patterns Resolution: 120 ticks per quarter note Maximum Note Storage: approximately 1600 notes Tempo 30 - 280 BPM... -
Page 34: (5.6) Trademarks & Licenses
(5.6) Trademarks & Licenses Alesis is a trademark of inMusic Brands, Inc., registered in the U.S. and other countries. The Bluetooth word mark and logos are owned by the Bluetooth SIG, Inc., and any use of such marks by Alesis is under license. All other product names, company names, trademarks, or trade names are those of their respective owners. - Page 35 alesis.com Manual Version 1.1...
Need help?
Do you have a question about the NITRO MAX and is the answer not in the manual?
Questions and answers
Why dis there no sound in my headphones
There may be several reasons why there is no sound in the headphones for the Alesis Drums Nitro Max:
1. Headphones Not Properly Connected – Ensure that the headphones are plugged into the 1/8" (3.5 mm) stereo headphone output on the module.
2. Volume Too Low – Check the module's volume settings and increase the headphone volume as needed.
3. Incorrect Output Selection – Ensure that the sound is routed to the headphone output and not another output (e.g., audio output or auxiliary input).
4. Faulty Headphones or Cable – Test the headphones with another device to confirm they are working properly.
5. Module Not Receiving Input – Verify that the drum kit is correctly connected to the module using the cable snake.
6. Bluetooth or External Audio Interference – If using Bluetooth, ensure that the connection is stable and not interfering with the drum sounds.
If none of these solutions work, restarting the module or checking for hardware issues may help.
This answer is automatically generated
@Mr. Anderson none of these