Table of Contents
Advertisement
Available languages
Available languages
Owner's Manual
AIR COMPRESSOR
3-gallon
1.5 HP (max developed)
1 HP Running
Oil Lubricated
Model No. 921.153100
CAUTION:
Before using this product,
read this manual and follow
all its Safety Rules and
Operating Instructions.
• Safety instructions
• Installation & Operation
• Maintenance & Storage
• Troubleshooting
Guide
• Parts List
• Espa_ol, p. 10
Sears,
Roebuck
and Co., Hoffman
Estates,
IL 60179 U.S.A.
www.sears.com/craftsman
06/17#2004
Part NO. E100731
Advertisement
Chapters
Table of Contents

Related Manuals for Craftsman CRAFTSMAN 921.1531


Summary of Contents for Craftsman CRAFTSMAN 921.1531
- Page 1 Before using this product, read this manual and follow all its Safety Rules and Operating Instructions. Sears, Roebuck and Co., Hoffman www.sears.com/craftsman 06/17#2004 Part NO. E100731 • Safety instructions • Installation & Operation • Maintenance & Storage • Troubleshooting • Parts List •...
-
Page 2: Table Of Contents
ONE YEAR FULL WARRANTY If this Craftsman Air Compressor fails due to manufacturer's defects in material or workmanship within one year of the date of purchase, RETURN IT TO THE NEAREST SEARS STORE OR SERVICE CENTER IN THE UNITED STATES and it will be replaced or repaired (at our option), free of charge. -
Page 3: Safety Instructions
The air compressor should be operated on a dedicated 15 amp circuit. If the circuit does not have 15 free amps available, a larger circuit must be used. Always use more air hose before utilizing extension cords. -
Page 4: Specifications
Duty Cycle This is a 50% duty cycle air compressor. Do not run the air compressor more than 30 minutes of one hour. Doing so could damage the air compressor. Minimum Circuit Requirement ... 15 Amps... -
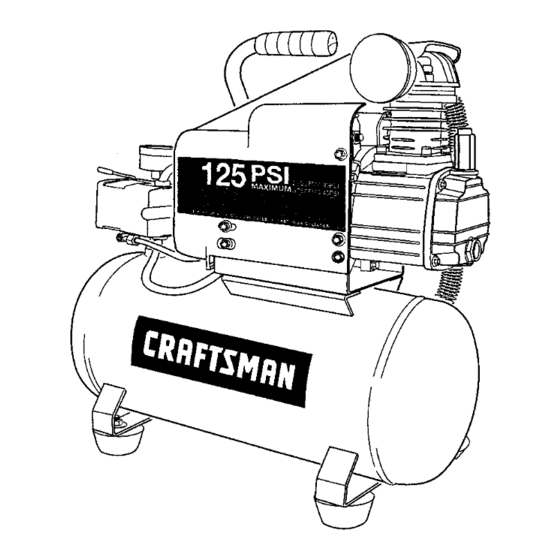
Page 5: Parts & Features
The pressure relief valve located on the side of the pressure switch, is designed to automatically release compressed air when the air compressor reaches cut-out pressure. The released air should only escape momentarilyand the valve should then close. Used to allow excess tank pressure to escape into the atmosphere.This valve... -
Page 6: Installation & Assembly
Do not attempt to start the air compressor without first adding oil to the crankcase. Serious damage can result unless filled with oil. The pump is shipped without oil from the factory. -
Page 7: Operating Procedures
PSi settings. Note: The air compressor is now ready for use. The following inflation and cleaning accessories packaged with this unit should only be operated at maximum pressure of 20-30 PSI: blow gun, tapered nozzle, inflation needles, blow gun adapter. -
Page 8: Maintenance
Use a SAE-10 during extreme winter conditions. 4. Open the drain valve to bleed all air from the tank. 5. Close the drain valve. 6. Store the air compressor in a clean and dry location. Every 100 hours... -
Page 9: Troubleshooting Guide
Troubleshooting Guide The air compressor should be turned off and unplugged from the power source before any maintenance is performed as well as the air bled from the tank and the unit allowed time to cool. Personal injuries could occur from moving parts, electrical sources, compressed air, or hot surfaces. -
Page 10: Parts List
Craftsman Air Compressor Model 921.153100 Parts List _j33 _j3, ! ._"_... - Page 11 Craftsman Air Compressor Model 921.153100 Reference Part Description Number Number Number EI00434 IntakeFilterHousing, 1/2NPT(Kunsan) E100435 FilterElement ( Kunsan) HeadBolt,M8x 1.0x 30 LockWasher, 6mm E100227 Cylinder Head E100085 ExhaustElbow Gasket,Head E100228 ValvePlate E100229 ValveReed Gasket,ValvePlate Gasket,Cylinder Upper Cylinder, I D42mm x H65mm Bolt,M6x 1.0x 20...
- Page 12 Lista de partes ... GARANT|A DE UN AI_IO SOBRE COMPRESOR Si este compresor de aire Craftsman llega a fallar debido a defectos de manufactura o de matedales atribuibles al fabricante en un plazo de un aSo desde la fecha de compra, DEVUI_LVALO A LA TIENDA O CENTRO DE SERVICIO SEARS M/_S CERCANO EN LOS ESTADOS UNIDOS para que le sea reemplazado o reparado (a opci6n nuestra) sin ning_n cargo.
-
Page 13: Instrucciones De Seguridad
Instrucciones de seguridad El operador debe leer y entender siguiente. Esta informaci6n se ofrece para proteger al usuario durante la operaci6n Indica una situaci6n de riesgo inminente que, de no evitarse, provocarfa lesiones graves o la muerte. Indica una situaci6n potencialmente peligrosa qua, de no evitarse, podrfa provocar lesiones graves o la muerte. -
Page 14: Especificaciones
Instrucciones y pautas de seguridad irnportantes (cont,) Evite utilizar el compresor de aire en _reas encerradas. Siempre tenga un espacio libre Riesgo para la adecuado (30 cm.) en todos los lados del compresor.Tambi6n mantenga fuera del drea respiraci6n do operaci6n a mascotas, ni6os y otras personas. Este compresor de aire no provee aire que pueda ser respirado ni empleado auxiliar. -
Page 15: Partes Y Caractedsticas
Partes y caracterfsticas Como referencia, yea las figuras de abajo. Filtro de aire Suministra aire Iimpio a la bomba. Siempre se le debe tenet libre de suciedad. Revfselo diariamente o antes de cada uso. (V_ase la imagon en la secciSn do ensamblaje. Tubo de salida Tap6n de Ilenado de aceite... -
Page 16: Instalaci6N Y Ensamblaje
Instalacibn y ensamblaje Antes de dar mantenirniento al compresor de aire, se le debe apagar y desconectar de la fuente de poder, adem_s de purgar el aire del tanque y dade suficiente tiempo pars enfriarse, Existe el desgo de que las partes m6viles, ]a fuente el_ctrica, el sire comprimido y las superficies calientes provoquen lesiones. -
Page 17: Procedimientos De Operaci6N
Procedimientos de operaci6n Procedimiento diario de arranque interruptor (_Ponga Auto-On/Often apagado (Off). _Compruebe visualmente qua dafios ni obstrucciones. (_)Cierre la v&lvula de drenado. (_Revise el nivel de aceite de la bomba. Enchufe la manguera de aire al conector de acoplamiento rdpido de la unidad del regulador. El collarin del conector de acoplamiento r#.pido saltar_, para adelante, sujetando el enchufe y efectuando un sello entre el conector y el enchufe. -
Page 18: Mantenimiento
Mantenimiento NOTA: Cualquier procedimiento de servicio que no este cubierto en el prograrna de mantenimiento que sigue deberd ser efectuado por personal de servicio calificado. Puntos a revisar o ¢ambiar Revisar la va.lvula de seguridad del tanque Reviser visualmente el aspecto general de la unidad Revisar el nivel de aceite Cambiar el aceite Revisar el filtro de aceite (con mayor frecuencia si se trabaja en... -
Page 19: Diagn6Stico Y Correcci6N De Fa_Las
Diagnbstico y correccibn de fallas Antes de dar mantenimiento al equipo, se le debe apagar y desconectar del tomacorriente, asi come purgar el aire del tanque y permitir que la unidad se enfr{e. Las partes en movimiento, las fuentes el6ctricas, el aire comprLmido y las superficies ca[ientes pueden provoear lesiones. PROBLEMA Fuga de aire en ta valvula do retenci6n o en la v_.lvu]a de... - Page 20 For repair - in your home - of all major brand appliances, lawn and garden equipment, or heating and cooling systems, no matter who made it, no matter who sold it! For the replacement parts, accessories and owner's manuals that you need to do-it-yourself. For Sears professional installation of home appliances and items like garage door openers and water heaters.