Table of Contents
Advertisement
Advertisement
Table of Contents

Related Manuals for Erbauer ECSP41


Summary of Contents for Erbauer ECSP41
- Page 1 Petrol Chain Saw (41.4 cm ECSP41 EAN: 5059340255897 BX220IM/B3 WARNING: Read the instruction handbook thoroughly before using the product. First time operators should receive practical use instructions of the product and protective equipment from an experienced operator.
-
Page 2: Table Of Contents
ECSP41 Let’s get started... These instructions are for your safety. Please read through them thoroughly before use and retain them for future reference. Getting Started... Safety information Your product Technical specifications Before start Quick start more detail... Product functions Operation... -
Page 3: Safety Information
Safety information ECSP41 Safety warnings 1. This product is not intended for use by children and persons with reduced physical, sensory or mental capabilities, or lack of experience and knowledge. 2. Children should be supervised to ensure that they do not play with the product. - Page 4 Safety information ECSP41 > Do not under any circumstances modify the product. Modifications can result in serious personal injury or death. > Do not start cutting until you have a clear work area and secure footing. > All product servicing and maintenance, other than the items listed in this manual, should be performed by an authorised service centre.
- Page 5 Safety information ECSP41 > Fuel vapour pressure may build up inside the fuel tank depending on the fuel used, weather conditions and the tank venting system. To reduce the risk of burns and other personal injuries, remove the fuel tank cap carefully to allow any pressure build up to release slowly.
- Page 6 Safety information ECSP41 Operation > When sawing ensure the product does not touch any foreign materials such as rocks, fences, nails etc. Such objects may be flung out and could result in damage to the product, serious or even fatal injuries.
- Page 7 Safety information ECSP41 Transport and storage > Stop the engine and engage the chain brake before transporting the product. > Carry the product with the engine stopped, the guide bar and saw chain to the rear, and the exhaust away from the body.
- Page 8 Safety information ECSP41 > Only use replacement bars and chains specified by the manufacturer. Incorrect replacement bars and chains may cause chain breakage and/or kickback. > Follow the manufacturer’s sharpening and maintenance instructions for the saw chain. Decreasing the depth gauge height can lead to increased kickback.
- Page 9 Safety information ECSP41 Residual risks Even if you are operating this product in accordance with all the safety requirements, potential risks of injury and damage remain. The following dangers can arise in connection with the structure and design of this product: >...
- Page 10 Safety information ECSP41 Description of signal words: The signal word that indicates a hazard with a high level of risk DANGER! which, if not avoided, will result in death or serious injury. The signal word that indicates a hazard with a medium level of WARNING! risk which, if not avoided, could result in death or serious injury.
- Page 11 Safety information ECSP41 Hot surface, do not touch! High temperatures on the product’s surfaces and structural parts that could cause burns, if they are touched. The product can also stay hot for a longer period of time after the operation! Petrol engines produce toxic carbon monoxide exhaust fumes.
- Page 12 Safety information ECSP41 Choke – OPEN position. Primer Objects thrown by the product could hit the operator or other bystanders. Always ensure that other people and pets remain at a safe distance from the product when it is in operation. In general, children must not come near the area where the product is operating.
-
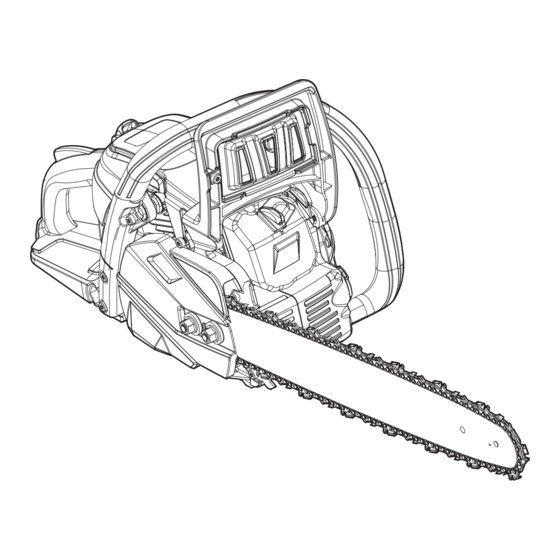
Page 13: Your Product
Your product ECSP41 1. Lubrication holes (on both sides) 11. Stop switch 2. Guide bar 12. Fuel tank cap 3. Saw chain 13. Choke 4. Front hand guard (with chain brake) 14. Adjusting screws for carburetor 5. Front handle (for left hand) 15. -
Page 14: Technical Specifications
Your product / Technical specifications ECSP41 Content of delivery 22. Chain oil flow adjuster 25. Fuel mixing container 23. Main unit 26. Guide bar cover 24. Multi-tool 27. File 28. Screwdriver Technical specifications General > Dimensions: approx. 42 x 25 x 28 cm >... - Page 15 Technical specifications ECSP41 > Saw chain brand / model: OREGON® / 80TXL064X > Saw chain pitch: 8.255 mm (0.325") > Saw chain speed n 23.114 m/s > Drive sprocket (teeth and pitch): 7 teeth x 8.255 mm Engine > Engine model: 1E42F-2 >...
-
Page 16: Before You Start
Before you start ECSP41 WARNING! Depending on the actual use of the product the vibration values can differ from the declared total. Adopt proper measures to protect yourself against vibration exposures. Take the whole work process including times the product is running under no load or switched off into consideration! - Page 17 Before you start ECSP41 Assembly WARNING! The product must be fully assembled before operation! Do not use a product that is only partly assembled or assembled with damaged parts! Follow the assembly instructions step-by-step and use the pictures provided as a visual guide to assemble the product easily! Disconnect the spark plug connector before assembly! Reconnect it after assembly (see "Maintenance").
- Page 18 Before you start ECSP41 1. Pull the front hand guard (4) backwards to disengage the chain brake (Fig. 1). 2. Loosen the fixing nuts (19) using the multi-tool (24) and remove the clutch cover (20) (Fig. 2). Ensure the spiked bumper (17) is properly fixed to the product. Tighten the 2 bolts...
- Page 19 Before you start ECSP41 3. Place the slot on the guide bar (2) over the 2 bolts (step 1, Fig. 3). 4. Push the guide bar (2) to the left towards the drive sprocket (step 2, Fig. 3). 5. Place the saw chain (3) over the drive sprocket (behind the clutch) and fit around the nose sprocket at the tip of the guide bar (2) in the correct direction (Fig.
- Page 20 Before you start ECSP41 8. Align the tension adjuster pin with the lower hole on the guide bar (2) by turning the chain tension screw (21) clockwise or anti-clockwise with the multi-tool (24) (Fig. 5). Tension adjuster pin 9. Refit the clutch cover (20). Tighten the fixing nuts (19) finger tight only at this stage (Fig.
- Page 21 Before you start ECSP41 Tightening the saw chain WARNING! Disconnect the spark plug connector before adjusting saw chain tension! The cutting edges of the saw chain are sharp! Always wear protective gloves when handling chain! Always maintain proper chain tension! A loose chain increases the risk of...
- Page 22 Before you start ECSP41 3. After adjusting the tension it should be possible to lift the saw chain (3) 3-4 mm from the guide bar (2) (Fig. 9). 3-4 mm 4. Tighten the fixing nuts (19) with the multi-tool (24) to secure the guide bar (2) and the clutch cover (20).
- Page 23 Before you start ECSP41 Location Ambient temperature Anti-freeze mode: Standard mode: under +5 °C above +5 °C Open vent Closed vent Vent tab 4. Refit the air filter (6b). Refit the top cover (6) and secure it with the locking lever.
- Page 24 Before you start ECSP41 Chain lubrication WARNING! The product is not filled with chain oil. It is essential to fill the product with chain oil before using it! Never operate the product without chain oil as this will result in extensive damage to the product! Operating the saw...
- Page 25 Before you start ECSP41 3. Fill suitable saw chain oil into the tank using a funnel fitted with a filter to avoid debris entering the tank. Do not overfill and leave approximately 5 mm of space between the top of the oil and the inside edge of the tank to allow for expansion (Fig. 11).
- Page 26 Before you start ECSP41 Test run NOTE: Perform the following test before operating your product. This product is equipped with an automatic oiling system! The oiling system automatically delivers the proper amount of oil to the guide bar (2) and saw chain (3).
- Page 27 Before you start ECSP41 Filling up fuel and oil WARNING! This product is not supplied with petrol-oil mixture in the engine! Before operating this product it is essential to fill it with petrol-oil mixture! This product is equipped with a 2-stroke engine, the fuel and oil tank are combined and it is essential to fill a fuel-oil mixture before operating this product.
- Page 28 Before you start ECSP41 4. Unscrew and remove the fuel tank cap (12) by turning it anti-clockwise (Fig. 14). 5. Fill the fuel and oil mixture into the fuel tank. Leave approximately 5 mm of space between the top of the fuel and the inside edge of the tank to allow for expansion.
-
Page 29: Quick Start
Quick Start ECSP41 Operating controls Front hand guard Primer Recoil starter handle Throttle trigger lock-out Oil tank cap Choke Fuel tank cap Stop switch Throttle trigger Chain oil flow adjuster... - Page 30 Quick start ECSP41 Preparation Add fuel and oil Assemble Adjust Add chain oil mixture Starting Engage the Press primer Set the choke Pull recoil Set the choke chain brake 6 times to CLOSE starter handle to OPEN position 4 times...
- Page 31 Quick start ECSP41 Stopping Release throttle trigger and throttle Push the stop switch to trigger lock-out O position until the engine stops Storage Empty fuel tank Empty oil Clean and maintain Store WARNING! This quick start provides only a short overview of how to start...
-
Page 32: In More Detail
Product functions ECSP41 Intended use This petrol chain saw ECSP41 is designated with a power output of 1.85 kW. The product is intended for cutting logs and limbs with a thickness of max. 37 cm (see “Technical specifications”). WARNING! The product must be used by an experienced operator* having... - Page 33 Product functions ECSP41 Safety equipment The product has several pieces of safety equipment which reduce the risk of injury when working (Fig. 16): Throttle trigger Chain brake / lock-out front hand guard Chain catcher Stop switch Use the stop switch (11) switch to start and stop the engine.
- Page 34 Product functions ECSP41 Chain brake / front hand guard The front hand guard (4) is a safety mechanism that stops the saw chain (3) immediately when it is pushed towards the operator in case of a kickback. The chain brake is a safety mechanism activated by the front hand guard (4). When kickback occurs, the saw chain stops immediately.
-
Page 35: Operation
Product functions / Operation ECSP41 Throttle trigger lock-out The throttle trigger lock-out (8) prevents unintentional activation of the throttle trigger (10). The throttle trigger can only be activated if the throttle trigger lock-out is pressed. Chain catcher The chain catcher (18) is intended to catch a torn saw chain (3) or saw chain which has jumped out of the guide bar (2). - Page 36 Operation ECSP41 Starting the engine DANGER! Risk of fire! > Due to any spilled fuel, the product can catch fire. > Wipe any spilled fuel up before starting. > Start the engine a few metres away from the place where you have filled it.
- Page 37 Operation ECSP41 5. Hold the product securely to the ground. Place your left hand on the front handle (5) and additionally secure the product with your right foot (Fig. 21). 6. Pull the recoil starter handle (15) slowly with your right hand until you feel a definite resistance and then give it a brisk, strong pull.
- Page 38 Operation ECSP41 4. Hold the product securely to the ground. Place your left hand on the front handle (5) and additionally secure the product with your right foot (Fig. 23). 5. Pull the recoil starter handle (15) briskly and strongly. Repeat until the engine starts.
- Page 39 Operation ECSP41 Basic operating / cutting procedure 1. To become proficient attend a recognised chain saw training course to learn how to operate chain saws safely and effectively. Familiarise yourself with all the controls and switches. Practise all movements with the product switched off.
- Page 40 Operation ECSP41 8. Do not operate the product with arms fully extended or attempt to saw areas which are difficult to reach, or on a ladder. Never use the product above shoulder height (Fig. 25). 9. Optimum sawing is achieved if the chain speed remains constant during cutting.
- Page 41 Operation ECSP41 1. Pinching the saw chain (3) along the bottom of the guide bar (2) may pull the product forward away from the operator (“skating”) (Fig. 27). 2. Pinching the saw chain along the top of the guide bar may push the guide bar rapidly back toward the operator (“bouncing”) (Fig.
- Page 42 Operation ECSP41 WARNING! Most “kickback” accidents happen during limbing! Pay close attention to the position of the ‘kickback’ zone of the bar when you are “limbing branches that are under tension. Felling a tree 1. When bucking and felling operations are being performed by two or more persons at the same time, the felling operations should be separated from the bucking operation by a distance of at least twice the height of the tree being felled.
- Page 43 Operation ECSP41 Felling back cut 1. Make the felling back cut (Fig. 30, A) at least 50 mm higher than the horizontal notching cut (Fig. 30). Keep the felling back cut parallel to the horizontal notching cut. Make the felling back cut so enough wood is left to act as a hinge. The hinge (Fig.
- Page 44 Operation ECSP41 Cutting spring poles A spring pole is any log, branch, rooted stump, or sapling which is bent under tension by other wood so that it springs back if the wood holding it is cut or removed. On a fallen tree, a rooted stump has a high potential of springing back to the upright position during the bucking cut to separate the log from the stump.
- Page 45 Operation ECSP41 5. Support small logs on a sawing stand or another log while bucking (Fig. 36). 6. If the wood diameter is large enough for you to insert a soft bucking wedge without touching the chain, you should use the wedge to hold the cut open to prevent pinching (Fig.
-
Page 46: Care And Maintenance
Care and maintenance ECSP41 The golden rules for care WARNING! Always stop the engine, disconnect the spark plug connector and let the product cool before performing inspection, maintenance and cleaning work. DANGER! Proper maintenance is essential for safe and trouble free operation. - Page 47 Care and maintenance ECSP41 check lubricate Saw chain clean sharpen whenever necessary replace whenever necessary check lubricate Guide bar clean replace whenever necessary clean every 10 hours of operation or whenever necessary Nose sprocket lubricate every 10 hours of operation or whenever necessary...
- Page 48 Care and maintenance ECSP41 Cleaning NOTE: Do not use chemical, alkaline, abrasive or other aggressive detergents or disinfectants to clean this product as they might be harmful to its surfaces. Cleaning the housing > Use a damp, lint-free cloth to clean the housing of the product.
- Page 49 Care and maintenance ECSP41 Chain catcher Replace a damaged or worn chain catcher (18) with a new one of the same type. 1. Loosen the bolt of the chain catcher (18) and remove it. 2. Fix a new chain catcher to the product.
- Page 50 Care and maintenance ECSP41 4. Remove any dirt accumulated inside the guide bar (2) slot using a plastic putty knife (not provided) (Fig. 40). 5. Check the guide bar “rail” for wear: Hold a ruler (straight edge) against the side of the guide bar (2) and “cutter side plates”.
- Page 51 Care and maintenance ECSP41 Saw chain sharpening NOTE: Never saw with a blunt chain. The saw chain is blunt if you have to push the product into the tree and the chips are very small. 1. Have the saw chain (3) sharpened professionally at an authorised service centre or sharpen the chain yourself by using the file (27).
- Page 52 Care and maintenance ECSP41 4. Use the chain file (27), with diameter 1.1 times the cutting tooth depth. Make sure 20 % of the file diameter is above the cutter’s top plate. 5. File at an angle perpendicular to the bar, and at an angle of 25° to the direction of travel (Fig.
- Page 53 Care and maintenance ECSP41 Air filter Inspect the air filter (6b) regularly. Clean or replace it with a new one if necessary. 1. Insert the multi-tool (24) into the slot on the locking lever and push downwards to pry the top cover (6) open (Fig. 46).
- Page 54 Care and maintenance ECSP41 Spark plug NOTE: For good performance, the spark plug must be properly gapped and free of deposits. Inspect the spark plug every 25 hours or before long-term storage over 180 days. Clean or replace with a new one if necessary (type: BPMR7A).
- Page 55 Care and maintenance ECSP41 Check the spark plug for damage and wear. The colour of the ground electrode should be light-brown. 5. Remove the deposits from the electrode with a soft wired brush. Avoid heavy cleaning of the electrode. Spark plug 6.
- Page 56 Care and maintenance ECSP41 Idle speed screw WARNING! Adjusting the screws L and H must be performed by an authorised service centre or a similarly qualified person. Using a single D screwdriver (not provided) turn the screws L and H to adjust the quantity of fuel in relation to the air.
- Page 57 Care and maintenance ECSP41 Repair This product does not contain any parts that can be repaired by the consumer. Contact an authorised service centre or a similarly qualified specialist to have it checked and repaired. Storage WARNING! Risk of injury! Make sure that unauthorized persons do not have...
- Page 58 Care and maintenance ECSP41 Long term storage NOTE: Risk of product damage! > If you are not going to be using the product for a while, remove the fuel and saw chain oil from the product. This way, you will prevent a gumming-up of the engine and of the grease pump.
-
Page 59: Troubleshooting
Troubleshooting ECSP41 Troubleshooting Suspected malfunctions are often due to causes that the operators can fix themselves. Therefore check the product using this section. In most cases, the problem can be solved quickly. WARNING! Only perform the steps described in these instructions! All further... - Page 60 Troubleshooting ECSP41 Problem Possible cause Solution Engine does Spark plug defective? Replace spark plug. not start. Engine too cold? Follow cold starting procedures and set to anti-freeze mode if necessary. Engine too hot? Wait until engine is cool. Follow warm starting procedures,...
-
Page 61: Recycling And Disposal
Recycling and disposal / Guarantee ECSP41 Recycling and disposal 1. Old equipments are potentially recyclable and do not, therefore, belong in your household rubbish. You are requested to assist us and our contribution to saving resources and protecting the environment by handing in this equipment to an equipped collection centre (if there is one available). -
Page 62: Customer Care And Technical Helpline
Customer care and technical helpline ECSP41 Customer care and technical helpline A better way to repair your tools Kingfisher takes special care in creating high-quality garden power tools that are designed to last. But if a fault develops with your garden power tool and you need to claim under... -
Page 63: Availability Of Spare Parts
Availability of spare parts ECSP41 Availability of spare parts Contact the customer service helpline for assistance or visit www.kingfisherspares.com For assistance contact the customer services helpline: UK: 0800 0789647 uk@Kingfisherservice.com EIRE: 1800 932226 eire@kingfisherservice.com Further information about this product can also be found at:... -
Page 64: Uk Declaration Of Conformity
UK declaration of conformity ECSP41 (UK) DECLARATION OF CONFORMITY Product > Petrol Chain saw > ECSP41 > 41.4 cm , 1.85 kW > 000001 - 999999 Name and address of the manufacturer or his authorised representative: Kingfisher International Products Limited... -
Page 65: Eu Declaration Of Conformity
EU declaration of conformity ECSP41 (EN) EU DECLARATION OF CONFORMITY (FR) DÉCLARATION UE DE CONFORMITÉ (PL) DEKLARACJA ZGODNOŚCI UE (RO) DECLARAȚIA DE CONFORMITATE UE (ES) DECLARACIÓN UE DE CONFORMIDAD (PT) DECLARAÇÃO DE CONFORMIDADE UE Product/ Produit/ Produkt/Produsul/Producto/Produto > Petrol Chain saw/Tronçonneuse/Pilarka łancuchowa/Motoferastrau/Motosierra/Motosserra Tronçonneuse/Pilarka łancuchowa/Motoferastrau/Motosierra/Motosserra... - Page 66 EU declaration of conformity ECSP41 The object of the declaration described above is in conformity with the relevant Union harmonisation legislation: L’objet de la déclaration décrit ci-dessus est conforme à la législation d’harmonisation de l’Union applicable: Wymieniony powyżej przedmiot niniejszej deklaracji jest zgodny z odnośnymi wymaganiami unijnego prawodawstwa harmonizacyjnego: Obiectul declarației descris mai sus este în conformitate cu legislația relevantă...
- Page 67 EU declaration of conformity ECSP41 Measured Sound Power Level/ Niveau de puissance acoustique mesuré/ Zmierzony poziom mocy akustycznej/ Nivel de putere acustică măsurat/ Nivel de potencia sonora medido / Nível de potência sonora medido: 111.3 dB(A) Guaranteed Sound Power Level/ Niveau de puissance acoustique garanti/ Gwarantowany poziom mocy akustycznej/ Nivel de putere acustică...
- Page 68 Manufacturer, Fabricant, Prodecent, Producător, Fabricante: UK Manufacturer: Kingfisher International Products Limited 3 Sheldon Square London W2 6PX United Kingdom EU Manufacturer: Kingfisher International Products B.V. Rapenburgerstraat 175E 1011 VM Amsterdam The Netherlands www.diy.com www.screwfix.com www.screwfix.ie To view instruction manuals online, visit www.kingfisher.com/products...
Need help?
Do you have a question about the ECSP41 and is the answer not in the manual?
Questions and answers
How to fit a chain